Getting Started with WPF TreeViewAdv (Classic)
19 Oct 202210 minutes to read
This section explains how to create Tree layout using TreeViewAdv control.
Assembly deployment
Refer to the Control Dependencies section to get the list of assemblies or NuGet package that needs to be added as a reference to use the control in any application.
Refer to this documentation to find more details about installing nuget packages in a WPF application.
Add TreeViewAdv to Project
The TreeViewAdv control can be added to project by the following ways.
- Adding TreeViewAdv by designer.
- Adding TreeViewAdv by XAML.
- Adding TreeViewAdv by C#.
Adding WPF TreeViewAdv via designer
-
The TreeViewAdv can be added to an application by dragging it from the toolbox to a designer view. The following dependent assemblies will be added automatically.
-
Syncfusion.Tools.Wpf
-
Syncfusion.Shared.Wpf
-
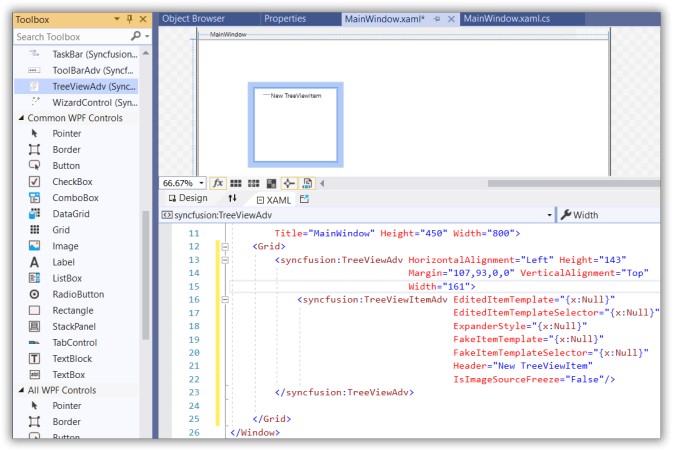
- Set the properties for TreeViewAdv in design mode using the SmartTag feature.
Adding WPF TreeViewAdv via XAML
To add the TreeViewAdv manually in XAML, follow these steps:
-
Create a new WPF project in Visual Studio.
-
Add the following required assembly references to the project:
-
Syncfusion.Tools.Wpf
-
Syncfusion.Shared.Wpf
-
-
Import Syncfusion WPF schema http://schemas.syncfusion.com/wpf, and declare the TreeViewAdv in XAML page.
<Window x:Class="TreeViewAdv_sample.MainWindow"
        xmlns="http://schemas.microsoft.com/winfx/2006/xaml/presentation"
        xmlns:x="http://schemas.microsoft.com/winfx/2006/xaml"
        xmlns:d="http://schemas.microsoft.com/expression/blend/2008"
        xmlns:mc="http://schemas.openxmlformats.org/markup-compatibility/2006"
        xmlns:local="clr-namespace:TreeViewAdv_sample"
        xmlns:syncfusion="http://schemas.syncfusion.com/wpf"
        mc:Ignorable="d"
        Title="MainWindow" Height="450" Width="800">

<Grid>
<syncfusion:TreeViewAdv Height="160" Width="160" HorizontalAlignment="Center"
VerticalAlignment="Center" syncfusion:DockingManager.DockToFill="True" />
</Grid>
</Window>
Adding WPF TreeViewAdv via C#
To add the TreeViewAdv manually in C#, follow these steps:
-
Create a new WPF application via Visual Studio.
-
Add the following required assembly references to the project:
-
Syncfusion.Tools.Wpf
-
Syncfusion.Shared.Wpf
-
-
Include the required namespace.
using Syncfusion.Windows.Tools.Controls; -
Create an instance of TreeViewAdv, and add it to the window.
//Initializing TreeViewAdv
            TreeViewAdv treeView = new TreeViewAdv();

            //Setting Height,Width and HorizontalAlignment
            treeView.Height = 150;
            treeView.Width = 150;
            treeView.HorizontalAlignment = HorizontalAlignment.Center;

            //Adding control in MainWindow
            this.Content = treeView;
Adding TreeView item to TreeViewAdv control
The TreeviewItem is added to a TreeViewAdv control either by using XAML or C# codes. The following code example lets you to create and add treeview items to the TreeViewAdv using TreeViewItemAdv.
<Window x:Class="WpfApplication1.MainWindow"
xmlns="http://schemas.microsoft.com/winfx/2006/xaml/presentation"
xmlns:x="http://schemas.microsoft.com/winfx/2006/xaml"
xmlns:syncfusion="http://schemas.syncfusion.com/wpf"
Title="MainWindow" Height="350" Width="525">
<Grid>
<syncfusion:TreeViewAdv x:Name="Tree">
<syncfusion:TreeViewItemAdv Header="WPF" />
<syncfusion:TreeViewItemAdv Header="Winrt" />
<syncfusion:TreeViewItemAdv Header="Silverlight" />
<syncfusion:TreeViewItemAdv Header="WindowPhone" />
<syncfusion:TreeViewItemAdv Header="UniversalWindows" />
</syncfusion:TreeViewAdv>
</Grid>
</Window>
public partial class MainWindow : Window
{
public MainWindow()
{
InitializeComponent();
TreeViewAdv treeView = new TreeViewAdv() { Name = "Tree" };
treeView.Height = 150;
treeView.Width = 150;
treeView.HorizontalAlignment = HorizontalAlignment.Center;
TreeViewItemAdv item1 = new TreeViewItemAdv();
item1.Header = "WPF";
TreeViewItemAdv item2 = new TreeViewItemAdv();
item2.Header = "Winrt";
TreeViewItemAdv item3 = new TreeViewItemAdv();
item3.Header = "Silverlight";
TreeViewItemAdv item4 = new TreeViewItemAdv();
item4.Header = "WindowPhone";
TreeViewItemAdv item5 = new TreeViewItemAdv();
item5.Header = "UniversalWindows";
treeView.Items.Add(item1);
treeView.Items.Add(item2);
treeView.Items.Add(item3);
treeView.Items.Add(item4);
treeView.Items.Add(item5);
this.Content = treeView;
}
}Set VisualStyle
TreeViewAdv supports various visual styles by using the SkinStorage. To apply Visual Studio style on the current layout, refer the below code to apply the value Metro to the VisualStyle property of the SkinStorage for the Window
<Window x:Class="WpfApplication1.MainWindow"
xmlns="http://schemas.microsoft.com/winfx/2006/xaml/presentation"
xmlns:x="http://schemas.microsoft.com/winfx/2006/xaml"
xmlns:syncfusion="http://schemas.syncfusion.com/wpf"
Title="MainWindow" Height="350" Width="525">
<Grid>
<syncfusion:TreeViewAdv syncfusion:SkinStorage.VisualStyle="Metro" x:Name="Tree">
<syncfusion:TreeViewItemAdv Header="WPF" />
<syncfusion:TreeViewItemAdv Header="Winrt" />
<syncfusion:TreeViewItemAdv Header="Silverlight" />
<syncfusion:TreeViewItemAdv Header="WindowPhone" />
<syncfusion:TreeViewItemAdv Header="UniversalWindows"/>
</syncfusion:TreeViewAdv>
</Grid>
</Window>
TreeViewAdv treeView = new TreeViewAdv();
SkinStorage.SetVisualStyle(treeView, "Metro");
this.Content = treeView;
Setting ItemsSource for TreeviewAdv
The following code snippet sets a collection used to generate the Items of the TreeViewAdv control.
<Window x:Class="WpfApplication1.MainWindow"
xmlns="http://schemas.microsoft.com/winfx/2006/xaml/presentation"
xmlns:x="http://schemas.microsoft.com/winfx/2006/xaml"
xmlns:syncfusion="http://schemas.syncfusion.com/wpf"
syncfusion:SkinStorage.VisualStyle="Metro"
xmlns:local="clr-namespace:WpfApplication1"
Title="MainWindow" Height="350" Width="525">
<Window.Resources>
<local:TechnologyList x:Key="technologyList" />
</Window.Resources>
<Grid>
<syncfusion:TreeViewAdv x:Name="Tree" ItemsSource="{StaticResource technologyList}" >
</syncfusion:TreeViewAdv>
</Grid>
</Window>public class TechnologyList : ObservableCollection<string>
{
public TechnologyList()
{
this.Add("WPF");
this.Add("Winrt");
this.Add("Silverlight");
this.Add("WindowPhone");
this.Add("UniversalWindows");
}
}Public Class TechnologyList
Inherits ObservableCollection(Of String)
Public Sub New()
Me.Add("WPF")
Me.Add("Winrt")
Me.Add("Silverlight")
Me.Add("WindowPhone")
Me.Add("UniversalWindows")
End Sub
End Class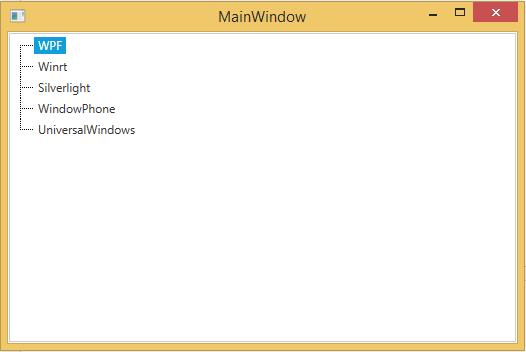
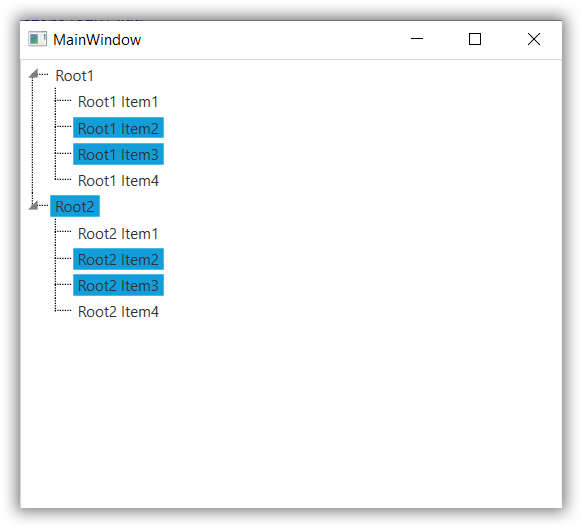
Multiple Selection in TreeViewAdv
The TreeViewAdv control supports selecting multiple items by using the CTRL or SHIFT keys. The selected items are dragged to any item or node within the same control or to another TreeViewAdv control. This is achieved by enabling the AllowMultiSelect property. Click here to get detailed information on AllowMultiSelect function.
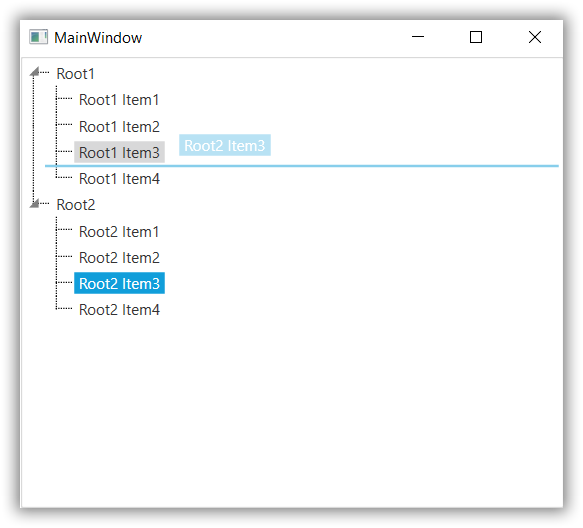
Drag and Drop in TreeViewAdv
By enabling the AllowDragDrop property TreeViewAdv control allows us to drag TreeView items from one location to another. By using the DraggingContainerOpacity property, we can change the opacity value of the dragged element. It is useful to be able to view the content behind the dragged element. Click here to get detailed information on drag and drop of TreeViewAdv items.
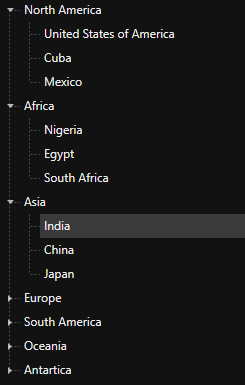
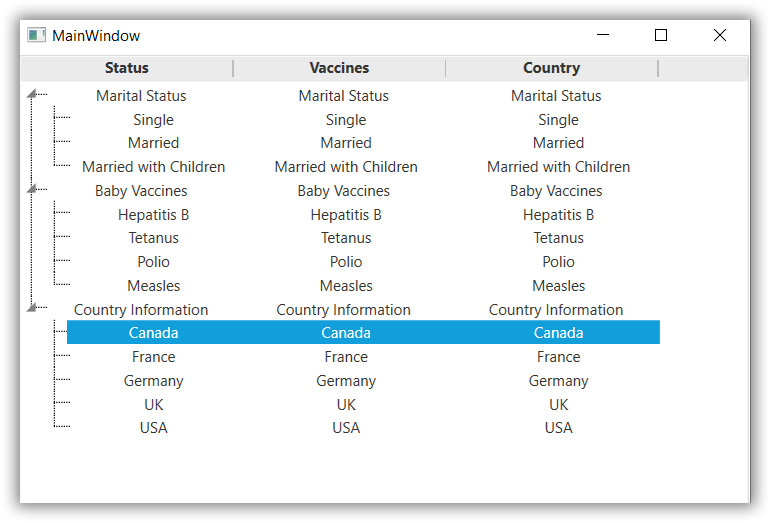
MultiColumn TreeView in TreeViewAdv
TreeView control can be created with multiple columns by setting the MultiColumnEnable property to true. Click here to get detailed information on how to create MultiColumn TreeViewAdv.
Theme
TreeViewAdv supports various built-in themes. Refer to the below links to apply themes for the TreeViewAdv,