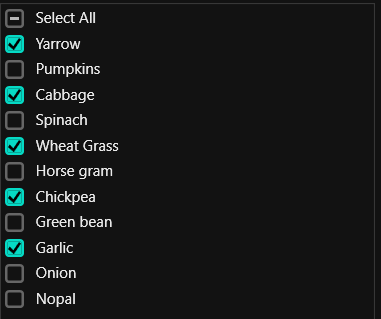
Appearance in WPF CheckedListBox
18 Nov 201824 minutes to read
This section explains different UI customization, styling, theming options available in WPF CheckedListBox control.
Setting the Foreground
You can change the foreground color of WPF CheckedListBox items by setting the Foreground property. The default value of the Foreground property is Black.
<syncfusion:CheckListBox Foreground="Red"
                         Name="checkListBox">
    <syncfusion:CheckListBoxItem Content="Mexico"/>
    <syncfusion:CheckListBoxItem Content="Canada" />
    <syncfusion:CheckListBoxItem Content="Bermuda" />
    <syncfusion:CheckListBoxItem Content="Belize" />
    <syncfusion:CheckListBoxItem Content="Panama" />
</syncfusion:CheckListBox>
CheckListBox checkListBox = new CheckListBox();
checkListBox.Items.Add( new CheckListBoxItem() { Content = "Mexico" });
checkListBox.Items.Add( new CheckListBoxItem() { Content = "Canada" });
checkListBox.Items.Add( new CheckListBoxItem() { Content = "Bermuda" });
checkListBox.Items.Add( new CheckListBoxItem() { Content = "Belize" });
checkListBox.Items.Add( new CheckListBoxItem() { Content = "Panama" });
//Setting the foreground brush
checkListBox.Foreground=Brushes.Red;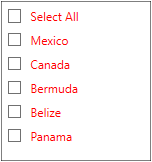
Setting the Background
You can change the background color of WPF CheckedListBox items by setting the Background property. To distinguish a hovered item or a currently selected item from other items, you can use the MouseOverBackground and SelectedItemBackground properties.
<syncfusion:CheckListBox Background="SkyBlue"
                         MouseOverBackground="DeepPink"
                         SelectedItemBackground="Yellow"
                         Name="checkListBox">
    <syncfusion:CheckListBoxItem Content="Mexico"/>
    <syncfusion:CheckListBoxItem Content="Canada" />
    <syncfusion:CheckListBoxItem Content="Bermuda" />
    <syncfusion:CheckListBoxItem Content="Belize" />
    <syncfusion:CheckListBoxItem Content="Panama" />
</syncfusion:CheckListBox>
CheckListBox checkListBox = new CheckListBox();
checkListBox.Items.Add( new CheckListBoxItem() { Content = "Mexico" });
checkListBox.Items.Add( new CheckListBoxItem() { Content = "Canada" });
checkListBox.Items.Add( new CheckListBoxItem() { Content = "Bermuda" });
checkListBox.Items.Add( new CheckListBoxItem() { Content = "Belize" });
checkListBox.Items.Add( new CheckListBoxItem() { Content = "Panama" });
//Setting various background.
checkListBox.Background = Brushes.SkyBlue;
checkListBox.MouseOverBackground = Brushes.DeepPink;
checkListBox.SelectedItemBackground = Brushes.Yellow;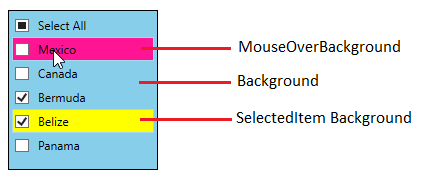
Change flow direction
You can change the flow direction of the WPF CheckedListBox layout from right to left by setting the FlowDirection property to RightToLeft. The default value of the FlowDirection property is LeftToRight.
<syncfusion:CheckListBox FlowDirection="RightToLeft"
                         Name="checkListBox">
    <syncfusion:CheckListBoxItem Content="Mexico"/>
    <syncfusion:CheckListBoxItem Content="Canada" />
    <syncfusion:CheckListBoxItem Content="Bermuda" />
    <syncfusion:CheckListBoxItem Content="Belize" />
    <syncfusion:CheckListBoxItem Content="Panama" />
</syncfusion:CheckListBox>
CheckListBox checkListBox = new CheckListBox();
checkListBox.Items.Add( new CheckListBoxItem() { Content = "Mexico" });
checkListBox.Items.Add( new CheckListBoxItem() { Content = "Canada" });
checkListBox.Items.Add( new CheckListBoxItem() { Content = "Bermuda" });
checkListBox.Items.Add( new CheckListBoxItem() { Content = "Belize" });
checkListBox.Items.Add( new CheckListBoxItem() { Content = "Panama" });
//Setting flow direction as RTL
checkListBox.FlowDirection = FlowDirection.RightToLeft;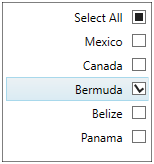
Item Template
You can change the DataTemplate of each WPF CheckedListBox item by using the ItemTemplate property.
//Model.cs
class Vegetable {
    public string Category { get; set; }
    public int Price { get; set; }
    public string Name { get; set; }
}

//ViewModel.cs
class ViewModel {
    public ObservableCollection<Vegetable> Vegetables { get; set; }
    public ViewModel() {
        Vegetables = new ObservableCollection<Vegetable>();
        Vegetables.Add(new Vegetable { Price=10, Name="Yarrow", Category="Leafy and Salad" });
        Vegetables.Add(new Vegetable { Price=20, Name="Pumpkins", Category="Leafy and Salad" });
        Vegetables.Add(new Vegetable { Price=30, Name="Cabbage", Category="Leafy and Salad" });
        Vegetables.Add(new Vegetable { Price=10, Name="Spinach", Category="Leafy and Salad" });
        Vegetables.Add(new Vegetable { Price=20, Name="Wheat Grass", Category="Leafy and Salad" });
        Vegetables.Add(new Vegetable { Price=30, Name="Horse gram", Category="Beans" });
        Vegetables.Add(new Vegetable { Price=10, Name="Chickpea", Category="Beans" });
        Vegetables.Add(new Vegetable { Price=20, Name="Green bean", Category="Beans" });
        Vegetables.Add(new Vegetable { Price=30, Name="Garlic", Category="Bulb and Stem" });
        Vegetables.Add(new Vegetable { Price=10, Name="Onion", Category="Bulb and Stem" });
        Vegetables.Add(new Vegetable { Price=20, Name="Nopal", Category="Bulb and Stem" });
    }
}<syncfusion:CheckListBox x:Name="ListBox"
ItemsSource="{Binding Vegetables}">
<syncfusion:CheckListBox.DataContext>
<local:ViewModel></local:ViewModel>
</syncfusion:CheckListBox.DataContext>
<!--DataTemplate for the CheckListBox items-->
<syncfusion:CheckListBox.ItemTemplate>
<DataTemplate>
<StackPanel Orientation="Horizontal">
<TextBlock FontWeight="Bold"
Foreground="SkyBlue"
Text="{Binding Name}" />
</StackPanel>
</DataTemplate>
</syncfusion:CheckListBox.ItemTemplate>
</syncfusion:CheckListBox>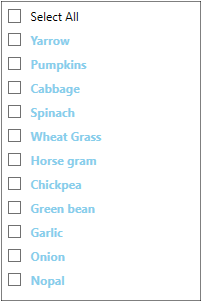
Group Template
You can change the DataTemplate of the group header items by using the GroupTemplate property.
//Model.cs
public class Vegetable {
    public string Category { get; set; }
    public int Price { get; set; }
    public string Name { get; set; }
}

//ViewModel.cs
public class ViewModel {
    public ObservableCollection<Vegetable> Vegetables { get; set; }
    public ICommand LoadedCommand { get; set; }
    public void OnLoaded(object param) {
        CollectionView view = (CollectionView)CollectionViewSource.GetDefaultView(Vegetables);

        //Adding group description
        view.GroupDescriptions.Add(new PropertyGroupDescription("Category"));
    }
    public ViewModel() {
        Vegetables = new ObservableCollection<Vegetable>();
        Vegetables.Add(new Vegetable { Price=10, Name="Yarrow", Category="Leafy and Salad" });
        Vegetables.Add(new Vegetable { Price=20, Name="Pumpkins", Category="Leafy and Salad" });
        Vegetables.Add(new Vegetable { Price=30, Name="Cabbage", Category="Leafy and Salad" });
        Vegetables.Add(new Vegetable { Price=10, Name="Spinach", Category="Leafy and Salad" });
        Vegetables.Add(new Vegetable { Price=20, Name="Wheat Grass", Category="Leafy and Salad" });
        Vegetables.Add(new Vegetable { Price=30, Name="Horse gram", Category="Beans" });
        Vegetables.Add(new Vegetable { Price=10, Name="Chickpea", Category="Beans" });
        Vegetables.Add(new Vegetable { Price=20, Name="Green bean", Category="Beans" });
        Vegetables.Add(new Vegetable { Price=30, Name="Garlic", Category="Bulb and Stem" });
        Vegetables.Add(new Vegetable { Price=10, Name="Onion", Category="Bulb and Stem" });
        Vegetables.Add(new Vegetable { Price=20, Name="Nopal", Category="Bulb and Stem" });

        //Initialize the checklistbox LoadedCommand
        LoadedCommand = new DelegateCommand<object>(OnLoaded);
    }
}

// Required usings:
// using System.Collections.ObjectModel;
// using System.ComponentModel;
// using System.Windows.Data;
// using System.Windows.Input;
// using Syncfusion.Windows.Shared; (for DelegateCommand)<syncfusion:CheckListBox x:Name="ListBox"
ItemsSource="{Binding Vegetables}"
DisplayMemberPath="Name">
<syncfusion:CheckListBox.DataContext>
<local:ViewModel></local:ViewModel>
</syncfusion:CheckListBox.DataContext>
<i:Interaction.Triggers>
<i:EventTrigger EventName="Loaded">
<i:InvokeCommandAction Command="{Binding LoadedCommand}" />
</i:EventTrigger>
</i:Interaction.Triggers>
<!--DataTemplate for the GroupHeader items-->
<syncfusion:CheckListBox.GroupTemplate>
<DataTemplate>
<TextBlock Text="{Binding Name}"
Foreground="Green"
FontWeight="Bold">
</TextBlock>
</DataTemplate>
</syncfusion:CheckListBox.GroupTemplate>
</syncfusion:CheckListBox>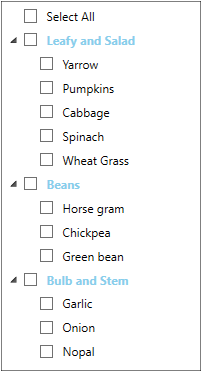
SelectAll Template
You can change the DataTemplate of the SelectAll item by using the SelectAllTemplate property.
//Model.cs
class Vegetable {
    public string Category { get; set; }
    public int Price { get; set; }
    public string Name { get; set; }
}

//ViewModel.cs
class ViewModel {
    public ObservableCollection<Vegetable> Vegetables { get; set; }
    public ViewModel() {
        Vegetables = new ObservableCollection<Vegetable>();
        Vegetables.Add(new Vegetable { Price=10, Name="Yarrow", Category="Leafy and Salad" });
        Vegetables.Add(new Vegetable { Price=20, Name="Pumpkins", Category="Leafy and Salad" });
        Vegetables.Add(new Vegetable { Price=30, Name="Cabbage", Category="Leafy and Salad" });
        Vegetables.Add(new Vegetable { Price=10, Name="Spinach", Category="Leafy and Salad" });
        Vegetables.Add(new Vegetable { Price=20, Name="Wheat Grass", Category="Leafy and Salad" });
        Vegetables.Add(new Vegetable { Price=30, Name="Horse gram", Category="Beans" });
        Vegetables.Add(new Vegetable { Price=10, Name="Chickpea", Category="Beans" });
        Vegetables.Add(new Vegetable { Price=20, Name="Green bean", Category="Beans" });
        Vegetables.Add(new Vegetable { Price=30, Name="Garlic", Category="Bulb and Stem" });
        Vegetables.Add(new Vegetable { Price=10, Name="Onion", Category="Bulb and Stem" });
        Vegetables.Add(new Vegetable { Price=20, Name="Nopal", Category="Bulb and Stem" });
    }
}<syncfusion:CheckListBox x:Name="ListBox"
ItemsSource="{Binding Vegetables}"
DisplayMemberPath="Name">
<syncfusion:CheckListBox.DataContext>
<local:ViewModel></local:ViewModel>
</syncfusion:CheckListBox.DataContext>
<!--DataTemplate for the SelectAll items-->
<syncfusion:CheckListBox.SelectAllTemplate>
<DataTemplate>
<TextBlock FontWeight="Bold"
Foreground="SkyBlue"
Text="Select All"
FontStyle="Italic"/>
</DataTemplate>
</syncfusion:CheckListBox.SelectAllTemplate>
</syncfusion:CheckListBox>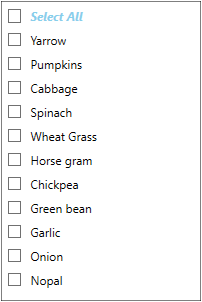
ItemContainerStyle
You can change the item container style of WPF CheckedListBox by using the ItemContainerStyle, which is applied to the container element that is generated for each item. The default value of ItemContainerStyle is null.
class ViewModel {
    private ObservableCollection<string> daysCollection = new ObservableCollection<string>();
    public ObservableCollection<string> DaysCollection {
        get { return daysCollection; }
        set { daysCollection = value; }
    }

    public ViewModel() {
        //Days added in the collection
        DaysCollection.Add("Sunday");
        DaysCollection.Add("Monday");
        DaysCollection.Add("Tuesday");
        DaysCollection.Add("Wednesday");
        DaysCollection.Add("Thursday");
        DaysCollection.Add("Friday");
        DaysCollection.Add("Saturday");
    }
}<syncfusion:CheckListBox ItemsSource="{Binding DaysCollection}" x:Name="checkListBox">
<syncfusion:CheckListBox.DataContext>
<local:ViewModel></local:ViewModel>
</syncfusion:CheckListBox.DataContext>
<!--Setting ItemContainerStyle for the CheckListBoxItems-->
<syncfusion:CheckListBox.ItemContainerStyle>
<Style TargetType="syncfusion:CheckListBoxItem">
<Style.Triggers>
<Trigger Property="IsChecked" Value="True">
<Setter Property="FontWeight" Value="Bold"></Setter>
</Trigger>
</Style.Triggers>
</Style>
</syncfusion:CheckListBox.ItemContainerStyle>
</syncfusion:CheckListBox>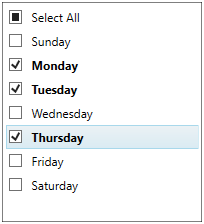
Here, the checked items are styled with a bold font.
ItemTemplateSelector
You can change the DataTemplate for WPF CheckedListBox items based on the provided logic by using the ItemTemplateSelector.
//Model.cs
public class Vegetable {
    public string Category { get; set; }
    public int Price { get; set; }
    public string Name { get; set; }
}

//ViewModel.cs
class ViewModel {
    public ObservableCollection<Vegetable> Vegetables { get; set; }
    public ICommand LoadedCommand { get; set; }
    public void OnLoaded(object param) {
        CollectionView view = (CollectionView)CollectionViewSource.GetDefaultView(Vegetables);

        //Adding group description
        view.GroupDescriptions.Add(new PropertyGroupDescription("Category"));
    }
    public ViewModel() {
        Vegetables = new ObservableCollection<Vegetable>();
        Vegetables.Add(new Vegetable { Price=10, Name="Yarrow", Category="Leafy and Salad" });
        Vegetables.Add(new Vegetable { Price=20, Name="Pumpkins", Category="Leafy and Salad" });
        Vegetables.Add(new Vegetable { Price=30, Name="Cabbage", Category="Leafy and Salad" });
        Vegetables.Add(new Vegetable { Price=10, Name="Spinach", Category="Leafy and Salad" });
        Vegetables.Add(new Vegetable { Price=20, Name="Wheat Grass", Category="Leafy and Salad" });
        Vegetables.Add(new Vegetable { Price=30, Name="Horse gram", Category="Beans" });
        Vegetables.Add(new Vegetable { Price=10, Name="Chickpea", Category="Beans" });
        Vegetables.Add(new Vegetable { Price=20, Name="Green bean", Category="Beans" });
        Vegetables.Add(new Vegetable { Price=30, Name="Garlic", Category="Bulb and Stem" });
        Vegetables.Add(new Vegetable { Price=10, Name="Onion", Category="Bulb and Stem" });
        Vegetables.Add(new Vegetable { Price=20, Name="Nopal", Category="Bulb and Stem" });

        //Initialize the checklistbox LoadedCommand
        LoadedCommand = new DelegateCommand<object>(OnLoaded);
    }
}

//ItemTemplateSelector class for select a DataTemplate
public class MyTemplateSelector : DataTemplateSelector {
    public DataTemplate Template { get; set; }
    public DataTemplate itemTemplate { get; set; }

    public override DataTemplate SelectTemplate(object item, DependencyObject container) {
        if (item is Vegetable && (item as Vegetable).Category == "Beans")
            return itemTemplate;
        else
            return Template;
    }
}<Window.Resources>
<local:MyTemplateSelector x:Key="Mytemplate">
<local:MyTemplateSelector.Template>
<DataTemplate>
<TextBlock Text="{Binding Name}" FontWeight="Bold"></TextBlock>
</DataTemplate>
</local:MyTemplateSelector.Template>
<local:MyTemplateSelector.itemTemplate>
<DataTemplate>
<TextBlock Text="{Binding Name}" FontStyle="Italic"></TextBlock>
</DataTemplate>
</local:MyTemplateSelector.itemTemplate>
</local:MyTemplateSelector>
</Window.Resources>
<syncfusion:CheckListBox ItemTemplateSelector="{StaticResource Mytemplate}"
ItemsSource="{Binding Vegetables}"
Name="checkListBox">
<syncfusion:CheckListBox.DataContext>
<local:ViewModel></local:ViewModel>
</syncfusion:CheckListBox.DataContext>
<i:Interaction.Triggers>
<i:EventTrigger EventName="Loaded">
<i:InvokeCommandAction Command="{Binding LoadedCommand}" />
</i:EventTrigger>
</i:Interaction.Triggers>
</syncfusion:CheckListBox>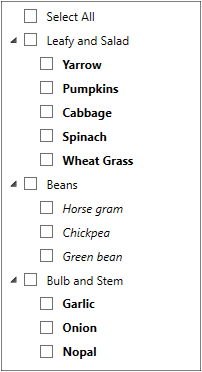
Here, the Leaf and Salad and Bulb and Stem group items have same data template and the Beans group items have separate data template.
ItemContainerStyleSelection
You can choose the style for WPF CheckedListBox items based on the provided logic by using the ItemContainerStyleSelector.
//Model.cs
public class Vegetable {
    public string Category { get; set; }
    public int Price { get; set; }
    public string Name { get; set; }
}

//ViewModel.cs
class ViewModel {
    public ObservableCollection<Vegetable> Vegetables { get; set; }
    public ICommand LoadedCommand { get; set; }
    public void OnLoaded(object param) {
        CollectionView view = (CollectionView)CollectionViewSource.GetDefaultView(Vegetables);

        //Adding group description
        view.GroupDescriptions.Add(new PropertyGroupDescription("Category"));
    }
    public ViewModel() {
        Vegetables = new ObservableCollection<Vegetable>();
        Vegetables.Add(new Vegetable { Price=10, Name="Yarrow", Category="Leafy and Salad" });
        Vegetables.Add(new Vegetable { Price=20, Name="Pumpkins", Category="Leafy and Salad" });
        Vegetables.Add(new Vegetable { Price=30, Name="Cabbage", Category="Leafy and Salad" });
        Vegetables.Add(new Vegetable { Price=10, Name="Spinach", Category="Leafy and Salad" });
        Vegetables.Add(new Vegetable { Price=20, Name="Wheat Grass", Category="Leafy and Salad" });
        Vegetables.Add(new Vegetable { Price=30, Name="Horse gram", Category="Beans" });
        Vegetables.Add(new Vegetable { Price=10, Name="Chickpea", Category="Beans" });
        Vegetables.Add(new Vegetable { Price=20, Name="Green bean", Category="Beans" });
        Vegetables.Add(new Vegetable { Price=30, Name="Garlic", Category="Bulb and Stem" });
        Vegetables.Add(new Vegetable { Price=10, Name="Onion", Category="Bulb and Stem" });
        Vegetables.Add(new Vegetable { Price=20, Name="Nopal", Category="Bulb and Stem" });

        //Initialize the checklistbox LoadedCommand
        LoadedCommand = new DelegateCommand<object>(OnLoaded);
    }
}

// A class that choose style for for the items
public class VegetableStyleSelector : StyleSelector {
    public Style GroupStyle { get; set; }
    public Style ItemStyle { get; set; }
    public override Style SelectStyle(object item, DependencyObject container) {
        if (item is Vegetable)
            return ItemStyle;
        else
            return GroupStyle;
    }
}<Window.Resources>
<Style TargetType="syncfusion:CheckListBoxItem" x:Key="Groupstyle">
<Setter Property="Foreground" Value="Red"></Setter>
</Style>
<Style TargetType="syncfusion:CheckListBoxItem" x:Key="ItemStyle">
<Setter Property="Foreground" Value="Blue"></Setter>
</Style>
<local:VegetableStyleSelector x:Key="StyleSelector"
GroupStyle="{StaticResource Groupstyle}"
ItemStyle="{StaticResource ItemStyle}">
</local:VegetableStyleSelector>
</Window.Resources>
<syncfusion:CheckListBox ItemContainerStyleSelector="{StaticResource StyleSelector}"
ItemsSource="{Binding Vegetables}"
DisplayMemberPath="Name"
Name="checkListBox"
Margin="20">
<syncfusion:CheckListBox.DataContext>
<local:ViewModel></local:ViewModel>
</syncfusion:CheckListBox.DataContext>
<i:Interaction.Triggers>
<i:EventTrigger EventName="Loaded">
<i:InvokeCommandAction Command="{Binding LoadedCommand}" />
</i:EventTrigger>
</i:Interaction.Triggers>
</syncfusion:CheckListBox>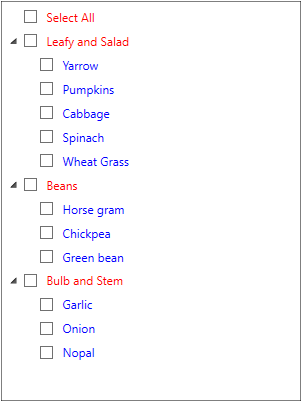
Here, the GroupStyle is applied to the group header and the ItemStyle is applied to the child items.
Theme
The WPF CheckedListBox supports various built-in themes. Refer to the links below to apply themes,