Getting Started with React Scheduler and Vite
This article explains how to set up a Vite project with JavaScript and integrate React Scheduler.
Vite is a fast, modern build tool and development server optimized for projects that use ES modules, TypeScript, JSX, and CSS modules. Its development server leverages native ES modules in modern browsers, which provides quick startup and fast feedback during development.
Prerequisites
System requirements for Syncfusion® React UI components
Set up the Vite project
To create a new Vite project, use one of the commands specific to NPM or Yarn.
npm create vite@latestyarn create viteUsing either command starts the project setup flow with the following configurations:
Step 1: Define the project name - Specify the project name directly. This article uses react-app.
√ Project name: » **react-app**Step 2: Select the framework - Select React as the framework.
√ Select a framework: » **React**Step 3: Choose the framework variant - Select JavaScript as the framework variant.
√ Select a variant: » **JavaScript**Step 4: If prompted for experimental options, choose according to your needs. This guide selects No.
√ Use rolldown-vite (Experimental)?: » **No**Step 5: When asked whether to install dependencies and start now, choose Yes to install and run immediately, or No to install later and start the dev server manually.
√ Install with npm and start now? » **Yes**After the setup completes, the application is available at http://localhost:5173.
Add Syncfusion® React Scheduler packages
Syncfusion® React component packages are available on npmjs.com. To use the Syncfusion® React Schedule component in the project, install the corresponding package @syncfusion/ej2-react-schedule by using one of the following commands.
npm install @syncfusion/ej2-react-scheduleyarn add @syncfusion/ej2-react-scheduleImport Syncfusion® CSS styles
In this example, the Material theme styles for the Scheduler and its dependencies are imported in src/App.css.
@import "../node_modules/@syncfusion/ej2-base/styles/material.css";
@import "../node_modules/@syncfusion/ej2-buttons/styles/material.css";
@import "../node_modules/@syncfusion/ej2-calendars/styles/material.css";
@import "../node_modules/@syncfusion/ej2-dropdowns/styles/material.css";
@import "../node_modules/@syncfusion/ej2-inputs/styles/material.css";
@import "../node_modules/@syncfusion/ej2-navigations/styles/material.css";
@import "../node_modules/@syncfusion/ej2-popups/styles/material.css";
@import "../node_modules/@syncfusion/ej2-react-schedule/styles/material.css";
Note: Import CSS styles in the same order as their dependency graph.
Add Syncfusion® React Schedule component
In src/App.jsx, use the following code snippet to render the Syncfusion React Schedule component and import App.css to apply styles.
import './App.css';
import { ScheduleComponent, Day, Week, WorkWeek, Month, Agenda, Inject } from '@syncfusion/ej2-react-schedule';

const App = () => {

  return (<ScheduleComponent>
    <Inject services={[Day, Week, WorkWeek, Month, Agenda]} />
  </ScheduleComponent>);

};
export default App;
Note: The preceding demo displays an empty Scheduler.
Populating appointments
To populate the empty Scheduler with appointments, bind event data to it by assigning the dataSource property with either local JSON data or a remote URL.
Here, local JSON data is assigned to the Scheduler dataSource.
import './App.css';
import { ScheduleComponent, Day, Week, WorkWeek, Month, Agenda, Inject } from '@syncfusion/ej2-react-schedule';
const App = () => {

    const data = [
      {
        Id: '101',
        Subject: 'Daily Standup | Engineering',
        StartTime: new Date(2026, 1, 2, 9, 0),
        EndTime: new Date(2026, 1, 2, 9, 30),
      },
      {
        Id: '102',
        Subject: 'Design Review | Mobile App v3',
        StartTime: new Date(2026, 1, 2, 10, 0),
        EndTime: new Date(2026, 1, 2, 11, 0),
      },
      {
        Id: '103',
        Subject: 'Client Check-in | Orion Traders',
        StartTime: new Date(2026, 1, 2, 11, 30),
        EndTime: new Date(2026, 1, 2, 12, 15),
      },
      {
        Id: '104',
        Subject: 'Sprint Planning | Q1 S2',
        StartTime: new Date(2026, 1, 2, 14, 0),
        EndTime: new Date(2026, 1, 2, 15, 30),
      },
      {
        Id: '105',
        Subject: 'Vendor Call | Cloud Cost Optimization',
        StartTime: new Date(2026, 1, 2, 16, 0),
        EndTime: new Date(2026, 1, 2, 17, 0),
      },
    ];

    const eventSettings = { dataSource: data };

    return (<ScheduleComponent height='550px' selectedDate={new Date(2026, 1, 2)} currentView='Day' eventSettings={eventSettings} >
      <Inject services={[Day, Week, WorkWeek, Month, Agenda]} />
    </ScheduleComponent>);

};
export default App;
Run the project
To run the project, use the following command:
npm run devyarn run devOutput Preview
Syncfusion React Scheduler
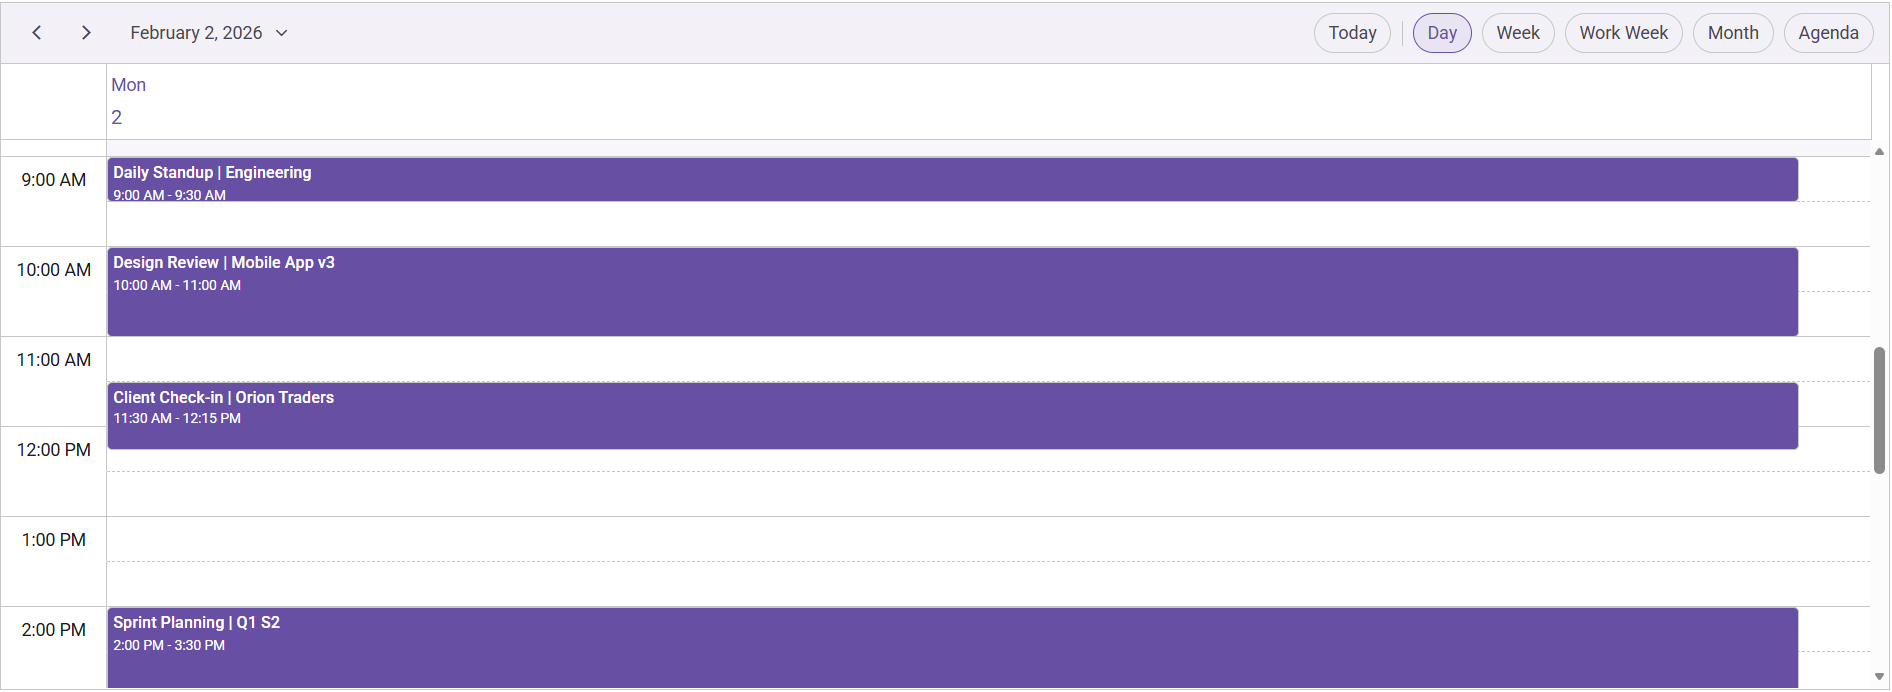
Image illustrating the Syncfusion React Scheduler
You can find the sample in this GitHub location.