Getting Started with React Scheduler and SharePoint
This article provides a step-by-step guide for setting up a SharePoint project and integrating the React Scheduler.
SharePoint Framework (SPFx) is a modern client-side development model provided by Microsoft for building custom solutions and extensions for SharePoint and Microsoft Teams.
Tip: Use this guide when you want to host the React Scheduler inside a SharePoint web part.
Prerequisites
Set up the SharePoint project
Create a new SPFx project by running the following command:
Step 1: To start a new SharePoint project, run:
yo @microsoft/sharepointStep 2: Use my-project as the project name and App as the Web Part name for this article. You will be prompted with configuration questions similar to the following:
Let's create a new Microsoft 365 solution.
? What is your solution name? my-project
? Which type of client-side component to create? WebPart
Add new Web part to solution my-project.
? What is your Web part name? App
? Which template would you like to use? React
Step 3: To trust the development certificate, run:
heft trust-dev-certAfter these steps, your my-project SPFx solution is ready for Syncfusion® component integration.
Important: Make sure your SPFx environment is configured correctly before you proceed with package installation.
Add React Schedule packages
Syncfusion® React component packages are available at npmjs.com. To use React Schedule component in the project, install the corresponding npm package:
npm install @syncfusion/ej2-react-schedule --saveImport Syncfusion® CSS styles
Themes for Syncfusion React components can be applied using CSS files from npm packages, CDN, CRG, or Theme Studio. Refer to the themes documentation for more details.
This example demonstrates importing the Bootstrap theme CSS within the App.tsx file located at ~/src/webparts/app/components/.
Note: Import only the CSS files required by the Syncfusion components used in your SPFx solution.
require('@syncfusion/ej2-base/styles/bootstrap5.css');
require('@syncfusion/ej2-buttons/styles/bootstrap5.css');
require('@syncfusion/ej2-calendars/styles/bootstrap5.css');
require('@syncfusion/ej2-dropdowns/styles/bootstrap5.css');
require('@syncfusion/ej2-inputs/styles/bootstrap5.css');
require('@syncfusion/ej2-lists/styles/bootstrap5.css');
require('@syncfusion/ej2-navigations/styles/bootstrap5.css');
require('@syncfusion/ej2-popups/styles/bootstrap5.css');
require('@syncfusion/ej2-splitbuttons/styles/bootstrap5.css');
require('@syncfusion/ej2-schedule/styles/bootstrap5.css');
Update the TypeScript configuration tsconfig.json to map Syncfusion package paths for proper module resolution in the SPFx project:
{
  "extends": "./node_modules/@microsoft/spfx-web-build-rig/profiles/default/tsconfig-base.json",
  "compilerOptions": {
	  "jsx": "react",
    "paths": {
      "@syncfusion/*": ["./node_modules/@syncfusion/*"]
    }
  }
}
Add React Schedule component
Follow these steps to add the component.
Step 1: In the App.tsx file inside the ~/src/webparts/app/components folder, render the Syncfusion React Schedule component:
import * as React from 'react';
import type { IAppProps } from './IAppProps';
import { ScheduleComponent, Day, Week, WorkWeek, Month, Agenda, Inject } from '@syncfusion/ej2-react-schedule';

export default class App extends React.Component<IAppProps> {
    public render(): React.ReactElement<IAppProps> {
        return (
            <ScheduleComponent>
                <Inject services={[Day, Week, WorkWeek, Month, Agenda]} />
            </ScheduleComponent>
        );
    }
}
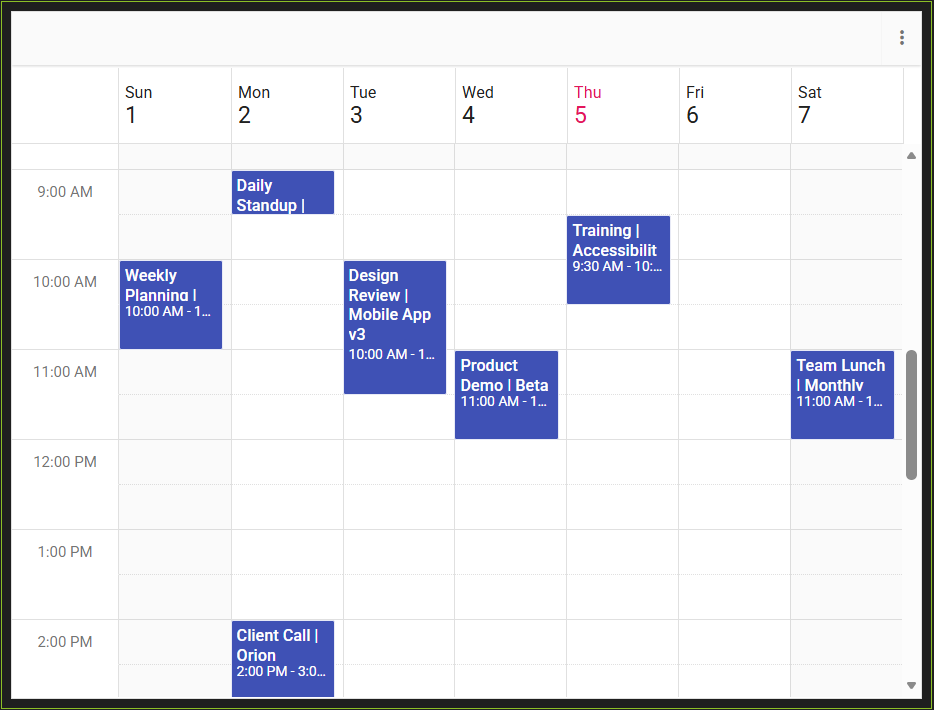
Step 2: Populate events in the React Scheduler:
public render(): React.ReactElement<IAppProps> {
    const data = [
        {
            Id: '201',
            Subject: 'Weekly Planning | Team Leads',
            StartTime: new Date(2026, 1, 1, 10, 0),
            EndTime: new Date(2026, 1, 1, 11, 0),
        },
        {
            Id: '202',
            Subject: 'Daily Standup | Engineering',
            StartTime: new Date(2026, 1, 2, 9, 0),
            EndTime: new Date(2026, 1, 2, 9, 30),
        },
        {
            Id: '203',
            Subject: 'Client Call | Orion Traders',
            StartTime: new Date(2026, 1, 2, 14, 0),
            EndTime: new Date(2026, 1, 2, 15, 0),
        },
        {
            Id: '204',
            Subject: 'Design Review | Mobile App v3',
            StartTime: new Date(2026, 1, 3, 10, 0),
            EndTime: new Date(2026, 1, 3, 11, 30),
        },
        {
            Id: '205',
            Subject: 'Security Sync | Q1 Controls',
            StartTime: new Date(2026, 1, 3, 16, 0),
            EndTime: new Date(2026, 1, 3, 17, 0),
        },
        {
            Id: '206',
            Subject: 'Product Demo | Beta Cohort',
            StartTime: new Date(2026, 1, 4, 11, 0),
            EndTime: new Date(2026, 1, 4, 12, 0),
        },
        {
            Id: '207',
            Subject: 'Sprint Retrospective | S2',
            StartTime: new Date(2026, 1, 4, 15, 0),
            EndTime: new Date(2026, 1, 4, 16, 30),
        },
        {
            Id: '208',
            Subject: 'Training | Accessibility & WCAG',
            StartTime: new Date(2026, 1, 5, 9, 30),
            EndTime: new Date(2026, 1, 5, 10, 30),
        },
        {
            Id: '209',
            Subject: 'Release Go/No-Go | v2.4',
            StartTime: new Date(2026, 1, 6, 15, 0),
            EndTime: new Date(2026, 1, 6, 16, 0),
        },
        {
            Id: '210',
            Subject: 'Team Lunch | Monthly Social',
            StartTime: new Date(2026, 1, 7, 11, 0),
            EndTime: new Date(2026, 1, 7, 12, 0),
        },
    ];

    const eventSettings = { dataSource: data };
    return (
        <ScheduleComponent height='550px' selectedDate={new Date(2026, 1, 2)} currentView='Week' eventSettings={eventSettings}>
            <Inject services={[Day, Week, WorkWeek, Month, Agenda]} />
        </ScheduleComponent>
    );
}
The following summarized code combines the previous steps:
import * as React from 'react';
import type { IAppProps } from './IAppProps';
import { ScheduleComponent, Day, Week, WorkWeek, Month, Agenda, Inject } from '@syncfusion/ej2-react-schedule';

// import Syncfusion CSS
require('@syncfusion/ej2-base/styles/bootstrap5.css');
require('@syncfusion/ej2-buttons/styles/bootstrap5.css');
require('@syncfusion/ej2-calendars/styles/bootstrap5.css');
require('@syncfusion/ej2-dropdowns/styles/bootstrap5.css');
require('@syncfusion/ej2-inputs/styles/bootstrap5.css');
require('@syncfusion/ej2-lists/styles/bootstrap5.css');
require('@syncfusion/ej2-navigations/styles/bootstrap5.css');
require('@syncfusion/ej2-popups/styles/bootstrap5.css');
require('@syncfusion/ej2-splitbuttons/styles/bootstrap5.css');
require('@syncfusion/ej2-schedule/styles/bootstrap5.css');

export default class App extends React.Component<IAppProps> {
	public render(): React.ReactElement<IAppProps> {
		const data = [
			{
				Id: '201',
				Subject: 'Weekly Planning | Team Leads',
				StartTime: new Date(2026, 1, 1, 10, 0),
				EndTime: new Date(2026, 1, 1, 11, 0),
			},
			{
				Id: '202',
				Subject: 'Daily Standup | Engineering',
				StartTime: new Date(2026, 1, 2, 9, 0),
				EndTime: new Date(2026, 1, 2, 9, 30),
			},
			{
				Id: '203',
				Subject: 'Client Call | Orion Traders',
				StartTime: new Date(2026, 1, 2, 14, 0),
				EndTime: new Date(2026, 1, 2, 15, 0),
			},
			{
				Id: '204',
				Subject: 'Design Review | Mobile App v3',
				StartTime: new Date(2026, 1, 3, 10, 0),
				EndTime: new Date(2026, 1, 3, 11, 30),
			},
			{
				Id: '205',
				Subject: 'Security Sync | Q1 Controls',
				StartTime: new Date(2026, 1, 3, 16, 0),
				EndTime: new Date(2026, 1, 3, 17, 0),
			},
			{
				Id: '206',
				Subject: 'Product Demo | Beta Cohort',
				StartTime: new Date(2026, 1, 4, 11, 0),
				EndTime: new Date(2026, 1, 4, 12, 0),
			},
			{
				Id: '207',
				Subject: 'Sprint Retrospective | S2',
				StartTime: new Date(2026, 1, 4, 15, 0),
				EndTime: new Date(2026, 1, 4, 16, 30),
			},
			{
				Id: '208',
				Subject: 'Training | Accessibility & WCAG',
				StartTime: new Date(2026, 1, 5, 9, 30),
				EndTime: new Date(2026, 1, 5, 10, 30),
			},
			{
				Id: '209',
				Subject: 'Release Go/No-Go | v2.4',
				StartTime: new Date(2026, 1, 6, 15, 0),
				EndTime: new Date(2026, 1, 6, 16, 0),
			},
			{
				Id: '210',
				Subject: 'Team Lunch | Monthly Social',
				StartTime: new Date(2026, 1, 7, 11, 0),
				EndTime: new Date(2026, 1, 7, 12, 0),
			},
		];

		const eventSettings = { dataSource: data };
		return (
			<ScheduleComponent height='550px' selectedDate={new Date(2026, 1, 2)} currentView='Week' eventSettings={eventSettings}>
				<Inject services={[Day, Week, WorkWeek, Month, Agenda]} />
			</ScheduleComponent>
		);
	}
}
Set up Tenant domain for SPFx
The following configuration ensures that your SPFx solution loads the SharePoint Workbench for your tenant. Replace {tenantDomain} with your actual SharePoint tenant domain.
config/serve.json
{
  "$schema": "https://developer.microsoft.com/json-schemas/spfx-build/spfx-serve.schema.json",
  "port": 4321,
  "https": true,
  "initialPage": "https://{tenantDomain}/_layouts/workbench.aspx"
}
Note: Update the tenant domain before running the SPFx workbench locally.
Run the project
To run the project, use the following command:
heft startThe output appears as follows:
Tip: You can review the complete sample in this GitHub repository.
See also
- React Schedule component - Component homepage
- Getting Started with the React Schedule component - Basic setup guide
- Getting Started with the Syncfusion® React UI component - Quick start guide