Appointments in JavaScript Scheduler
Appointments represent events scheduled for specific time periods. Each appointment can be configured with various durations and recurrence patterns. The Scheduler supports the following appointment types:
- Normal events
- Spanned events
- All-day events
- Recurring events
Normal events
Normal events are appointments scheduled within a specific time interval on a single day.
Creating a normal event
Example: create a normal event using JSON data:
var data = [{
    Id: 1,
    Subject: 'Paris',
    StartTime: new Date(2018, 1, 15, 10, 0),
    EndTime: new Date(2018, 1, 15, 12, 30),
}];
var scheduleObj = new ej.schedule.Schedule({
    height: '550px',
    selectedDate: new Date(2018, 1, 15),
    views: ['Day', 'Week', 'TimelineWeek', 'Month', 'Agenda'],
    eventSettings: { dataSource: data }
});
scheduleObj.appendTo('#Schedule');
<!DOCTYPE html>
<html lang="en">
<head>
<title>Schedule Typescript Control</title>
<meta charset="utf-8">
<meta name="viewport" content="width=device-width, initial-scale=1.0">
<meta name="description" content="Typescript Schedule Control">
<meta name="author" content="Syncfusion">
<link href="index.css" rel="stylesheet">
<link href="https://cdn.syncfusion.com/ej2/35.1.37/bootstrap5.3.css" rel="stylesheet" />
<script src="https://cdn.syncfusion.com/ej2/35.1.37/dist/ej2.min.js" type="text/javascript"></script>
</head>
<body>
<div id="container">
<div id="Schedule"></div>
</div>
<script>
var ele = document.getElementById('container');
if (ele) {
ele.style.visibility = "visible";
}
</script>
<script src="index.js" type="text/javascript"></script>
</body>
</html>Spanned events
Spanned events extend beyond 24 hours. By default, these events display in the all-day row. This also includes events that cross midnight but last less than 24 hours; such events display across both days.
Example: an appointment from November 25, 2018 at 11:00 PM to November 26, 2018 at 2:00 AM will be split and shown on both days.
Customize the rendering of the spanned events
By default, the Scheduler renders spanned events (appointments lasting more than 24 hours) in the all-day row. To display these events within work cells instead, set the spannedEventPlacement option to TimeSlot within the eventSettings property. The following example demonstrates this customization:
var data = [{
    Id: 1,
    Subject: 'Paris',
    StartTime: new Date(2018, 1, 15, 10, 0),
    EndTime: new Date(2018, 1, 17, 12, 30),
    IsAllDay: false
}, {
    Id: 2,
    Subject: 'London',
    StartTime: new Date(2018, 1, 16, 12, 0),
    EndTime: new Date(2018, 1, 18, 13, 0),
    IsAllDay: false
}];

var scheduleObj = new ej.schedule.Schedule({
    height: '550px',
    selectedDate: new Date(2018, 1, 15),
    views: ['Day', 'Week', 'Month', 'Agenda'],
    eventSettings: { dataSource: data, spannedEventPlacement: 'TimeSlot' }
});
scheduleObj.appendTo('#Schedule');
<!DOCTYPE html>
<html lang="en">
<head>
<title>Schedule Typescript Control</title>
<meta charset="utf-8">
<meta name="viewport" content="width=device-width, initial-scale=1.0">
<meta name="description" content="Typescript Schedule Control">
<meta name="author" content="Syncfusion">
<link href="index.css" rel="stylesheet">
<link href="https://cdn.syncfusion.com/ej2/35.1.37/bootstrap5.3.css" rel="stylesheet" />
<script src="https://cdn.syncfusion.com/ej2/35.1.37/dist/ej2.min.js" type="text/javascript"></script>
</head>
<body>
<div id="container">
<div id="Schedule"></div>
</div>
<script>
var ele = document.getElementById('container');
if (ele) {
ele.style.visibility = "visible";
}
</script>
<script src="index.js" type="text/javascript"></script>
</body>
</html>All-day events
All-day events are appointments that occupy an entire day, such as holidays or full-day conferences. These events typically display in a separate all-day row below the date header section. In Timeline views, all-day appointments appear within the main content area since these views do not include a separate all-day row.
To designate a normal appointment as an all-day event, set the
isAllDayfield to true.
Hide all-day row events
The all-day row appointments can be hidden from the Scheduler UI using CSS customization:
    <style>
        .e-schedule .e-date-header-wrap .e-schedule-table thead {
           display: none;
        }
    </style>
The all-day row supports scrolling functionality. For more information, refer to the enable scroll option on all-day section documentation.
Expand all day appointments view on initial load
When numerous appointments exist in the all-day view, the dataBound event can be utilized to automatically display all all-day events on initial load, eliminating the need for users to manually click the expand toggle.
var data = [
  {
    EndTime: new Date(2022, 4, 4, 0, 0),
    Id: '1',
    IsAllDay: true,
    StartTime: new Date(2022, 4, 2, 0, 0),
    Subject:
      '<i class="fas fa-truck-pickup"></i> | Install Bullnose Brick/ Coping | Jones | 3521',
  },
  {
    EndTime: new Date(2022, 3, 30, 0, 0),
    Id: '2',
    IsAllDay: true,
    StartTime: new Date(2022, 3, 29, 0, 0),
    Subject:
      '<i class="fas fa-truck-pickup"></i> | Plumbing Checklist | Jaimungal | 3671 :: Pool',
  },
  {
    EndTime: new Date(2022, 4, 7, 0, 0),
    Id: '3',
    IsAllDay: true,
    StartTime: new Date(2022, 4, 2, 0, 0),
    Subject:
      '<i class="fas fa-truck-pickup"></i> | Waterline Tile | Jaimungal | 3671 :: Pool',
  },
  {
    EndTime: new Date(2022, 3, 30, 0, 0),
    Id: '4',
    IsAllDay: true,
    StartTime: new Date(2022, 3, 28, 0, 0),
    Subject:
      '<i class="fas fa-truck-pickup"></i> | Underground Plumbing | Jaimungal | 3671 :: Pool',
  },
  {
    EndTime: new Date(2022, 4, 4, 0, 0),
    Id: '5',
    IsAllDay: true,
    StartTime: new Date(2022, 4, 3, 0, 0),
    Subject:
      '<i class="fas fa-truck-pickup"></i> | Backfill/ Compaction | Jaimungal | 3671 :: Pool',
  },
  {
    EndTime: new Date(2022, 4, 7, 0, 0),
    Id: '6',
    IsAllDay: true,
    StartTime: new Date(2022, 4, 4, 0, 0),
    Subject:
      '<i class="fas fa-truck-pickup"></i> | Install Bullnose Brick/ Coping | Jaimungal | 3671 :: Pool',
  },
  {
    EndTime: new Date(2022, 4, 1, 0, 0),
    Id: '7',
    IsAllDay: true,
    StartTime: new Date(2022, 3, 30, 0, 0),
    Subject:
      '<i class="fas fa-truck-pickup"></i> | Steel/ Checklist | VP Highland Model | 3719 :: Pool',
  },
  {
    Description:
      'Let Yves know I did not see skimmer southern gunite did shell',
    EndTime: new Date(2022, 4, 4, 0, 0),
    Id: '8',
    IsAllDay: true,
    StartTime: new Date(2022, 4, 3, 0, 0),
    Subject:
      '<i class="fas fa-truck-pickup"></i> | Shotcrete Shell | VP Highland Model | 3719 :: Pool',
  },
  {
    EndTime: new Date(2022, 3, 30, 0, 0),
    Id: '9',
    IsAllDay: true,
    StartTime: new Date(2022, 3, 29, 0, 0),
    Subject:
      '<i class="fas fa-truck-pickup"></i> | Tile Selections/ Pavers/ Finish | VP Highland Model | 3719 :: Pool',
  },
  {
    EndTime: new Date(2022, 3, 30, 0, 0),
    Id: '10',
    IsAllDay: true,
    StartTime: new Date(2022, 3, 26, 0, 0),
    Subject:
      '<i class="fas fa-truck-pickup"></i> | Layout/ Form Rebar Shell | VP Highland Model | 3719 :: Pool',
  },
];
var scheduleObj = new ej.schedule.Schedule({
  dataBound: function () {
    if (initialLoad) {
      this.element.querySelector('.e-all-day-appointment-section').click();
      initialLoad = false;
    }
  },
  height: '750px',
  selectedDate: new Date(2022, 3, 26),
  views: ['Day', 'Week'],
  eventSettings: { dataSource: data },
  enableHtmlSanitizer: false
});
var initialLoad = true;

scheduleObj.appendTo('#Schedule');
<!DOCTYPE html>
<html lang="en">
<head>
<title>Schedule Typescript Control</title>
<meta charset="utf-8">
<meta name="viewport" content="width=device-width, initial-scale=1.0">
<meta name="description" content="Typescript Schedule Control">
<meta name="author" content="Syncfusion">
<link href="index.css" rel="stylesheet">
<link href="https://cdn.syncfusion.com/ej2/35.1.37/bootstrap5.3.css" rel="stylesheet" />
<script src="https://cdn.syncfusion.com/ej2/35.1.37/dist/ej2.min.js" type="text/javascript"></script>
</head>
<body>
<div id="container">
<div id="Schedule"></div>
</div>
<script>
var ele = document.getElementById('container');
if (ele) {
ele.style.visibility = "visible";
}
</script>
<script src="index.js" type="text/javascript"></script>
</body>
</html>Recurring events
Recurring events are appointments that repeat at regular intervals according to a defined recurrence rule. These events can recur daily, weekly, monthly, or yearly, and are typically indicated by a repeat marker icon at the bottom-right corner of the appointment.
Creating a recurring event
The following example demonstrates how to create a recurring event in the Scheduler with a specific recurrenceRule. In this example, an event recurs daily and ends after 5 occurrences:
var data = [{
    Id: 1,
    Subject: 'Paris',
    StartTime: new Date(2018, 1, 15, 10, 0),
    EndTime: new Date(2018, 1, 15, 12, 30),
    IsAllDay: false,
    RecurrenceRule: 'FREQ=DAILY;INTERVAL=1;COUNT=5',
}];

var scheduleObj = new ej.schedule.Schedule({
    height: '550px',
    selectedDate: new Date(2018, 1, 15),
    views: ['Day', 'Week', 'TimelineMonth', 'Month', 'Agenda'],
    eventSettings: { dataSource: data }
});
scheduleObj.appendTo('#Schedule');
<!DOCTYPE html>
<html lang="en">
<head>
<title>Schedule Typescript Control</title>
<meta charset="utf-8">
<meta name="viewport" content="width=device-width, initial-scale=1.0">
<meta name="description" content="Typescript Schedule Control">
<meta name="author" content="Syncfusion">
<link href="index.css" rel="stylesheet">
<link href="https://cdn.syncfusion.com/ej2/35.1.37/bootstrap5.3.css" rel="stylesheet" />
<script src="https://cdn.syncfusion.com/ej2/35.1.37/dist/ej2.min.js" type="text/javascript"></script>
</head>
<body>
<div id="container">
<div id="Schedule"></div>
</div>
<script>
var ele = document.getElementById('container');
if (ele) {
ele.style.visibility = "visible";
}
</script>
<script src="index.js" type="text/javascript"></script>
</body>
</html>Adding exceptions
Specific dates can be excluded from a recurrence series by adding them to the recurrenceException field. Exception dates must be provided in ISO date-time format without hyphens (-) separating date elements.
For example, February 22, 2018, should be represented as “20180222”. The time component in UTC format requires a “Z” suffix without spaces. For instance, “07:30:00 UTC” becomes “073000Z”.
var data = [{
    Id: 1,
    Subject: 'Paris',
    StartTime: new Date(2018, 0, 28, 10, 0),
    EndTime: new Date(2018, 0, 28, 12, 30),
    IsAllDay: false,
    RecurrenceRule: 'FREQ=DAILY;INTERVAL=1;COUNT=8',
    RecurrenceException: '20180129T043000Z,20180131T043000Z,20180202T043000Z'
}];
var scheduleObj = new ej.schedule.Schedule({
    height: '550px',
    selectedDate: new Date(2018, 0, 28),
    eventSettings: { dataSource: data }
});
scheduleObj.appendTo('#Schedule');
<!DOCTYPE html>
<html lang="en">
<head>
<title>Schedule Typescript Control</title>
<meta charset="utf-8">
<meta name="viewport" content="width=device-width, initial-scale=1.0">
<meta name="description" content="Typescript Schedule Control">
<meta name="author" content="Syncfusion">
<link href="index.css" rel="stylesheet">
<link href="https://cdn.syncfusion.com/ej2/35.1.37/bootstrap5.3.css" rel="stylesheet" />
<script src="https://cdn.syncfusion.com/ej2/35.1.37/dist/ej2.min.js" type="text/javascript"></script>
</head>
<body>
<div id="container">
<div id="Schedule"></div>
</div>
<script>
var ele = document.getElementById('container');
if (ele) {
ele.style.visibility = "visible";
}
</script>
<script src="index.js" type="text/javascript"></script>
</body>
</html>Editing an occurrence from a series
To edit a particular occurrence from an event series and display it on the initial Scheduler load, add the edited occurrence as a new event to the dataSource collection. Include an additional recurrenceID field that references the ID value of the parent event.
In the following example, a recurring instance appearing on January 30, 2018, is modified with alternative timings. This date is removed from the parent repeating event (running from January 28 to February 4, 2018) by populating the recurrenceException field on the parent event with the excluded date value. The edited occurrence, created as a new event, includes a recurrenceID field that references the parent event’s Id value.
var data = [{
    Id: 1,
    Subject: 'Scrum Meeting',
    StartTime: new Date(2018, 0, 28, 10, 0),
    EndTime: new Date(2018, 0, 28, 12, 30),
    IsAllDay: false,
    RecurrenceRule: 'FREQ=DAILY;INTERVAL=1;COUNT=8',
    RecurrenceException: '20180130T043000Z'
}, {
    Id: 2,
    Subject: 'Scrum Meeting',
    StartTime: new Date(2018, 0, 30, 9, 0),
    EndTime: new Date(2018, 0, 30, 10, 30),
    Description: "Meeting time changed based on team activities.",
    RecurrenceID: 1
}];

var scheduleObj = new ej.schedule.Schedule({
    height: '550px',
    selectedDate: new Date(2018, 0, 28),
    eventSettings: { dataSource: data }
});
scheduleObj.appendTo('#Schedule');
<!DOCTYPE html>
<html lang="en">
<head>
<title>Schedule Typescript Control</title>
<meta charset="utf-8">
<meta name="viewport" content="width=device-width, initial-scale=1.0">
<meta name="description" content="Typescript Schedule Control">
<meta name="author" content="Syncfusion">
<link href="index.css" rel="stylesheet">
<link href="https://cdn.syncfusion.com/ej2/35.1.37/bootstrap5.3.css" rel="stylesheet" />
<script src="https://cdn.syncfusion.com/ej2/35.1.37/dist/ej2.min.js" type="text/javascript"></script>
</head>
<body>
<div id="container">
<div id="Schedule"></div>
</div>
<script>
var ele = document.getElementById('container');
if (ele) {
ele.style.visibility = "visible";
}
</script>
<script src="index.js" type="text/javascript"></script>
</body>
</html>Edit only the current and following events
To edit only the current and following events in a recurring series, enable the editFollowingEvents property within eventSettings. Add the edited occurrence as a new event to the dataSource collection with an additional followingID field that references the ID value of the immediate parent event.
In the following example, a recurring instance appearing on January 30, 2018, and all following dates are modified with a different subject. These dates are removed from the parent repeating event (repeating from January 28 to February 4, 2018) by modifying the recurrenceRule field on the parent event with an until date value. The updated events, created as new events, include a followingID field that references the immediate parent event’s Id value.
var data = [{
    Id: 1,
    Subject: 'Scrum Meeting',
    StartTime: new Date(2018, 0, 28, 10, 0),
    EndTime: new Date(2018, 0, 28, 12, 30),
    IsAllDay: false,
    RecurrenceRule: 'FREQ=DAILY;INTERVAL=1;COUNT=8',
    RecurrenceException: '20180130T043000Z'
}, {
    Id: 2,
    Subject: 'Scrum Meeting',
    StartTime: new Date(2018, 0, 30, 9, 0),
    EndTime: new Date(2018, 0, 30, 10, 30),
    Description: "Meeting time changed based on team activities.",
    RecurrenceID: 1
}];
var scheduleObj = new ej.schedule.Schedule({
    height: '550px',
    selectedDate: new Date(2018, 0, 28),
    eventSettings: { dataSource: data }
});
scheduleObj.appendTo('#Schedule');
<!DOCTYPE html>
<html lang="en">
<head>
<title>Schedule Typescript Control</title>
<meta charset="utf-8">
<meta name="viewport" content="width=device-width, initial-scale=1.0">
<meta name="description" content="Typescript Schedule Control">
<meta name="author" content="Syncfusion">
<link href="index.css" rel="stylesheet">
<link href="https://cdn.syncfusion.com/ej2/35.1.37/bootstrap5.3.css" rel="stylesheet" />
<script src="https://cdn.syncfusion.com/ej2/35.1.37/dist/ej2.min.js" type="text/javascript"></script>
</head>
<body>
<div id="container">
<div id="Schedule"></div>
</div>
<script>
var ele = document.getElementById('container');
if (ele) {
ele.style.visibility = "visible";
}
</script>
<script src="index.js" type="text/javascript"></script>
</body>
</html>Recurrence options and rules
Events can repeat on daily, weekly, monthly, or yearly bases using recurrence rules. The following details must be assigned to the recurrenceRule property to generate recurring instances:
- Repeat type (daily/weekly/monthly/yearly)
- Repetition frequency
- Interval duration
- Time period for rendering the appointment
Four repeat types are available:
- Daily - Creates recurring instances on a daily basis.
- Weekly - Creates recurring instances on a weekly basis for selected days.
- Monthly - Creates recurring instances on a monthly basis for selected months and other specified recurrence criteria.
- Yearly - Creates recurring instances on a yearly basis.
Recurrence properties
The following table describes the properties used to create recurrence appointments with their respective time periods. Valid rule strings can be referenced from iCalendar specifications.
Refer to iCalendar specifications for valid recurrence rule string formats.
| Property | Purpose | Example |
|---|---|---|
| FREQ | Maintains the repeat type (Daily, Weekly, Monthly, Yearly) value of the appointment. | FREQ=DAILY;INTERVAL=1 |
| INTERVAL | Maintains the interval value of the appointments. When you create the daily appointment at an interval of 2, the appointments are rendered on the days Monday, Wednesday and Friday (Creates an appointment on all days by leaving the interval of one day gap). | FREQ=DAILY;INTERVAL=2 |
| COUNT | It holds the appointment’s count value. When the COUNT value is 10, then 10 instances of appointments are created in the recurrence series. | FREQ=DAILY;INTERVAL=1;COUNT=10 |
| UNTIL | This property holds the end date value (in ISO format) denoting when the recurrence actually ends. | FREQ=DAILY;INTERVAL=1;UNTIL=20180530T041343Z; |
| BYDAY | It holds the day value(s), representing on which the appointments actually renders. Create the weekly appointment, and select the day(s) from the day options (Monday/Tuesday/Wednesday/Thursday/Friday/Saturday/Sunday). When Monday is selected, the first two letters of the selected day “MO” is saved in the BYDAY property. When multiple days are selected, the values are separated by commas. | FREQ=WEEKLY;INTERVAL=1;BYDAY=MO,WE;COUNT=10 |
| BYMONTHDAY | This property is used to store the date value of the Month, while creating the Month recurrence appointment. When you create a Monthly recurrence appointment for every 3rd day of the month, then BYMONTHDAY holds the value 3 and creates the appointment on 3rd day of every month. | FREQ=MONTHLY;BYMONTHDAY=3;INTERVAL=1;COUNT=10 |
| BYMONTH | This property is used to store the index value of the selected Month while creating the yearly appointments. When you create the yearly appointment on June month, the index value of June month 6 will get stored in the BYMONTH field. The appointment is created on every 6th month of a year. | FREQ=YEARLY;BYMONTHDAY=16;BYMONTH=6;INTERVAL=1;COUNT=10 |
| BYSETPOS | This property is used to store the index value of the week. When you create the monthly appointment in second week of a month, the index value of the second week (2) is stored in BYSETPOS. | FREQ=MONTHLY;BYDAY=MO;BYSETPOS=2;COUNT=10 |
The default recurrence validation for appointments follows Outlook-style validation. This validation occurs during the creation, editing, dragging, dropping, or resizing of recurrence appointments, and when any single occurrence is modified.
Daily Frequency
| Description | Example |
|---|---|
| Daily recurring event that never ends | FREQ=DAILY;INTERVAL=1 |
| Daily recurring event that ends after 5 occurrences | FREQ=DAILY;INTERVAL=1;COUNT=5 |
| Daily recurring event that ends exactly on 12/12/2018 | FREQ=DAILY;INTERVAL=1;UNTIL=20181212T041343Z |
| Daily event that recurs on alternative days and repeats for 10 occurrences | FREQ=DAILY;INTERVAL=2;COUNT=10 |
Weekly Frequency
| Description | Example |
|---|---|
| Weekly recurring event that repeats on every Monday, Wednesday and Friday and never ends | FREQ=WEEKLY;INTERVAL=1;BYDAY=MO,WE,FR |
| Repeats every week Thursday and ends after 10 occurrences | FREQ=WEEKLY;INTERVAL=1;BYDAY=TH; COUNT=10 |
| Repeats every week Monday and ends on 12/12/2018 | FREQ=WEEKLY;INTERVAL=1;BYDAY=MO; UNTIL=20181212T041343Z |
| Repeats on Monday, Wednesday and Friday of alternative weeks and ends after 10 occurrences | FREQ=WEEKLY;INTERVAL=2;BYDAY=MO,WE,FR;COUNT=10 |
Monthly Frequency
| Description | Example |
|---|---|
| Monthly recurring event that repeats on every 15th day of a month and never ends | FREQ=MONTHLY; BYMONTHDAY=15;INTERVAL=1 |
| Monthly recurring event that repeats on every 16th day of a month and ends after 10 occurrences | FREQ=MONTHLY;BYMONTHDAY=16;INTERVAL=1;COUNT=10 |
| Repeats every 17th day of a month and ends on 12/12/2018 | FREQ=MONTHLY;BYMONTHDAY=17; INTERVAL=1;UNTIL=20181212T041343Z |
| Repeats every 2nd Friday of a month and never ends | FREQ=MONTHLY;BYDAY=FR;BYSETPOS=2; INTERVAL=1 |
| Repeats every 4th Wednesday of a month and ends after 10 occurrences | FREQ=MONTHLY;BYDAY=WE; BYSETPOS=4;INTERVAL=1;COUNT=10 |
| Repeats every 4th Friday of a month and ends on 12/12/2018 | FREQ=MONTHLY;BYDAY=FR;BYSETPOS=4; INTERVAL=1;UNTIL=20181212T041343Z; |
Yearly Frequency
| Description | Example |
|---|---|
| Yearly event that repeats on every 15th day of December month and never ends | FREQ=YEARLY; BYMONTHDAY=15;BYMONTH=12;INTERVAL=1 |
| Event that repeats on every 10th day of December month and ends after 10 occurrences | FREQ=YEARLY; BYMONTHDAY=10;BYMONTH=12;INTERVAL=1;COUNT=10 |
| Repeats on every 12th day of December month and ends on 12/12/2025 | FREQ=YEARLY;BYMONTHDAY=12; BYMONTH=12;INTERVAL=1;UNTIL=20251212T041343Z |
| Repeats on every 3rd Friday of December month and never ends | FREQ=YEARLY;BYDAY=FR;BYMONTH=12; BYSETPOS=3;INTERVAL=1 |
| Repeats on every 3rd Tuesday of December month and ends after 10 occurrences | FREQ=YEARLY; BYDAY=TU;BYMONTH=12;BYSETPOS=3;INTERVAL=1;COUNT=10 |
| Repeats on every 4th Wednesday of December month and ends on 12/12/2028 | FREQ=YEARLY;BYDAY=WE; BYMONTH=12;BYSETPOS=4;INTERVAL=1;UNTIL=20281212T041343Z |
Recurrence Validation
Built-in validation support is enabled by default for recurring appointments during creation, editing, drag and drop, and resize actions. The following validation alerts may display in the Scheduler when creating or editing recurring events:
| Validation messages | Description |
|---|---|
| The recurrence pattern is not valid. | This alert appears when the selected recurrence rule is invalid. For example, if the Until date is before the start date, an alert notifies that the chosen pattern is invalid. |
| The changes made to specific instances of this series will be cancelled and those events will match the series again. | This alert will raise, when you try to edit the whole series, whose occurrence might have been already edited. For example, If there are five occurrences and one of the occurrence is already edited. Now, when you try to edit the entire series, you will get this validation alert. |
| The duration of the event must be shorter than how frequently it occurs. Shorten the duration, or change the recurrence pattern in the recurrence event editor. | This validation will occur, if the event duration is longer than the selected frequency. For example, if you create a recurring appointment with two days duration in Daily frequency with no intervals set to it, you may get this alert. |
| Some months have fewer than the selected date. For these months, the occurrence will fall on the last date of the month. | When you try to create a recurring appointment on 31st of every month, where few months won’t have 31 days and in this scenario, you will get this alert. |
| Two occurrences of the same event cannot occur on the same day. | This validation will occur, when you try to edit or move any single occurrence to some other date, where another occurrence of the same event is already present. |
Event fields
The Scheduler dataSource contains event objects, each with a set of fields. When binding remote data, map these fields to the corresponding database columns. For local JSON data, ensure the event field names match the Scheduler’s field mapping.
To create an event,
startTimeandendTimeare required. Theidfield is mandatory for processing CRUD operations.
Built-in fields
The built-in fields available on Scheduler event objects are as follows:
| Field name | Description |
|---|---|
| id | The id field is mandatory and must be unique for each event. |
| subject | The subject field is optional; it holds the event summary. |
| startTime | The startTime field defines an event’s start time and is required. |
| endTime | The endTime field defines an event’s end time and is required. |
| startTimezone | Maps the startTimezone field and accepts valid IANA timezone names. This timezone applies to the startTime; if not provided, the Scheduler’s timezone is used. |
| endTimezone | Maps the endTimezone field and accepts valid IANA timezone names. This timezone applies to the endTime; if not provided, the Scheduler’s timezone is used. |
| location | Maps the location field and displays location text on events. |
| description | Maps the description field and contains the event description (optional). |
| isAllDay | Maps the isAllDay field and denotes whether an event occupies a full day. |
| recurrenceID | Maps the recurrenceID field and holds the parent recurring event’s ID for edited occurrences. |
| recurrenceRule | Maps the recurrenceRule field and holds the recurrence rule string for recurring events. |
| recurrenceException | Maps the recurrenceException field and contains exception dates to exclude from a recurrence; specify dates in UTC format. |
| isReadonly | Maps the isReadonly field; set to true to make events read-only. |
| isBlock | Maps the isBlock field; used to block specific time ranges and prevent event creation on those slots. |
Binding different field names
When event instances have default mapping names, manual mapping is unnecessary. However, if the Scheduler’s dataSource contains events with different field names, mapping them to their equivalent field names within the eventSettings property becomes necessary.
var data = [{
    TravelId: 2,
    TravelSummary: 'Paris',
    DepartureTime: new Date(2018, 1, 15, 10, 0),
    ArrivalTime: new Date(2018, 1, 15, 12, 30),
    FullDay: false,
    Source: 'London',
    Comments: 'Summer vacation planned for outstation.',
    Origin: 'Asia/Yekaterinburg',
    Destination: 'Asia/Yekaterinburg'
}, {
    TravelId: 1,
    TravelSummary: "Tokyo",
    DepartureTime: new Date(2018, 1, 16, 10, 0, 0),
    ArrivalTime: new Date(2018, 1, 16, 12, 30, 0),
    FullDay: false,
    Source: "Beijing",
    Comments: "Conference on emerging technologies.",
    Origin: "Asia/Yekaterinburg",
    Destination: "Asia/Yekaterinburg",
    IsDisabled: true
}];

var scheduleObj = new ej.schedule.Schedule({
    height: '550px',
    selectedDate: new Date(2018, 1, 15),
    eventSettings: {
        dataSource: data,
        fields: {
            id: 'TravelId',
            subject: { name: 'TravelSummary' },
            isAllDay: { name: 'FullDay' },
            location: { name: 'Source' },
            description: { name: 'Comments' },
            startTime: { name: 'DepartureTime' },
            endTime: { name: 'ArrivalTime' },
            startTimezone: { name: 'Origin' },
            endTimezone: { name: 'Destination' },
            isBlock: 'IsDisabled'
        }
    }
});
scheduleObj.appendTo('#Schedule');
<!DOCTYPE html>
<html lang="en">
<head>
<title>Schedule Typescript Control</title>
<meta charset="utf-8">
<meta name="viewport" content="width=device-width, initial-scale=1.0">
<meta name="description" content="Typescript Schedule Control">
<meta name="author" content="Syncfusion">
<link href="index.css" rel="stylesheet">
<link href="https://cdn.syncfusion.com/ej2/35.1.37/bootstrap5.3.css" rel="stylesheet" />
<script src="https://cdn.syncfusion.com/ej2/35.1.37/dist/ej2.min.js" type="text/javascript"></script>
</head>
<body>
<div id="container">
<div id="Schedule"></div>
</div>
<script>
var ele = document.getElementById('container');
if (ele) {
ele.style.visibility = "visible";
}
</script>
<script src="index.js" type="text/javascript"></script>
</body>
</html>The mapper field
idis of string type with no additional validation options, whereas all other fields are ofObjecttype with additional options available.
Event field settings
Each Scheduler event field includes additional settings, such as options to set default values, map to appropriate dataSource fields, validate each event field, and provide label values for the event window.
| Options | Description |
|---|---|
| default | Accepts the default value to the applicable fields (Subject, Location and Description), when no values are provided to them from dataSource. |
| name | Accepts the field name to be mapped from the dataSource fields. |
| title | Accepts the label values to be displayed for the fields of event editor. |
| validation | Defines the validation rules to be applied on the event fields within the event editor. |
In the following example, the Subject field in the event editor displays the label Summary. If no subject value is provided when saving an event, the appointment is saved with the default subject value Add Summary.
var data = [{
    TravelId: 2,
    TravelSummary: 'Paris',
    DepartureTime: new Date(2018, 1, 15, 10, 0),
    ArrivalTime: new Date(2018, 1, 15, 12, 30),
    Source: 'London',
    Comments: 'Summer vacation planned for outstation.'
}];

var scheduleObj = new ej.schedule.Schedule({
    height: '550px',
    selectedDate: new Date(2018, 1, 15),
    eventSettings: {
        dataSource: data,
        fields: {
            id: 'TravelId',
            subject: { name: 'TravelSummary', title: 'Summary', default: 'Add Summary' },
            location: { name: 'Source', default: 'USA' },
            description: { name: 'Comments' },
            startTime: { name: 'DepartureTime' },
            endTime: { name: 'ArrivalTime' }
        }
    }
});
scheduleObj.appendTo('#Schedule');
<!DOCTYPE html>
<html lang="en">
<head>
<title>Schedule Typescript Control</title>
<meta charset="utf-8">
<meta name="viewport" content="width=device-width, initial-scale=1.0">
<meta name="description" content="Typescript Schedule Control">
<meta name="author" content="Syncfusion">
<link href="index.css" rel="stylesheet">
<link href="https://cdn.syncfusion.com/ej2/35.1.37/bootstrap5.3.css" rel="stylesheet" />
<script src="https://cdn.syncfusion.com/ej2/35.1.37/dist/ej2.min.js" type="text/javascript"></script>
</head>
<body>
<div id="container">
<div id="Schedule"></div>
</div>
<script>
var ele = document.getElementById('container');
if (ele) {
ele.style.visibility = "visible";
}
</script>
<script src="index.js" type="text/javascript"></script>
</body>
</html>Adding Custom fields
In addition to default Scheduler fields, any number of custom fields can be included for appointments. The following code example demonstrates how to incorporate two custom fields, Status and Priority, within the event collection. Binding custom fields within eventSettings is optional; however, these additional fields can be easily accessed for internal processing and from the application end.
var data = [{
    Id: 2,
    Subject: 'Meeting',
    StartTime: new Date(2018, 1, 15, 10, 0),
    EndTime: new Date(2018, 1, 15, 12, 30),
    IsAllDay: false,
    Status: 'Completed',
    Priority: 'High'
}];

var scheduleObj = new ej.schedule.Schedule({
    height: '550px',
    selectedDate: new Date(2018, 1, 15),
    eventSettings: {
        dataSource: data,
        fields: {
            id: 'Id',
            subject: { name: 'Subject' },
            isAllDay: { name: 'IsAllDay' },
            startTime: { name: 'StartTime' },
            endTime: { name: 'EndTime' }
        }
    }
});
scheduleObj.appendTo('#Schedule');
<!DOCTYPE html>
<html lang="en">
<head>
<title>Schedule Typescript Control</title>
<meta charset="utf-8">
<meta name="viewport" content="width=device-width, initial-scale=1.0">
<meta name="description" content="Typescript Schedule Control">
<meta name="author" content="Syncfusion">
<link href="index.css" rel="stylesheet">
<link href="https://cdn.syncfusion.com/ej2/35.1.37/bootstrap5.3.css" rel="stylesheet" />
<script src="https://cdn.syncfusion.com/ej2/35.1.37/dist/ej2.min.js" type="text/javascript"></script>
</head>
<body>
<div id="container">
<div id="Schedule"></div>
</div>
<script>
var ele = document.getElementById('container');
if (ele) {
ele.style.visibility = "visible";
}
</script>
<script src="index.js" type="text/javascript"></script>
</body>
</html>Customize the order of the overlapping events
By default, the Scheduler renders overlapping events based on their start and end times. The order of overlapping events can be customized using the sortComparer property within the eventSettings property. The following code example demonstrates how to sort appointments based on a custom field:
var data = [{
  Id: 1,
  Subject: 'Rank 1',
  StartTime: new Date(2017, 9, 29, 10, 0),
  EndTime: new Date(2017, 9, 29, 11, 30),
  IsAllDay: false,
  RankId: '1'
}, {
  Id: 2,
  Subject: 'Rank 3',
  StartTime: new Date(2017, 9, 29, 10, 30),
  EndTime: new Date(2017, 9, 29, 12, 30),
  IsAllDay: false,
  RankId: '3'
}, {
  Id: 3,
  Subject: 'Rank 6',
  StartTime: new Date(2017, 9, 29, 7, 0),
  EndTime: new Date(2017, 9, 29, 14, 30),
  IsAllDay: false,
  RankId: '6'
}, {
  Id: 4,
  Subject: 'Rank 9',
  StartTime: new Date(2017, 9, 29, 11, 0),
  EndTime: new Date(2017, 9, 29, 15, 30),
  IsAllDay: false,
  RankId: '9'
}];

var comparerFun = function (args) {
  return args.sort(function (event1, event2) {
    return event1.RankId.localeCompare(event2.RankId, undefined, { numeric: true });
  });
};

var scheduleObj = new ej.schedule.Schedule({
  height: '550px',
  selectedDate: new Date(2017, 9, 29),
  views: ['Day', 'Week', 'TimelineWeek', 'Month', 'Agenda'],
  eventSettings: { dataSource: data, sortComparer: comparerFun }
});
scheduleObj.appendTo('#Schedule');
<!DOCTYPE html>
<html lang="en">
<head>
<title>Schedule Typescript Control</title>
<meta charset="utf-8">
<meta name="viewport" content="width=device-width, initial-scale=1.0">
<meta name="description" content="Typescript Schedule Control">
<meta name="author" content="Syncfusion">
<link href="index.css" rel="stylesheet">
<link href="https://cdn.syncfusion.com/ej2/35.1.37/bootstrap5.3.css" rel="stylesheet" />
<script src="https://cdn.syncfusion.com/ej2/35.1.37/dist/ej2.min.js" type="text/javascript"></script>
</head>
<body>
<div id="container">
<div id="Schedule"></div>
</div>
<script>
var ele = document.getElementById('container');
if (ele) {
ele.style.visibility = "visible";
}
</script>
<script src="index.js" type="text/javascript"></script>
</body>
</html>Preventing Overlapping Events
By default, the Scheduler displays overlapping events according to their start and end times. To prevent overlapping, set the allowOverlap property to false.
When this property is set to false, any new or updated events overlapping with existing ones will trigger an overlap alert. Overlapping events are collected in the overlapEvents property within the PopupOpenEventArgs.
When allowOverlap is set to false, the Scheduler behaves as follows:
Initial Load Behavior: Upon initial loading, the Scheduler prioritizes non-overlapping events based on duration and all-day status. Events with longer durations and all-day designations receive higher priority to ensure no overlaps.
Recurring Appointments: If conflicts exist within a recurring appointment series during initial load, the Scheduler displays all occurrences except the conflicting instance.
Event Modifications: When users edit, save, or remove appointments, the Scheduler checks for potential overlaps. If a conflict is detected, the action is blocked, and a conflict alert is displayed to the user.
Dynamic Recurrence Series Creation or Editing: When users create or edit a recurrence series dynamically, the Scheduler prevents any occurrences from being added if a conflict is found within the series.
The following code example demonstrates how to enable the allowOverlap property:
var eventsData = [
    {
        Id: 1,
        Subject: "Annual Conference",
        StartTime: new Date(2025, 2, 2, 10, 0, 0),
        EndTime: new Date(2025, 2, 2, 11, 0, 0)
    },
    {
        Id: 2,
        Subject: "Tech Symposium",
        StartTime: new Date(2025, 2, 2, 10, 30, 0),
        EndTime: new Date(2025, 2, 2, 11, 30, 0)
    },
    {
        Id: 3,
        Subject: "Client Meeting",
        StartTime: new Date(2025, 2, 3, 12, 0, 0),
        EndTime: new Date(2025, 2, 3, 14, 0, 0),
        RecurrenceRule: "FREQ=DAILY;INTERVAL=1;COUNT=5"
    },
    {
        Id: 4,
        Subject: "Project Review",
        StartTime: new Date(2025, 2, 4, 11, 0, 0),
        EndTime: new Date(2025, 2, 4, 14, 0, 0)
    },
    {
        Id: 5,
        Subject: "Strategy Session",
        StartTime: new Date(2025, 2, 6, 9, 30, 0),
        EndTime: new Date(2025, 2, 6, 10, 0, 0)
    },
    {
        Id: 6,
        Subject: "Board Meeting",
        StartTime: new Date(2025, 2, 6, 9, 30, 0),
        EndTime: new Date(2025, 2, 6, 11, 0, 0)
    }
];
var scheduleObj = new ej.schedule.Schedule({
    height: '550px',
    selectedDate: new Date(2025, 2, 6),
    views: ['Day', 'Week', 'TimelineWeek', 'Month', 'Agenda'],
    allowOverlap: false,
    eventSettings: { dataSource: eventsData }
});
scheduleObj.appendTo('#Schedule');
<!DOCTYPE html>
<html lang="en">
<head>
<title>Schedule Typescript Control</title>
<meta charset="utf-8">
<meta name="viewport" content="width=device-width, initial-scale=1.0">
<meta name="description" content="Typescript Schedule Control">
<meta name="author" content="Syncfusion">
<link href="index.css" rel="stylesheet">
<link href="https://cdn.syncfusion.com/ej2/35.1.37/bootstrap5.3.css" rel="stylesheet" />
<script src="https://cdn.syncfusion.com/ej2/35.1.37/dist/ej2.min.js" type="text/javascript"></script>
</head>
<body>
<div id="container">
<div id="Schedule"></div>
</div>
<script>
var ele = document.getElementById('container');
if (ele) {
ele.style.visibility = "visible";
}
</script>
<script src="index.js" type="text/javascript"></script>
</body>
</html>Limitations
The allowOverlap property checks for event overlaps only within the currently visible date range. Events scheduled outside the rendered date range are not included in the overlap check by default.
To check for overlaps with events outside the visible date range, leverage the promise field within the actionBegin event to validate all events before proceeding. By implementing a custom validation method inside the actionBegin event, the result (a boolean) can be assigned to the promise field. If the result is true, the action (e.g., adding or saving the event) proceeds; if false, the action is blocked.
Additionally, the public method openOverlapAlert can be used to display an alert popup whenever an overlap occurs and the result is false.
The following code example demonstrates how to check for overlaps when adding an event. If an overlap is found, the event is not added, and an alert is displayed:
var eventsData = [
    { Id: 1, Subject: 'Board Meeting', StartTime: new Date(2025, 1, 26, 9, 30), EndTime: new Date(2025, 1, 26, 11, 0) },
    { Id: 2, Subject: 'Annual Conference', StartTime: new Date(2025, 2, 2, 10, 0), EndTime: new Date(2025, 2, 2, 11, 0) },
    { Id: 3, Subject: 'Tech Symposium', StartTime: new Date(2025, 2, 2, 10, 30), EndTime: new Date(2025, 2, 2, 11, 30) },
    { Id: 4, Subject: 'Project Workshop', StartTime: new Date(2025, 2, 10, 9, 0), EndTime: new Date(2025, 2, 10, 11, 0) },
    { Id: 5, Subject: 'Client Presentation', StartTime: new Date(2025, 2, 5, 9, 0), EndTime: new Date(2025, 2, 5, 10, 30) },
    { Id: 6, Subject: 'Business Meetup', StartTime: new Date(2025, 2, 15, 11, 0), EndTime: new Date(2025, 2, 15, 13, 0) },
    { Id: 7, Subject: 'Project Review', StartTime: new Date(2025, 2, 13, 10, 0), EndTime: new Date(2025, 2, 13, 13, 0) }
];

var scheduleObj = new ej.schedule.Schedule({
    height: '550px',
    selectedDate: new Date(2025, 2, 6),
    views: ['Day', 'Week', 'TimelineWeek', 'Month', 'Agenda'],
    allowOverlap: false,
    eventSettings: { dataSource: eventsData },
    actionBegin: function(args) {
        if ((args.requestType === 'eventCreate') || (args.requestType === 'eventChange')) {
            var result = checkOverlap(args);
            args.promise = result;
        }
    }
});
scheduleObj.appendTo('#Schedule');

function checkOverlap(args) {
    return new Promise(function(resolve) {
        var eventsToCheck = Array.isArray(args.data) ? args.data : [args.data];
        var overlappingEvents = eventsData.filter(function(event) {
            return eventsToCheck.some(function(newEvent) {
                return new Date(event.StartTime) < newEvent.EndTime &&
                    new Date(event.EndTime) > newEvent.StartTime &&
                    event.Id !== newEvent.Id;
            });
        });

        var result = overlappingEvents.length === 0;

        if (!result) {
            var popupArgs = {
                type: 'OverlapAlert',
                data: eventsToCheck,
                overlapEvents: overlappingEvents,
                element: null,
                cancel: false
            };
            scheduleObj.openOverlapAlert(popupArgs);
        }

        resolve(result);
    });
}

var overlapEvent= {
    Id: 8,
    Subject: 'OverlapEvent',
    StartTime: new Date(2025, 2, 13, 10, 0),
    EndTime: new Date(2025, 2, 13, 11, 0)
};

var nonOverlapEvent = {
    Id: 9,
    Subject: 'Non-OverlapEvent',
    StartTime: new Date(2025, 2, 12, 10, 0),
    EndTime: new Date(2025, 2, 12, 11, 0)
};

var overlapButton = document.getElementById('AddOverlapEvent');
if (overlapButton) {
    overlapButton.addEventListener('click', function () {
        scheduleObj.addEvent(overlapEvent);
    });
}

var nonOverlapButton = document.getElementById('AddNonOverlapEvent');
if (nonOverlapButton) {
    nonOverlapButton.addEventListener('click', function () {
        scheduleObj.addEvent(nonOverlapEvent);
    });
}
<!DOCTYPE html>
<html lang="en">
<head>
<title>Schedule Typescript Control</title>
<meta charset="utf-8">
<meta name="viewport" content="width=device-width, initial-scale=1.0">
<meta name="description" content="Typescript Schedule Control">
<meta name="author" content="Syncfusion">
<link href="index.css" rel="stylesheet">
<link href="https://cdn.syncfusion.com/ej2/35.1.37/bootstrap5.3.css" rel="stylesheet" />
<script src="https://cdn.syncfusion.com/ej2/35.1.37/dist/ej2.min.js" type="text/javascript"></script>
</head>
<body>
<div id="container">
<div id="Schedule"></div>
<button id="AddOverlapEvent">Add OverlapEvent</button>
<button id="AddNonOverlapEvent">Add Non-OverlapEvent</button>
</div>
<script>
var ele = document.getElementById('container');
if (ele) {
ele.style.visibility = "visible";
}
</script>
<script src="index.js" type="text/javascript"></script>
</body>
</html>Drag and drop appointments
Appointments can be rescheduled to any time by dragging and dropping them to the desired location. To use drag-and-drop functionality, inject the DragAndDrop module and ensure allowDragAndDrop is set to true (the default value). In mobile mode, tap and hold an event, then drop it at the desired location.
By default, drag-and-drop is available in all Scheduler views except
Agenda,Month-Agenda, andYearviews.
var scheduleObj = new ej.schedule.Schedule({
    height: '550px',
    selectedDate: new Date(2018, 1, 15),
    eventSettings: { dataSource: scheduleData }
});
scheduleObj.appendTo('#Schedule');
<!DOCTYPE html>
<html lang="en">
<head>
<title>Schedule Typescript Control</title>
<meta charset="utf-8">
<meta name="viewport" content="width=device-width, initial-scale=1.0">
<meta name="description" content="Typescript Schedule Control">
<meta name="author" content="Syncfusion">
<link href="index.css" rel="stylesheet">
<link href="https://cdn.syncfusion.com/ej2/35.1.37/bootstrap5.3.css" rel="stylesheet" />
<script src="https://cdn.syncfusion.com/ej2/35.1.37/dist/ej2.min.js" type="text/javascript"></script>
<script src="es5-datasource.js" type="text/javascript"></script>
</head>
<body>
<div id="container">
<div id="Schedule"></div>
</div>
<script>
var ele = document.getElementById('container');
if (ele) {
ele.style.visibility = "visible";
}
</script>
<script src="index.js" type="text/javascript"></script>
</body>
</html>export var scheduleData = [
{
Id: 1,
Subject: 'Explosion of Betelgeuse Star',
StartTime: new Date(2018, 1, 11, 9, 30),
EndTime: new Date(2018, 1, 11, 11, 0),
CategoryColor: '#1aaa55'
}, {
Id: 2,
Subject: 'Thule Air Crash Report',
StartTime: new Date(2018, 1, 12, 12, 0),
EndTime: new Date(2018, 1, 12, 14, 0),
CategoryColor: '#357cd2'
}, {
Id: 3,
Subject: 'Blue Moon Eclipse',
StartTime: new Date(2018, 1, 13, 9, 30),
EndTime: new Date(2018, 1, 13, 11, 0),
CategoryColor: '#7fa900'
}, {
Id: 4,
Subject: 'Meteor Showers in 2018',
StartTime: new Date(2018, 1, 14, 13, 0),
EndTime: new Date(2018, 1, 14, 14, 30),
CategoryColor: '#ea7a57'
}, {
Id: 5,
Subject: 'Milky Way as Melting pot',
StartTime: new Date(2018, 1, 15, 12, 0),
EndTime: new Date(2018, 1, 15, 14, 0),
CategoryColor: '#00bdae'
}, {
Id: 6,
Subject: 'Mysteries of Bermuda Triangle',
StartTime: new Date(2018, 1, 15, 9, 30),
EndTime: new Date(2018, 1, 15, 11, 0),
CategoryColor: '#f57f17'
}, {
Id: 7,
Subject: 'Glaciers and Snowflakes',
StartTime: new Date(2018, 1, 16, 11, 0),
EndTime: new Date(2018, 1, 16, 12, 30),
CategoryColor: '#1aaa55'
}, {
Id: 8,
Subject: 'Life on Mars',
StartTime: new Date(2018, 1, 17, 9, 0),
EndTime: new Date(2018, 1, 17, 10, 0),
CategoryColor: '#357cd2'
}, {
Id: 9,
Subject: 'Alien Civilization',
StartTime: new Date(2018, 1, 19, 11, 0),
EndTime: new Date(2018, 1, 19, 13, 0),
CategoryColor: '#7fa900'
}, {
Id: 10,
Subject: 'Wildlife Galleries',
StartTime: new Date(2018, 1, 21, 11, 0),
EndTime: new Date(2018, 1, 21, 13, 0),
CategoryColor: '#ea7a57'
}, {
Id: 11,
Subject: 'Best Photography 2018',
StartTime: new Date(2018, 1, 22, 9, 30),
EndTime: new Date(2018, 1, 22, 11, 0),
CategoryColor: '#00bdae'
}, {
Id: 12,
Subject: 'Smarter Puppies',
StartTime: new Date(2018, 1, 9, 10, 0),
EndTime: new Date(2018, 1, 9, 11, 30),
CategoryColor: '#f57f17'
}, {
Id: 13,
Subject: 'Myths of Andromeda Galaxy',
StartTime: new Date(2018, 1, 7, 10, 30),
EndTime: new Date(2018, 1, 7, 12, 30),
CategoryColor: '#1aaa55'
}, {
Id: 14,
Subject: 'Aliens vs Humans',
StartTime: new Date(2018, 1, 5, 10, 0),
EndTime: new Date(2018, 1, 5, 11, 30),
CategoryColor: '#357cd2'
}, {
Id: 15,
Subject: 'Facts of Humming Birds',
StartTime: new Date(2018, 1, 20, 9, 30),
EndTime: new Date(2018, 1, 20, 11, 0),
CategoryColor: '#7fa900'
}, {
Id: 16,
Subject: 'Sky Gazers',
StartTime: new Date(2018, 1, 23, 11, 0),
EndTime: new Date(2018, 1, 23, 13, 0),
CategoryColor: '#ea7a57'
}, {
Id: 17,
Subject: 'The Cycle of Seasons',
StartTime: new Date(2018, 1, 12, 5, 30),
EndTime: new Date(2018, 1, 12, 7, 30),
CategoryColor: '#00bdae'
}, {
Id: 18,
Subject: 'Space Galaxies and Planets',
StartTime: new Date(2018, 1, 12, 17, 0),
EndTime: new Date(2018, 1, 12, 18, 30),
CategoryColor: '#f57f17'
}, {
Id: 19,
Subject: 'Lifecycle of Bumblebee',
StartTime: new Date(2018, 1, 15, 6, 0),
EndTime: new Date(2018, 1, 15, 7, 30),
CategoryColor: '#7fa900'
}, {
Id: 20,
Subject: 'Sky Gazers',
StartTime: new Date(2018, 1, 15, 16, 0),
EndTime: new Date(2018, 1, 15, 18, 0),
CategoryColor: '#ea7a57'
}
];Drag and drop multiple appointments
Multiple appointments can be dragged and dropped by enabling the allowMultiDrag property. Select multiple appointments by holding the CTRL key, then release it and begin dragging the events.
Multiple events can also be dragged from one resource to another. If all selected events belong to different resources, they will all be moved to the single resource associated with the target event.
Note: Dragging and dropping multiple events is not supported on mobile devices.
var scheduleObj = new ej.schedule.Schedule({
    height: '550px',
    allowMultiDrag: false,
    selectedDate: new Date(2018, 1, 15),
    eventSettings: { dataSource: scheduleData }
});
scheduleObj.appendTo('#Schedule');
<!DOCTYPE html>
<html lang="en">
<head>
<title>Schedule Typescript Control</title>
<meta charset="utf-8">
<meta name="viewport" content="width=device-width, initial-scale=1.0">
<meta name="description" content="Typescript Schedule Control">
<meta name="author" content="Syncfusion">
<link href="index.css" rel="stylesheet">
<link href="https://cdn.syncfusion.com/ej2/35.1.37/bootstrap5.3.css" rel="stylesheet" />
<script src="https://cdn.syncfusion.com/ej2/35.1.37/dist/ej2.min.js" type="text/javascript"></script>
<script src="es5-datasource.js" type="text/javascript"></script>
</head>
<body>
<div id="container">
<div id="Schedule"></div>
</div>
<script>
var ele = document.getElementById('container');
if (ele) {
ele.style.visibility = "visible";
}
</script>
<script src="index.js" type="text/javascript"></script>
</body>
</html>var scheduleData = [
{
Id: 1,
Subject: 'Explosion of Betelgeuse Star',
StartTime: new Date(2018, 1, 11, 9, 30),
EndTime: new Date(2018, 1, 11, 11, 0),
CategoryColor: '#1aaa55'
}, {
Id: 2,
Subject: 'Thule Air Crash Report',
StartTime: new Date(2018, 1, 12, 12, 0),
EndTime: new Date(2018, 1, 12, 14, 0),
CategoryColor: '#357cd2'
}, {
Id: 3,
Subject: 'Blue Moon Eclipse',
StartTime: new Date(2018, 1, 13, 9, 30),
EndTime: new Date(2018, 1, 13, 11, 0),
CategoryColor: '#7fa900'
}, {
Id: 4,
Subject: 'Meteor Showers in 2018',
StartTime: new Date(2018, 1, 14, 13, 0),
EndTime: new Date(2018, 1, 14, 14, 30),
CategoryColor: '#ea7a57'
}, {
Id: 5,
Subject: 'Milky Way as Melting pot',
StartTime: new Date(2018, 1, 15, 12, 0),
EndTime: new Date(2018, 1, 15, 14, 0),
CategoryColor: '#00bdae'
}, {
Id: 6,
Subject: 'Mysteries of Bermuda Triangle',
StartTime: new Date(2018, 1, 15, 9, 30),
EndTime: new Date(2018, 1, 15, 11, 0),
CategoryColor: '#f57f17'
}, {
Id: 7,
Subject: 'Glaciers and Snowflakes',
StartTime: new Date(2018, 1, 16, 11, 0),
EndTime: new Date(2018, 1, 16, 12, 30),
CategoryColor: '#1aaa55'
}, {
Id: 8,
Subject: 'Life on Mars',
StartTime: new Date(2018, 1, 17, 9, 0),
EndTime: new Date(2018, 1, 17, 10, 0),
CategoryColor: '#357cd2'
}, {
Id: 9,
Subject: 'Alien Civilization',
StartTime: new Date(2018, 1, 19, 11, 0),
EndTime: new Date(2018, 1, 19, 13, 0),
CategoryColor: '#7fa900'
}, {
Id: 10,
Subject: 'Wildlife Galleries',
StartTime: new Date(2018, 1, 21, 11, 0),
EndTime: new Date(2018, 1, 21, 13, 0),
CategoryColor: '#ea7a57'
}, {
Id: 11,
Subject: 'Best Photography 2018',
StartTime: new Date(2018, 1, 22, 9, 30),
EndTime: new Date(2018, 1, 22, 11, 0),
CategoryColor: '#00bdae'
}, {
Id: 12,
Subject: 'Smarter Puppies',
StartTime: new Date(2018, 1, 9, 10, 0),
EndTime: new Date(2018, 1, 9, 11, 30),
CategoryColor: '#f57f17'
}, {
Id: 13,
Subject: 'Myths of Andromeda Galaxy',
StartTime: new Date(2018, 1, 7, 10, 30),
EndTime: new Date(2018, 1, 7, 12, 30),
CategoryColor: '#1aaa55'
}, {
Id: 14,
Subject: 'Aliens vs Humans',
StartTime: new Date(2018, 1, 5, 10, 0),
EndTime: new Date(2018, 1, 5, 11, 30),
CategoryColor: '#357cd2'
}, {
Id: 15,
Subject: 'Facts of Humming Birds',
StartTime: new Date(2018, 1, 20, 9, 30),
EndTime: new Date(2018, 1, 20, 11, 0),
CategoryColor: '#7fa900'
}, {
Id: 16,
Subject: 'Sky Gazers',
StartTime: new Date(2018, 1, 23, 11, 0),
EndTime: new Date(2018, 1, 23, 13, 0),
CategoryColor: '#ea7a57'
}, {
Id: 17,
Subject: 'The Cycle of Seasons',
StartTime: new Date(2018, 1, 12, 5, 30),
EndTime: new Date(2018, 1, 12, 7, 30),
CategoryColor: '#00bdae'
}, {
Id: 18,
Subject: 'Space Galaxies and Planets',
StartTime: new Date(2018, 1, 12, 17, 0),
EndTime: new Date(2018, 1, 12, 18, 30),
CategoryColor: '#f57f17'
}, {
Id: 19,
Subject: 'Lifecycle of Bumblebee',
StartTime: new Date(2018, 1, 15, 6, 0),
EndTime: new Date(2018, 1, 15, 7, 30),
CategoryColor: '#7fa900'
}, {
Id: 20,
Subject: 'Sky Gazers',
StartTime: new Date(2018, 1, 15, 16, 0),
EndTime: new Date(2018, 1, 15, 18, 0),
CategoryColor: '#ea7a57'
}
];Disable the drag action
By default, events can be dragged and dropped within any applicable Scheduler view. To disable this functionality, set the allowDragAndDrop property to false.
var scheduleObj = new ej.schedule.Schedule({
    height: '550px',
    allowDragAndDrop: false,
    selectedDate: new Date(2018, 1, 15),
    eventSettings: { dataSource: scheduleData }
});
scheduleObj.appendTo('#Schedule');
<!DOCTYPE html>
<html lang="en">
<head>
<title>Schedule Typescript Control</title>
<meta charset="utf-8">
<meta name="viewport" content="width=device-width, initial-scale=1.0">
<meta name="description" content="Typescript Schedule Control">
<meta name="author" content="Syncfusion">
<link href="index.css" rel="stylesheet">
<link href="https://cdn.syncfusion.com/ej2/35.1.37/bootstrap5.3.css" rel="stylesheet" />
<script src="https://cdn.syncfusion.com/ej2/35.1.37/dist/ej2.min.js" type="text/javascript"></script>
<script src="es5-datasource.js" type="text/javascript"></script>
</head>
<body>
<div id="container">
<div id="Schedule"></div>
</div>
<script>
var ele = document.getElementById('container');
if (ele) {
ele.style.visibility = "visible";
}
</script>
<script src="index.js" type="text/javascript"></script>
</body>
</html>var scheduleData = [
{
Id: 1,
Subject: 'Explosion of Betelgeuse Star',
StartTime: new Date(2018, 1, 11, 9, 30),
EndTime: new Date(2018, 1, 11, 11, 0),
CategoryColor: '#1aaa55'
}, {
Id: 2,
Subject: 'Thule Air Crash Report',
StartTime: new Date(2018, 1, 12, 12, 0),
EndTime: new Date(2018, 1, 12, 14, 0),
CategoryColor: '#357cd2'
}, {
Id: 3,
Subject: 'Blue Moon Eclipse',
StartTime: new Date(2018, 1, 13, 9, 30),
EndTime: new Date(2018, 1, 13, 11, 0),
CategoryColor: '#7fa900'
}, {
Id: 4,
Subject: 'Meteor Showers in 2018',
StartTime: new Date(2018, 1, 14, 13, 0),
EndTime: new Date(2018, 1, 14, 14, 30),
CategoryColor: '#ea7a57'
}, {
Id: 5,
Subject: 'Milky Way as Melting pot',
StartTime: new Date(2018, 1, 15, 12, 0),
EndTime: new Date(2018, 1, 15, 14, 0),
CategoryColor: '#00bdae'
}, {
Id: 6,
Subject: 'Mysteries of Bermuda Triangle',
StartTime: new Date(2018, 1, 15, 9, 30),
EndTime: new Date(2018, 1, 15, 11, 0),
CategoryColor: '#f57f17'
}, {
Id: 7,
Subject: 'Glaciers and Snowflakes',
StartTime: new Date(2018, 1, 16, 11, 0),
EndTime: new Date(2018, 1, 16, 12, 30),
CategoryColor: '#1aaa55'
}, {
Id: 8,
Subject: 'Life on Mars',
StartTime: new Date(2018, 1, 17, 9, 0),
EndTime: new Date(2018, 1, 17, 10, 0),
CategoryColor: '#357cd2'
}, {
Id: 9,
Subject: 'Alien Civilization',
StartTime: new Date(2018, 1, 19, 11, 0),
EndTime: new Date(2018, 1, 19, 13, 0),
CategoryColor: '#7fa900'
}, {
Id: 10,
Subject: 'Wildlife Galleries',
StartTime: new Date(2018, 1, 21, 11, 0),
EndTime: new Date(2018, 1, 21, 13, 0),
CategoryColor: '#ea7a57'
}, {
Id: 11,
Subject: 'Best Photography 2018',
StartTime: new Date(2018, 1, 22, 9, 30),
EndTime: new Date(2018, 1, 22, 11, 0),
CategoryColor: '#00bdae'
}, {
Id: 12,
Subject: 'Smarter Puppies',
StartTime: new Date(2018, 1, 9, 10, 0),
EndTime: new Date(2018, 1, 9, 11, 30),
CategoryColor: '#f57f17'
}, {
Id: 13,
Subject: 'Myths of Andromeda Galaxy',
StartTime: new Date(2018, 1, 7, 10, 30),
EndTime: new Date(2018, 1, 7, 12, 30),
CategoryColor: '#1aaa55'
}, {
Id: 14,
Subject: 'Aliens vs Humans',
StartTime: new Date(2018, 1, 5, 10, 0),
EndTime: new Date(2018, 1, 5, 11, 30),
CategoryColor: '#357cd2'
}, {
Id: 15,
Subject: 'Facts of Humming Birds',
StartTime: new Date(2018, 1, 20, 9, 30),
EndTime: new Date(2018, 1, 20, 11, 0),
CategoryColor: '#7fa900'
}, {
Id: 16,
Subject: 'Sky Gazers',
StartTime: new Date(2018, 1, 23, 11, 0),
EndTime: new Date(2018, 1, 23, 13, 0),
CategoryColor: '#ea7a57'
}, {
Id: 17,
Subject: 'The Cycle of Seasons',
StartTime: new Date(2018, 1, 12, 5, 30),
EndTime: new Date(2018, 1, 12, 7, 30),
CategoryColor: '#00bdae'
}, {
Id: 18,
Subject: 'Space Galaxies and Planets',
StartTime: new Date(2018, 1, 12, 17, 0),
EndTime: new Date(2018, 1, 12, 18, 30),
CategoryColor: '#f57f17'
}, {
Id: 19,
Subject: 'Lifecycle of Bumblebee',
StartTime: new Date(2018, 1, 15, 6, 0),
EndTime: new Date(2018, 1, 15, 7, 30),
CategoryColor: '#7fa900'
}, {
Id: 20,
Subject: 'Sky Gazers',
StartTime: new Date(2018, 1, 15, 16, 0),
EndTime: new Date(2018, 1, 15, 18, 0),
CategoryColor: '#ea7a57'
}
];Preventing drag and drop on specific targets
Drag actions on specific targets can be prevented by specifying the target to exclude in the excludeSelectors option within the dragStart event. In the following example, drag actions are prevented on the all-day row:
var scheduleObj = new ej.schedule.Schedule({
    height: '550px',
    selectedDate: new Date(2018, 1, 15),
    eventSettings: { dataSource: scheduleData },
    dragStart: function (args) {
        args.excludeSelectors = 'e-header-cells,e-header-day,e-header-date,e-all-day-cells';
    }
});
scheduleObj.appendTo('#Schedule');
<!DOCTYPE html>
<html lang="en">
<head>
<title>Schedule Typescript Control</title>
<meta charset="utf-8">
<meta name="viewport" content="width=device-width, initial-scale=1.0">
<meta name="description" content="Typescript Schedule Control">
<meta name="author" content="Syncfusion">
<link href="index.css" rel="stylesheet">
<link href="https://cdn.syncfusion.com/ej2/35.1.37/bootstrap5.3.css" rel="stylesheet" />
<script src="https://cdn.syncfusion.com/ej2/35.1.37/dist/ej2.min.js" type="text/javascript"></script>
<script src="es5-datasource.js" type="text/javascript"></script>
</head>
<body>
<div id="container">
<div id="Schedule"></div>
</div>
<script>
var ele = document.getElementById('container');
if (ele) {
ele.style.visibility = "visible";
}
</script>
<script src="index.js" type="text/javascript"></script>
</body>
</html>var scheduleData = [
{
Id: 1,
Subject: 'Explosion of Betelgeuse Star',
StartTime: new Date(2018, 1, 11, 9, 30),
EndTime: new Date(2018, 1, 11, 11, 0),
CategoryColor: '#1aaa55'
}, {
Id: 2,
Subject: 'Thule Air Crash Report',
StartTime: new Date(2018, 1, 12, 12, 0),
EndTime: new Date(2018, 1, 12, 14, 0),
CategoryColor: '#357cd2'
}, {
Id: 3,
Subject: 'Blue Moon Eclipse',
StartTime: new Date(2018, 1, 13, 9, 30),
EndTime: new Date(2018, 1, 13, 11, 0),
CategoryColor: '#7fa900'
}, {
Id: 4,
Subject: 'Meteor Showers in 2018',
StartTime: new Date(2018, 1, 14, 13, 0),
EndTime: new Date(2018, 1, 14, 14, 30),
CategoryColor: '#ea7a57'
}, {
Id: 5,
Subject: 'Milky Way as Melting pot',
StartTime: new Date(2018, 1, 15, 12, 0),
EndTime: new Date(2018, 1, 15, 14, 0),
CategoryColor: '#00bdae'
}, {
Id: 6,
Subject: 'Mysteries of Bermuda Triangle',
StartTime: new Date(2018, 1, 15, 9, 30),
EndTime: new Date(2018, 1, 15, 11, 0),
CategoryColor: '#f57f17'
}, {
Id: 7,
Subject: 'Glaciers and Snowflakes',
StartTime: new Date(2018, 1, 16, 11, 0),
EndTime: new Date(2018, 1, 16, 12, 30),
CategoryColor: '#1aaa55'
}, {
Id: 8,
Subject: 'Life on Mars',
StartTime: new Date(2018, 1, 17, 9, 0),
EndTime: new Date(2018, 1, 17, 10, 0),
CategoryColor: '#357cd2'
}, {
Id: 9,
Subject: 'Alien Civilization',
StartTime: new Date(2018, 1, 19, 11, 0),
EndTime: new Date(2018, 1, 19, 13, 0),
CategoryColor: '#7fa900'
}, {
Id: 10,
Subject: 'Wildlife Galleries',
StartTime: new Date(2018, 1, 21, 11, 0),
EndTime: new Date(2018, 1, 21, 13, 0),
CategoryColor: '#ea7a57'
}, {
Id: 11,
Subject: 'Best Photography 2018',
StartTime: new Date(2018, 1, 22, 9, 30),
EndTime: new Date(2018, 1, 22, 11, 0),
CategoryColor: '#00bdae'
}, {
Id: 12,
Subject: 'Smarter Puppies',
StartTime: new Date(2018, 1, 9, 10, 0),
EndTime: new Date(2018, 1, 9, 11, 30),
CategoryColor: '#f57f17'
}, {
Id: 13,
Subject: 'Myths of Andromeda Galaxy',
StartTime: new Date(2018, 1, 7, 10, 30),
EndTime: new Date(2018, 1, 7, 12, 30),
CategoryColor: '#1aaa55'
}, {
Id: 14,
Subject: 'Aliens vs Humans',
StartTime: new Date(2018, 1, 5, 10, 0),
EndTime: new Date(2018, 1, 5, 11, 30),
CategoryColor: '#357cd2'
}, {
Id: 15,
Subject: 'Facts of Humming Birds',
StartTime: new Date(2018, 1, 20, 9, 30),
EndTime: new Date(2018, 1, 20, 11, 0),
CategoryColor: '#7fa900'
}, {
Id: 16,
Subject: 'Sky Gazers',
StartTime: new Date(2018, 1, 23, 11, 0),
EndTime: new Date(2018, 1, 23, 13, 0),
CategoryColor: '#ea7a57'
}, {
Id: 17,
Subject: 'The Cycle of Seasons',
StartTime: new Date(2018, 1, 12, 5, 30),
EndTime: new Date(2018, 1, 12, 7, 30),
CategoryColor: '#00bdae'
}, {
Id: 18,
Subject: 'Space Galaxies and Planets',
StartTime: new Date(2018, 1, 12, 17, 0),
EndTime: new Date(2018, 1, 12, 18, 30),
CategoryColor: '#f57f17'
}, {
Id: 19,
Subject: 'Lifecycle of Bumblebee',
StartTime: new Date(2018, 1, 15, 6, 0),
EndTime: new Date(2018, 1, 15, 7, 30),
CategoryColor: '#7fa900'
}, {
Id: 20,
Subject: 'Sky Gazers',
StartTime: new Date(2018, 1, 15, 16, 0),
EndTime: new Date(2018, 1, 15, 18, 0),
CategoryColor: '#ea7a57'
}
];Disable scrolling on drag action
By default, when dragging an appointment to the edges (top or bottom in vertical Scheduler, or left or right in timeline Scheduler), automatic scrolling occurs. To prevent this scrolling action, set the scroll value to false within the dragStart event arguments.
var scheduleObj = new ej.schedule.Schedule({
    height: '550px',
    selectedDate: new Date(2018, 1, 15),
    eventSettings: { dataSource: scheduleData },
    dragStart: function (args) {
        args.scroll = { enable: false };
    }
});
scheduleObj.appendTo('#Schedule');
<!DOCTYPE html>
<html lang="en">
<head>
<title>Schedule Typescript Control</title>
<meta charset="utf-8">
<meta name="viewport" content="width=device-width, initial-scale=1.0">
<meta name="description" content="Typescript Schedule Control">
<meta name="author" content="Syncfusion">
<link href="index.css" rel="stylesheet">
<link href="https://cdn.syncfusion.com/ej2/35.1.37/bootstrap5.3.css" rel="stylesheet" />
<script src="https://cdn.syncfusion.com/ej2/35.1.37/dist/ej2.min.js" type="text/javascript"></script>
<script src="es5-datasource.js" type="text/javascript"></script>
</head>
<body>
<div id="container">
<div id="Schedule"></div>
</div>
<script>
var ele = document.getElementById('container');
if (ele) {
ele.style.visibility = "visible";
}
</script>
<script src="index.js" type="text/javascript"></script>
</body>
</html>var scheduleData = [
{
Id: 1,
Subject: 'Explosion of Betelgeuse Star',
StartTime: new Date(2018, 1, 11, 9, 30),
EndTime: new Date(2018, 1, 11, 11, 0),
CategoryColor: '#1aaa55'
}, {
Id: 2,
Subject: 'Thule Air Crash Report',
StartTime: new Date(2018, 1, 12, 12, 0),
EndTime: new Date(2018, 1, 12, 14, 0),
CategoryColor: '#357cd2'
}, {
Id: 3,
Subject: 'Blue Moon Eclipse',
StartTime: new Date(2018, 1, 13, 9, 30),
EndTime: new Date(2018, 1, 13, 11, 0),
CategoryColor: '#7fa900'
}, {
Id: 4,
Subject: 'Meteor Showers in 2018',
StartTime: new Date(2018, 1, 14, 13, 0),
EndTime: new Date(2018, 1, 14, 14, 30),
CategoryColor: '#ea7a57'
}, {
Id: 5,
Subject: 'Milky Way as Melting pot',
StartTime: new Date(2018, 1, 15, 12, 0),
EndTime: new Date(2018, 1, 15, 14, 0),
CategoryColor: '#00bdae'
}, {
Id: 6,
Subject: 'Mysteries of Bermuda Triangle',
StartTime: new Date(2018, 1, 15, 9, 30),
EndTime: new Date(2018, 1, 15, 11, 0),
CategoryColor: '#f57f17'
}, {
Id: 7,
Subject: 'Glaciers and Snowflakes',
StartTime: new Date(2018, 1, 16, 11, 0),
EndTime: new Date(2018, 1, 16, 12, 30),
CategoryColor: '#1aaa55'
}, {
Id: 8,
Subject: 'Life on Mars',
StartTime: new Date(2018, 1, 17, 9, 0),
EndTime: new Date(2018, 1, 17, 10, 0),
CategoryColor: '#357cd2'
}, {
Id: 9,
Subject: 'Alien Civilization',
StartTime: new Date(2018, 1, 19, 11, 0),
EndTime: new Date(2018, 1, 19, 13, 0),
CategoryColor: '#7fa900'
}, {
Id: 10,
Subject: 'Wildlife Galleries',
StartTime: new Date(2018, 1, 21, 11, 0),
EndTime: new Date(2018, 1, 21, 13, 0),
CategoryColor: '#ea7a57'
}, {
Id: 11,
Subject: 'Best Photography 2018',
StartTime: new Date(2018, 1, 22, 9, 30),
EndTime: new Date(2018, 1, 22, 11, 0),
CategoryColor: '#00bdae'
}, {
Id: 12,
Subject: 'Smarter Puppies',
StartTime: new Date(2018, 1, 9, 10, 0),
EndTime: new Date(2018, 1, 9, 11, 30),
CategoryColor: '#f57f17'
}, {
Id: 13,
Subject: 'Myths of Andromeda Galaxy',
StartTime: new Date(2018, 1, 7, 10, 30),
EndTime: new Date(2018, 1, 7, 12, 30),
CategoryColor: '#1aaa55'
}, {
Id: 14,
Subject: 'Aliens vs Humans',
StartTime: new Date(2018, 1, 5, 10, 0),
EndTime: new Date(2018, 1, 5, 11, 30),
CategoryColor: '#357cd2'
}, {
Id: 15,
Subject: 'Facts of Humming Birds',
StartTime: new Date(2018, 1, 20, 9, 30),
EndTime: new Date(2018, 1, 20, 11, 0),
CategoryColor: '#7fa900'
}, {
Id: 16,
Subject: 'Sky Gazers',
StartTime: new Date(2018, 1, 23, 11, 0),
EndTime: new Date(2018, 1, 23, 13, 0),
CategoryColor: '#ea7a57'
}, {
Id: 17,
Subject: 'The Cycle of Seasons',
StartTime: new Date(2018, 1, 12, 5, 30),
EndTime: new Date(2018, 1, 12, 7, 30),
CategoryColor: '#00bdae'
}, {
Id: 18,
Subject: 'Space Galaxies and Planets',
StartTime: new Date(2018, 1, 12, 17, 0),
EndTime: new Date(2018, 1, 12, 18, 30),
CategoryColor: '#f57f17'
}, {
Id: 19,
Subject: 'Lifecycle of Bumblebee',
StartTime: new Date(2018, 1, 15, 6, 0),
EndTime: new Date(2018, 1, 15, 7, 30),
CategoryColor: '#7fa900'
}, {
Id: 20,
Subject: 'Sky Gazers',
StartTime: new Date(2018, 1, 15, 16, 0),
EndTime: new Date(2018, 1, 15, 18, 0),
CategoryColor: '#ea7a57'
}
];Controlling scroll speed while dragging an event
The scrolling speed while dragging an appointment to the Scheduler edges can be controlled within the dragStart event by setting desired values for scrollBy and timeDelay options. Default values are 30 minutes for scrollBy and 100 ms for timeDelay.
var scheduleObj = new ej.schedule.Schedule({
    height: '550px',
    selectedDate: new Date(2018, 1, 15),
    eventSettings: { dataSource: scheduleData },
    dragStart: function (args) {
        args.scroll = { enable: true, scrollBy: 5 };
    }
});
scheduleObj.appendTo('#Schedule');
<!DOCTYPE html>
<html lang="en">
<head>
<title>Schedule Typescript Control</title>
<meta charset="utf-8">
<meta name="viewport" content="width=device-width, initial-scale=1.0">
<meta name="description" content="Typescript Schedule Control">
<meta name="author" content="Syncfusion">
<link href="index.css" rel="stylesheet">
<link href="https://cdn.syncfusion.com/ej2/35.1.37/bootstrap5.3.css" rel="stylesheet" />
<script src="https://cdn.syncfusion.com/ej2/35.1.37/dist/ej2.min.js" type="text/javascript"></script>
<script src="es5-datasource.js" type="text/javascript"></script>
</head>
<body>
<div id="container">
<div id="Schedule"></div>
</div>
<script>
var ele = document.getElementById('container');
if (ele) {
ele.style.visibility = "visible";
}
</script>
<script src="index.js" type="text/javascript"></script>
</body>
</html>var scheduleData = [
{
Id: 1,
Subject: 'Explosion of Betelgeuse Star',
StartTime: new Date(2018, 1, 11, 9, 30),
EndTime: new Date(2018, 1, 11, 11, 0),
CategoryColor: '#1aaa55'
}, {
Id: 2,
Subject: 'Thule Air Crash Report',
StartTime: new Date(2018, 1, 12, 12, 0),
EndTime: new Date(2018, 1, 12, 14, 0),
CategoryColor: '#357cd2'
}, {
Id: 3,
Subject: 'Blue Moon Eclipse',
StartTime: new Date(2018, 1, 13, 9, 30),
EndTime: new Date(2018, 1, 13, 11, 0),
CategoryColor: '#7fa900'
}, {
Id: 4,
Subject: 'Meteor Showers in 2018',
StartTime: new Date(2018, 1, 14, 13, 0),
EndTime: new Date(2018, 1, 14, 14, 30),
CategoryColor: '#ea7a57'
}, {
Id: 5,
Subject: 'Milky Way as Melting pot',
StartTime: new Date(2018, 1, 15, 12, 0),
EndTime: new Date(2018, 1, 15, 14, 0),
CategoryColor: '#00bdae'
}, {
Id: 6,
Subject: 'Mysteries of Bermuda Triangle',
StartTime: new Date(2018, 1, 15, 9, 30),
EndTime: new Date(2018, 1, 15, 11, 0),
CategoryColor: '#f57f17'
}, {
Id: 7,
Subject: 'Glaciers and Snowflakes',
StartTime: new Date(2018, 1, 16, 11, 0),
EndTime: new Date(2018, 1, 16, 12, 30),
CategoryColor: '#1aaa55'
}, {
Id: 8,
Subject: 'Life on Mars',
StartTime: new Date(2018, 1, 17, 9, 0),
EndTime: new Date(2018, 1, 17, 10, 0),
CategoryColor: '#357cd2'
}, {
Id: 9,
Subject: 'Alien Civilization',
StartTime: new Date(2018, 1, 19, 11, 0),
EndTime: new Date(2018, 1, 19, 13, 0),
CategoryColor: '#7fa900'
}, {
Id: 10,
Subject: 'Wildlife Galleries',
StartTime: new Date(2018, 1, 21, 11, 0),
EndTime: new Date(2018, 1, 21, 13, 0),
CategoryColor: '#ea7a57'
}, {
Id: 11,
Subject: 'Best Photography 2018',
StartTime: new Date(2018, 1, 22, 9, 30),
EndTime: new Date(2018, 1, 22, 11, 0),
CategoryColor: '#00bdae'
}, {
Id: 12,
Subject: 'Smarter Puppies',
StartTime: new Date(2018, 1, 9, 10, 0),
EndTime: new Date(2018, 1, 9, 11, 30),
CategoryColor: '#f57f17'
}, {
Id: 13,
Subject: 'Myths of Andromeda Galaxy',
StartTime: new Date(2018, 1, 7, 10, 30),
EndTime: new Date(2018, 1, 7, 12, 30),
CategoryColor: '#1aaa55'
}, {
Id: 14,
Subject: 'Aliens vs Humans',
StartTime: new Date(2018, 1, 5, 10, 0),
EndTime: new Date(2018, 1, 5, 11, 30),
CategoryColor: '#357cd2'
}, {
Id: 15,
Subject: 'Facts of Humming Birds',
StartTime: new Date(2018, 1, 20, 9, 30),
EndTime: new Date(2018, 1, 20, 11, 0),
CategoryColor: '#7fa900'
}, {
Id: 16,
Subject: 'Sky Gazers',
StartTime: new Date(2018, 1, 23, 11, 0),
EndTime: new Date(2018, 1, 23, 13, 0),
CategoryColor: '#ea7a57'
}, {
Id: 17,
Subject: 'The Cycle of Seasons',
StartTime: new Date(2018, 1, 12, 5, 30),
EndTime: new Date(2018, 1, 12, 7, 30),
CategoryColor: '#00bdae'
}, {
Id: 18,
Subject: 'Space Galaxies and Planets',
StartTime: new Date(2018, 1, 12, 17, 0),
EndTime: new Date(2018, 1, 12, 18, 30),
CategoryColor: '#f57f17'
}, {
Id: 19,
Subject: 'Lifecycle of Bumblebee',
StartTime: new Date(2018, 1, 15, 6, 0),
EndTime: new Date(2018, 1, 15, 7, 30),
CategoryColor: '#7fa900'
}, {
Id: 20,
Subject: 'Sky Gazers',
StartTime: new Date(2018, 1, 15, 16, 0),
EndTime: new Date(2018, 1, 15, 18, 0),
CategoryColor: '#ea7a57'
}
];Auto navigation of date ranges on dragging an event
When an event is dragged to either the left or right extreme edges of the Scheduler and held for a few seconds without dropping, auto-navigation of date ranges can be enabled. This allows the Scheduler to navigate back and forth between the current date range. By default, this action is set to false. To enable it, set navigation to true within the dragStart event.
By default, the navigation delay is set to 2000 ms, determining how long a user must drag and hold appointments at the extremities. A custom delay value can be set using the timeDelay option within the dragStart event.
var scheduleObj = new ej.schedule.Schedule({
  height: '550px',
  selectedDate: new Date(2018, 1, 15),
  eventSettings: { dataSource: scheduleData },
  dragStart: function (args) {
    args.navigation = { enable: true, timeDelay: 4000 }
  }
});
scheduleObj.appendTo('#Schedule');
<!DOCTYPE html>
<html lang="en">
<head>
<title>Schedule Typescript Control</title>
<meta charset="utf-8">
<meta name="viewport" content="width=device-width, initial-scale=1.0">
<meta name="description" content="Typescript Schedule Control">
<meta name="author" content="Syncfusion">
<link href="index.css" rel="stylesheet">
<link href="https://cdn.syncfusion.com/ej2/35.1.37/bootstrap5.3.css" rel="stylesheet" />
<script src="https://cdn.syncfusion.com/ej2/35.1.37/dist/ej2.min.js" type="text/javascript"></script>
<script src="es5-datasource.js" type="text/javascript"></script>
</head>
<body>
<div id="container">
<div id="Schedule"></div>
</div>
<script>
var ele = document.getElementById('container');
if (ele) {
ele.style.visibility = "visible";
}
</script>
<script src="index.js" type="text/javascript"></script>
</body>
</html>var scheduleData = [
{
Id: 1,
Subject: 'Explosion of Betelgeuse Star',
StartTime: new Date(2018, 1, 11, 9, 30),
EndTime: new Date(2018, 1, 11, 11, 0),
CategoryColor: '#1aaa55'
}, {
Id: 2,
Subject: 'Thule Air Crash Report',
StartTime: new Date(2018, 1, 12, 12, 0),
EndTime: new Date(2018, 1, 12, 14, 0),
CategoryColor: '#357cd2'
}, {
Id: 3,
Subject: 'Blue Moon Eclipse',
StartTime: new Date(2018, 1, 13, 9, 30),
EndTime: new Date(2018, 1, 13, 11, 0),
CategoryColor: '#7fa900'
}, {
Id: 4,
Subject: 'Meteor Showers in 2018',
StartTime: new Date(2018, 1, 14, 13, 0),
EndTime: new Date(2018, 1, 14, 14, 30),
CategoryColor: '#ea7a57'
}, {
Id: 5,
Subject: 'Milky Way as Melting pot',
StartTime: new Date(2018, 1, 15, 12, 0),
EndTime: new Date(2018, 1, 15, 14, 0),
CategoryColor: '#00bdae'
}, {
Id: 6,
Subject: 'Mysteries of Bermuda Triangle',
StartTime: new Date(2018, 1, 15, 9, 30),
EndTime: new Date(2018, 1, 15, 11, 0),
CategoryColor: '#f57f17'
}, {
Id: 7,
Subject: 'Glaciers and Snowflakes',
StartTime: new Date(2018, 1, 16, 11, 0),
EndTime: new Date(2018, 1, 16, 12, 30),
CategoryColor: '#1aaa55'
}, {
Id: 8,
Subject: 'Life on Mars',
StartTime: new Date(2018, 1, 17, 9, 0),
EndTime: new Date(2018, 1, 17, 10, 0),
CategoryColor: '#357cd2'
}, {
Id: 9,
Subject: 'Alien Civilization',
StartTime: new Date(2018, 1, 19, 11, 0),
EndTime: new Date(2018, 1, 19, 13, 0),
CategoryColor: '#7fa900'
}, {
Id: 10,
Subject: 'Wildlife Galleries',
StartTime: new Date(2018, 1, 21, 11, 0),
EndTime: new Date(2018, 1, 21, 13, 0),
CategoryColor: '#ea7a57'
}, {
Id: 11,
Subject: 'Best Photography 2018',
StartTime: new Date(2018, 1, 22, 9, 30),
EndTime: new Date(2018, 1, 22, 11, 0),
CategoryColor: '#00bdae'
}, {
Id: 12,
Subject: 'Smarter Puppies',
StartTime: new Date(2018, 1, 9, 10, 0),
EndTime: new Date(2018, 1, 9, 11, 30),
CategoryColor: '#f57f17'
}, {
Id: 13,
Subject: 'Myths of Andromeda Galaxy',
StartTime: new Date(2018, 1, 7, 10, 30),
EndTime: new Date(2018, 1, 7, 12, 30),
CategoryColor: '#1aaa55'
}, {
Id: 14,
Subject: 'Aliens vs Humans',
StartTime: new Date(2018, 1, 5, 10, 0),
EndTime: new Date(2018, 1, 5, 11, 30),
CategoryColor: '#357cd2'
}, {
Id: 15,
Subject: 'Facts of Humming Birds',
StartTime: new Date(2018, 1, 20, 9, 30),
EndTime: new Date(2018, 1, 20, 11, 0),
CategoryColor: '#7fa900'
}, {
Id: 16,
Subject: 'Sky Gazers',
StartTime: new Date(2018, 1, 23, 11, 0),
EndTime: new Date(2018, 1, 23, 13, 0),
CategoryColor: '#ea7a57'
}, {
Id: 17,
Subject: 'The Cycle of Seasons',
StartTime: new Date(2018, 1, 12, 5, 30),
EndTime: new Date(2018, 1, 12, 7, 30),
CategoryColor: '#00bdae'
}, {
Id: 18,
Subject: 'Space Galaxies and Planets',
StartTime: new Date(2018, 1, 12, 17, 0),
EndTime: new Date(2018, 1, 12, 18, 30),
CategoryColor: '#f57f17'
}, {
Id: 19,
Subject: 'Lifecycle of Bumblebee',
StartTime: new Date(2018, 1, 15, 6, 0),
EndTime: new Date(2018, 1, 15, 7, 30),
CategoryColor: '#7fa900'
}, {
Id: 20,
Subject: 'Sky Gazers',
StartTime: new Date(2018, 1, 15, 16, 0),
EndTime: new Date(2018, 1, 15, 18, 0),
CategoryColor: '#ea7a57'
}
];Setting drag time interval
By default, when dragging an appointment, it moves in 30-minute intervals. To change the dragging time interval, pass appropriate values to the interval option within the dragStart event.
var scheduleObj = new ej.schedule.Schedule({
    height: '550px',
    selectedDate: new Date(2018, 1, 15),
    eventSettings: { dataSource: scheduleData },
    dragStart: function (args) {
        args.interval = 10;
    }
});
scheduleObj.appendTo('#Schedule');
<!DOCTYPE html>
<html lang="en">
<head>
<title>Schedule Typescript Control</title>
<meta charset="utf-8">
<meta name="viewport" content="width=device-width, initial-scale=1.0">
<meta name="description" content="Typescript Schedule Control">
<meta name="author" content="Syncfusion">
<link href="index.css" rel="stylesheet">
<link href="https://cdn.syncfusion.com/ej2/35.1.37/bootstrap5.3.css" rel="stylesheet" />
<script src="https://cdn.syncfusion.com/ej2/35.1.37/dist/ej2.min.js" type="text/javascript"></script>
<script src="es5-datasource.js" type="text/javascript"></script>
</head>
<body>
<div id="container">
<div id="Schedule"></div>
</div>
<script>
var ele = document.getElementById('container');
if (ele) {
ele.style.visibility = "visible";
}
</script>
<script src="index.js" type="text/javascript"></script>
</body>
</html>var scheduleData = [
{
Id: 1,
Subject: 'Explosion of Betelgeuse Star',
StartTime: new Date(2018, 1, 11, 9, 30),
EndTime: new Date(2018, 1, 11, 11, 0),
CategoryColor: '#1aaa55'
}, {
Id: 2,
Subject: 'Thule Air Crash Report',
StartTime: new Date(2018, 1, 12, 12, 0),
EndTime: new Date(2018, 1, 12, 14, 0),
CategoryColor: '#357cd2'
}, {
Id: 3,
Subject: 'Blue Moon Eclipse',
StartTime: new Date(2018, 1, 13, 9, 30),
EndTime: new Date(2018, 1, 13, 11, 0),
CategoryColor: '#7fa900'
}, {
Id: 4,
Subject: 'Meteor Showers in 2018',
StartTime: new Date(2018, 1, 14, 13, 0),
EndTime: new Date(2018, 1, 14, 14, 30),
CategoryColor: '#ea7a57'
}, {
Id: 5,
Subject: 'Milky Way as Melting pot',
StartTime: new Date(2018, 1, 15, 12, 0),
EndTime: new Date(2018, 1, 15, 14, 0),
CategoryColor: '#00bdae'
}, {
Id: 6,
Subject: 'Mysteries of Bermuda Triangle',
StartTime: new Date(2018, 1, 15, 9, 30),
EndTime: new Date(2018, 1, 15, 11, 0),
CategoryColor: '#f57f17'
}, {
Id: 7,
Subject: 'Glaciers and Snowflakes',
StartTime: new Date(2018, 1, 16, 11, 0),
EndTime: new Date(2018, 1, 16, 12, 30),
CategoryColor: '#1aaa55'
}, {
Id: 8,
Subject: 'Life on Mars',
StartTime: new Date(2018, 1, 17, 9, 0),
EndTime: new Date(2018, 1, 17, 10, 0),
CategoryColor: '#357cd2'
}, {
Id: 9,
Subject: 'Alien Civilization',
StartTime: new Date(2018, 1, 19, 11, 0),
EndTime: new Date(2018, 1, 19, 13, 0),
CategoryColor: '#7fa900'
}, {
Id: 10,
Subject: 'Wildlife Galleries',
StartTime: new Date(2018, 1, 21, 11, 0),
EndTime: new Date(2018, 1, 21, 13, 0),
CategoryColor: '#ea7a57'
}, {
Id: 11,
Subject: 'Best Photography 2018',
StartTime: new Date(2018, 1, 22, 9, 30),
EndTime: new Date(2018, 1, 22, 11, 0),
CategoryColor: '#00bdae'
}, {
Id: 12,
Subject: 'Smarter Puppies',
StartTime: new Date(2018, 1, 9, 10, 0),
EndTime: new Date(2018, 1, 9, 11, 30),
CategoryColor: '#f57f17'
}, {
Id: 13,
Subject: 'Myths of Andromeda Galaxy',
StartTime: new Date(2018, 1, 7, 10, 30),
EndTime: new Date(2018, 1, 7, 12, 30),
CategoryColor: '#1aaa55'
}, {
Id: 14,
Subject: 'Aliens vs Humans',
StartTime: new Date(2018, 1, 5, 10, 0),
EndTime: new Date(2018, 1, 5, 11, 30),
CategoryColor: '#357cd2'
}, {
Id: 15,
Subject: 'Facts of Humming Birds',
StartTime: new Date(2018, 1, 20, 9, 30),
EndTime: new Date(2018, 1, 20, 11, 0),
CategoryColor: '#7fa900'
}, {
Id: 16,
Subject: 'Sky Gazers',
StartTime: new Date(2018, 1, 23, 11, 0),
EndTime: new Date(2018, 1, 23, 13, 0),
CategoryColor: '#ea7a57'
}, {
Id: 17,
Subject: 'The Cycle of Seasons',
StartTime: new Date(2018, 1, 12, 5, 30),
EndTime: new Date(2018, 1, 12, 7, 30),
CategoryColor: '#00bdae'
}, {
Id: 18,
Subject: 'Space Galaxies and Planets',
StartTime: new Date(2018, 1, 12, 17, 0),
EndTime: new Date(2018, 1, 12, 18, 30),
CategoryColor: '#f57f17'
}, {
Id: 19,
Subject: 'Lifecycle of Bumblebee',
StartTime: new Date(2018, 1, 15, 6, 0),
EndTime: new Date(2018, 1, 15, 7, 30),
CategoryColor: '#7fa900'
}, {
Id: 20,
Subject: 'Sky Gazers',
StartTime: new Date(2018, 1, 15, 16, 0),
EndTime: new Date(2018, 1, 15, 18, 0),
CategoryColor: '#ea7a57'
}
];Drag and drop items from external source
It is possible to drag and drop unplanned items from any external source into the scheduler by manually saving the dropped items as new appointment data using the addEvent method of the scheduler.
In the following example, the tree view control serves as the external source, with child nodes dragged and dropped onto the Scheduler. The [nodeDragStop] event of the TreeView component is utilized to create an event object and save it using the addEvent method.
var scheduleObj = new ej.schedule.Schedule({
    width: '100%',
    height: '550px',
    selectedDate: new Date(2018, 1, 15),
    cssClass: 'schedule-drag-drop',
    views: ['Month'],
    eventSettings: { dataSource: eventData },
    actionBegin: onActionBegin,
    drag: onItemDrag
});
scheduleObj.appendTo('#Schedule');

var treeObj = new ej.navigations.TreeView({
    fields: { dataSource: waitingList, id: 'Id', text: 'Name' },
    allowDragAndDrop: true,
    nodeDragStop: onTreeDragStop,
    nodeDragging: onItemDrag,
    cssClass: 'treeview-external-drag'
});
treeObj.appendTo('#Tree');

var isTreeItemDropped = false;
var draggedItemId = '';

function onItemDrag(event) {
    if (scheduleObj.isAdaptive) {
        var classElement = scheduleObj.element.querySelector('.e-device-hover');
        if (classElement) {
            classElement.classList.remove('e-device-hover');
        }
        if (event.target.classList.contains('e-work-cells')) {
            addClass([event.target], 'e-device-hover');
        }
    }
    if (document.body.style.cursor === 'not-allowed') {
        document.body.style.cursor = '';
    }
    if (event.name === 'nodeDragging') {
        var dragElementIcon =
            document.querySelectorAll('.e-drag-item.treeview-external-drag .e-icon-expandable');
        for (var i = 0; i < dragElementIcon.length; i++) {
            dragElementIcon[i].style.display = 'none';
        }
    }
}

function onActionBegin(event) {
    if (event.requestType === 'eventCreate' && isTreeItemDropped) {
        var treeViewdata = treeObj.fields.dataSource;
        var filteredPeople = treeViewdata.filter(function (item) { return item.Id !== parseInt(draggedItemId, 10); });
        treeObj.fields.dataSource = filteredPeople;
        var elements = document.querySelectorAll('.e-drag-item.treeview-external-drag');
        for (var i = 0; i < elements.length; i++) {
            remove(elements[i]);
        }
    }
}

function onTreeDragStop(event) {
    var treeElement = ej.base.closest(event.target, '.e-treeview');
    var classElement = scheduleObj.element.querySelector('.e-device-hover');
    if (classElement) {
        classElement.classList.remove('e-device-hover');
    }
    if (!treeElement) {
        event.cancel = true;
        var scheduleElement = ej.base.closest(event.target, '.e-content-wrap') ||
            ej.base.closest(event.target, '.e-all-day-row');
        if (scheduleElement) {
            var treeviewData = treeObj.fields.dataSource;
            if (event.target.classList.contains('e-work-cells')) {
                var filteredData = treeviewData.filter(function (item) { return item.Id === parseInt(event.draggedNodeData.id, 10); });
                var cellData = scheduleObj.getCellDetails(event.target);
                var eventData = {
                    Subject: filteredData[0].Name,
                    StartTime: cellData.startTime,
                    EndTime: cellData.endTime,
                    IsAllDay: cellData.isAllDay,
                    Description: filteredData[0].Description
                };
                scheduleObj.addEvent(eventData);
                isTreeItemDropped = true;
                draggedItemId = event.draggedNodeData.id;
            }
        }
    }
}
<!DOCTYPE html>
<html lang="en">
<head>
<title>Schedule Typescript Control</title>
<meta charset="utf-8">
<meta name="viewport" content="width=device-width, initial-scale=1.0">
<meta name="description" content="Typescript Schedule Control">
<meta name="author" content="Syncfusion">
<link href="https://cdn.syncfusion.com/ej2/35.1.37/bootstrap5.3.css" rel="stylesheet" />
<link href="index.css" rel="stylesheet">
<script src="https://cdn.syncfusion.com/ej2/35.1.37/dist/ej2.min.js" type="text/javascript"></script>
<script src="es5-datasource.js" type="text/javascript"></script>
<style>
.content-wrapper {
display: -ms-flexbox;
display: flex;
}
.e-device-hover {
background-color: #e0e0e0 !important;
}
.schedule-container {
padding-right: 10px
}
.title-container {
padding-bottom: 10px;
}
.treeview-external-drag .e-list-text,
.e-bigger .treeview-external-drag .e-list-text {
background: white;
border: 0.5px solid #E1E7EC;
height: 30px;
line-height: 15px;
padding: 5px;
width: 220px;
}
.treeview-external-drag .e-list-parent,
.e-bigger .treeview-external-drag .e-list-parent {
height: 100%;
padding: 0 2px;
}
.treeview-external-drag .e-list-item,
.e-bigger .treeview-external-drag .e-list-item {
height: 100%;
padding: 0 0 5px 0;
}
.treeview-external-drag .e-fullrow,
.e-bigger .treeview-external-drag .e-fullrow {
height: 55px;
}
.treeview-external-drag .e-list-item.e-hover>.e-fullrow,
.treeview-external-drag .e-list-item.e-active>.e-fullrow,
.treeview-external-drag .e-list-item.e-active.e-hover>.e-fullrow,
.e-bigger .treeview-external-drag .e-list-item.e-hover>.e-fullrow,
.e-bigger .treeview-external-drag .e-list-item.e-active>.e-fullrow,
.e-bigger .treeview-external-drag .e-list-item.e-active.e-hover>.e-fullrow {
background-color: transparent;
border-color: transparent;
box-shadow: none !important;
}
.treeview-external-drag .e-text-content,
.e-bigger .treeview-external-drag .e-text-content {
padding: 0;
}
.e-drag-item.e-treeview.treeview-external-drag,
.e-bigger .e-drag-item.e-treeview.treeview-external-drag {
padding: 0 !important;
}
.title-text {
font-size: 18px;
margin: 0px;
font-weight: bold;
text-align: center;
}
@media (max-width: 550px) {
.content-wrapper {
display: block;
}
.schedule-container {
padding-bottom: 10px
}
.treeview-external-drag.e-treeview,
.e-bigger .treeview-external-drag.e-treeview {
width: 225px;
}
.e-bigger .treeview-external-drag.e-treeview.e-drag-item {
position: relative !important;
}
}
</style>
</head>
<body>
<div id="container" class="container col-lg-12 custom-tree">
<div class="content-wrapper">
<div class="schedule-container">
<div class="title-container">
<h3 class="title-text">Scheduler</h3>
</div>
<div id="Schedule">
</div>
</div>
<div class="treeview-container">
<div class="title-container">
<h3 class="title-text">Waiting List</h3>
</div>
<div id="Tree"></div>
</div>
</div>
</div>
<script>
var ele = document.getElementById('container');
if (ele) {
ele.style.visibility = "visible";
}
</script>
<script src="index.js" type="text/javascript"></script>
</body>
</html>var eventData = [
{
Id: 1,
Subject: 'Explosion of Betelgeuse Star',
StartTime: new Date(2018, 1, 11, 9, 30),
EndTime: new Date(2018, 1, 11, 11, 0),
CategoryColor: '#1aaa55'
}, {
Id: 2,
Subject: 'Thule Air Crash Report',
StartTime: new Date(2018, 1, 12, 12, 0),
EndTime: new Date(2018, 1, 12, 14, 0),
CategoryColor: '#357cd2'
}, {
Id: 3,
Subject: 'Blue Moon Eclipse',
StartTime: new Date(2018, 1, 13, 9, 30),
EndTime: new Date(2018, 1, 13, 11, 0),
CategoryColor: '#7fa900'
}, {
Id: 4,
Subject: 'Meteor Showers in 2018',
StartTime: new Date(2018, 1, 14, 13, 0),
EndTime: new Date(2018, 1, 14, 14, 30),
CategoryColor: '#ea7a57'
}, {
Id: 5,
Subject: 'Milky Way as Melting pot',
StartTime: new Date(2018, 1, 15, 12, 0),
EndTime: new Date(2018, 1, 15, 14, 0),
CategoryColor: '#00bdae'
}, {
Id: 6,
Subject: 'Mysteries of Bermuda Triangle',
StartTime: new Date(2018, 1, 15, 9, 30),
EndTime: new Date(2018, 1, 15, 11, 0),
CategoryColor: '#f57f17'
}, {
Id: 7,
Subject: 'Glaciers and Snowflakes',
StartTime: new Date(2018, 1, 16, 11, 0),
EndTime: new Date(2018, 1, 16, 12, 30),
CategoryColor: '#1aaa55'
}, {
Id: 8,
Subject: 'Life on Mars',
StartTime: new Date(2018, 1, 17, 9, 0),
EndTime: new Date(2018, 1, 17, 10, 0),
CategoryColor: '#357cd2'
}, {
Id: 9,
Subject: 'Alien Civilization',
StartTime: new Date(2018, 1, 19, 11, 0),
EndTime: new Date(2018, 1, 19, 13, 0),
CategoryColor: '#7fa900'
}, {
Id: 10,
Subject: 'Wildlife Galleries',
StartTime: new Date(2018, 1, 21, 11, 0),
EndTime: new Date(2018, 1, 21, 13, 0),
CategoryColor: '#ea7a57'
}, {
Id: 11,
Subject: 'Best Photography 2018',
StartTime: new Date(2018, 1, 22, 9, 30),
EndTime: new Date(2018, 1, 22, 11, 0),
CategoryColor: '#00bdae'
}, {
Id: 12,
Subject: 'Smarter Puppies',
StartTime: new Date(2018, 1, 9, 10, 0),
EndTime: new Date(2018, 1, 9, 11, 30),
CategoryColor: '#f57f17'
}, {
Id: 13,
Subject: 'Myths of Andromeda Galaxy',
StartTime: new Date(2018, 1, 7, 10, 30),
EndTime: new Date(2018, 1, 7, 12, 30),
CategoryColor: '#1aaa55'
}, {
Id: 14,
Subject: 'Aliens vs Humans',
StartTime: new Date(2018, 1, 5, 10, 0),
EndTime: new Date(2018, 1, 5, 11, 30),
CategoryColor: '#357cd2'
}
];
var waitingList = [
{
Id: 15,
Name: 'Facts of Humming Birds',
StartTime: new Date(2018, 1, 20, 9, 30),
EndTime: new Date(2018, 1, 20, 11, 0),
CategoryColor: '#7fa900'
}, {
Id: 16,
Name: 'Sky Gazers',
StartTime: new Date(2018, 1, 23, 11, 0),
EndTime: new Date(2018, 1, 23, 13, 0),
CategoryColor: '#ea7a57'
}, {
Id: 17,
Name: 'The Cycle of Seasons',
StartTime: new Date(2018, 1, 12, 5, 30),
EndTime: new Date(2018, 1, 12, 7, 30),
CategoryColor: '#00bdae'
}, {
Id: 18,
Name: 'Space Galaxies and Planets',
StartTime: new Date(2018, 1, 12, 17, 0),
EndTime: new Date(2018, 1, 12, 18, 30),
CategoryColor: '#f57f17'
}, {
Id: 19,
Name: 'Lifecycle of Bumblebee',
StartTime: new Date(2018, 1, 15, 6, 0),
EndTime: new Date(2018, 1, 15, 7, 30),
CategoryColor: '#7fa900'
}, {
Id: 20,
Name: 'Aliens vs Humans',
StartTime: new Date(2018, 1, 15, 16, 0),
EndTime: new Date(2018, 1, 15, 18, 0),
CategoryColor: '#ea7a57'
}
];Opening the editor window on drag stop
In scenarios where opening the editor filled with data at a newly dropped location is desired, proceeding to save only when the Save button is clicked, and reverting changes when Cancel is clicked, use the dragStop event of the Scheduler.
var scheduleObj = new ej.schedule.Schedule({
    height: '550px',
    selectedDate: new Date(2018, 1, 15),
    eventSettings: { dataSource: scheduleData },
    dragStop: function (args) {
        args.cancel = true; //cancels the drop action
        scheduleObj.openEditor(args.data, "Save"); //open the event window with updated start and end time
    }
});
scheduleObj.appendTo('#Schedule');
<!DOCTYPE html>
<html lang="en">
<head>
<title>Schedule Typescript Control</title>
<meta charset="utf-8">
<meta name="viewport" content="width=device-width, initial-scale=1.0">
<meta name="description" content="Typescript Schedule Control">
<meta name="author" content="Syncfusion">
<link href="index.css" rel="stylesheet">
<link href="https://cdn.syncfusion.com/ej2/35.1.37/bootstrap5.3.css" rel="stylesheet" />
<script src="https://cdn.syncfusion.com/ej2/35.1.37/dist/ej2.min.js" type="text/javascript"></script>
<script src="es5-datasource.js" type="text/javascript"></script>
</head>
<body>
<div id="container">
<div id="Schedule"></div>
</div>
<script>
var ele = document.getElementById('container');
if (ele) {
ele.style.visibility = "visible";
}
</script>
<script src="index.js" type="text/javascript"></script>
</body>
</html>var scheduleData = [
{
Id: 1,
Subject: 'Explosion of Betelgeuse Star',
StartTime: new Date(2018, 1, 11, 9, 30),
EndTime: new Date(2018, 1, 11, 11, 0),
CategoryColor: '#1aaa55'
}, {
Id: 2,
Subject: 'Thule Air Crash Report',
StartTime: new Date(2018, 1, 12, 12, 0),
EndTime: new Date(2018, 1, 12, 14, 0),
CategoryColor: '#357cd2'
}, {
Id: 3,
Subject: 'Blue Moon Eclipse',
StartTime: new Date(2018, 1, 13, 9, 30),
EndTime: new Date(2018, 1, 13, 11, 0),
CategoryColor: '#7fa900'
}, {
Id: 4,
Subject: 'Meteor Showers in 2018',
StartTime: new Date(2018, 1, 14, 13, 0),
EndTime: new Date(2018, 1, 14, 14, 30),
CategoryColor: '#ea7a57'
}, {
Id: 5,
Subject: 'Milky Way as Melting pot',
StartTime: new Date(2018, 1, 15, 12, 0),
EndTime: new Date(2018, 1, 15, 14, 0),
CategoryColor: '#00bdae'
}, {
Id: 6,
Subject: 'Mysteries of Bermuda Triangle',
StartTime: new Date(2018, 1, 15, 9, 30),
EndTime: new Date(2018, 1, 15, 11, 0),
CategoryColor: '#f57f17'
}, {
Id: 7,
Subject: 'Glaciers and Snowflakes',
StartTime: new Date(2018, 1, 16, 11, 0),
EndTime: new Date(2018, 1, 16, 12, 30),
CategoryColor: '#1aaa55'
}, {
Id: 8,
Subject: 'Life on Mars',
StartTime: new Date(2018, 1, 17, 9, 0),
EndTime: new Date(2018, 1, 17, 10, 0),
CategoryColor: '#357cd2'
}, {
Id: 9,
Subject: 'Alien Civilization',
StartTime: new Date(2018, 1, 19, 11, 0),
EndTime: new Date(2018, 1, 19, 13, 0),
CategoryColor: '#7fa900'
}, {
Id: 10,
Subject: 'Wildlife Galleries',
StartTime: new Date(2018, 1, 21, 11, 0),
EndTime: new Date(2018, 1, 21, 13, 0),
CategoryColor: '#ea7a57'
}, {
Id: 11,
Subject: 'Best Photography 2018',
StartTime: new Date(2018, 1, 22, 9, 30),
EndTime: new Date(2018, 1, 22, 11, 0),
CategoryColor: '#00bdae'
}, {
Id: 12,
Subject: 'Smarter Puppies',
StartTime: new Date(2018, 1, 9, 10, 0),
EndTime: new Date(2018, 1, 9, 11, 30),
CategoryColor: '#f57f17'
}, {
Id: 13,
Subject: 'Myths of Andromeda Galaxy',
StartTime: new Date(2018, 1, 7, 10, 30),
EndTime: new Date(2018, 1, 7, 12, 30),
CategoryColor: '#1aaa55'
}, {
Id: 14,
Subject: 'Aliens vs Humans',
StartTime: new Date(2018, 1, 5, 10, 0),
EndTime: new Date(2018, 1, 5, 11, 30),
CategoryColor: '#357cd2'
}, {
Id: 15,
Subject: 'Facts of Humming Birds',
StartTime: new Date(2018, 1, 20, 9, 30),
EndTime: new Date(2018, 1, 20, 11, 0),
CategoryColor: '#7fa900'
}, {
Id: 16,
Subject: 'Sky Gazers',
StartTime: new Date(2018, 1, 23, 11, 0),
EndTime: new Date(2018, 1, 23, 13, 0),
CategoryColor: '#ea7a57'
}, {
Id: 17,
Subject: 'The Cycle of Seasons',
StartTime: new Date(2018, 1, 12, 5, 30),
EndTime: new Date(2018, 1, 12, 7, 30),
CategoryColor: '#00bdae'
}, {
Id: 18,
Subject: 'Space Galaxies and Planets',
StartTime: new Date(2018, 1, 12, 17, 0),
EndTime: new Date(2018, 1, 12, 18, 30),
CategoryColor: '#f57f17'
}, {
Id: 19,
Subject: 'Lifecycle of Bumblebee',
StartTime: new Date(2018, 1, 15, 6, 0),
EndTime: new Date(2018, 1, 15, 7, 30),
CategoryColor: '#7fa900'
}, {
Id: 20,
Subject: 'Sky Gazers',
StartTime: new Date(2018, 1, 15, 16, 0),
EndTime: new Date(2018, 1, 15, 18, 0),
CategoryColor: '#ea7a57'
}
];Inline Appointment
The Scheduler provides inline Add/Edit support for managing appointment subjects directly. This feature enables users to quickly manage appointments without opening a separate dialog.
To add an appointment inline:
- Single-click on any Scheduler cell or press enter on selected cells.
- A text box appears within the clicked cell with a blinking cursor.
- Enter the appointment subject.
- Press enter to save the appointment.
To edit an appointment inline:
- Single-click on an existing appointment’s subject.
- The subject becomes editable.
- Make changes.
- Press enter to update the appointment.
Enable or disable this feature using the allowInline property, which is set to false by default.
Important notes:
- When
allowInlineis enabled,showQuickInfois turned off. - The quick popup does not appear when clicking on a work cell or appointment if
allowInlineis set totrue. - In work cells, multiple cells can be selected using the keyboard, then press enter to create an appointment wrapper.
- Be aware of potential overlapping scenarios when creating inline events.
Normal Event
For editing appointments, single-click the appointment subject. The editable option is enabled in the UI with cursor focus at the text end. Inline editing is available for all possible views.
var data = [{
    Id: 1,
    Subject: 'Paris',
    StartTime: new Date(2018, 1, 15, 10, 0),
    EndTime: new Date(2018, 1, 15, 12, 30)
}, {
    Id: 2,
    Subject: 'Scrum Meeting',
    StartTime: new Date(2018, 1, 11, 9, 30),
    EndTime: new Date(2018, 1, 11, 11, 0)
}, {
    Id: 3,
    Subject: 'Meeting',
    StartTime: new Date(2018, 1, 13, 10, 0),
    EndTime: new Date(2018, 1, 13, 10, 30)
}, {
    Id: 4,
    Subject: 'Inline Editer Window',
    StartTime: new Date(2018, 1, 13, 11, 0),
    EndTime: new Date(2018, 1, 13, 12, 0)
}, {
    Id: 5,
    Subject: 'Validated',
    StartTime: new Date(2018, 1, 17, 11, 0),
    EndTime: new Date(2018, 1, 17, 12, 30)
}];
var scheduleObj = new ej.schedule.Schedule({
    height: '550px',
    selectedDate: new Date(2018, 1, 11),
    views: ['Day', 'Week', 'TimelineWeek', 'Month', 'Agenda'],
    allowInline: true,
    eventSettings: { dataSource: data }
});
scheduleObj.appendTo('#Schedule');
<!DOCTYPE html>
<html lang="en">
<head>
<title>Schedule Typescript Control</title>
<meta charset="utf-8">
<meta name="viewport" content="width=device-width, initial-scale=1.0">
<meta name="description" content="Typescript Schedule Control">
<meta name="author" content="Syncfusion">
<link href="index.css" rel="stylesheet">
<link href="https://cdn.syncfusion.com/ej2/35.1.37/bootstrap5.3.css" rel="stylesheet" />
<script src="https://cdn.syncfusion.com/ej2/35.1.37/dist/ej2.min.js" type="text/javascript"></script>
</head>
<body>
<div id="container">
<div id="Schedule"></div>
</div>
<script>
var ele = document.getElementById('container');
if (ele) {
ele.style.visibility = "visible";
}
</script>
<script src="index.js" type="text/javascript"></script>
</body>
</html>Recurrence Event
When editing an occurrence from a recurrence series, only a single occurrence can be edited, not the entire series.
Appointment Resizing
Another way to reschedule appointments is by resizing them. To use resizing functionality, inject the Resize module and ensure the allowResizing property is set to true (the default value).
var scheduleObj = new ej.schedule.Schedule({
    height: '550px',
    selectedDate: new Date(2018, 1, 15),
    eventSettings: { dataSource: scheduleData }
});
scheduleObj.appendTo('#Schedule');
<!DOCTYPE html>
<html lang="en">
<head>
<title>Schedule Typescript Control</title>
<meta charset="utf-8">
<meta name="viewport" content="width=device-width, initial-scale=1.0">
<meta name="description" content="Typescript Schedule Control">
<meta name="author" content="Syncfusion">
<link href="index.css" rel="stylesheet">
<link href="https://cdn.syncfusion.com/ej2/35.1.37/bootstrap5.3.css" rel="stylesheet" />
<script src="https://cdn.syncfusion.com/ej2/35.1.37/dist/ej2.min.js" type="text/javascript"></script>
<script src="es5-datasource.js" type="text/javascript"></script>
</head>
<body>
<div id="container">
<div id="Schedule"></div>
</div>
<script>
var ele = document.getElementById('container');
if (ele) {
ele.style.visibility = "visible";
}
</script>
<script src="index.js" type="text/javascript"></script>
</body>
</html>var scheduleData = [
{
Id: 1,
Subject: 'Explosion of Betelgeuse Star',
StartTime: new Date(2018, 1, 11, 9, 30),
EndTime: new Date(2018, 1, 11, 11, 0),
CategoryColor: '#1aaa55'
}, {
Id: 2,
Subject: 'Thule Air Crash Report',
StartTime: new Date(2018, 1, 12, 12, 0),
EndTime: new Date(2018, 1, 12, 14, 0),
CategoryColor: '#357cd2'
}, {
Id: 3,
Subject: 'Blue Moon Eclipse',
StartTime: new Date(2018, 1, 13, 9, 30),
EndTime: new Date(2018, 1, 13, 11, 0),
CategoryColor: '#7fa900'
}, {
Id: 4,
Subject: 'Meteor Showers in 2018',
StartTime: new Date(2018, 1, 14, 13, 0),
EndTime: new Date(2018, 1, 14, 14, 30),
CategoryColor: '#ea7a57'
}, {
Id: 5,
Subject: 'Milky Way as Melting pot',
StartTime: new Date(2018, 1, 15, 12, 0),
EndTime: new Date(2018, 1, 15, 14, 0),
CategoryColor: '#00bdae'
}, {
Id: 6,
Subject: 'Mysteries of Bermuda Triangle',
StartTime: new Date(2018, 1, 15, 9, 30),
EndTime: new Date(2018, 1, 15, 11, 0),
CategoryColor: '#f57f17'
}, {
Id: 7,
Subject: 'Glaciers and Snowflakes',
StartTime: new Date(2018, 1, 16, 11, 0),
EndTime: new Date(2018, 1, 16, 12, 30),
CategoryColor: '#1aaa55'
}, {
Id: 8,
Subject: 'Life on Mars',
StartTime: new Date(2018, 1, 17, 9, 0),
EndTime: new Date(2018, 1, 17, 10, 0),
CategoryColor: '#357cd2'
}, {
Id: 9,
Subject: 'Alien Civilization',
StartTime: new Date(2018, 1, 19, 11, 0),
EndTime: new Date(2018, 1, 19, 13, 0),
CategoryColor: '#7fa900'
}, {
Id: 10,
Subject: 'Wildlife Galleries',
StartTime: new Date(2018, 1, 21, 11, 0),
EndTime: new Date(2018, 1, 21, 13, 0),
CategoryColor: '#ea7a57'
}, {
Id: 11,
Subject: 'Best Photography 2018',
StartTime: new Date(2018, 1, 22, 9, 30),
EndTime: new Date(2018, 1, 22, 11, 0),
CategoryColor: '#00bdae'
}, {
Id: 12,
Subject: 'Smarter Puppies',
StartTime: new Date(2018, 1, 9, 10, 0),
EndTime: new Date(2018, 1, 9, 11, 30),
CategoryColor: '#f57f17'
}, {
Id: 13,
Subject: 'Myths of Andromeda Galaxy',
StartTime: new Date(2018, 1, 7, 10, 30),
EndTime: new Date(2018, 1, 7, 12, 30),
CategoryColor: '#1aaa55'
}, {
Id: 14,
Subject: 'Aliens vs Humans',
StartTime: new Date(2018, 1, 5, 10, 0),
EndTime: new Date(2018, 1, 5, 11, 30),
CategoryColor: '#357cd2'
}, {
Id: 15,
Subject: 'Facts of Humming Birds',
StartTime: new Date(2018, 1, 20, 9, 30),
EndTime: new Date(2018, 1, 20, 11, 0),
CategoryColor: '#7fa900'
}, {
Id: 16,
Subject: 'Sky Gazers',
StartTime: new Date(2018, 1, 23, 11, 0),
EndTime: new Date(2018, 1, 23, 13, 0),
CategoryColor: '#ea7a57'
}, {
Id: 17,
Subject: 'The Cycle of Seasons',
StartTime: new Date(2018, 1, 12, 5, 30),
EndTime: new Date(2018, 1, 12, 7, 30),
CategoryColor: '#00bdae'
}, {
Id: 18,
Subject: 'Space Galaxies and Planets',
StartTime: new Date(2018, 1, 12, 17, 0),
EndTime: new Date(2018, 1, 12, 18, 30),
CategoryColor: '#f57f17'
}, {
Id: 19,
Subject: 'Lifecycle of Bumblebee',
StartTime: new Date(2018, 1, 15, 6, 0),
EndTime: new Date(2018, 1, 15, 7, 30),
CategoryColor: '#7fa900'
}, {
Id: 20,
Subject: 'Sky Gazers',
StartTime: new Date(2018, 1, 15, 16, 0),
EndTime: new Date(2018, 1, 15, 18, 0),
CategoryColor: '#ea7a57'
}
];Disable the resize action
By default, resizing events is allowed on all Scheduler views except Agenda and Month-Agenda view. To disable event resizing, set allowResizing to false.
var scheduleObj = new ej.schedule.Schedule({
    height: '550px',
    allowResizing: false,
    selectedDate: new Date(2018, 1, 15),
    eventSettings: { dataSource: scheduleData }
});
scheduleObj.appendTo('#Schedule');
<!DOCTYPE html>
<html lang="en">
<head>
<title>Schedule Typescript Control</title>
<meta charset="utf-8">
<meta name="viewport" content="width=device-width, initial-scale=1.0">
<meta name="description" content="Typescript Schedule Control">
<meta name="author" content="Syncfusion">
<link href="index.css" rel="stylesheet">
<link href="https://cdn.syncfusion.com/ej2/35.1.37/bootstrap5.3.css" rel="stylesheet" />
<script src="https://cdn.syncfusion.com/ej2/35.1.37/dist/ej2.min.js" type="text/javascript"></script>
<script src="es5-datasource.js" type="text/javascript"></script>
</head>
<body>
<div id="container">
<div id="Schedule"></div>
</div>
<script>
var ele = document.getElementById('container');
if (ele) {
ele.style.visibility = "visible";
}
</script>
<script src="index.js" type="text/javascript"></script>
</body>
</html>var scheduleData = [
{
Id: 1,
Subject: 'Explosion of Betelgeuse Star',
StartTime: new Date(2018, 1, 11, 9, 30),
EndTime: new Date(2018, 1, 11, 11, 0),
CategoryColor: '#1aaa55'
}, {
Id: 2,
Subject: 'Thule Air Crash Report',
StartTime: new Date(2018, 1, 12, 12, 0),
EndTime: new Date(2018, 1, 12, 14, 0),
CategoryColor: '#357cd2'
}, {
Id: 3,
Subject: 'Blue Moon Eclipse',
StartTime: new Date(2018, 1, 13, 9, 30),
EndTime: new Date(2018, 1, 13, 11, 0),
CategoryColor: '#7fa900'
}, {
Id: 4,
Subject: 'Meteor Showers in 2018',
StartTime: new Date(2018, 1, 14, 13, 0),
EndTime: new Date(2018, 1, 14, 14, 30),
CategoryColor: '#ea7a57'
}, {
Id: 5,
Subject: 'Milky Way as Melting pot',
StartTime: new Date(2018, 1, 15, 12, 0),
EndTime: new Date(2018, 1, 15, 14, 0),
CategoryColor: '#00bdae'
}, {
Id: 6,
Subject: 'Mysteries of Bermuda Triangle',
StartTime: new Date(2018, 1, 15, 9, 30),
EndTime: new Date(2018, 1, 15, 11, 0),
CategoryColor: '#f57f17'
}, {
Id: 7,
Subject: 'Glaciers and Snowflakes',
StartTime: new Date(2018, 1, 16, 11, 0),
EndTime: new Date(2018, 1, 16, 12, 30),
CategoryColor: '#1aaa55'
}, {
Id: 8,
Subject: 'Life on Mars',
StartTime: new Date(2018, 1, 17, 9, 0),
EndTime: new Date(2018, 1, 17, 10, 0),
CategoryColor: '#357cd2'
}, {
Id: 9,
Subject: 'Alien Civilization',
StartTime: new Date(2018, 1, 19, 11, 0),
EndTime: new Date(2018, 1, 19, 13, 0),
CategoryColor: '#7fa900'
}, {
Id: 10,
Subject: 'Wildlife Galleries',
StartTime: new Date(2018, 1, 21, 11, 0),
EndTime: new Date(2018, 1, 21, 13, 0),
CategoryColor: '#ea7a57'
}, {
Id: 11,
Subject: 'Best Photography 2018',
StartTime: new Date(2018, 1, 22, 9, 30),
EndTime: new Date(2018, 1, 22, 11, 0),
CategoryColor: '#00bdae'
}, {
Id: 12,
Subject: 'Smarter Puppies',
StartTime: new Date(2018, 1, 9, 10, 0),
EndTime: new Date(2018, 1, 9, 11, 30),
CategoryColor: '#f57f17'
}, {
Id: 13,
Subject: 'Myths of Andromeda Galaxy',
StartTime: new Date(2018, 1, 7, 10, 30),
EndTime: new Date(2018, 1, 7, 12, 30),
CategoryColor: '#1aaa55'
}, {
Id: 14,
Subject: 'Aliens vs Humans',
StartTime: new Date(2018, 1, 5, 10, 0),
EndTime: new Date(2018, 1, 5, 11, 30),
CategoryColor: '#357cd2'
}, {
Id: 15,
Subject: 'Facts of Humming Birds',
StartTime: new Date(2018, 1, 20, 9, 30),
EndTime: new Date(2018, 1, 20, 11, 0),
CategoryColor: '#7fa900'
}, {
Id: 16,
Subject: 'Sky Gazers',
StartTime: new Date(2018, 1, 23, 11, 0),
EndTime: new Date(2018, 1, 23, 13, 0),
CategoryColor: '#ea7a57'
}, {
Id: 17,
Subject: 'The Cycle of Seasons',
StartTime: new Date(2018, 1, 12, 5, 30),
EndTime: new Date(2018, 1, 12, 7, 30),
CategoryColor: '#00bdae'
}, {
Id: 18,
Subject: 'Space Galaxies and Planets',
StartTime: new Date(2018, 1, 12, 17, 0),
EndTime: new Date(2018, 1, 12, 18, 30),
CategoryColor: '#f57f17'
}, {
Id: 19,
Subject: 'Lifecycle of Bumblebee',
StartTime: new Date(2018, 1, 15, 6, 0),
EndTime: new Date(2018, 1, 15, 7, 30),
CategoryColor: '#7fa900'
}, {
Id: 20,
Subject: 'Sky Gazers',
StartTime: new Date(2018, 1, 15, 16, 0),
EndTime: new Date(2018, 1, 15, 18, 0),
CategoryColor: '#ea7a57'
}
];Disable scrolling on resize action
By default, when resizing an appointment and its handler reaches the edge of the Scheduler, scrolling occurs along with event resizing. To prevent this scrolling action, set the scroll value to false within the resizeStart event.
var scheduleObj = new ej.schedule.Schedule({
    height: '550px',
    selectedDate: new Date(2018, 1, 15),
    eventSettings: { dataSource: scheduleData },
    resizeStart: function (args) {
        args.scroll = { enable: false };
    }
});
scheduleObj.appendTo('#Schedule');
<!DOCTYPE html>
<html lang="en">
<head>
<title>Schedule Typescript Control</title>
<meta charset="utf-8">
<meta name="viewport" content="width=device-width, initial-scale=1.0">
<meta name="description" content="Typescript Schedule Control">
<meta name="author" content="Syncfusion">
<link href="index.css" rel="stylesheet">
<link href="https://cdn.syncfusion.com/ej2/35.1.37/bootstrap5.3.css" rel="stylesheet" />
<script src="https://cdn.syncfusion.com/ej2/35.1.37/dist/ej2.min.js" type="text/javascript"></script>
<script src="es5-datasource.js" type="text/javascript"></script>
</head>
<body>
<div id="container">
<div id="Schedule"></div>
</div>
<script>
var ele = document.getElementById('container');
if (ele) {
ele.style.visibility = "visible";
}
</script>
<script src="index.js" type="text/javascript"></script>
</body>
</html>var scheduleData = [
{
Id: 1,
Subject: 'Explosion of Betelgeuse Star',
StartTime: new Date(2018, 1, 11, 9, 30),
EndTime: new Date(2018, 1, 11, 11, 0),
CategoryColor: '#1aaa55'
}, {
Id: 2,
Subject: 'Thule Air Crash Report',
StartTime: new Date(2018, 1, 12, 12, 0),
EndTime: new Date(2018, 1, 12, 14, 0),
CategoryColor: '#357cd2'
}, {
Id: 3,
Subject: 'Blue Moon Eclipse',
StartTime: new Date(2018, 1, 13, 9, 30),
EndTime: new Date(2018, 1, 13, 11, 0),
CategoryColor: '#7fa900'
}, {
Id: 4,
Subject: 'Meteor Showers in 2018',
StartTime: new Date(2018, 1, 14, 13, 0),
EndTime: new Date(2018, 1, 14, 14, 30),
CategoryColor: '#ea7a57'
}, {
Id: 5,
Subject: 'Milky Way as Melting pot',
StartTime: new Date(2018, 1, 15, 12, 0),
EndTime: new Date(2018, 1, 15, 14, 0),
CategoryColor: '#00bdae'
}, {
Id: 6,
Subject: 'Mysteries of Bermuda Triangle',
StartTime: new Date(2018, 1, 15, 9, 30),
EndTime: new Date(2018, 1, 15, 11, 0),
CategoryColor: '#f57f17'
}, {
Id: 7,
Subject: 'Glaciers and Snowflakes',
StartTime: new Date(2018, 1, 16, 11, 0),
EndTime: new Date(2018, 1, 16, 12, 30),
CategoryColor: '#1aaa55'
}, {
Id: 8,
Subject: 'Life on Mars',
StartTime: new Date(2018, 1, 17, 9, 0),
EndTime: new Date(2018, 1, 17, 10, 0),
CategoryColor: '#357cd2'
}, {
Id: 9,
Subject: 'Alien Civilization',
StartTime: new Date(2018, 1, 19, 11, 0),
EndTime: new Date(2018, 1, 19, 13, 0),
CategoryColor: '#7fa900'
}, {
Id: 10,
Subject: 'Wildlife Galleries',
StartTime: new Date(2018, 1, 21, 11, 0),
EndTime: new Date(2018, 1, 21, 13, 0),
CategoryColor: '#ea7a57'
}, {
Id: 11,
Subject: 'Best Photography 2018',
StartTime: new Date(2018, 1, 22, 9, 30),
EndTime: new Date(2018, 1, 22, 11, 0),
CategoryColor: '#00bdae'
}, {
Id: 12,
Subject: 'Smarter Puppies',
StartTime: new Date(2018, 1, 9, 10, 0),
EndTime: new Date(2018, 1, 9, 11, 30),
CategoryColor: '#f57f17'
}, {
Id: 13,
Subject: 'Myths of Andromeda Galaxy',
StartTime: new Date(2018, 1, 7, 10, 30),
EndTime: new Date(2018, 1, 7, 12, 30),
CategoryColor: '#1aaa55'
}, {
Id: 14,
Subject: 'Aliens vs Humans',
StartTime: new Date(2018, 1, 5, 10, 0),
EndTime: new Date(2018, 1, 5, 11, 30),
CategoryColor: '#357cd2'
}, {
Id: 15,
Subject: 'Facts of Humming Birds',
StartTime: new Date(2018, 1, 20, 9, 30),
EndTime: new Date(2018, 1, 20, 11, 0),
CategoryColor: '#7fa900'
}, {
Id: 16,
Subject: 'Sky Gazers',
StartTime: new Date(2018, 1, 23, 11, 0),
EndTime: new Date(2018, 1, 23, 13, 0),
CategoryColor: '#ea7a57'
}, {
Id: 17,
Subject: 'The Cycle of Seasons',
StartTime: new Date(2018, 1, 12, 5, 30),
EndTime: new Date(2018, 1, 12, 7, 30),
CategoryColor: '#00bdae'
}, {
Id: 18,
Subject: 'Space Galaxies and Planets',
StartTime: new Date(2018, 1, 12, 17, 0),
EndTime: new Date(2018, 1, 12, 18, 30),
CategoryColor: '#f57f17'
}, {
Id: 19,
Subject: 'Lifecycle of Bumblebee',
StartTime: new Date(2018, 1, 15, 6, 0),
EndTime: new Date(2018, 1, 15, 7, 30),
CategoryColor: '#7fa900'
}, {
Id: 20,
Subject: 'Sky Gazers',
StartTime: new Date(2018, 1, 15, 16, 0),
EndTime: new Date(2018, 1, 15, 18, 0),
CategoryColor: '#ea7a57'
}
];Controlling scroll speed while resizing an event
The scrolling speed when resizing an appointment to the Scheduler edges can be controlled by setting the desired value for the scrollBy option within the resizeStart event.
var scheduleObj = new ej.schedule.Schedule({
    height: '550px',
    selectedDate: new Date(2018, 1, 15),
    eventSettings: { dataSource: scheduleData },
    resizeStart: function (args) {
        args.scroll = { enable: true, scrollBy: 15 };
    }
});
scheduleObj.appendTo('#Schedule');
<!DOCTYPE html>
<html lang="en">
<head>
<title>Schedule Typescript Control</title>
<meta charset="utf-8">
<meta name="viewport" content="width=device-width, initial-scale=1.0">
<meta name="description" content="Typescript Schedule Control">
<meta name="author" content="Syncfusion">
<link href="index.css" rel="stylesheet">
<link href="https://cdn.syncfusion.com/ej2/35.1.37/bootstrap5.3.css" rel="stylesheet" />
<script src="https://cdn.syncfusion.com/ej2/35.1.37/dist/ej2.min.js" type="text/javascript"></script>
<script src="es5-datasource.js" type="text/javascript"></script>
</head>
<body>
<div id="container">
<div id="Schedule"></div>
</div>
<script>
var ele = document.getElementById('container');
if (ele) {
ele.style.visibility = "visible";
}
</script>
<script src="index.js" type="text/javascript"></script>
</body>
</html>var scheduleData = [
{
Id: 1,
Subject: 'Explosion of Betelgeuse Star',
StartTime: new Date(2018, 1, 11, 9, 30),
EndTime: new Date(2018, 1, 11, 11, 0),
CategoryColor: '#1aaa55'
}, {
Id: 2,
Subject: 'Thule Air Crash Report',
StartTime: new Date(2018, 1, 12, 12, 0),
EndTime: new Date(2018, 1, 12, 14, 0),
CategoryColor: '#357cd2'
}, {
Id: 3,
Subject: 'Blue Moon Eclipse',
StartTime: new Date(2018, 1, 13, 9, 30),
EndTime: new Date(2018, 1, 13, 11, 0),
CategoryColor: '#7fa900'
}, {
Id: 4,
Subject: 'Meteor Showers in 2018',
StartTime: new Date(2018, 1, 14, 13, 0),
EndTime: new Date(2018, 1, 14, 14, 30),
CategoryColor: '#ea7a57'
}, {
Id: 5,
Subject: 'Milky Way as Melting pot',
StartTime: new Date(2018, 1, 15, 12, 0),
EndTime: new Date(2018, 1, 15, 14, 0),
CategoryColor: '#00bdae'
}, {
Id: 6,
Subject: 'Mysteries of Bermuda Triangle',
StartTime: new Date(2018, 1, 15, 9, 30),
EndTime: new Date(2018, 1, 15, 11, 0),
CategoryColor: '#f57f17'
}, {
Id: 7,
Subject: 'Glaciers and Snowflakes',
StartTime: new Date(2018, 1, 16, 11, 0),
EndTime: new Date(2018, 1, 16, 12, 30),
CategoryColor: '#1aaa55'
}, {
Id: 8,
Subject: 'Life on Mars',
StartTime: new Date(2018, 1, 17, 9, 0),
EndTime: new Date(2018, 1, 17, 10, 0),
CategoryColor: '#357cd2'
}, {
Id: 9,
Subject: 'Alien Civilization',
StartTime: new Date(2018, 1, 19, 11, 0),
EndTime: new Date(2018, 1, 19, 13, 0),
CategoryColor: '#7fa900'
}, {
Id: 10,
Subject: 'Wildlife Galleries',
StartTime: new Date(2018, 1, 21, 11, 0),
EndTime: new Date(2018, 1, 21, 13, 0),
CategoryColor: '#ea7a57'
}, {
Id: 11,
Subject: 'Best Photography 2018',
StartTime: new Date(2018, 1, 22, 9, 30),
EndTime: new Date(2018, 1, 22, 11, 0),
CategoryColor: '#00bdae'
}, {
Id: 12,
Subject: 'Smarter Puppies',
StartTime: new Date(2018, 1, 9, 10, 0),
EndTime: new Date(2018, 1, 9, 11, 30),
CategoryColor: '#f57f17'
}, {
Id: 13,
Subject: 'Myths of Andromeda Galaxy',
StartTime: new Date(2018, 1, 7, 10, 30),
EndTime: new Date(2018, 1, 7, 12, 30),
CategoryColor: '#1aaa55'
}, {
Id: 14,
Subject: 'Aliens vs Humans',
StartTime: new Date(2018, 1, 5, 10, 0),
EndTime: new Date(2018, 1, 5, 11, 30),
CategoryColor: '#357cd2'
}, {
Id: 15,
Subject: 'Facts of Humming Birds',
StartTime: new Date(2018, 1, 20, 9, 30),
EndTime: new Date(2018, 1, 20, 11, 0),
CategoryColor: '#7fa900'
}, {
Id: 16,
Subject: 'Sky Gazers',
StartTime: new Date(2018, 1, 23, 11, 0),
EndTime: new Date(2018, 1, 23, 13, 0),
CategoryColor: '#ea7a57'
}, {
Id: 17,
Subject: 'The Cycle of Seasons',
StartTime: new Date(2018, 1, 12, 5, 30),
EndTime: new Date(2018, 1, 12, 7, 30),
CategoryColor: '#00bdae'
}, {
Id: 18,
Subject: 'Space Galaxies and Planets',
StartTime: new Date(2018, 1, 12, 17, 0),
EndTime: new Date(2018, 1, 12, 18, 30),
CategoryColor: '#f57f17'
}, {
Id: 19,
Subject: 'Lifecycle of Bumblebee',
StartTime: new Date(2018, 1, 15, 6, 0),
EndTime: new Date(2018, 1, 15, 7, 30),
CategoryColor: '#7fa900'
}, {
Id: 20,
Subject: 'Sky Gazers',
StartTime: new Date(2018, 1, 15, 16, 0),
EndTime: new Date(2018, 1, 15, 18, 0),
CategoryColor: '#ea7a57'
}
];Setting resize time interval
By default, when resizing an appointment, it extends or shrinks at 30-minute intervals. To change this default resize interval, set appropriate values to the interval option within the resizeStart event.
var scheduleObj = new ej.schedule.Schedule({
    height: '550px',
    selectedDate: new Date(2018, 1, 15),
    eventSettings: { dataSource: scheduleData },
    resizeStart: function (args) {
        args.interval = 10;
    }
});
scheduleObj.appendTo('#Schedule');
<!DOCTYPE html>
<html lang="en">
<head>
<title>Schedule Typescript Control</title>
<meta charset="utf-8">
<meta name="viewport" content="width=device-width, initial-scale=1.0">
<meta name="description" content="Typescript Schedule Control">
<meta name="author" content="Syncfusion">
<link href="index.css" rel="stylesheet">
<link href="https://cdn.syncfusion.com/ej2/35.1.37/bootstrap5.3.css" rel="stylesheet" />
<script src="https://cdn.syncfusion.com/ej2/35.1.37/dist/ej2.min.js" type="text/javascript"></script>
<script src="es5-datasource.js" type="text/javascript"></script>
</head>
<body>
<div id="container">
<div id="Schedule"></div>
</div>
<script>
var ele = document.getElementById('container');
if (ele) {
ele.style.visibility = "visible";
}
</script>
<script src="index.js" type="text/javascript"></script>
</body>
</html>var scheduleData = [
{
Id: 1,
Subject: 'Explosion of Betelgeuse Star',
StartTime: new Date(2018, 1, 11, 9, 30),
EndTime: new Date(2018, 1, 11, 11, 0),
CategoryColor: '#1aaa55'
}, {
Id: 2,
Subject: 'Thule Air Crash Report',
StartTime: new Date(2018, 1, 12, 12, 0),
EndTime: new Date(2018, 1, 12, 14, 0),
CategoryColor: '#357cd2'
}, {
Id: 3,
Subject: 'Blue Moon Eclipse',
StartTime: new Date(2018, 1, 13, 9, 30),
EndTime: new Date(2018, 1, 13, 11, 0),
CategoryColor: '#7fa900'
}, {
Id: 4,
Subject: 'Meteor Showers in 2018',
StartTime: new Date(2018, 1, 14, 13, 0),
EndTime: new Date(2018, 1, 14, 14, 30),
CategoryColor: '#ea7a57'
}, {
Id: 5,
Subject: 'Milky Way as Melting pot',
StartTime: new Date(2018, 1, 15, 12, 0),
EndTime: new Date(2018, 1, 15, 14, 0),
CategoryColor: '#00bdae'
}, {
Id: 6,
Subject: 'Mysteries of Bermuda Triangle',
StartTime: new Date(2018, 1, 15, 9, 30),
EndTime: new Date(2018, 1, 15, 11, 0),
CategoryColor: '#f57f17'
}, {
Id: 7,
Subject: 'Glaciers and Snowflakes',
StartTime: new Date(2018, 1, 16, 11, 0),
EndTime: new Date(2018, 1, 16, 12, 30),
CategoryColor: '#1aaa55'
}, {
Id: 8,
Subject: 'Life on Mars',
StartTime: new Date(2018, 1, 17, 9, 0),
EndTime: new Date(2018, 1, 17, 10, 0),
CategoryColor: '#357cd2'
}, {
Id: 9,
Subject: 'Alien Civilization',
StartTime: new Date(2018, 1, 19, 11, 0),
EndTime: new Date(2018, 1, 19, 13, 0),
CategoryColor: '#7fa900'
}, {
Id: 10,
Subject: 'Wildlife Galleries',
StartTime: new Date(2018, 1, 21, 11, 0),
EndTime: new Date(2018, 1, 21, 13, 0),
CategoryColor: '#ea7a57'
}, {
Id: 11,
Subject: 'Best Photography 2018',
StartTime: new Date(2018, 1, 22, 9, 30),
EndTime: new Date(2018, 1, 22, 11, 0),
CategoryColor: '#00bdae'
}, {
Id: 12,
Subject: 'Smarter Puppies',
StartTime: new Date(2018, 1, 9, 10, 0),
EndTime: new Date(2018, 1, 9, 11, 30),
CategoryColor: '#f57f17'
}, {
Id: 13,
Subject: 'Myths of Andromeda Galaxy',
StartTime: new Date(2018, 1, 7, 10, 30),
EndTime: new Date(2018, 1, 7, 12, 30),
CategoryColor: '#1aaa55'
}, {
Id: 14,
Subject: 'Aliens vs Humans',
StartTime: new Date(2018, 1, 5, 10, 0),
EndTime: new Date(2018, 1, 5, 11, 30),
CategoryColor: '#357cd2'
}, {
Id: 15,
Subject: 'Facts of Humming Birds',
StartTime: new Date(2018, 1, 20, 9, 30),
EndTime: new Date(2018, 1, 20, 11, 0),
CategoryColor: '#7fa900'
}, {
Id: 16,
Subject: 'Sky Gazers',
StartTime: new Date(2018, 1, 23, 11, 0),
EndTime: new Date(2018, 1, 23, 13, 0),
CategoryColor: '#ea7a57'
}, {
Id: 17,
Subject: 'The Cycle of Seasons',
StartTime: new Date(2018, 1, 12, 5, 30),
EndTime: new Date(2018, 1, 12, 7, 30),
CategoryColor: '#00bdae'
}, {
Id: 18,
Subject: 'Space Galaxies and Planets',
StartTime: new Date(2018, 1, 12, 17, 0),
EndTime: new Date(2018, 1, 12, 18, 30),
CategoryColor: '#f57f17'
}, {
Id: 19,
Subject: 'Lifecycle of Bumblebee',
StartTime: new Date(2018, 1, 15, 6, 0),
EndTime: new Date(2018, 1, 15, 7, 30),
CategoryColor: '#7fa900'
}, {
Id: 20,
Subject: 'Sky Gazers',
StartTime: new Date(2018, 1, 15, 16, 0),
EndTime: new Date(2018, 1, 15, 18, 0),
CategoryColor: '#ea7a57'
}
];Appointment customization
The Scheduler provides multiple approaches to customize the appearance of appointments. Use the most appropriate method based on requirements:
- Customize appointments using templates
- Customize appointments using using eventRendered event
- Customize appointments using CSS classes
Using template
Add text, images, and links to customize the appearance of events. Use the template option within the eventSettings property to format and change the default appearance of events. The following example customizes the appointment’s default color and time format:
var instance = new ej.base.Internationalization();

window.getTimeString = function (value) {
    return instance.formatDate(value, { skeleton: 'hm' });
};

var scheduleObj = new ej.schedule.Schedule({
    width: '100%',
    height: '500px',
    readonly: true,
    selectedDate: new Date(2018, 1, 15),
    eventSettings: {
        dataSource: webinarData,
        template: '#apptemplate'
    }
});
scheduleObj.appendTo('#Schedule');
<!DOCTYPE html>
<html lang="en">
<head>
<title>Schedule Typescript Control</title>
<meta charset="utf-8">
<meta name="viewport" content="width=device-width, initial-scale=1.0">
<meta name="description" content="Typescript Schedule Control">
<meta name="author" content="Syncfusion">
<link href="index.css" rel="stylesheet">
<link href="https://cdn.syncfusion.com/ej2/35.1.37/bootstrap5.3.css" rel="stylesheet" />
<script src="https://cdn.syncfusion.com/ej2/35.1.37/dist/ej2.min.js" type="text/javascript"></script>
<script src="es5-datasource.js" type="text/javascript"></script>
<style>
.e-schedule .e-vertical-view .e-content-wrap .e-appointment {
border-radius: 8px;
}
.e-schedule .e-vertical-view .e-content-wrap .e-appointment .e-appointment-details {
padding: 0;
height: 100%;
}
.e-schedule .template-wrap {
height: 100%;
white-space: normal;
}
.e-schedule .template-wrap .subject {
font-weight: 600;
font-size: 15px;
padding: 4px 4px 4px;
text-overflow: ellipsis;
white-space: nowrap;
overflow: hidden;
}
.e-schedule .template-wrap .time {
height: 50px;
font-size: 12px;
padding: 4px 6px 4px;
overflow: hidden;
}
</style>
<script id="apptemplate" type="text/x-template">
<div class="template-wrap" style="background:${SecondaryColor}">
<div class="subject" style="background:${PrimaryColor}">${Subject}</div>
<div class="time" style="background:${PrimaryColor}">Time: ${getTimeString(data.StartTime)} - ${getTimeString(data.EndTime)}</div>
</div>
</script>
</head>
<body>
<div id="container">
<div id="Schedule"></div>
</div>
<script>
var ele = document.getElementById('container');
if (ele) {
ele.style.visibility = "visible";
}
</script>
<script src="index.js" type="text/javascript"></script>
</body>
</html>var webinarData = [
{
Id: 1,
Subject: 'Environment Day',
Tags: 'Eco day, Forest conserving, Earth & its resources',
Description: 'A day that creates awareness to promote the healthy planet and reduce the air pollution crisis on nature earth.',
StartTime: new Date(2018, 1, 12, 9, 0),
EndTime: new Date(2018, 1, 12, 10, 0),
ImageName: 'environment-day',
PrimaryColor: '#1aaa55',
SecondaryColor: '#47bb76'
}, {
Id: 2,
Subject: 'Health Day',
Tags: 'Reduce mental stress, Follow good food habits',
Description: 'A day that raises awareness on different health issues. It marks the anniversary of the foundation of WHO.',
StartTime: new Date(2018, 1, 13, 9, 0),
EndTime: new Date(2018, 1, 13, 10, 0),
ImageName: 'health-day',
PrimaryColor: '#357cd2',
SecondaryColor: '#5d96db'
}, {
Id: 3,
Subject: 'Cancer Day',
Tags: 'Life threatening cancer effects, Palliative care',
Description: 'A day that raises awareness on cancer and its preventive measures. Early detection saves life.',
StartTime: new Date(2018, 1, 14, 9, 0),
EndTime: new Date(2018, 1, 14, 10, 0),
ImageName: 'cancer-day',
PrimaryColor: '#7fa900',
SecondaryColor: '#a4c932'
}, {
Id: 4,
Subject: 'Happiness Day',
Tags: 'Stress-free, Smile, Resolve frustration and bring happiness',
Description: 'A general idea is to promote happiness and smile around the world.',
StartTime: new Date(2018, 1, 15, 9, 0),
EndTime: new Date(2018, 1, 15, 10, 0),
ImageName: 'happiness-day',
PrimaryColor: '#ea7a57',
SecondaryColor: '#ee9478'
}, {
Id: 5,
Subject: 'Tourism Day',
Tags: 'Diverse cultural heritage, strengthen peace',
Description: 'A day that raises awareness on the role of tourism and its effect on social and economic values.',
StartTime: new Date(2018, 1, 16, 9, 0),
EndTime: new Date(2018, 1, 16, 10, 0),
ImageName: 'tourism-day',
PrimaryColor: '#00bdae',
SecondaryColor: '#32cabe'
}
];All built-in fields mapped to appropriate field properties within
eventSettings, as well as custom mapped fields from the Scheduler dataSource, can be accessed within the template code.
Customize appointments using eventRendered event
The eventRendered event triggers before an appointment is rendered on the Scheduler. Use this client-side event to customize the appearance of appointments based on specific criteria before rendering them.
var scheduleObj = new ej.schedule.Schedule({
    height: '550px',
    selectedDate: new Date(2018, 1, 15),
    eventSettings: { dataSource: scheduleData },
    eventRendered: applyCategoryColor
});
scheduleObj.appendTo('#Schedule');

function applyCategoryColor(args, currentView) {
    var categoryColor = args.data.CategoryColor;
    if (!args.element || !categoryColor) {
        return;
    }
    if (currentView === 'Agenda') {
        (args.element.firstChild).style.borderLeftColor = categoryColor;
    } else {
        args.element.style.backgroundColor = categoryColor;
    }
}
<!DOCTYPE html>
<html lang="en">
<head>
<title>Schedule Typescript Control</title>
<meta charset="utf-8">
<meta name="viewport" content="width=device-width, initial-scale=1.0">
<meta name="description" content="Typescript Schedule Control">
<meta name="author" content="Syncfusion">
<link href="index.css" rel="stylesheet">
<link href="https://cdn.syncfusion.com/ej2/35.1.37/bootstrap5.3.css" rel="stylesheet" />
<script src="https://cdn.syncfusion.com/ej2/35.1.37/dist/ej2.min.js" type="text/javascript"></script>
<script src="es5-datasource.js" type="text/javascript"></script>
</head>
<body>
<div id="container">
<div id="Schedule"></div>
</div>
<script>
var ele = document.getElementById('container');
if (ele) {
ele.style.visibility = "visible";
}
</script>
<script src="index.js" type="text/javascript"></script>
</body>
</html>var scheduleData = [
{
Id: 1,
Subject: 'Explosion of Betelgeuse Star',
StartTime: new Date(2018, 1, 11, 9, 30),
EndTime: new Date(2018, 1, 11, 11, 0),
CategoryColor: '#1aaa55'
}, {
Id: 2,
Subject: 'Thule Air Crash Report',
StartTime: new Date(2018, 1, 12, 12, 0),
EndTime: new Date(2018, 1, 12, 14, 0),
CategoryColor: '#357cd2'
}, {
Id: 3,
Subject: 'Blue Moon Eclipse',
StartTime: new Date(2018, 1, 13, 9, 30),
EndTime: new Date(2018, 1, 13, 11, 0),
CategoryColor: '#7fa900'
}, {
Id: 4,
Subject: 'Meteor Showers in 2018',
StartTime: new Date(2018, 1, 14, 13, 0),
EndTime: new Date(2018, 1, 14, 14, 30),
CategoryColor: '#ea7a57'
}, {
Id: 5,
Subject: 'Milky Way as Melting pot',
StartTime: new Date(2018, 1, 15, 12, 0),
EndTime: new Date(2018, 1, 15, 14, 0),
CategoryColor: '#00bdae'
}, {
Id: 6,
Subject: 'Mysteries of Bermuda Triangle',
StartTime: new Date(2018, 1, 15, 9, 30),
EndTime: new Date(2018, 1, 15, 11, 0),
CategoryColor: '#f57f17'
}, {
Id: 7,
Subject: 'Glaciers and Snowflakes',
StartTime: new Date(2018, 1, 16, 11, 0),
EndTime: new Date(2018, 1, 16, 12, 30),
CategoryColor: '#1aaa55'
}, {
Id: 8,
Subject: 'Life on Mars',
StartTime: new Date(2018, 1, 17, 9, 0),
EndTime: new Date(2018, 1, 17, 10, 0),
CategoryColor: '#357cd2'
}, {
Id: 9,
Subject: 'Alien Civilization',
StartTime: new Date(2018, 1, 19, 11, 0),
EndTime: new Date(2018, 1, 19, 13, 0),
CategoryColor: '#7fa900'
}, {
Id: 10,
Subject: 'Wildlife Galleries',
StartTime: new Date(2018, 1, 21, 11, 0),
EndTime: new Date(2018, 1, 21, 13, 0),
CategoryColor: '#ea7a57'
}, {
Id: 11,
Subject: 'Best Photography 2018',
StartTime: new Date(2018, 1, 22, 9, 30),
EndTime: new Date(2018, 1, 22, 11, 0),
CategoryColor: '#00bdae'
}, {
Id: 12,
Subject: 'Smarter Puppies',
StartTime: new Date(2018, 1, 9, 10, 0),
EndTime: new Date(2018, 1, 9, 11, 30),
CategoryColor: '#f57f17'
}, {
Id: 13,
Subject: 'Myths of Andromeda Galaxy',
StartTime: new Date(2018, 1, 7, 10, 30),
EndTime: new Date(2018, 1, 7, 12, 30),
CategoryColor: '#1aaa55'
}, {
Id: 14,
Subject: 'Aliens vs Humans',
StartTime: new Date(2018, 1, 5, 10, 0),
EndTime: new Date(2018, 1, 5, 11, 30),
CategoryColor: '#357cd2'
}, {
Id: 15,
Subject: 'Facts of Humming Birds',
StartTime: new Date(2018, 1, 20, 9, 30),
EndTime: new Date(2018, 1, 20, 11, 0),
CategoryColor: '#7fa900'
}, {
Id: 16,
Subject: 'Sky Gazers',
StartTime: new Date(2018, 1, 23, 11, 0),
EndTime: new Date(2018, 1, 23, 13, 0),
CategoryColor: '#ea7a57'
}, {
Id: 17,
Subject: 'The Cycle of Seasons',
StartTime: new Date(2018, 1, 12, 5, 30),
EndTime: new Date(2018, 1, 12, 7, 30),
CategoryColor: '#00bdae'
}, {
Id: 18,
Subject: 'Space Galaxies and Planets',
StartTime: new Date(2018, 1, 12, 17, 0),
EndTime: new Date(2018, 1, 12, 18, 30),
CategoryColor: '#f57f17'
}, {
Id: 19,
Subject: 'Lifecycle of Bumblebee',
StartTime: new Date(2018, 1, 15, 6, 0),
EndTime: new Date(2018, 1, 15, 7, 30),
CategoryColor: '#7fa900'
}, {
Id: 20,
Subject: 'Sky Gazers',
StartTime: new Date(2018, 1, 15, 16, 0),
EndTime: new Date(2018, 1, 15, 18, 0),
CategoryColor: '#ea7a57'
}
];Customize appointments using CSS classes
You can also customize event appearance using the cssClass property of the Scheduler. The following example changes the background of appointments using cssClass:
var scheduleObj = new ej.schedule.Schedule({
    height: '550px',
    cssClass: 'custom-class',
    selectedDate: new Date(2018, 1, 15),
    views: ['Day', 'Week', 'WorkWeek', 'Month'],
    eventSettings: { dataSource: scheduleData }
});
scheduleObj.appendTo('#Schedule');
<!DOCTYPE html>
<html lang="en">
<head>
<title>Schedule Typescript Control</title>
<meta charset="utf-8">
<meta name="viewport" content="width=device-width, initial-scale=1.0">
<meta name="description" content="Typescript Schedule Control">
<meta name="author" content="Syncfusion">
<link href="index.css" rel="stylesheet">
<link href="https://cdn.syncfusion.com/ej2/35.1.37/bootstrap5.3.css" rel="stylesheet" />
<script src="https://cdn.syncfusion.com/ej2/35.1.37/dist/ej2.min.js" type="text/javascript"></script>
<script src="es5-datasource.js" type="text/javascript"></script>
<style>
.custom-class.e-schedule .e-vertical-view .e-all-day-appointment-wrapper .e-appointment,
.custom-class.e-schedule .e-vertical-view .e-day-wrapper .e-appointment,
.custom-class.e-schedule .e-month-view .e-appointment {
background: green;
}
</style>
</head>
<body>
<div id="container">
<div id="Schedule"></div>
</div>
<script>
var ele = document.getElementById('container');
if (ele) {
ele.style.visibility = "visible";
}
</script>
<script src="index.js" type="text/javascript"></script>
</body>
</html>var scheduleData = [
{
Id: 1,
Subject: 'Explosion of Betelgeuse Star',
StartTime: new Date(2018, 1, 11, 9, 30),
EndTime: new Date(2018, 1, 11, 11, 0),
CategoryColor: '#1aaa55'
}, {
Id: 2,
Subject: 'Thule Air Crash Report',
StartTime: new Date(2018, 1, 12, 12, 0),
EndTime: new Date(2018, 1, 12, 14, 0),
CategoryColor: '#357cd2'
}, {
Id: 3,
Subject: 'Blue Moon Eclipse',
StartTime: new Date(2018, 1, 13, 9, 30),
EndTime: new Date(2018, 1, 13, 11, 0),
CategoryColor: '#7fa900'
}, {
Id: 4,
Subject: 'Meteor Showers in 2018',
StartTime: new Date(2018, 1, 14, 13, 0),
EndTime: new Date(2018, 1, 14, 14, 30),
CategoryColor: '#ea7a57'
}, {
Id: 5,
Subject: 'Milky Way as Melting pot',
StartTime: new Date(2018, 1, 15, 12, 0),
EndTime: new Date(2018, 1, 15, 14, 0),
CategoryColor: '#00bdae'
}, {
Id: 6,
Subject: 'Mysteries of Bermuda Triangle',
StartTime: new Date(2018, 1, 15, 9, 30),
EndTime: new Date(2018, 1, 15, 11, 0),
CategoryColor: '#f57f17'
}, {
Id: 7,
Subject: 'Glaciers and Snowflakes',
StartTime: new Date(2018, 1, 16, 11, 0),
EndTime: new Date(2018, 1, 16, 12, 30),
CategoryColor: '#1aaa55'
}, {
Id: 8,
Subject: 'Life on Mars',
StartTime: new Date(2018, 1, 17, 9, 0),
EndTime: new Date(2018, 1, 17, 10, 0),
CategoryColor: '#357cd2'
}, {
Id: 9,
Subject: 'Alien Civilization',
StartTime: new Date(2018, 1, 19, 11, 0),
EndTime: new Date(2018, 1, 19, 13, 0),
CategoryColor: '#7fa900'
}, {
Id: 10,
Subject: 'Wildlife Galleries',
StartTime: new Date(2018, 1, 21, 11, 0),
EndTime: new Date(2018, 1, 21, 13, 0),
CategoryColor: '#ea7a57'
}, {
Id: 11,
Subject: 'Best Photography 2018',
StartTime: new Date(2018, 1, 22, 9, 30),
EndTime: new Date(2018, 1, 22, 11, 0),
CategoryColor: '#00bdae'
}, {
Id: 12,
Subject: 'Smarter Puppies',
StartTime: new Date(2018, 1, 9, 10, 0),
EndTime: new Date(2018, 1, 9, 11, 30),
CategoryColor: '#f57f17'
}, {
Id: 13,
Subject: 'Myths of Andromeda Galaxy',
StartTime: new Date(2018, 1, 7, 10, 30),
EndTime: new Date(2018, 1, 7, 12, 30),
CategoryColor: '#1aaa55'
}, {
Id: 14,
Subject: 'Aliens vs Humans',
StartTime: new Date(2018, 1, 5, 10, 0),
EndTime: new Date(2018, 1, 5, 11, 30),
CategoryColor: '#357cd2'
}, {
Id: 15,
Subject: 'Facts of Humming Birds',
StartTime: new Date(2018, 1, 20, 9, 30),
EndTime: new Date(2018, 1, 20, 11, 0),
CategoryColor: '#7fa900'
}, {
Id: 16,
Subject: 'Sky Gazers',
StartTime: new Date(2018, 1, 23, 11, 0),
EndTime: new Date(2018, 1, 23, 13, 0),
CategoryColor: '#ea7a57'
}, {
Id: 17,
Subject: 'The Cycle of Seasons',
StartTime: new Date(2018, 1, 12, 5, 30),
EndTime: new Date(2018, 1, 12, 7, 30),
CategoryColor: '#00bdae'
}, {
Id: 18,
Subject: 'Space Galaxies and Planets',
StartTime: new Date(2018, 1, 12, 17, 0),
EndTime: new Date(2018, 1, 12, 18, 30),
CategoryColor: '#f57f17'
}, {
Id: 19,
Subject: 'Lifecycle of Bumblebee',
StartTime: new Date(2018, 1, 15, 6, 0),
EndTime: new Date(2018, 1, 15, 7, 30),
CategoryColor: '#7fa900'
}, {
Id: 20,
Subject: 'Sky Gazers',
StartTime: new Date(2018, 1, 15, 16, 0),
EndTime: new Date(2018, 1, 15, 18, 0),
CategoryColor: '#ea7a57'
}
];Setting minimum height
You can set a minimal height for appointments on the Scheduler using the eventRendered event when the start and end time duration is less than the default duration of a single slot.
var data = [{
    Id: 13,
    Subject: 'Myths of Andromeda Galaxy',
    StartTime: new Date(2018, 1, 16, 10, 30),
    EndTime: new Date(2018, 1, 16, 10, 40)
}, {
    Id: 14,
    Subject: 'Aliens vs Humans',
    StartTime: new Date(2018, 1, 15, 10, 0),
    EndTime: new Date(2018, 1, 15, 10, 20)
}];

var scheduleObj = new ej.schedule.Schedule({
    height: '550px',
    selectedDate: new Date(2018, 1, 15),
    eventSettings: { dataSource: data },
    eventRendered: function (args) {
        var cellHeight = (scheduleObj.element.querySelector('.e-work-cells')).offsetHeight;
        var appHeight = (args.data.EndTime.getTime() - args.data.StartTime.getTime()) / (60 * 1000) * (cellHeight * scheduleObj.timeScale.slotCount) / scheduleObj.timeScale.interval;
        args.element.style.height = appHeight + 'px';
    }
});
scheduleObj.appendTo('#Schedule');
<!DOCTYPE html>
<html lang="en">
<head>
<title>Schedule Typescript Control</title>
<meta charset="utf-8">
<meta name="viewport" content="width=device-width, initial-scale=1.0">
<meta name="description" content="Typescript Schedule Control">
<meta name="author" content="Syncfusion">
<link href="index.css" rel="stylesheet">
<link href="https://cdn.syncfusion.com/ej2/35.1.37/bootstrap5.3.css" rel="stylesheet" />
<script src="https://cdn.syncfusion.com/ej2/35.1.37/dist/ej2.min.js" type="text/javascript"></script>
<script src="es5-datasource.js" type="text/javascript"></script>
</head>
<body>
<div id="container">
<div id="Schedule"></div>
</div>
<script>
var ele = document.getElementById('container');
if (ele) {
ele.style.visibility = "visible";
}
</script>
<script src="index.js" type="text/javascript"></script>
</body>
</html>Block Dates and Times
Block a set of dates or specific time ranges on the Scheduler by defining an appointment object within eventSettings with the required time range and setting the isBlock field to true. Appointments with the isBlock field set to true will prevent users from creating new appointments, dragging existing appointments, or resizing appointments within the specified time ranges defined by startTime and endTime fields.
var scheduleObj = new ej.schedule.Schedule({
    height: '550px',
    selectedDate: new Date(2018, 1, 15),
    eventSettings: { dataSource: blockData },
    views: ['Day', 'Week', 'TimelineWeek', 'Month', 'Agenda']
});
scheduleObj.appendTo('#Schedule');
<!DOCTYPE html>
<html lang="en">
<head>
<title>Schedule Typescript Control</title>
<meta charset="utf-8">
<meta name="viewport" content="width=device-width, initial-scale=1.0">
<meta name="description" content="Typescript Schedule Control">
<meta name="author" content="Syncfusion">
<link href="index.css" rel="stylesheet">
<link href="https://cdn.syncfusion.com/ej2/35.1.37/bootstrap5.3.css" rel="stylesheet" />
<script src="https://cdn.syncfusion.com/ej2/35.1.37/dist/ej2.min.js" type="text/javascript"></script>
<script src="es5-datasource.js" type="text/javascript"></script>
</head>
<body>
<div id="container">
<div id="Schedule"></div>
</div>
<script>
var ele = document.getElementById('container');
if (ele) {
ele.style.visibility = "visible";
}
</script>
<script src="index.js" type="text/javascript"></script>
</body>
</html>var blockData = [
{
Id: 1,
Subject: 'Explosion of Betelgeuse Star',
StartTime: new Date(2018, 1, 11, 9, 30),
EndTime: new Date(2018, 1, 11, 11, 0),
IsBlock: true
}, {
Id: 2,
Subject: 'Thule Air Crash Report',
StartTime: new Date(2018, 1, 12, 12, 0),
EndTime: new Date(2018, 1, 12, 14, 0)
}, {
Id: 3,
Subject: 'Blue Moon Eclipse',
StartTime: new Date(2018, 1, 13, 9, 30),
EndTime: new Date(2018, 1, 13, 11, 0)
}, {
Id: 4,
Subject: 'Meteor Showers in 2018',
StartTime: new Date(2018, 1, 14, 13, 0),
EndTime: new Date(2018, 1, 14, 14, 30),
IsBlock: true
}, {
Id: 5,
Subject: 'Milky Way as Melting pot',
StartTime: new Date(2018, 1, 15, 12, 0),
EndTime: new Date(2018, 1, 15, 14, 0)
}, {
Id: 6,
Subject: 'Mysteries of Bermuda Triangle',
StartTime: new Date(2018, 1, 15, 9, 30),
EndTime: new Date(2018, 1, 15, 11, 0),
IsBlock: true
}, {
Id: 7,
Subject: 'Glaciers and Snowflakes',
StartTime: new Date(2018, 1, 16, 11, 0),
EndTime: new Date(2018, 1, 16, 12, 30),
IsBlock: true
}, {
Id: 8,
Subject: 'Life on Mars',
StartTime: new Date(2018, 1, 17, 9, 0),
EndTime: new Date(2018, 1, 17, 10, 0),
}, {
Id: 9,
Subject: 'Alien Civilization',
StartTime: new Date(2018, 1, 19, 11, 0),
EndTime: new Date(2018, 1, 19, 13, 0),
}, {
Id: 10,
Subject: 'Wildlife Galleries',
StartTime: new Date(2018, 1, 21, 11, 0),
EndTime: new Date(2018, 1, 21, 13, 0),
IsBlock: true
}, {
Id: 11,
Subject: 'Best Photography 2018',
StartTime: new Date(2018, 1, 22, 9, 30),
EndTime: new Date(2018, 1, 22, 11, 0),
}, {
Id: 12,
Subject: 'Smarter Puppies',
StartTime: new Date(2018, 1, 9, 10, 0),
EndTime: new Date(2018, 1, 9, 11, 30),
IsBlock: true
}, {
Id: 13,
Subject: 'Myths of Andromeda Galaxy',
StartTime: new Date(2018, 1, 7, 10, 30),
EndTime: new Date(2018, 1, 7, 12, 30),
IsBlock: true
}, {
Id: 14,
Subject: 'Aliens vs Humans',
StartTime: new Date(2018, 1, 5, 10, 0),
EndTime: new Date(2018, 1, 5, 11, 30),
}, {
Id: 15,
Subject: 'Facts of Humming Birds',
StartTime: new Date(2018, 1, 20, 9, 30),
EndTime: new Date(2018, 1, 20, 11, 0),
}, {
Id: 16,
Subject: 'Sky Gazers',
StartTime: new Date(2018, 1, 23, 11, 0),
EndTime: new Date(2018, 1, 23, 13, 0),
IsBlock: true
}, {
Id: 17,
Subject: 'The Cycle of Seasons',
StartTime: new Date(2018, 1, 12, 5, 30),
EndTime: new Date(2018, 1, 12, 7, 30),
}, {
Id: 18,
Subject: 'Space Galaxies and Planets',
StartTime: new Date(2018, 1, 12, 17, 0),
EndTime: new Date(2018, 1, 12, 18, 30),
IsBlock: true
}, {
Id: 19,
Subject: 'Lifecycle of Bumblebee',
StartTime: new Date(2018, 1, 15, 6, 0),
EndTime: new Date(2018, 1, 15, 7, 30),
}, {
Id: 20,
Subject: 'Sky Gazers',
StartTime: new Date(2018, 1, 15, 16, 0),
EndTime: new Date(2018, 1, 15, 18, 0),
IsBlock: true
}
];Block appointments can also be defined to repeat on several days as shown in the following code example.
var data = [{
    Id: 1,
    Subject: 'Explosion of Betelgeuse Star',
    StartTime: new Date(2018, 1, 15, 9, 30),
    EndTime: new Date(2018, 1, 15, 11, 0),
    RecurrenceRule: 'FREQ=DAILY;INTERVAL=1;COUNT=5',
    IsBlock: true
}, {
    Id: 2,
    Subject: 'Thule Air Crash Report',
    StartTime: new Date(2018, 1, 14, 12, 0),
    EndTime: new Date(2018, 1, 14, 14, 0)
}];

var scheduleObj = new ej.schedule.Schedule({
    height: '550px',
    selectedDate: new Date(2018, 1, 15),
    views: ['Day', 'Week', 'TimelineMonth', 'Month', 'Agenda'],
    eventSettings: { dataSource: data }
});
scheduleObj.appendTo('#Schedule');
<!DOCTYPE html>
<html lang="en">
<head>
<title>Schedule Typescript Control</title>
<meta charset="utf-8">
<meta name="viewport" content="width=device-width, initial-scale=1.0">
<meta name="description" content="Typescript Schedule Control">
<meta name="author" content="Syncfusion">
<link href="index.css" rel="stylesheet">
<link href="https://cdn.syncfusion.com/ej2/35.1.37/bootstrap5.3.css" rel="stylesheet" />
<script src="https://cdn.syncfusion.com/ej2/35.1.37/dist/ej2.min.js" type="text/javascript"></script>
<script src="es5-datasource.js" type="text/javascript"></script>
</head>
<body>
<div id="container">
<div id="Schedule"></div>
</div>
<script>
var ele = document.getElementById('container');
if (ele) {
ele.style.visibility = "visible";
}
</script>
<script src="index.js" type="text/javascript"></script>
</body>
</html>Readonly
Enable or disable interaction with Scheduler appointments using the readonly property. When enabled, navigation between Scheduler dates and views is allowed, and appointment details can be viewed in the quick info window. However, CRUD actions cannot be performed on the Scheduler. By default, this property is set to false.
var scheduleObj = new ej.schedule.Schedule({
  height: '550px',
  readonly: true,
  selectedDate: new Date(2018, 1, 15),
  views: ['Day', 'Week', 'WorkWeek', 'Month'],
  eventSettings: { dataSource: scheduleData }
});
scheduleObj.appendTo('#Schedule');
<!DOCTYPE html>
<html lang="en">
<head>
<title>Schedule Typescript Control</title>
<meta charset="utf-8">
<meta name="viewport" content="width=device-width, initial-scale=1.0">
<meta name="description" content="Typescript Schedule Control">
<meta name="author" content="Syncfusion">
<link href="index.css" rel="stylesheet">
<link href="https://cdn.syncfusion.com/ej2/35.1.37/bootstrap5.3.css" rel="stylesheet" />
<script src="https://cdn.syncfusion.com/ej2/35.1.37/dist/ej2.min.js" type="text/javascript"></script>
<script src="es5-datasource.js" type="text/javascript"></script>
</head>
<body>
<div id="container">
<div id="Schedule"></div>
</div>
<script>
var ele = document.getElementById('container');
if (ele) {
ele.style.visibility = "visible";
}
</script>
<script src="index.js" type="text/javascript"></script>
</body>
</html>var scheduleData = [
{
Id: 1,
Subject: 'Explosion of Betelgeuse Star',
StartTime: new Date(2018, 1, 11, 9, 30),
EndTime: new Date(2018, 1, 11, 11, 0),
CategoryColor: '#1aaa55'
}, {
Id: 2,
Subject: 'Thule Air Crash Report',
StartTime: new Date(2018, 1, 12, 12, 0),
EndTime: new Date(2018, 1, 12, 14, 0),
CategoryColor: '#357cd2'
}, {
Id: 3,
Subject: 'Blue Moon Eclipse',
StartTime: new Date(2018, 1, 13, 9, 30),
EndTime: new Date(2018, 1, 13, 11, 0),
CategoryColor: '#7fa900'
}, {
Id: 4,
Subject: 'Meteor Showers in 2018',
StartTime: new Date(2018, 1, 14, 13, 0),
EndTime: new Date(2018, 1, 14, 14, 30),
CategoryColor: '#ea7a57'
}, {
Id: 5,
Subject: 'Milky Way as Melting pot',
StartTime: new Date(2018, 1, 15, 12, 0),
EndTime: new Date(2018, 1, 15, 14, 0),
CategoryColor: '#00bdae'
}, {
Id: 6,
Subject: 'Mysteries of Bermuda Triangle',
StartTime: new Date(2018, 1, 15, 9, 30),
EndTime: new Date(2018, 1, 15, 11, 0),
CategoryColor: '#f57f17'
}, {
Id: 7,
Subject: 'Glaciers and Snowflakes',
StartTime: new Date(2018, 1, 16, 11, 0),
EndTime: new Date(2018, 1, 16, 12, 30),
CategoryColor: '#1aaa55'
}, {
Id: 8,
Subject: 'Life on Mars',
StartTime: new Date(2018, 1, 17, 9, 0),
EndTime: new Date(2018, 1, 17, 10, 0),
CategoryColor: '#357cd2'
}, {
Id: 9,
Subject: 'Alien Civilization',
StartTime: new Date(2018, 1, 19, 11, 0),
EndTime: new Date(2018, 1, 19, 13, 0),
CategoryColor: '#7fa900'
}, {
Id: 10,
Subject: 'Wildlife Galleries',
StartTime: new Date(2018, 1, 21, 11, 0),
EndTime: new Date(2018, 1, 21, 13, 0),
CategoryColor: '#ea7a57'
}, {
Id: 11,
Subject: 'Best Photography 2018',
StartTime: new Date(2018, 1, 22, 9, 30),
EndTime: new Date(2018, 1, 22, 11, 0),
CategoryColor: '#00bdae'
}, {
Id: 12,
Subject: 'Smarter Puppies',
StartTime: new Date(2018, 1, 9, 10, 0),
EndTime: new Date(2018, 1, 9, 11, 30),
CategoryColor: '#f57f17'
}, {
Id: 13,
Subject: 'Myths of Andromeda Galaxy',
StartTime: new Date(2018, 1, 7, 10, 30),
EndTime: new Date(2018, 1, 7, 12, 30),
CategoryColor: '#1aaa55'
}, {
Id: 14,
Subject: 'Aliens vs Humans',
StartTime: new Date(2018, 1, 5, 10, 0),
EndTime: new Date(2018, 1, 5, 11, 30),
CategoryColor: '#357cd2'
}, {
Id: 15,
Subject: 'Facts of Humming Birds',
StartTime: new Date(2018, 1, 20, 9, 30),
EndTime: new Date(2018, 1, 20, 11, 0),
CategoryColor: '#7fa900'
}, {
Id: 16,
Subject: 'Sky Gazers',
StartTime: new Date(2018, 1, 23, 11, 0),
EndTime: new Date(2018, 1, 23, 13, 0),
CategoryColor: '#ea7a57'
}, {
Id: 17,
Subject: 'The Cycle of Seasons',
StartTime: new Date(2018, 1, 12, 5, 30),
EndTime: new Date(2018, 1, 12, 7, 30),
CategoryColor: '#00bdae'
}, {
Id: 18,
Subject: 'Space Galaxies and Planets',
StartTime: new Date(2018, 1, 12, 17, 0),
EndTime: new Date(2018, 1, 12, 18, 30),
CategoryColor: '#f57f17'
}, {
Id: 19,
Subject: 'Lifecycle of Bumblebee',
StartTime: new Date(2018, 1, 15, 6, 0),
EndTime: new Date(2018, 1, 15, 7, 30),
CategoryColor: '#7fa900'
}, {
Id: 20,
Subject: 'Sky Gazers',
StartTime: new Date(2018, 1, 15, 16, 0),
EndTime: new Date(2018, 1, 15, 18, 0),
CategoryColor: '#ea7a57'
}
];Make specific events readonly
In some scenarios, CRUD actions on specific appointments may need to be restricted based on certain conditions. For example, past appointments can be made readonly. This can be achieved by setting the isReadonly field of readonly appointments to true.
var scheduleObj = new ej.schedule.Schedule({
    height: '550px',
    selectedDate: new Date(2018, 1, 15),
    views: ['Day', 'Week', 'WorkWeek', 'Month'],
    eventSettings: { dataSource: readOnlyData }
});
scheduleObj.appendTo('#Schedule');
<!DOCTYPE html>
<html lang="en">
<head>
<title>Schedule Typescript Control</title>
<meta charset="utf-8">
<meta name="viewport" content="width=device-width, initial-scale=1.0">
<meta name="description" content="Typescript Schedule Control">
<meta name="author" content="Syncfusion">
<link href="index.css" rel="stylesheet">
<link href="https://cdn.syncfusion.com/ej2/35.1.37/bootstrap5.3.css" rel="stylesheet" />
<script src="https://cdn.syncfusion.com/ej2/35.1.37/dist/ej2.min.js" type="text/javascript"></script>
<script src="es5-datasource.js" type="text/javascript"></script>
</head>
<body>
<div id="container">
<div id="Schedule"></div>
</div>
<script>
var ele = document.getElementById('container');
if (ele) {
ele.style.visibility = "visible";
}
</script>
<script src="index.js" type="text/javascript"></script>
</body>
</html>var readOnlyData = [
{
Id: 1,
Subject: 'Explosion of Betelgeuse Star',
StartTime: new Date(2018, 1, 11, 9, 30),
EndTime: new Date(2018, 1, 11, 11, 0),
IsReadonly: true
}, {
Id: 2,
Subject: 'Thule Air Crash Report',
StartTime: new Date(2018, 1, 12, 12, 0),
EndTime: new Date(2018, 1, 12, 14, 0),
IsReadonly: true
}, {
Id: 3,
Subject: 'Blue Moon Eclipse',
StartTime: new Date(2018, 1, 13, 9, 30),
EndTime: new Date(2018, 1, 13, 11, 0),
IsReadonly: true
}, {
Id: 4,
Subject: 'Meteor Showers in 2018',
StartTime: new Date(2018, 1, 14, 13, 0),
EndTime: new Date(2018, 1, 14, 14, 30),
IsReadonly: true
}, {
Id: 5,
Subject: 'Milky Way as Melting pot',
StartTime: new Date(2018, 1, 15, 12, 0),
EndTime: new Date(2018, 1, 15, 14, 0),
IsReadonly: true
}, {
Id: 6,
Subject: 'Mysteries of Bermuda Triangle',
StartTime: new Date(2018, 1, 15, 9, 30),
EndTime: new Date(2018, 1, 15, 11, 0),
IsReadonly: false
}, {
Id: 7,
Subject: 'Glaciers and Snowflakes',
StartTime: new Date(2018, 1, 16, 11, 0),
EndTime: new Date(2018, 1, 16, 12, 30),
IsReadonly: false
}, {
Id: 8,
Subject: 'Life on Mars',
StartTime: new Date(2018, 1, 17, 9, 0),
EndTime: new Date(2018, 1, 17, 10, 0),
IsReadonly: false
}, {
Id: 9,
Subject: 'Alien Civilization',
StartTime: new Date(2018, 1, 11, 12, 0),
EndTime: new Date(2018, 1, 11, 14, 0),
IsReadonly: true
}, {
Id: 10,
Subject: 'Wildlife Galleries',
StartTime: new Date(2018, 1, 21, 11, 0),
EndTime: new Date(2018, 1, 21, 13, 0),
IsReadonly: false
}, {
Id: 11,
Subject: 'Best Photography 2018',
StartTime: new Date(2018, 1, 22, 9, 30),
EndTime: new Date(2018, 1, 22, 11, 0),
IsReadonly: false
}, {
Id: 12,
Subject: 'Smarter Puppies',
StartTime: new Date(2018, 1, 9, 10, 0),
EndTime: new Date(2018, 1, 9, 11, 30),
IsReadonly: true
}, {
Id: 13,
Subject: 'Myths of Andromeda Galaxy',
StartTime: new Date(2018, 1, 7, 10, 30),
EndTime: new Date(2018, 1, 7, 12, 30),
IsReadonly: true
}, {
Id: 14,
Subject: 'Aliens vs Humans',
StartTime: new Date(2018, 1, 5, 10, 0),
EndTime: new Date(2018, 1, 5, 11, 30),
IsReadonly: true
}, {
Id: 15,
Subject: 'Facts of Humming Birds',
StartTime: new Date(2018, 1, 20, 9, 30),
EndTime: new Date(2018, 1, 20, 11, 0),
IsReadonly: false
}, {
Id: 16,
Subject: 'Sky Gazers',
StartTime: new Date(2018, 1, 23, 11, 0),
EndTime: new Date(2018, 1, 23, 13, 0),
IsReadonly: false
}, {
Id: 17,
Subject: 'The Cycle of Seasons',
StartTime: new Date(2018, 1, 12, 5, 30),
EndTime: new Date(2018, 1, 12, 7, 30),
IsReadonly: true
}, {
Id: 18,
Subject: 'Space Galaxies and Planets',
StartTime: new Date(2018, 1, 12, 17, 0),
EndTime: new Date(2018, 1, 12, 18, 30),
IsReadonly: true
}, {
Id: 19,
Subject: 'Lifecycle of Bumblebee',
StartTime: new Date(2018, 1, 15, 6, 0),
EndTime: new Date(2018, 1, 15, 7, 30),
IsReadonly: false
}, {
Id: 20,
Subject: 'Sky Gazers',
StartTime: new Date(2018, 1, 15, 16, 0),
EndTime: new Date(2018, 1, 15, 18, 0),
IsReadonly: false
}
];By default, the event editor is prevented from opening on readonly events when the
isReadonlyfield is set totrue.
Restricting appointment creation on specific time slots
Restrict users from creating and updating more than one appointment on specific time slots using the Scheduler’s public method isSlotAvailable. CRUD actions also be disabled on occupied time slots using the Scheduler’s public method isSlotAvailable.
var scheduleObj = new ej.schedule.Schedule({
    width: '100%', height: '550px',
    views: ['Day', 'TimelineWeek', 'WorkWeek', 'Month'],
    currentView: 'TimelineWeek',
    selectedDate: new Date(2018, 1, 15),
    actionBegin: function (args) {
        if ((args.requestType === 'eventCreate' || args.requestType === 'eventChange') && args.data.length > 0 || !(new ej.base.isNullOrUndefined(args.data))) {
            var eventData = args.data;
            var eventField = scheduleObj.eventFields;
            var startDate = ((args.data.length > 0) ? eventData[0][eventField.startTime] : eventData[eventField.startTime]);
            var endDate = ((args.data.length > 0) ? eventData[0][eventField.endTime] : eventData[eventField.endTime]);
            args.cancel = !scheduleObj.isSlotAvailable(startDate, endDate);
        }
    },
    eventSettings: { dataSource: scheduleData }
});
scheduleObj.appendTo('#Schedule');
<!DOCTYPE html>
<html lang="en">
<head>
<title>Schedule Typescript Control</title>
<meta charset="utf-8">
<meta name="viewport" content="width=device-width, initial-scale=1.0">
<meta name="description" content="Typescript Schedule Control">
<meta name="author" content="Syncfusion">
<link href="index.css" rel="stylesheet">
<link href="https://cdn.syncfusion.com/ej2/35.1.37/bootstrap5.3.css" rel="stylesheet" />
<script src="https://cdn.syncfusion.com/ej2/35.1.37/dist/ej2.min.js" type="text/javascript"></script>
<script src="es5-datasource.js" type="text/javascript"></script>
</head>
<body>
<div id="container">
<div id="Schedule"></div>
</div>
<script>
var ele = document.getElementById('container');
if (ele) {
ele.style.visibility = "visible";
}
</script>
<script src="index.js" type="text/javascript"></script>
</body>
</html>var scheduleData = [
{
Id: 1,
Subject: 'Explosion of Betelgeuse Star',
StartTime: new Date(2018, 1, 11, 9, 30),
EndTime: new Date(2018, 1, 11, 11, 0),
CategoryColor: '#1aaa55'
}, {
Id: 2,
Subject: 'Thule Air Crash Report',
StartTime: new Date(2018, 1, 12, 12, 0),
EndTime: new Date(2018, 1, 12, 14, 0),
CategoryColor: '#357cd2'
}, {
Id: 3,
Subject: 'Blue Moon Eclipse',
StartTime: new Date(2018, 1, 13, 9, 30),
EndTime: new Date(2018, 1, 13, 11, 0),
CategoryColor: '#7fa900'
}, {
Id: 4,
Subject: 'Meteor Showers in 2018',
StartTime: new Date(2018, 1, 14, 13, 0),
EndTime: new Date(2018, 1, 14, 14, 30),
CategoryColor: '#ea7a57'
}, {
Id: 5,
Subject: 'Milky Way as Melting pot',
StartTime: new Date(2018, 1, 15, 12, 0),
EndTime: new Date(2018, 1, 15, 14, 0),
CategoryColor: '#00bdae'
}, {
Id: 6,
Subject: 'Mysteries of Bermuda Triangle',
StartTime: new Date(2018, 1, 15, 9, 30),
EndTime: new Date(2018, 1, 15, 11, 0),
CategoryColor: '#f57f17'
}, {
Id: 7,
Subject: 'Glaciers and Snowflakes',
StartTime: new Date(2018, 1, 16, 11, 0),
EndTime: new Date(2018, 1, 16, 12, 30),
CategoryColor: '#1aaa55'
}, {
Id: 8,
Subject: 'Life on Mars',
StartTime: new Date(2018, 1, 17, 9, 0),
EndTime: new Date(2018, 1, 17, 10, 0),
CategoryColor: '#357cd2'
}, {
Id: 9,
Subject: 'Alien Civilization',
StartTime: new Date(2018, 1, 19, 11, 0),
EndTime: new Date(2018, 1, 19, 13, 0),
CategoryColor: '#7fa900'
}, {
Id: 10,
Subject: 'Wildlife Galleries',
StartTime: new Date(2018, 1, 21, 11, 0),
EndTime: new Date(2018, 1, 21, 13, 0),
CategoryColor: '#ea7a57'
}, {
Id: 11,
Subject: 'Best Photography 2018',
StartTime: new Date(2018, 1, 22, 9, 30),
EndTime: new Date(2018, 1, 22, 11, 0),
CategoryColor: '#00bdae'
}, {
Id: 12,
Subject: 'Smarter Puppies',
StartTime: new Date(2018, 1, 9, 10, 0),
EndTime: new Date(2018, 1, 9, 11, 30),
CategoryColor: '#f57f17'
}, {
Id: 13,
Subject: 'Myths of Andromeda Galaxy',
StartTime: new Date(2018, 1, 7, 10, 30),
EndTime: new Date(2018, 1, 7, 12, 30),
CategoryColor: '#1aaa55'
}, {
Id: 14,
Subject: 'Aliens vs Humans',
StartTime: new Date(2018, 1, 5, 10, 0),
EndTime: new Date(2018, 1, 5, 11, 30),
CategoryColor: '#357cd2'
}, {
Id: 15,
Subject: 'Facts of Humming Birds',
StartTime: new Date(2018, 1, 20, 9, 30),
EndTime: new Date(2018, 1, 20, 11, 0),
CategoryColor: '#7fa900'
}, {
Id: 16,
Subject: 'Sky Gazers',
StartTime: new Date(2018, 1, 23, 11, 0),
EndTime: new Date(2018, 1, 23, 13, 0),
CategoryColor: '#ea7a57'
}, {
Id: 17,
Subject: 'The Cycle of Seasons',
StartTime: new Date(2018, 1, 12, 5, 30),
EndTime: new Date(2018, 1, 12, 7, 30),
CategoryColor: '#00bdae'
}, {
Id: 18,
Subject: 'Space Galaxies and Planets',
StartTime: new Date(2018, 1, 12, 17, 0),
EndTime: new Date(2018, 1, 12, 18, 30),
CategoryColor: '#f57f17'
}, {
Id: 19,
Subject: 'Lifecycle of Bumblebee',
StartTime: new Date(2018, 1, 15, 6, 0),
EndTime: new Date(2018, 1, 15, 7, 30),
CategoryColor: '#7fa900'
}, {
Id: 20,
Subject: 'Sky Gazers',
StartTime: new Date(2018, 1, 15, 16, 0),
EndTime: new Date(2018, 1, 15, 18, 0),
CategoryColor: '#ea7a57'
}
];The isSlotAvailable method focuses on verifies appointments within the current view’s date range. It does not evaluate availability for recurrence occurrences outside this particular date range.
Differentiate the past time appointments
Differentiate the appearance of appointments based on specific criteria, such as displaying past hour appointments with different colors on the Scheduler, using the eventRendered event. This event triggers before an appointment renders on the Scheduler.
var isReadOnly = function (data) {
    return data.ReadOnly || (data.EndTime < scheduleObj.selectedDate);
};

var scheduleObj = new ej.schedule.Schedule({
    width: '100%', height: '550px',
    views: ['Day', 'Week', 'WorkWeek', 'Month'],
    selectedDate: new Date(2018, 1, 15),
    eventRendered: function (args) {
        if (isReadOnly(args.data)) {
            args.element.classList.add('e-past-app');
        }
    },
    eventSettings: { dataSource: scheduleData }
});
scheduleObj.appendTo('#Schedule');
<!DOCTYPE html>
<html lang="en">
<head>
<title>Schedule Typescript Control</title>
<meta charset="utf-8">
<meta name="viewport" content="width=device-width, initial-scale=1.0">
<meta name="description" content="Typescript Schedule Control">
<meta name="author" content="Syncfusion">
<link href="index.css" rel="stylesheet">
<link href="https://cdn.syncfusion.com/ej2/35.1.37/bootstrap5.3.css" rel="stylesheet" />
<script src="https://cdn.syncfusion.com/ej2/35.1.37/dist/ej2.min.js" type="text/javascript"></script>
<script src="es5-datasource.js" type="text/javascript"></script>
<style>
.e-past-app {
background-color: chocolate !important;
}
</style>
</head>
<body>
<div id="container">
<div id="Schedule"></div>
</div>
<script>
var ele = document.getElementById('container');
if (ele) {
ele.style.visibility = "visible";
}
</script>
<script src="index.js" type="text/javascript"></script>
</body>
</html>var scheduleData = [
{
Id: 1,
Subject: 'Explosion of Betelgeuse Star',
StartTime: new Date(2018, 1, 11, 9, 30),
EndTime: new Date(2018, 1, 11, 11, 0),
CategoryColor: '#1aaa55'
}, {
Id: 2,
Subject: 'Thule Air Crash Report',
StartTime: new Date(2018, 1, 12, 12, 0),
EndTime: new Date(2018, 1, 12, 14, 0),
CategoryColor: '#357cd2'
}, {
Id: 3,
Subject: 'Blue Moon Eclipse',
StartTime: new Date(2018, 1, 13, 9, 30),
EndTime: new Date(2018, 1, 13, 11, 0),
CategoryColor: '#7fa900'
}, {
Id: 4,
Subject: 'Meteor Showers in 2018',
StartTime: new Date(2018, 1, 14, 13, 0),
EndTime: new Date(2018, 1, 14, 14, 30),
CategoryColor: '#ea7a57'
}, {
Id: 5,
Subject: 'Milky Way as Melting pot',
StartTime: new Date(2018, 1, 15, 12, 0),
EndTime: new Date(2018, 1, 15, 14, 0),
CategoryColor: '#00bdae'
}, {
Id: 6,
Subject: 'Mysteries of Bermuda Triangle',
StartTime: new Date(2018, 1, 15, 9, 30),
EndTime: new Date(2018, 1, 15, 11, 0),
CategoryColor: '#f57f17'
}, {
Id: 7,
Subject: 'Glaciers and Snowflakes',
StartTime: new Date(2018, 1, 16, 11, 0),
EndTime: new Date(2018, 1, 16, 12, 30),
CategoryColor: '#1aaa55'
}, {
Id: 8,
Subject: 'Life on Mars',
StartTime: new Date(2018, 1, 17, 9, 0),
EndTime: new Date(2018, 1, 17, 10, 0),
CategoryColor: '#357cd2'
}, {
Id: 9,
Subject: 'Alien Civilization',
StartTime: new Date(2018, 1, 19, 11, 0),
EndTime: new Date(2018, 1, 19, 13, 0),
CategoryColor: '#7fa900'
}, {
Id: 10,
Subject: 'Wildlife Galleries',
StartTime: new Date(2018, 1, 21, 11, 0),
EndTime: new Date(2018, 1, 21, 13, 0),
CategoryColor: '#ea7a57'
}, {
Id: 11,
Subject: 'Best Photography 2018',
StartTime: new Date(2018, 1, 22, 9, 30),
EndTime: new Date(2018, 1, 22, 11, 0),
CategoryColor: '#00bdae'
}, {
Id: 12,
Subject: 'Smarter Puppies',
StartTime: new Date(2018, 1, 9, 10, 0),
EndTime: new Date(2018, 1, 9, 11, 30),
CategoryColor: '#f57f17'
}, {
Id: 13,
Subject: 'Myths of Andromeda Galaxy',
StartTime: new Date(2018, 1, 7, 10, 30),
EndTime: new Date(2018, 1, 7, 12, 30),
CategoryColor: '#1aaa55'
}, {
Id: 14,
Subject: 'Aliens vs Humans',
StartTime: new Date(2018, 1, 5, 10, 0),
EndTime: new Date(2018, 1, 5, 11, 30),
CategoryColor: '#357cd2'
}, {
Id: 15,
Subject: 'Facts of Humming Birds',
StartTime: new Date(2018, 1, 20, 9, 30),
EndTime: new Date(2018, 1, 20, 11, 0),
CategoryColor: '#7fa900'
}, {
Id: 16,
Subject: 'Sky Gazers',
StartTime: new Date(2018, 1, 23, 11, 0),
EndTime: new Date(2018, 1, 23, 13, 0),
CategoryColor: '#ea7a57'
}, {
Id: 17,
Subject: 'The Cycle of Seasons',
StartTime: new Date(2018, 1, 12, 5, 30),
EndTime: new Date(2018, 1, 12, 7, 30),
CategoryColor: '#00bdae'
}, {
Id: 18,
Subject: 'Space Galaxies and Planets',
StartTime: new Date(2018, 1, 12, 17, 0),
EndTime: new Date(2018, 1, 12, 18, 30),
CategoryColor: '#f57f17'
}, {
Id: 19,
Subject: 'Lifecycle of Bumblebee',
StartTime: new Date(2018, 1, 15, 6, 0),
EndTime: new Date(2018, 1, 15, 7, 30),
CategoryColor: '#7fa900'
}, {
Id: 20,
Subject: 'Sky Gazers',
StartTime: new Date(2018, 1, 15, 16, 0),
EndTime: new Date(2018, 1, 15, 18, 0),
CategoryColor: '#ea7a57'
}
];Appointments occupying entire cell
The Scheduler allows appointments to occupy the full height of the cell without its header part by setting true for the enableMaxHeight property.
When multiple appointments are available in the same cell, an indicator can be displayed by setting true to the enableIndicator property. Its default value is false.
var scheduleObj = new ej.schedule.Schedule({
    height: '550px',
    currentView: 'TimelineMonth',
    selectedDate: new Date(2018, 1, 15),
    views: ['TimelineWeek', 'TimelineMonth'],
    eventSettings: {
        dataSource: scheduleData,
        enableMaxHeight: true,
        enableIndicator: false
    }
});
scheduleObj.appendTo('#Schedule');
<!DOCTYPE html>
<html lang="en">
<head>
<title>Schedule Typescript Control</title>
<meta charset="utf-8">
<meta name="viewport" content="width=device-width, initial-scale=1.0">
<meta name="description" content="Typescript Schedule Control">
<meta name="author" content="Syncfusion">
<link href="index.css" rel="stylesheet">
<link href="https://cdn.syncfusion.com/ej2/35.1.37/bootstrap5.3.css" rel="stylesheet" />
<script src="https://cdn.syncfusion.com/ej2/35.1.37/dist/ej2.min.js" type="text/javascript"></script>
<script src="es5-datasource.js" type="text/javascript"></script>
</head>
<body>
<div id="container">
<div id="Schedule"></div>
</div>
<script>
var ele = document.getElementById('container');
if (ele) {
ele.style.visibility = "visible";
}
</script>
<script src="index.js" type="text/javascript"></script>
</body>
</html>var scheduleData = [
{
Id: 1,
Subject: 'Explosion of Betelgeuse Star',
StartTime: new Date(2018, 1, 11, 9, 30),
EndTime: new Date(2018, 1, 11, 11, 0),
CategoryColor: '#1aaa55'
}, {
Id: 2,
Subject: 'Thule Air Crash Report',
StartTime: new Date(2018, 1, 12, 12, 0),
EndTime: new Date(2018, 1, 12, 14, 0),
CategoryColor: '#357cd2'
}, {
Id: 3,
Subject: 'Blue Moon Eclipse',
StartTime: new Date(2018, 1, 13, 9, 30),
EndTime: new Date(2018, 1, 13, 11, 0),
CategoryColor: '#7fa900'
}, {
Id: 4,
Subject: 'Meteor Showers in 2018',
StartTime: new Date(2018, 1, 14, 13, 0),
EndTime: new Date(2018, 1, 14, 14, 30),
CategoryColor: '#ea7a57'
}, {
Id: 5,
Subject: 'Milky Way as Melting pot',
StartTime: new Date(2018, 1, 15, 12, 0),
EndTime: new Date(2018, 1, 15, 14, 0),
CategoryColor: '#00bdae'
}, {
Id: 6,
Subject: 'Mysteries of Bermuda Triangle',
StartTime: new Date(2018, 1, 15, 9, 30),
EndTime: new Date(2018, 1, 15, 11, 0),
CategoryColor: '#f57f17'
}, {
Id: 7,
Subject: 'Glaciers and Snowflakes',
StartTime: new Date(2018, 1, 16, 11, 0),
EndTime: new Date(2018, 1, 16, 12, 30),
CategoryColor: '#1aaa55'
}, {
Id: 8,
Subject: 'Life on Mars',
StartTime: new Date(2018, 1, 17, 9, 0),
EndTime: new Date(2018, 1, 17, 10, 0),
CategoryColor: '#357cd2'
}, {
Id: 9,
Subject: 'Alien Civilization',
StartTime: new Date(2018, 1, 19, 11, 0),
EndTime: new Date(2018, 1, 19, 13, 0),
CategoryColor: '#7fa900'
}, {
Id: 10,
Subject: 'Wildlife Galleries',
StartTime: new Date(2018, 1, 21, 11, 0),
EndTime: new Date(2018, 1, 21, 13, 0),
CategoryColor: '#ea7a57'
}, {
Id: 11,
Subject: 'Best Photography 2018',
StartTime: new Date(2018, 1, 22, 9, 30),
EndTime: new Date(2018, 1, 22, 11, 0),
CategoryColor: '#00bdae'
}, {
Id: 12,
Subject: 'Smarter Puppies',
StartTime: new Date(2018, 1, 9, 10, 0),
EndTime: new Date(2018, 1, 9, 11, 30),
CategoryColor: '#f57f17'
}, {
Id: 13,
Subject: 'Myths of Andromeda Galaxy',
StartTime: new Date(2018, 1, 7, 10, 30),
EndTime: new Date(2018, 1, 7, 12, 30),
CategoryColor: '#1aaa55'
}, {
Id: 14,
Subject: 'Aliens vs Humans',
StartTime: new Date(2018, 1, 5, 10, 0),
EndTime: new Date(2018, 1, 5, 11, 30),
CategoryColor: '#357cd2'
}, {
Id: 15,
Subject: 'Facts of Humming Birds',
StartTime: new Date(2018, 1, 20, 9, 30),
EndTime: new Date(2018, 1, 20, 11, 0),
CategoryColor: '#7fa900'
}, {
Id: 16,
Subject: 'Sky Gazers',
StartTime: new Date(2018, 1, 23, 11, 0),
EndTime: new Date(2018, 1, 23, 13, 0),
CategoryColor: '#ea7a57'
}, {
Id: 17,
Subject: 'The Cycle of Seasons',
StartTime: new Date(2018, 1, 12, 5, 30),
EndTime: new Date(2018, 1, 12, 7, 30),
CategoryColor: '#00bdae'
}, {
Id: 18,
Subject: 'Space Galaxies and Planets',
StartTime: new Date(2018, 1, 12, 17, 0),
EndTime: new Date(2018, 1, 12, 18, 30),
CategoryColor: '#f57f17'
}, {
Id: 19,
Subject: 'Lifecycle of Bumblebee',
StartTime: new Date(2018, 1, 15, 6, 0),
EndTime: new Date(2018, 1, 15, 7, 30),
CategoryColor: '#7fa900'
}, {
Id: 20,
Subject: 'Sky Gazers',
StartTime: new Date(2018, 1, 15, 16, 0),
EndTime: new Date(2018, 1, 15, 18, 0),
CategoryColor: '#ea7a57'
}
];Event Buffer
The event buffer feature shows preparation time before an appointment and wrap-up time after it. Use it to block setup or tear down periods, reserve transition time between meetings, or show travel time around field visits.
Key capabilities:
- Set a different buffer duration before and after each event.
- Display buffer zones so they are visually distinct from the event itself.
- Customize buffer content and styling with a template.
- Use buffers with resource grouping.
- Render buffers in vertical views (Day, Week, Work Week) and timeline views (Timeline Day, Timeline Week, Timeline Work Week).
Configuring Event Buffer
To enable the event buffer feature, set the enableBuffer property to true in eventSettings and map the bufferBefore and bufferAfter fields to the matching fields in your data source.
eventSettings: {
    enableBuffer: true,
    fields: {
        bufferBefore: { name: 'bufferBefore' },
        bufferAfter: { name: 'bufferAfter' }
    }
}
Event Data Structure with Buffers
Set bufferBefore and bufferAfter on each event that needs a buffer. Events without these values, or with a value of 0, render without a buffer on that side.
var eventData = [
    {
        Id: 1,
        Subject: 'Team Sync',
        StartTime: new Date(2026, 0, 22, 9, 0),
        EndTime: new Date(2026, 0, 22, 10, 0),
        bufferBefore: 30,   // 30 minutes setup time before event
        bufferAfter: 15     // 15 minutes wrap-up time after event
    },
    {
        Id: 2,
        Subject: 'Client Review',
        StartTime: new Date(2026, 0, 22, 11, 0),
        EndTime: new Date(2026, 0, 22, 13, 0),
        bufferBefore: 45,
        bufferAfter: 20
    }
];
Note: If your data uses different field names, such as SetupTime and CleanupTime, map them using
bufferBefore: { name: 'SetupTime' }andbufferAfter: { name: 'CleanupTime' }.
Display buffers in the Week view
The following example enables event buffers in the Week view. Each event shows its setup time above the event and its wrap-up time below it.
var currentYear = new Date().getFullYear();
var eventData = [
    {
        Id: 1,
        Subject: 'Patient Consultation - Sarah Johnson',
        StartTime: new Date(currentYear, 0, 21, 10, 0),
        EndTime: new Date(currentYear, 0, 21, 11, 30),
        bufferBefore: 30,  // 30 min to review patient history
        bufferAfter: 45,   // 45 min to update medical records
        Location: 'Exam Room 3',
        Description: 'Follow-up consultation for hypertension management'
    },
    {
        Id: 2,
        Subject: 'Surgical Procedure - Knee Arthroscopy',
        StartTime: new Date(currentYear, 0, 22, 10, 30),
        EndTime: new Date(currentYear, 0, 22, 12, 0),
        bufferBefore: 45,  // 45 min OR setup and anesthesia prep
        bufferAfter: 30,   // 30 min recovery and post-op notes
        Location: 'Operating Room 2',
        Description: 'Outpatient knee arthroscopy for Mr. Robert Chen'
    },
    {
        Id: 3,
        Subject: 'Lunch & Rounds',
        StartTime: new Date(currentYear, 0, 22, 12, 30),
        EndTime: new Date(currentYear, 0, 22, 13, 30),
        bufferBefore: 0,   // Direct transition
        bufferAfter: 0,    // Direct transition
        Location: 'Hospital Cafeteria',
        Description: 'Working lunch with department heads'
    },
    {
        Id: 4,
        Subject: 'Patient Consultation - Michael Davis',
        StartTime: new Date(currentYear, 0, 22, 14, 30),
        EndTime: new Date(currentYear, 0, 22, 15, 15),
        bufferBefore: 25,  // 25 min to prep exam room
        bufferAfter: 20,   // 20 min to complete documentation
        Location: 'Exam Room 1',
        Description: 'New patient intake and physical examination'
    },
    {
        Id: 5,
        Subject: 'Telehealth Consultation - Emma Wilson',
        StartTime: new Date(currentYear, 0, 19, 11, 0),
        EndTime: new Date(currentYear, 0, 19, 16, 30),
        bufferBefore: 35,   // 35 min to test video connection and prepare
        bufferAfter: 20,   // 20 min to send e-prescription and notes
        Location: 'Virtual - Zoom',
        Description: 'Virtual follow-up for diabetes management'
    }
];

ej.schedule.Schedule.Inject(ej.schedule.Day, ej.schedule.Week, ej.schedule.WorkWeek, ej.schedule.DragAndDrop, ej.schedule.Resize);

var scheduleObj = new ej.schedule.Schedule({
    width: '100%',
    height: '550px',
    currentView: 'Week',
    selectedDate: new Date(currentYear, 0, 22),
    timeScale: { enable: true, interval: 60, slotCount: 2 },
    eventSettings: {
        dataSource: eventData,
        enableBuffer: true,
        fields: {
            bufferBefore: { name: 'bufferBefore' },
            bufferAfter: { name: 'bufferAfter' }
        }
    }
});
scheduleObj.appendTo('#Schedule');
<!DOCTYPE html>
<html lang="en">
<head>
<title>Schedule Typescript Control</title>
<meta charset="utf-8">
<meta name="viewport" content="width=device-width, initial-scale=1.0">
<meta name="description" content="Typescript Schedule Control">
<meta name="author" content="Syncfusion">
<link href="index.css" rel="stylesheet">
<link href="https://cdn.syncfusion.com/ej2/35.1.37/bootstrap5.3.css" rel="stylesheet" />
<script src="https://cdn.syncfusion.com/ej2/35.1.37/dist/ej2.min.js" type="text/javascript"></script>
</head>
<body>
<div id="container">
<div id="Schedule"></div>
</div>
<script>
var ele = document.getElementById('container');
if (ele) {
ele.style.visibility = "visible";
}
</script>
<script src="index.js" type="text/javascript"></script>
</body>
</html>Dynamic Buffer Updates
To change an event’s buffer at runtime, update its bufferBefore or bufferAfter value and pass the event to the saveEvent method. The Scheduler re-renders the event with the new buffer immediately.
var currentYear = new Date().getFullYear();
var eventData = [
    {
        Id: 1,
        Subject: 'Client Kickoff - Acme Corp',
        StartTime: new Date(currentYear, 0, 22, 9, 0),
        EndTime: new Date(currentYear, 0, 22, 10, 0),
        bufferBefore: 30,  // 30 min to set up conference room and test AV
        bufferAfter: 45,   // 45 min to send follow-up materials
        Location: 'Boardroom A',
        Description: 'Project kickoff meeting with Acme Corp leadership team'
    },
    {
        Id: 2,
        Subject: 'Sales Training Workshop',
        StartTime: new Date(currentYear, 0, 22, 11, 0),
        EndTime: new Date(currentYear, 0, 22, 13, 0),
        bufferBefore: 45,  // 45 min for room setup and materials distribution
        bufferAfter: 30,   // 30 min for Q&A and feedback collection
        Location: 'Training Room',
        Description: 'Quarterly sales techniques and product knowledge training'
    },
    {
        Id: 3,
        Subject: 'Product Demo - TechStart Inc',
        StartTime: new Date(currentYear, 0, 22, 14, 0),
        EndTime: new Date(currentYear, 0, 22, 15, 0),
        bufferBefore: 20,  // 20 min to test demo environment
        bufferAfter: 40,   // 40 min to gather requirements
        Location: 'Conference Room B',
        Description: 'Live demo of enterprise SaaS platform for TechStart Inc'
    }
];

ej.schedule.Schedule.Inject(ej.schedule.Day, ej.schedule.Week, ej.schedule.WorkWeek, ej.schedule.TimelineViews, ej.schedule.DragAndDrop, ej.schedule.Resize);

var scheduleObj = new ej.schedule.Schedule({
    width: '100%',
    height: '550px',
    currentView: 'TimelineWeek',
    selectedDate: new Date(currentYear, 0, 22),
    timeScale: { enable: true, interval: 60, slotCount: 4 },
    eventSettings: {
        dataSource: eventData,
        enableBuffer: true,
        fields: {
            bufferBefore: { name: 'bufferBefore' },
            bufferAfter: { name: 'bufferAfter' }
        }
    }
});
scheduleObj.appendTo('#Schedule');

function increaseBuffer() {
    if (scheduleObj.eventsData.length > 0) {
        var event = scheduleObj.eventsData[0];
        event.bufferBefore = (event.bufferBefore || 0) + 10;
        event.bufferAfter = (event.bufferAfter || 0) + 10;
        scheduleObj.saveEvent(event);
    }
}

function decreaseBuffer() {
    if (scheduleObj.eventsData.length > 0) {
        var event = scheduleObj.eventsData[0];
        event.bufferBefore = Math.max(0, (event.bufferBefore || 0) - 10);
        event.bufferAfter = Math.max(0, (event.bufferAfter || 0) - 10);
        scheduleObj.saveEvent(event);
    }
}

function resetBuffer() {
    if (scheduleObj.eventsData.length > 0) {
        var event = scheduleObj.eventsData[0];
        event.bufferBefore = 30;
        event.bufferAfter = 15;
        scheduleObj.saveEvent(event);
    }
}

new ej.buttons.Button().appendTo('#increaseBuffer');
new ej.buttons.Button().appendTo('#decreaseBuffer');
new ej.buttons.Button().appendTo('#resetBuffer');
document.getElementById('increaseBuffer').addEventListener('click', increaseBuffer);
document.getElementById('decreaseBuffer').addEventListener('click', decreaseBuffer);
document.getElementById('resetBuffer').addEventListener('click', resetBuffer);
<!DOCTYPE html>
<html lang="en">
<head>
<title>Schedule Typescript Control</title>
<meta charset="utf-8">
<meta name="viewport" content="width=device-width, initial-scale=1.0">
<meta name="description" content="Typescript Schedule Control">
<meta name="author" content="Syncfusion">
<link href="index.css" rel="stylesheet">
<link href="https://cdn.syncfusion.com/ej2/35.1.37/bootstrap5.3.css" rel="stylesheet" />
<script src="https://cdn.syncfusion.com/ej2/35.1.37/dist/ej2.min.js" type="text/javascript"></script>
</head>
<body>
<div id="container">
<button id="increaseBuffer">Increase Buffer</button>
<button id="decreaseBuffer">Decrease Buffer</button>
<button id="resetBuffer">Reset Buffer</button>
<div id="Schedule"></div>
</div>
<script>
var ele = document.getElementById('container');
if (ele) {
ele.style.visibility = "visible";
}
</script>
<script src="index.js" type="text/javascript"></script>
</body>
</html>Customizing Buffer Appearance with Templates
Use the bufferTemplate property in eventSettings to render custom content inside buffer regions. The template is called once for each buffer and receives a BufferTemplateArgs object.
| Argument | Type | Description |
|---|---|---|
| bufferType | ‘before’ | ‘after’ | Whether the template is rendering the leading or trailing buffer. |
| data | Object | The complete mapped event data, including bufferBefore, bufferAfter and all other event fields. |
| resourceData | Object | The resource data of the parent event. Available only when resource grouping is enabled. |
The following example color-codes buffer regions by event type and adds custom labels.
var currentYear = new Date().getFullYear();
var eventData = [
    {
        Id: 1,
        Subject: 'Therapy Session - John Smith',
        StartTime: new Date(currentYear, 0, 22, 9, 0),
        EndTime: new Date(currentYear, 0, 22, 10, 30),
        bufferBefore: 30,  // 30 min to review session notes
        bufferAfter: 25,   // 25 min to document observations
        eventType: 'development',
        Location: 'Counseling Room 2'
    },
    {
        Id: 2,
        Subject: 'Board Strategy Meeting',
        StartTime: new Date(currentYear, 0, 22, 11, 0),
        EndTime: new Date(currentYear, 0, 22, 12, 0),
        bufferBefore: 30,  // 30 min to prepare briefing materials
        bufferAfter: 20,   // 20 min for executive follow-up
        eventType: 'executive',
        Location: 'Boardroom'
    },
    {
        Id: 3,
        Subject: 'Personal Break',
        StartTime: new Date(currentYear, 0, 22, 12, 30),
        EndTime: new Date(currentYear, 0, 22, 13, 30),
        bufferBefore: 0,
        bufferAfter: 0,
        eventType: 'personal',
        Location: 'Office'
    },
    {
        Id: 4,
        Subject: 'Legal Consultation - Patent Filing',
        StartTime: new Date(currentYear, 0, 22, 14, 0),
        EndTime: new Date(currentYear, 0, 22, 15, 0),
        bufferBefore: 45,  // 45 min to gather all technical documents
        bufferAfter: 30,   // 30 min to review legal advice
        eventType: 'client',
        Location: 'Law Firm - Suite 500'
    }
];

ej.schedule.Schedule.Inject(ej.schedule.Day, ej.schedule.Week, ej.schedule.WorkWeek, ej.schedule.TimelineViews, ej.schedule.DragAndDrop, ej.schedule.Resize);

var scheduleObj = new ej.schedule.Schedule({
    width: '100%',
    height: '550px',
    currentView: 'TimelineWeek',
    selectedDate: new Date(currentYear, 0, 22),
    timeScale: { enable: true, interval: 60, slotCount: 4 },
    eventSettings: {
        dataSource: eventData,
        enableBuffer: true,
        fields: {
            bufferBefore: { name: 'bufferBefore' },
            bufferAfter: { name: 'bufferAfter' }
        },
        bufferTemplate: '<div style="height:100%;display:flex;align-items:center;justify-content:center;font-size:11px;color:#fff;text-align:center;">' +
        '<div>${bufferType === "before" ? "Setup" : "Wrap-up"}<br/>${bufferType === "before" ? data.bufferBefore : data.bufferAfter} min</div></div>'
    },
    eventRendered: function (args) {
        if (args.data.eventType === 'executive') {
            args.element.style.backgroundColor = '#ff6b6b';
            args.element.style.borderColor = '#ff6b6b';
        } else if (args.data.eventType === 'client') {
            args.element.style.backgroundColor = '#4e7de7';
            args.element.style.borderColor = '#4e7de7';
        } else if (args.data.eventType === 'development') {
            args.element.style.backgroundColor = '#ffa500';
            args.element.style.borderColor = '#ffa500';
        }
    }
});
scheduleObj.appendTo('#Schedule');
<!DOCTYPE html>
<html lang="en">
<head>
<title>Schedule Typescript Control</title>
<meta charset="utf-8">
<meta name="viewport" content="width=device-width, initial-scale=1.0">
<meta name="description" content="Typescript Schedule Control">
<meta name="author" content="Syncfusion">
<link href="index.css" rel="stylesheet">
<link href="https://cdn.syncfusion.com/ej2/35.1.37/bootstrap5.3.css" rel="stylesheet" />
<script src="https://cdn.syncfusion.com/ej2/35.1.37/dist/ej2.min.js" type="text/javascript"></script>
</head>
<body>
<div id="container">
<div id="Schedule"></div>
</div>
<script>
var ele = document.getElementById('container');
if (ele) {
ele.style.visibility = "visible";
}
</script>
<script src="index.js" type="text/javascript"></script>
</body>
</html>Supported Views
| View type | Views | Buffer Position |
|---|---|---|
| Vertical | Day, Week, Work Week | Above (before) and below (after) the event |
| Timeline | Timeline Day, Timeline Week, Timeline Work Week | Left (before) and right (after) of the event |
Buffers render only when time slots are shown, so timeScale.enable must be true.
Important Notes
-
Drag and resize: The Scheduler accounts for buffer time when an event is dragged or resized, so the event’s
StartTimeandEndTimestay accurate and the buffer moves with the event. -
Zero buffers: Set
bufferBeforeorbufferAfterto0to remove the buffer on that side for a specific event. -
Resource grouping: Buffers render within each resource’s row or column, and
bufferTemplatereceives that resource inresourceData.
Limiting maximum number of events displayed
In the Scheduler, you can limit the number of concurrent events displayed in each time slot to improve the quality of the presentation and prevent visual overcrowding. This can be accomplished using the following properties based on the view type:
Limiting events in month and timeline views
In the Scheduler, the default behavior is to display concurrent events based on cell height, with each new event represented as
+n more characters. However, you may want to improve the quality of the presentation by limiting the number of concurrent events. This can be accomplished by using the maxEventsPerRow property, which is defaulted to the views property.
The maxEventsPerRow property is specific to the month, timeline month, and timeline year views, allowing you to view events visually in these rows. Below is a code example that demonstrates how to use this constraint and the events displayed in a cell have been created:
var data = [
    { Id: 1, Subject: "Board Meeting", StartTime: new Date(2026, 5, 15, 9, 30, 0), EndTime: new Date(2026, 5, 15, 11, 0, 0) },
    { Id: 2, Subject: "Annual Conference", StartTime: new Date(2026, 5, 15, 10, 0, 0), EndTime: new Date(2026, 5, 15, 11, 0, 0) },
    { Id: 3, Subject: "Tech Symposium", StartTime: new Date(2026, 5, 15, 10, 30, 0), EndTime: new Date(2026, 5, 15, 11, 30, 0) },
    { Id: 4, Subject: "Client Meeting", StartTime: new Date(2026, 5, 15, 12, 0, 0), EndTime: new Date(2026, 5, 15, 14, 0, 0) },
    { Id: 5, Subject: "Project Review", StartTime: new Date(2026, 5, 15, 13, 0, 0), EndTime: new Date(2026, 5, 15, 15, 0, 0) }
];
var scheduleObj = new ej.schedule.Schedule({
    height: '550px',
    selectedDate: new Date(2026, 5, 15),
    currentView: 'Week',
    eventSettings: {
        dataSource: data
    },
    views: [
        { option: 'Month', maxEventsPerRow: 3 },
    ]
});
scheduleObj.appendTo('#Schedule');
<!DOCTYPE html>
<html lang="en">
<head>
<title>Schedule Typescript Control</title>
<meta charset="utf-8">
<meta name="viewport" content="width=device-width, initial-scale=1.0">
<meta name="description" content="Typescript Schedule Control">
<meta name="author" content="Syncfusion">
<link href="index.css" rel="stylesheet">
<link href="https://cdn.syncfusion.com/ej2/35.1.37/bootstrap5.3.css" rel="stylesheet" />
<script src="https://cdn.syncfusion.com/ej2/35.1.37/dist/ej2.min.js" type="text/javascript"></script>
</head>
<body>
<div id="container">
<div id="Schedule"></div>
</div>
<script>
var ele = document.getElementById('container');
if (ele) {
ele.style.visibility = "visible";
}
</script>
<script src="index.js" type="text/javascript"></script>
</body>
</html>The property maxEventsPerRow will be applicable only when rowAutoHeight feature is disabled in the Scheduler.
Limiting events in vertical views
The maxEventStack property on the views allows you to limit the number of overlapping events displayed in each time slot. This feature prevents visual overcrowding when multiple events overlap in the same time slot. When the number of overlapping events exceeds the specified limit, a +N indicator appears, indicating how many additional events exist. Users can click this indicator to view all remaining events in a popup window. By default, the Scheduler shows all overlapping events without any restrictions. The default value of maxEventStack is 0.
Below is a code example that demonstrates how to use this constraint:
let eventsData: Record<string, any>[] = [
    { Id: 1, Subject: "Board Meeting", StartTime: new Date(2026, 5, 15, 9, 30, 0), EndTime: new Date(2026, 5, 15, 11, 0, 0) },
    { Id: 2, Subject: "Annual Conference", StartTime: new Date(2026, 5, 15, 10, 0, 0), EndTime: new Date(2026, 5, 15, 11, 0, 0) },
    { Id: 3, Subject: "Tech Symposium", StartTime: new Date(2026, 5, 15, 10, 30, 0), EndTime: new Date(2026, 5, 15, 11, 30, 0) },
    { Id: 4, Subject: "Client Meeting", StartTime: new Date(2026, 5, 15, 12, 0, 0), EndTime: new Date(2026, 5, 15, 14, 0, 0) },
    { Id: 5, Subject: "Project Review", StartTime: new Date(2026, 5, 15, 13, 0, 0), EndTime: new Date(2026, 5, 15, 15, 0, 0) }
];

Schedule.Inject(Day, Week, WorkWeek);
let scheduleObj: Schedule = new Schedule({
    height: '550px',
    selectedDate: new Date(2026, 5, 15),
    currentView: 'Week',
    eventSettings: {
        dataSource: eventsData
    },
    views: [
        { option: 'Day', maxEventStack: 2 },
        { option: 'Week', maxEventStack: 2 },
        { option: 'WorkWeek', maxEventStack: 2 }
    ]
});
scheduleObj.appendTo('#Schedule');
How it works: In this example, maxEventStack is set to 2 for all three views. When you have three or more overlapping events in the same time slot:
- The Scheduler displays only the first two events
- A “+N” indicator appears to show how many additional events exist (for example, “+1” if there are 3 total events)
- Users can click the indicator to open a popup displaying all remaining events for that time slot
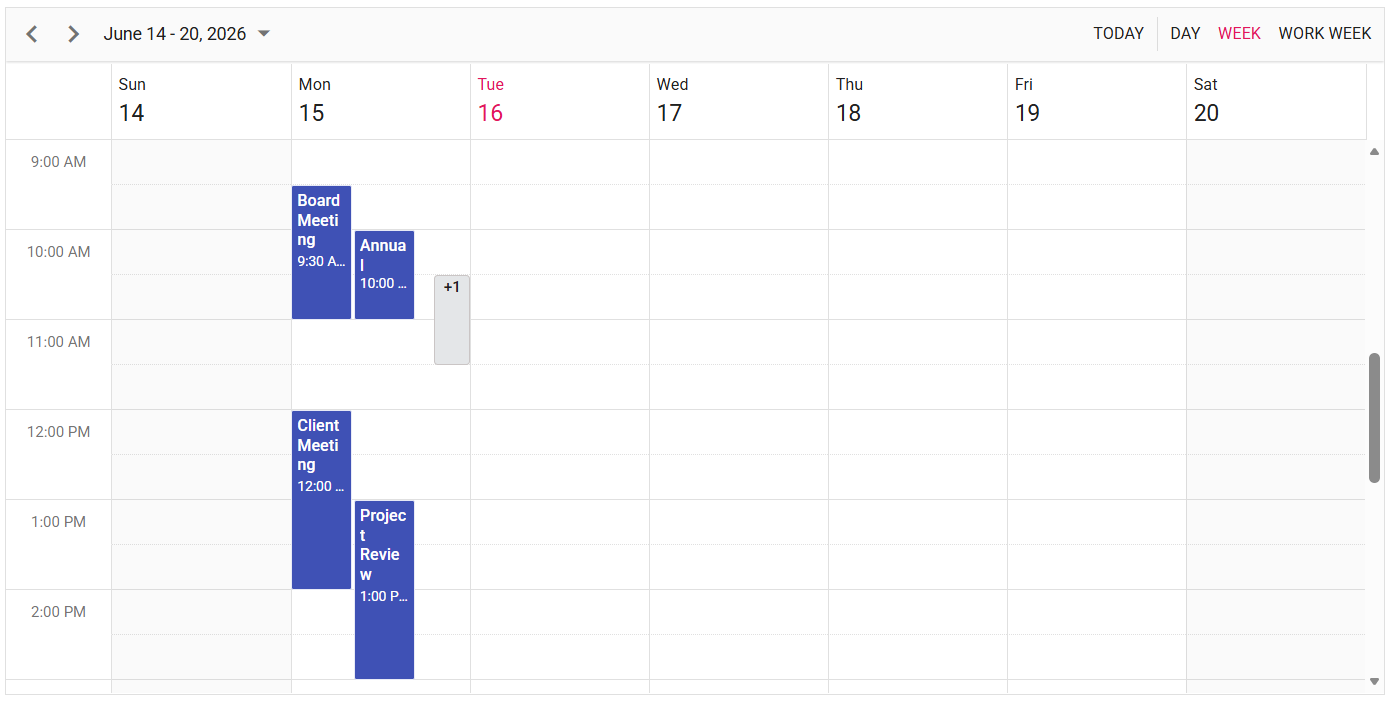
The
maxEventStackproperty is applicable only with Day, Week, and WorkWeek views when thetimeScaleoption is enabled.
Display tooltip for appointments
Tooltips provide additional information about appointments in a formatted style. Here’s how to work with tooltips:
Show or hide built-in tooltip
Display tooltips for appointments by setting true to the enableTooltip option within the eventSettings property.
var scheduleObj = new ej.schedule.Schedule({
    height: '550px',
    selectedDate: new Date(2018, 1, 15),
    views: ['TimelineDay', 'Week', 'WorkWeek', 'Month'],
    eventSettings: {
        dataSource: scheduleData,
        enableTooltip: true
    }
});
scheduleObj.appendTo('#Schedule');
<!DOCTYPE html>
<html lang="en">
<head>
<title>Schedule Typescript Control</title>
<meta charset="utf-8">
<meta name="viewport" content="width=device-width, initial-scale=1.0">
<meta name="description" content="Typescript Schedule Control">
<meta name="author" content="Syncfusion">
<link href="index.css" rel="stylesheet">
<link href="https://cdn.syncfusion.com/ej2/35.1.37/bootstrap5.3.css" rel="stylesheet" />
<script src="https://cdn.syncfusion.com/ej2/35.1.37/dist/ej2.min.js" type="text/javascript"></script>
<script src="es5-datasource.js" type="text/javascript"></script>
</head>
<body>
<div id="container">
<div id="Schedule"></div>
</div>
<script>
var ele = document.getElementById('container');
if (ele) {
ele.style.visibility = "visible";
}
</script>
<script src="index.js" type="text/javascript"></script>
</body>
</html>var scheduleData = [
{
Id: 1,
Subject: 'Explosion of Betelgeuse Star',
StartTime: new Date(2018, 1, 11, 9, 30),
EndTime: new Date(2018, 1, 11, 11, 0),
CategoryColor: '#1aaa55'
}, {
Id: 2,
Subject: 'Thule Air Crash Report',
StartTime: new Date(2018, 1, 12, 12, 0),
EndTime: new Date(2018, 1, 12, 14, 0),
CategoryColor: '#357cd2'
}, {
Id: 3,
Subject: 'Blue Moon Eclipse',
StartTime: new Date(2018, 1, 13, 9, 30),
EndTime: new Date(2018, 1, 13, 11, 0),
CategoryColor: '#7fa900'
}, {
Id: 4,
Subject: 'Meteor Showers in 2018',
StartTime: new Date(2018, 1, 14, 13, 0),
EndTime: new Date(2018, 1, 14, 14, 30),
CategoryColor: '#ea7a57'
}, {
Id: 5,
Subject: 'Milky Way as Melting pot',
StartTime: new Date(2018, 1, 15, 12, 0),
EndTime: new Date(2018, 1, 15, 14, 0),
CategoryColor: '#00bdae'
}, {
Id: 6,
Subject: 'Mysteries of Bermuda Triangle',
StartTime: new Date(2018, 1, 15, 9, 30),
EndTime: new Date(2018, 1, 15, 11, 0),
CategoryColor: '#f57f17'
}, {
Id: 7,
Subject: 'Glaciers and Snowflakes',
StartTime: new Date(2018, 1, 16, 11, 0),
EndTime: new Date(2018, 1, 16, 12, 30),
CategoryColor: '#1aaa55'
}, {
Id: 8,
Subject: 'Life on Mars',
StartTime: new Date(2018, 1, 17, 9, 0),
EndTime: new Date(2018, 1, 17, 10, 0),
CategoryColor: '#357cd2'
}, {
Id: 9,
Subject: 'Alien Civilization',
StartTime: new Date(2018, 1, 19, 11, 0),
EndTime: new Date(2018, 1, 19, 13, 0),
CategoryColor: '#7fa900'
}, {
Id: 10,
Subject: 'Wildlife Galleries',
StartTime: new Date(2018, 1, 21, 11, 0),
EndTime: new Date(2018, 1, 21, 13, 0),
CategoryColor: '#ea7a57'
}, {
Id: 11,
Subject: 'Best Photography 2018',
StartTime: new Date(2018, 1, 22, 9, 30),
EndTime: new Date(2018, 1, 22, 11, 0),
CategoryColor: '#00bdae'
}, {
Id: 12,
Subject: 'Smarter Puppies',
StartTime: new Date(2018, 1, 9, 10, 0),
EndTime: new Date(2018, 1, 9, 11, 30),
CategoryColor: '#f57f17'
}, {
Id: 13,
Subject: 'Myths of Andromeda Galaxy',
StartTime: new Date(2018, 1, 7, 10, 30),
EndTime: new Date(2018, 1, 7, 12, 30),
CategoryColor: '#1aaa55'
}, {
Id: 14,
Subject: 'Aliens vs Humans',
StartTime: new Date(2018, 1, 5, 10, 0),
EndTime: new Date(2018, 1, 5, 11, 30),
CategoryColor: '#357cd2'
}, {
Id: 15,
Subject: 'Facts of Humming Birds',
StartTime: new Date(2018, 1, 20, 9, 30),
EndTime: new Date(2018, 1, 20, 11, 0),
CategoryColor: '#7fa900'
}, {
Id: 16,
Subject: 'Sky Gazers',
StartTime: new Date(2018, 1, 23, 11, 0),
EndTime: new Date(2018, 1, 23, 13, 0),
CategoryColor: '#ea7a57'
}, {
Id: 17,
Subject: 'The Cycle of Seasons',
StartTime: new Date(2018, 1, 12, 5, 30),
EndTime: new Date(2018, 1, 12, 7, 30),
CategoryColor: '#00bdae'
}, {
Id: 18,
Subject: 'Space Galaxies and Planets',
StartTime: new Date(2018, 1, 12, 17, 0),
EndTime: new Date(2018, 1, 12, 18, 30),
CategoryColor: '#f57f17'
}, {
Id: 19,
Subject: 'Lifecycle of Bumblebee',
StartTime: new Date(2018, 1, 15, 6, 0),
EndTime: new Date(2018, 1, 15, 7, 30),
CategoryColor: '#7fa900'
}, {
Id: 20,
Subject: 'Sky Gazers',
StartTime: new Date(2018, 1, 15, 16, 0),
EndTime: new Date(2018, 1, 15, 18, 0),
CategoryColor: '#ea7a57'
}
];Customize tooltip content using templates
Customize the content and appearance of tooltips using templates. To implement this:
- Enable the default tooltip.
- Use the
tooltipTemplateoption within theeventSettingsproperty to define a custom template.
The following example demonstrates tooltip customization:
var template = '<div class="tooltip-wrap">' +
    '<div class="content-area"><div class="name">${Subject}</></div>' +
    '${if(City !== null && City !== undefined)}<div class="city">${City}</div>${/if}' +
    '<div class="time">From : ${StartTime.toLocaleString()} </div>' +
    '<div class="time">To   : ${EndTime.toLocaleString()} </div></div></div>';

var scheduleObj = new ej.schedule.Schedule({
    height: '550px',
    selectedDate: new Date(2018, 1, 15),
    views: ['Day', 'Week', 'WorkWeek', 'Month'],
    eventSettings: {
        dataSource: eventsData,
        enableTooltip: true,
        tooltipTemplate: template
    }
});
scheduleObj.appendTo('#Schedule');
<!DOCTYPE html>
<html lang="en">
<head>
<title>Schedule Typescript Control</title>
<meta charset="utf-8">
<meta name="viewport" content="width=device-width, initial-scale=1.0">
<meta name="description" content="Typescript Schedule Control">
<meta name="author" content="Syncfusion">
<link href="index.css" rel="stylesheet">
<link href="https://cdn.syncfusion.com/ej2/35.1.37/bootstrap5.3.css" rel="stylesheet" />
<style>
.e-schedule-event-tooltip .tooltip-wrap .name {
font-weight: 500;
font-size: 14px;
}
.e-schedule-event-tooltip .tooltip-wrap {
display: flex;
}
</style>
<script src="https://cdn.syncfusion.com/ej2/35.1.37/dist/ej2.min.js" type="text/javascript"></script>
<script src="es5-datasource.js" type="text/javascript"></script>
</head>
<body>
<div id="container">
<div id="Schedule"></div>
</div>
<script>
var ele = document.getElementById('container');
if (ele) {
ele.style.visibility = "visible";
}
</script>
<script src="index.js" type="text/javascript"></script>
</body>
</html>var eventsData = [
{
Id: 1,
Subject: 'Server Maintenance',
StartTime: new Date(2018, 1, 11, 10, 0),
EndTime: new Date(2018, 1, 11, 11, 30),
EventType: 'maintenance',
City: 'Seattle',
CategoryColor: '#1aaa55'
}, {
Id: 2,
Subject: 'Art & Painting Gallery',
StartTime: new Date(2018, 1, 12, 12, 0),
EndTime: new Date(2018, 1, 12, 14, 0),
EventType: 'public-event',
City: 'Costa Rica',
CategoryColor: '#357cd2'
}, {
Id: 3,
Subject: 'Dany Birthday Celebration',
StartTime: new Date(2018, 1, 13, 10, 0),
EndTime: new Date(2018, 1, 13, 11, 30),
EventType: 'family-event',
City: 'Kirkland',
CategoryColor: '#7fa900'
}, {
Id: 4,
Subject: 'John Wedding Anniversary',
StartTime: new Date(2018, 1, 14, 9, 0),
EndTime: new Date(2018, 1, 14, 10, 0),
EventType: 'family-event',
City: 'Redmond',
CategoryColor: '#ea7a57'
}, {
Id: 5,
Subject: 'ISA Annual Conference',
StartTime: new Date(2018, 1, 15, 10, 0),
EndTime: new Date(2018, 1, 15, 11, 30),
EventType: 'commercial-event',
City: 'USA',
CategoryColor: '#00bdae'
}, {
Id: 6,
Subject: 'Equipment Maintenance',
StartTime: new Date(2018, 1, 16, 12, 0),
EndTime: new Date(2018, 1, 16, 14, 0),
EventType: 'maintenance',
City: 'Seattle',
CategoryColor: '#f57f17'
}, {
Id: 7,
Subject: 'Aircraft Maintenance',
StartTime: new Date(2018, 1, 17, 10, 0),
EndTime: new Date(2018, 1, 17, 11, 30),
EventType: 'maintenance',
City: 'Seattle',
CategoryColor: '#1aaa55'
}, {
Id: 8,
Subject: 'Facilities Maintenance',
StartTime: new Date(2018, 1, 19, 9, 30),
EndTime: new Date(2018, 1, 19, 11, 0),
EventType: 'maintenance',
City: 'Seattle',
CategoryColor: '#357cd2'
}, {
Id: 9,
Subject: 'Britto Birthday Celebration',
StartTime: new Date(2018, 1, 21, 11, 0),
EndTime: new Date(2018, 1, 21, 13, 0),
EventType: 'family-event',
City: 'Greenland',
CategoryColor: '#7fa900'
}, {
Id: 10,
Subject: 'Justin Wedding Anniversary',
StartTime: new Date(2018, 1, 22, 9, 30),
EndTime: new Date(2018, 1, 22, 11, 0),
EventType: 'family-event',
City: 'Finland',
CategoryColor: '#ea7a57'
}, {
Id: 11,
Subject: 'AIEA Annual Meet',
StartTime: new Date(2018, 1, 9, 10, 0),
EndTime: new Date(2018, 1, 9, 11, 30),
EventType: 'commercial-event',
City: 'USA',
CategoryColor: '#00bdae'
}, {
Id: 12,
Subject: 'AAN Conference',
StartTime: new Date(2018, 1, 7, 10, 30),
EndTime: new Date(2018, 1, 7, 12, 30),
EventType: 'commercial-event',
City: 'USA',
CategoryColor: '#f57f17'
}, {
Id: 13,
Subject: 'Photography Gallery',
StartTime: new Date(2018, 1, 5, 10, 0),
EndTime: new Date(2018, 1, 5, 11, 30),
EventType: 'public-event',
City: 'Chennai',
CategoryColor: '#1aaa55'
}, {
Id: 14,
Subject: 'Beach Clean-up',
StartTime: new Date(2018, 1, 14, 12, 0),
EndTime: new Date(2018, 1, 14, 2, 0),
EventType: 'public-event',
City: 'Mumbai',
CategoryColor: '#357cd2'
}, {
Id: 15,
Subject: 'Turtle Walk',
StartTime: new Date(2018, 1, 19, 13, 0),
EndTime: new Date(2018, 1, 19, 14, 30),
EventType: 'public-event',
City: 'Costa Rica',
CategoryColor: '#7fa900'
}, {
Id: 16,
Subject: 'Silent Walk for Cancer day',
StartTime: new Date(2018, 1, 22, 13, 0),
EndTime: new Date(2018, 1, 22, 14, 30),
EventType: 'public-event',
City: 'Chennai',
CategoryColor: '#ea7a57'
}];Note: All field names mapped from the Scheduler dataSource can be accessed within the template, including
subject,description,location,startTime, andendTime.
Prevent tooltips for specific appointments
Selectively control when tooltips appear based on appointment data or other custom conditions using the tooltipOpen event.
To prevent a tooltip from appearing for certain events, set the cancel property to true within the tooltipOpen event. This ensures that tooltips are only displayed for the relevant appointments, improving user experience by minimizing unnecessary distractions.
var defaultData = [
    {
        Id: 1,
        Subject: 'Conference',
        StartTime: new Date(2025, 1, 7, 10, 0),
        EndTime: new Date(2025, 1, 7, 11, 0),
        IsAllDay: false
        }, {
        Id: 2,
        Subject: 'Meeting - 1',
        StartTime: new Date(2025, 1, 15, 10, 0),
        EndTime: new Date(2025, 1, 16, 12, 30),
        IsAllDay: false
        },{
        Id: 3,
        Subject: 'Paris',
        StartTime: new Date(2025, 1, 13, 12, 0),
        EndTime: new Date(2025, 1, 13, 12, 30),
        IsAllDay: false
        },{
        Id: 4,
        Subject: 'Vacation',
        StartTime: new Date(2025, 1, 12, 10, 0),
        EndTime: new Date(2025, 1, 12, 10, 30),
        IsAllDay: false
        }
];

var scheduleObj = new ej.schedule.Schedule({
    width: '100%',
    height: '550px',
    selectedDate: new Date(2025, 1, 15),
    currentView: 'Week',
    tooltipOpen: function (args) {
        var record = args.data;
        if (record.Subject === 'Vacation') {
            args.cancel = true;
        }
    },
    views: ['Day', 'Week', 'WorkWeek', 'Month', 'Year', 'Agenda', 'MonthAgenda', 'TimelineDay', 'TimelineWeek', 'TimelineWorkWeek', 'TimelineMonth', 'TimelineYear'],
    eventSettings: {
        dataSource: defaultData,
        enableTooltip: true,
        fields: {
            subject: { title: 'Name', name: 'Subject' },
            location: { title: 'Country Name', name: 'Location' },
            description: { title: 'Summary', name: 'Description' },
            startTime: { title: 'From', name: 'StartTime' },
            endTime: { title: 'To', name: 'EndTime' },
            startTimezone: { title: 'Origin', name: 'StartTimezone' },
            endTimezone: { title: 'Destination', name: 'EndTimezone' }
        }
    }
});
scheduleObj.appendTo('#Schedule');
<!DOCTYPE html>
<html lang="en">
<head>
<title>Schedule Typescript Control</title>
<meta charset="utf-8">
<meta name="viewport" content="width=device-width, initial-scale=1.0, user-scalable=no">
<meta name="description" content="Typescript Schedule Control">
<meta name="author" content="Syncfusion">
<link href="index.css" rel="stylesheet">
<link href="https://cdn.syncfusion.com/ej2/35.1.37/bootstrap5.3.css" rel="stylesheet" />
<script src="https://cdn.syncfusion.com/ej2/35.1.37/dist/ej2.min.js" type="text/javascript"></script>
<script src="es5-datasource.js" type="text/javascript"></script>
</head>
<body>
<div id="container">
<div id="Schedule"></div>
</div>
<script>
var ele = document.getElementById('container');
if (ele) {
ele.style.visibility = "visible";
}
</script>
<script src="index.js" type="text/javascript"></script>
</body>
</html>var scheduleData = [
{
Id: 1,
Subject: 'Explosion of Betelgeuse Star',
StartTime: new Date(2025, 1, 11, 9, 30),
EndTime: new Date(2025, 1, 11, 11, 0),
CategoryColor: '#1aaa55'
}, {
Id: 2,
Subject: 'Thule Air Crash Report',
StartTime: new Date(2025, 1, 12, 12, 0),
EndTime: new Date(2025, 1, 12, 14, 0),
CategoryColor: '#357cd2'
}, {
Id: 3,
Subject: 'Blue Moon Eclipse',
StartTime: new Date(2025, 1, 13, 9, 30),
EndTime: new Date(2025, 1, 13, 11, 0),
CategoryColor: '#7fa900'
}, {
Id: 4,
Subject: 'Meteor Showers in 2025',
StartTime: new Date(2025, 1, 14, 13, 0),
EndTime: new Date(2025, 1, 14, 14, 30),
CategoryColor: '#ea7a57'
}, {
Id: 5,
Subject: 'Milky Way as Melting pot',
StartTime: new Date(2025, 1, 15, 12, 0),
EndTime: new Date(2025, 1, 15, 14, 0),
CategoryColor: '#00bdae'
}, {
Id: 6,
Subject: 'Mysteries of Bermuda Triangle',
StartTime: new Date(2025, 1, 15, 9, 30),
EndTime: new Date(2025, 1, 15, 11, 0),
CategoryColor: '#f57f17'
}, {
Id: 7,
Subject: 'Glaciers and Snowflakes',
StartTime: new Date(2025, 1, 16, 11, 0),
EndTime: new Date(2025, 1, 16, 12, 30),
CategoryColor: '#1aaa55'
}, {
Id: 8,
Subject: 'Life on Mars',
StartTime: new Date(2025, 1, 17, 9, 0),
EndTime: new Date(2025, 1, 17, 10, 0),
CategoryColor: '#357cd2'
}, {
Id: 9,
Subject: 'Alien Civilization',
StartTime: new Date(2025, 1, 19, 11, 0),
EndTime: new Date(2025, 1, 19, 13, 0),
CategoryColor: '#7fa900'
}, {
Id: 10,
Subject: 'Wildlife Galleries',
StartTime: new Date(2025, 1, 21, 11, 0),
EndTime: new Date(2025, 1, 21, 13, 0),
CategoryColor: '#ea7a57'
}, {
Id: 11,
Subject: 'Best Photography 2025',
StartTime: new Date(2025, 1, 22, 9, 30),
EndTime: new Date(2025, 1, 22, 11, 0),
CategoryColor: '#00bdae'
}, {
Id: 12,
Subject: 'Smarter Puppies',
StartTime: new Date(2025, 1, 9, 10, 0),
EndTime: new Date(2025, 1, 9, 11, 30),
CategoryColor: '#f57f17'
}, {
Id: 13,
Subject: 'Myths of Andromeda Galaxy',
StartTime: new Date(2025, 1, 7, 10, 30),
EndTime: new Date(2025, 1, 7, 12, 30),
CategoryColor: '#1aaa55'
}, {
Id: 14,
Subject: 'Aliens vs Humans',
StartTime: new Date(2025, 1, 5, 10, 0),
EndTime: new Date(2025, 1, 5, 11, 30),
CategoryColor: '#357cd2'
}, {
Id: 15,
Subject: 'Facts of Humming Birds',
StartTime: new Date(2025, 1, 20, 9, 30),
EndTime: new Date(2025, 1, 20, 11, 0),
CategoryColor: '#7fa900'
}, {
Id: 16,
Subject: 'Sky Gazers',
StartTime: new Date(2025, 1, 23, 11, 0),
EndTime: new Date(2025, 1, 23, 13, 0),
CategoryColor: '#ea7a57'
}, {
Id: 17,
Subject: 'The Cycle of Seasons',
StartTime: new Date(2025, 1, 12, 5, 30),
EndTime: new Date(2025, 1, 12, 7, 30),
CategoryColor: '#00bdae'
}, {
Id: 18,
Subject: 'Space Galaxies and Planets',
StartTime: new Date(2025, 1, 12, 17, 0),
EndTime: new Date(2025, 1, 12, 18, 30),
CategoryColor: '#f57f17'
}, {
Id: 19,
Subject: 'Lifecycle of Bumblebee',
StartTime: new Date(2025, 1, 15, 6, 0),
EndTime: new Date(2025, 1, 15, 7, 30),
CategoryColor: '#7fa900'
}, {
Id: 20,
Subject: 'Sky Gazers',
StartTime: new Date(2025, 1, 15, 16, 0),
EndTime: new Date(2025, 1, 15, 18, 0),
CategoryColor: '#ea7a57'
}
];
var schedulerData = [
{
Id: 1,
Subject: 'Explosion of Betelgeuse Star',
StartTime: new Date(2025, 7, 11, 9, 30),
EndTime: new Date(2025, 7, 11, 11, 0),
CategoryColor: '#1aaa55'
}, {
Id: 2,
Subject: 'Thule Air Crash Report',
StartTime: new Date(2025, 7, 12, 12, 0),
EndTime: new Date(2025, 7, 12, 14, 0),
CategoryColor: '#357cd2'
}, {
Id: 3,
Subject: 'Blue Moon Eclipse',
StartTime: new Date(2025, 7, 13, 9, 30),
EndTime: new Date(2025, 7, 13, 11, 0),
CategoryColor: '#7fa900'
}, {
Id: 4,
Subject: 'Meteor Showers in 2025',
StartTime: new Date(2025, 7, 14, 13, 0),
EndTime: new Date(2025, 7, 14, 14, 30),
CategoryColor: '#ea7a57'
}, {
Id: 5,
Subject: 'Milky Way as Melting pot',
StartTime: new Date(2025, 7, 15, 12, 0),
EndTime: new Date(2025, 7, 15, 14, 0),
CategoryColor: '#00bdae'
}, {
Id: 6,
Subject: 'Mysteries of Bermuda Triangle',
StartTime: new Date(2025, 7, 15, 9, 30),
EndTime: new Date(2025, 7, 15, 11, 0),
CategoryColor: '#f57f17'
}, {
Id: 7,
Subject: 'Glaciers and Snowflakes',
StartTime: new Date(2025, 7, 16, 11, 0),
EndTime: new Date(2025, 7, 16, 12, 30),
CategoryColor: '#1aaa55'
}, {
Id: 8,
Subject: 'Life on Mars',
StartTime: new Date(2025, 7, 17, 9, 0),
EndTime: new Date(2025, 7, 17, 10, 0),
CategoryColor: '#357cd2'
}, {
Id: 9,
Subject: 'Alien Civilization',
StartTime: new Date(2025, 7, 19, 11, 0),
EndTime: new Date(2025, 7, 19, 13, 0),
CategoryColor: '#7fa900'
}, {
Id: 10,
Subject: 'Wildlife Galleries',
StartTime: new Date(2025, 7, 21, 11, 0),
EndTime: new Date(2025, 7, 21, 13, 0),
CategoryColor: '#ea7a57'
}, {
Id: 11,
Subject: 'Best Photography 2025',
StartTime: new Date(2025, 7, 22, 9, 30),
EndTime: new Date(2025, 7, 22, 11, 0),
CategoryColor: '#00bdae'
}, {
Id: 12,
Subject: 'Smarter Puppies',
StartTime: new Date(2025, 7, 9, 10, 0),
EndTime: new Date(2025, 7, 9, 11, 30),
CategoryColor: '#f57f17'
}, {
Id: 13,
Subject: 'Myths of Andromeda Galaxy',
StartTime: new Date(2025, 7, 7, 10, 30),
EndTime: new Date(2025, 7, 7, 12, 30),
CategoryColor: '#1aaa55'
}, {
Id: 14,
Subject: 'Aliens vs Humans',
StartTime: new Date(2025, 7, 5, 10, 0),
EndTime: new Date(2025, 7, 5, 11, 30),
CategoryColor: '#357cd2'
}, {
Id: 15,
Subject: 'Facts of Humming Birds',
StartTime: new Date(2025, 7, 20, 9, 30),
EndTime: new Date(2025, 7, 20, 11, 0),
CategoryColor: '#7fa900'
}, {
Id: 16,
Subject: 'Sky Gazers',
StartTime: new Date(2025, 7, 23, 11, 0),
EndTime: new Date(2025, 7, 23, 13, 0),
CategoryColor: '#ea7a57'
}, {
Id: 17,
Subject: 'The Cycle of Seasons',
StartTime: new Date(2025, 7, 12, 5, 30),
EndTime: new Date(2025, 7, 12, 7, 30),
CategoryColor: '#00bdae'
}, {
Id: 18,
Subject: 'Space Galaxies and Planets',
StartTime: new Date(2025, 7, 12, 17, 0),
EndTime: new Date(2025, 7, 12, 18, 30),
CategoryColor: '#f57f17'
}, {
Id: 19,
Subject: 'Lifecycle of Bumblebee',
StartTime: new Date(2025, 7, 15, 6, 0),
EndTime: new Date(2025, 7, 15, 7, 30),
CategoryColor: '#7fa900'
}, {
Id: 20,
Subject: 'Sky Gazers',
StartTime: new Date(2025, 7, 15, 16, 0),
EndTime: new Date(2025, 7, 15, 18, 0),
CategoryColor: '#ea7a57'
}
];Appointment filtering
Filter appointments based on specific criteria using the query option in eventSettings.
The following example demonstrates filtering to render only selected appointments:
var scheduleObj = new ej.schedule.Schedule({
  width: '100%',
  height: '550px',
  selectedDate: new Date(2018, 1, 15),
  eventSettings: { dataSource: scheduleData },
  eventRendered: function (args) {
    switch (args.data.EventType) {
      case 'Requested':
        args.element.style.backgroundColor = '#F57F17';
        break;
      case 'Confirmed':
        args.element.style.backgroundColor = '#7fa900';
        break;
      case 'New':
        args.element.style.backgroundColor = '#8e24aa';
        break;
    }
  }
});
scheduleObj.appendTo('#Schedule');

var confirm = new ej.buttons.CheckBox({ label: 'Confirmed', checked: true, change: onChange }, '#confirmed');
var request = new ej.buttons.CheckBox({ label: 'Requested', checked: true, change: onChange }, '#requested');
var fresh = new ej.buttons.CheckBox({ label: 'New', checked: true, change: onChange }, '#new');

function onChange() {
  var predicate;
  var checkBoxes = [confirm, request, fresh];
  checkBoxes.forEach(function (checkBoxObj) {
    if (checkBoxObj.checked) {
      if (predicate) {
        predicate = predicate.or('EventType', 'equal', checkBoxObj.label);
      } else {
        predicate = new ej.data.Predicate('EventType', 'equal', checkBoxObj.label);
      }
    }
  });
  scheduleObj.eventSettings.query = new ej.data.Query().where(predicate);
}
<!DOCTYPE html>
<html lang="en">
<head>
<title>Schedule Typescript Control</title>
<meta charset="utf-8">
<meta name="viewport" content="width=device-width, initial-scale=1.0">
<meta name="description" content="Typescript Schedule Control">
<meta name="author" content="Syncfusion">
<link href="index.css" rel="stylesheet">
<link href="https://cdn.syncfusion.com/ej2/35.1.37/bootstrap5.3.css" rel="stylesheet" />
<script src="https://cdn.syncfusion.com/ej2/35.1.37/dist/ej2.min.js" type="text/javascript"></script>
<script src="es5-datasource.js" type="text/javascript"></script>
</head>
<body>
<div id="container">
<table id="property" title="Filter events">
<tbody>
<tr>
<td>
<input id="confirmed" type="checkbox">
</td>
<td>
<input id="requested" type="checkbox">
</td>
<td>
<input id="new" type="checkbox">
</td>
</tr>
</tbody>
</table>
<div id="Schedule"></div>
</div>
<style>
#property td {
padding: 0 5px;
}
</style>
<script>
var ele = document.getElementById('container');
if (ele) {
ele.style.visibility = "visible";
}
</script>
<script src="index.js" type="text/javascript"></script>
</body>
</html>var scheduleData = [{
Id: 1,
Subject: "Surgery - Andrew",
EventType: "Confirmed",
StartTime: "2018-02-12T03:30:00.000Z",
EndTime: "2018-02-12T04:30:00.000Z"
}, {
Id: 2,
Subject: "Consulting - John",
EventType: "Confirmed",
StartTime: "2018-02-12T04:30:00.000Z",
EndTime: "2018-02-12T06:00:00.000Z"
}, {
Id: 3,
Subject: "Therapy - Robert",
EventType: "Requested",
StartTime: "2018-02-12T06:00:00.000Z",
EndTime: "2018-02-12T07:00:00.000Z"
}, {
Id: 4,
Subject: "Observation - Steven",
EventType: "Confirmed",
StartTime: "2018-02-12T07:00:00.000Z",
EndTime: "2018-02-12T08:00:00.000Z"
}, {
Id: 5,
Subject: "Extraction - Nancy",
EventType: "Confirmed",
StartTime: "2018-02-12T08:00:00.000Z",
EndTime: "2018-02-12T09:30:00.000Z"
}, {
Id: 6,
Subject: "Surgery - Paul",
EventType: "New",
StartTime: "2018-02-13T03:30:00.000Z",
EndTime: "2018-02-13T04:30:00.000Z"
}, {
Id: 7,
Subject: "Extraction - Josephs",
EventType: "Confirmed",
StartTime: "2018-02-13T04:30:00.000Z",
EndTime: "2018-02-13T05:30:00.000Z"
}, {
Id: 8,
Subject: "Consulting - Mario",
EventType: "Confirmed",
StartTime: "2018-02-13T05:30:00.000Z",
EndTime: "2018-02-13T06:30:00.000Z"
}, {
Id: 9,
Subject: "Therapy - Saveley",
EventType: "Requested",
StartTime: "2018-02-13T06:30:00.000Z",
EndTime: "2018-02-13T08:00:00.000Z"
}, {
Id: 10,
Subject: "Observation - Cartrain",
EventType: "Confirmed",
StartTime: "2018-02-13T08:00:00.000Z",
EndTime: "2018-02-13T10:00:00.000Z"
}, {
Id: 11,
Subject: "Consulting - Yang",
EventType: "New",
StartTime: "2018-02-14T03:30:00.000Z",
EndTime: "2018-02-14T04:30:00.000Z"
}, {
Id: 12,
Subject: "Observation - Michael",
EventType: "New",
StartTime: "2018-02-14T04:30:00.000Z",
EndTime: "2018-02-14T06:00:00.000Z"
}, {
Id: 13,
Subject: "Surgery - Roland",
EventType: "Confirmed",
StartTime: "2018-02-14T06:00:00.000Z",
EndTime: "2018-02-14T07:00:00.000Z"
}, {
Id: 14,
Subject: "Extraction - Francisco",
EventType: "Requested",
StartTime: "2018-02-14T07:00:00.000Z",
EndTime: "2018-02-14T08:00:00.000Z"
}, {
Id: 15,
Subject: "Therapy - Henriette",
EventType: "Confirmed",
StartTime: "2018-02-14T08:00:00.000Z",
EndTime: "2018-02-14T09:30:00.000Z"
}, {
Id: 16,
Subject: "Observation - Bernardo",
EventType: "Confirmed",
StartTime: "2018-02-15T03:30:00.000Z",
EndTime: "2018-02-15T04:30:00.000Z"
}, {
Id: 17,
Subject: "Therapy - Wilson",
EventType: "Confirmed",
StartTime: "2018-02-15T04:30:00.000Z",
EndTime: "2018-02-15T05:30:00.000Z"
}, {
Id: 18,
Subject: "Consulting - Horst",
EventType: "Confirmed",
StartTime: "2018-02-15T05:30:00.000Z",
EndTime: "2018-02-15T06:30:00.000Z"
}, {
Id: 19,
Subject: "Surgery - Limeira",
EventType: "Requested",
StartTime: "2018-02-15T06:30:00.000Z",
EndTime: "2018-02-15T08:00:00.000Z"
}, {
Id: 20,
Subject: "Observation - Victoria",
EventType: "Requested",
StartTime: "2018-02-15T08:00:00.000Z",
EndTime: "2018-02-15T10:00:00.000Z"
}, {
Id: 21,
Subject: "Extraction - Afonso",
EventType: "Confirmed",
StartTime: "2018-02-16T03:30:00.000Z",
EndTime: "2018-02-16T04:30:00.000Z"
}, {
Id: 22,
Subject: "Extraction - Paula",
EventType: "New",
StartTime: "2018-02-16T04:30:00.000Z",
EndTime: "2018-02-16T05:30:00.000Z"
}, {
Id: 23,
Subject: "Observation - George",
EventType: "Requested",
StartTime: "2018-02-16T05:30:00.000Z",
EndTime: "2018-02-16T06:30:00.000Z"
}, {
Id: 24,
Subject: "Therapy - Smith",
EventType: "New",
StartTime: "2018-02-16T06:30:00.000Z",
EndTime: "2018-02-16T08:00:00.000Z"
}, {
Id: 25,
Subject: "Surgery - Jennifer",
EventType: "New",
StartTime: "2018-02-16T08:00:00.000Z",
EndTime: "2018-02-16T10:00:00.000Z"
}];Appointment selection
Select appointments using mouse or keyboard actions. Selected appointments are visually distinguished with a box shadow effect.
| Action | Description |
|---|---|
| Mouse click or Single tap on appointments | Selects a single appointment. |
| Ctrl + [Mouse click] or Ctrl + [Single tap] on appointments | Selects multiple appointments. |
Deleting multiple appointments
After selecting multiple appointments, you can delete them all at once by pressing the delete key.
Note: When deleting multiple selected occurrences of a recurring event series, only the selected occurrences will be deleted, not the entire series.
Retrieve appointment details from UI elements
Access information about an appointment’s fields directly from its UI element using the public method getEventDetails. Pass the appointment element as an argument to this method.
The following example displays the subject of a clicked appointment:
var scheduleObj = new ej.schedule.Schedule({
    width: '100%',
    height: '550px',
    selectedDate: new Date(2018, 1, 15),
    eventSettings: { dataSource: eventData },
    eventClick: OnEventClick
});
scheduleObj.appendTo('#Schedule');

var btn = new ej.buttons.Button();
btn.appendTo('#clear');

document.getElementById('clear').onclick = function () {
    document.getElementById('EventLog').innerHTML = '';
};

function OnEventClick(args) {
    var event = scheduleObj.getEventDetails(args.element);
    appendElement(event.Subject + '<hr>');
}

function appendElement(html) {
    var span = document.createElement('span');
    span.innerHTML = html;
    var log = document.getElementById('EventLog');
    log.insertBefore(span, log.firstChild);
}
<!DOCTYPE html>
<html lang="en">
<head>
<title>Schedule Typescript Control</title>
<meta charset="utf-8">
<meta name="viewport" content="width=device-width, initial-scale=1.0">
<meta name="description" content="Typescript Schedule Control">
<meta name="author" content="Syncfusion">
<link href="index.css" rel="stylesheet">
<link href="https://cdn.syncfusion.com/ej2/35.1.37/bootstrap5.3.css" rel="stylesheet" />
<script src="https://cdn.syncfusion.com/ej2/35.1.37/dist/ej2.min.js" type="text/javascript"></script>
<script src="es5-datasource.js" type="text/javascript"></script>
<style>
.content-wrapper {
display: flex;
}
.control-section {
padding-right: 10px;
width: 70%;
}
</style>
</head>
<body>
<div id="container" class="col-lg-12">
<div class="content-wrapper">
<div class="col-lg-9 control-section">
<div id="Schedule"></div>
</div>
<div class="col-lg-3 property-section">
<table id="property" title="Event Trace">
<tbody>
<tr>
<td>
<div class="eventarea" style="height: 245px;overflow: auto">
<span class="EventLog" id="EventLog" style="word-break: normal;"></span>
</div>
</td>
</tr>
<tr>
<td>
<div class="evtbtn" style="padding-bottom: 10px">
<input id="clear" type="button" value="Clear">
</div>
</td>
</tr>
</tbody>
</table>
</div>
</div>
</div>
<script>
var ele = document.getElementById('container');
if (ele) {
ele.style.visibility = "visible";
}
</script>
<script src="index.js" type="text/javascript"></script>
</body>
</html>var eventData = [
{
Id: 1,
Subject: 'Explosion of Betelgeuse Star',
StartTime: new Date(2018, 1, 11, 9, 30),
EndTime: new Date(2018, 1, 11, 11, 0),
CategoryColor: '#1aaa55'
}, {
Id: 2,
Subject: 'Thule Air Crash Report',
StartTime: new Date(2018, 1, 12, 12, 0),
EndTime: new Date(2018, 1, 12, 14, 0),
CategoryColor: '#357cd2'
}, {
Id: 3,
Subject: 'Blue Moon Eclipse',
StartTime: new Date(2018, 1, 13, 9, 30),
EndTime: new Date(2018, 1, 13, 11, 0),
CategoryColor: '#7fa900'
}, {
Id: 4,
Subject: 'Meteor Showers in 2018',
StartTime: new Date(2018, 1, 14, 13, 0),
EndTime: new Date(2018, 1, 14, 14, 30),
CategoryColor: '#ea7a57'
}, {
Id: 5,
Subject: 'Milky Way as Melting pot',
StartTime: new Date(2018, 1, 15, 12, 0),
EndTime: new Date(2018, 1, 15, 14, 0),
CategoryColor: '#00bdae'
}, {
Id: 6,
Subject: 'Mysteries of Bermuda Triangle',
StartTime: new Date(2018, 1, 15, 9, 30),
EndTime: new Date(2018, 1, 15, 11, 0),
CategoryColor: '#f57f17'
}, {
Id: 7,
Subject: 'Glaciers and Snowflakes',
StartTime: new Date(2018, 1, 16, 11, 0),
EndTime: new Date(2018, 1, 16, 12, 30),
CategoryColor: '#1aaa55'
}, {
Id: 8,
Subject: 'Life on Mars',
StartTime: new Date(2018, 1, 17, 9, 0),
EndTime: new Date(2018, 1, 17, 10, 0),
CategoryColor: '#357cd2'
}, {
Id: 9,
Subject: 'Alien Civilization',
StartTime: new Date(2018, 1, 19, 11, 0),
EndTime: new Date(2018, 1, 19, 13, 0),
CategoryColor: '#7fa900'
}, {
Id: 10,
Subject: 'Wildlife Galleries',
StartTime: new Date(2018, 1, 21, 11, 0),
EndTime: new Date(2018, 1, 21, 13, 0),
CategoryColor: '#ea7a57'
}, {
Id: 11,
Subject: 'Best Photography 2018',
StartTime: new Date(2018, 1, 22, 9, 30),
EndTime: new Date(2018, 1, 22, 11, 0),
CategoryColor: '#00bdae'
}, {
Id: 12,
Subject: 'Smarter Puppies',
StartTime: new Date(2018, 1, 9, 10, 0),
EndTime: new Date(2018, 1, 9, 11, 30),
CategoryColor: '#f57f17'
}, {
Id: 13,
Subject: 'Myths of Andromeda Galaxy',
StartTime: new Date(2018, 1, 7, 10, 30),
EndTime: new Date(2018, 1, 7, 12, 30),
CategoryColor: '#1aaa55'
}, {
Id: 14,
Subject: 'Aliens vs Humans',
StartTime: new Date(2018, 1, 5, 10, 0),
EndTime: new Date(2018, 1, 5, 11, 30),
CategoryColor: '#357cd2'
}, {
Id: 15,
Subject: 'Facts of Humming Birds',
StartTime: new Date(2018, 1, 20, 9, 30),
EndTime: new Date(2018, 1, 20, 11, 0),
CategoryColor: '#7fa900'
}, {
Id: 16,
Subject: 'Sky Gazers',
StartTime: new Date(2018, 1, 23, 11, 0),
EndTime: new Date(2018, 1, 23, 13, 0),
CategoryColor: '#ea7a57'
}, {
Id: 17,
Subject: 'The Cycle of Seasons',
StartTime: new Date(2018, 1, 12, 5, 30),
EndTime: new Date(2018, 1, 12, 7, 30),
CategoryColor: '#00bdae'
}, {
Id: 18,
Subject: 'Space Galaxies and Planets',
StartTime: new Date(2018, 1, 12, 17, 0),
EndTime: new Date(2018, 1, 12, 18, 30),
CategoryColor: '#f57f17'
}, {
Id: 19,
Subject: 'Lifecycle of Bumblebee',
StartTime: new Date(2018, 1, 15, 6, 0),
EndTime: new Date(2018, 1, 15, 7, 30),
CategoryColor: '#7fa900'
}, {
Id: 20,
Subject: 'Sky Gazers',
StartTime: new Date(2018, 1, 15, 16, 0),
EndTime: new Date(2018, 1, 15, 18, 0),
CategoryColor: '#ea7a57'
}
];Get current view appointments
To retrieve the appointments visible in the current Scheduler view using the getCurrentViewEvents public method. In the following example, the count of current view appointment collection rendered has been traced in dataBound event.
var scheduleObj = new ej.schedule.Schedule({
    width: '100%',
    height: '550px',
    selectedDate: new Date(2018, 1, 15),
    eventSettings: { dataSource: eventData },
    dataBound: onDataBound
});
scheduleObj.appendTo('#Schedule');

var btn = new ej.buttons.Button();
btn.appendTo('#clear');

document.getElementById('clear').onclick = function () {
    document.getElementById('EventLog').innerHTML = '';
};

function onDataBound(args) {
    var event = scheduleObj.getCurrentViewEvents();
    if (event.length > 0) {
        appendElement('Events present on current view <b>' + event.length + '<b><hr>');
    } else {
        appendElement('No Events available in this view.<hr>');
    }
}

function appendElement(html) {
    var span = document.createElement('span');
    span.innerHTML = html;
    var log = document.getElementById('EventLog');
    log.insertBefore(span, log.firstChild);
}
<!DOCTYPE html>
<html lang="en">
<head>
<title>Schedule Typescript Control</title>
<meta charset="utf-8">
<meta name="viewport" content="width=device-width, initial-scale=1.0">
<meta name="description" content="Typescript Schedule Control">
<meta name="author" content="Syncfusion">
<link href="index.css" rel="stylesheet">
<link href="https://cdn.syncfusion.com/ej2/35.1.37/bootstrap5.3.css" rel="stylesheet" />
<script src="https://cdn.syncfusion.com/ej2/35.1.37/dist/ej2.min.js" type="text/javascript"></script>
<script src="es5-datasource.js" type="text/javascript"></script>
<style>
.content-wrapper {
display: flex;
}
.control-section {
padding-right: 10px;
width: 70%;
}
</style>
</head>
<body>
<div id="container" class="col-lg-12">
<div class="content-wrapper">
<div class="col-lg-9 control-section">
<div id="Schedule"></div>
</div>
<div class="col-lg-3 property-section">
<table id="property" title="Event Trace">
<tbody>
<tr>
<td>
<div class="eventarea" style="height: 245px;overflow: auto">
<span class="EventLog" id="EventLog" style="word-break: normal;"></span>
</div>
</td>
</tr>
<tr>
<td>
<div class="evtbtn" style="padding-bottom: 10px">
<input id="clear" type="button" value="Clear">
</div>
</td>
</tr>
</tbody>
</table>
</div>
</div>
</div>
<script>
var ele = document.getElementById('container');
if (ele) {
ele.style.visibility = "visible";
}
</script>
<script src="index.js" type="text/javascript"></script>
</body>
</html>var eventData = [
{
Id: 1,
Subject: 'Explosion of Betelgeuse Star',
StartTime: new Date(2018, 1, 11, 9, 30),
EndTime: new Date(2018, 1, 11, 11, 0),
CategoryColor: '#1aaa55'
}, {
Id: 2,
Subject: 'Thule Air Crash Report',
StartTime: new Date(2018, 1, 12, 12, 0),
EndTime: new Date(2018, 1, 12, 14, 0),
CategoryColor: '#357cd2'
}, {
Id: 3,
Subject: 'Blue Moon Eclipse',
StartTime: new Date(2018, 1, 13, 9, 30),
EndTime: new Date(2018, 1, 13, 11, 0),
CategoryColor: '#7fa900'
}, {
Id: 4,
Subject: 'Meteor Showers in 2018',
StartTime: new Date(2018, 1, 14, 13, 0),
EndTime: new Date(2018, 1, 14, 14, 30),
CategoryColor: '#ea7a57'
}, {
Id: 5,
Subject: 'Milky Way as Melting pot',
StartTime: new Date(2018, 1, 15, 12, 0),
EndTime: new Date(2018, 1, 15, 14, 0),
CategoryColor: '#00bdae'
}, {
Id: 6,
Subject: 'Mysteries of Bermuda Triangle',
StartTime: new Date(2018, 1, 15, 9, 30),
EndTime: new Date(2018, 1, 15, 11, 0),
CategoryColor: '#f57f17'
}, {
Id: 7,
Subject: 'Glaciers and Snowflakes',
StartTime: new Date(2018, 1, 16, 11, 0),
EndTime: new Date(2018, 1, 16, 12, 30),
CategoryColor: '#1aaa55'
}, {
Id: 8,
Subject: 'Life on Mars',
StartTime: new Date(2018, 1, 17, 9, 0),
EndTime: new Date(2018, 1, 17, 10, 0),
CategoryColor: '#357cd2'
}, {
Id: 9,
Subject: 'Alien Civilization',
StartTime: new Date(2018, 1, 19, 11, 0),
EndTime: new Date(2018, 1, 19, 13, 0),
CategoryColor: '#7fa900'
}, {
Id: 10,
Subject: 'Wildlife Galleries',
StartTime: new Date(2018, 1, 21, 11, 0),
EndTime: new Date(2018, 1, 21, 13, 0),
CategoryColor: '#ea7a57'
}, {
Id: 11,
Subject: 'Best Photography 2018',
StartTime: new Date(2018, 1, 22, 9, 30),
EndTime: new Date(2018, 1, 22, 11, 0),
CategoryColor: '#00bdae'
}, {
Id: 12,
Subject: 'Smarter Puppies',
StartTime: new Date(2018, 1, 9, 10, 0),
EndTime: new Date(2018, 1, 9, 11, 30),
CategoryColor: '#f57f17'
}, {
Id: 13,
Subject: 'Myths of Andromeda Galaxy',
StartTime: new Date(2018, 1, 7, 10, 30),
EndTime: new Date(2018, 1, 7, 12, 30),
CategoryColor: '#1aaa55'
}, {
Id: 14,
Subject: 'Aliens vs Humans',
StartTime: new Date(2018, 1, 5, 10, 0),
EndTime: new Date(2018, 1, 5, 11, 30),
CategoryColor: '#357cd2'
}, {
Id: 15,
Subject: 'Facts of Humming Birds',
StartTime: new Date(2018, 1, 20, 9, 30),
EndTime: new Date(2018, 1, 20, 11, 0),
CategoryColor: '#7fa900'
}, {
Id: 16,
Subject: 'Sky Gazers',
StartTime: new Date(2018, 1, 23, 11, 0),
EndTime: new Date(2018, 1, 23, 13, 0),
CategoryColor: '#ea7a57'
}, {
Id: 17,
Subject: 'The Cycle of Seasons',
StartTime: new Date(2018, 1, 12, 5, 30),
EndTime: new Date(2018, 1, 12, 7, 30),
CategoryColor: '#00bdae'
}, {
Id: 18,
Subject: 'Space Galaxies and Planets',
StartTime: new Date(2018, 1, 12, 17, 0),
EndTime: new Date(2018, 1, 12, 18, 30),
CategoryColor: '#f57f17'
}, {
Id: 19,
Subject: 'Lifecycle of Bumblebee',
StartTime: new Date(2018, 1, 15, 6, 0),
EndTime: new Date(2018, 1, 15, 7, 30),
CategoryColor: '#7fa900'
}, {
Id: 20,
Subject: 'Sky Gazers',
StartTime: new Date(2018, 1, 15, 16, 0),
EndTime: new Date(2018, 1, 15, 18, 0),
CategoryColor: '#ea7a57'
}
];Get all appointments
To access all appointments rendered on the Scheduler, regardless of the current view, use the getEvents public method. In the following example, the count of entire appointment collection rendered on the Scheduler has been traced in dataBound event.
var scheduleObj = new ej.schedule.Schedule({
    width: '100%',
    height: '550px',
    selectedDate: new Date(2018, 1, 15),
    eventSettings: { dataSource: eventData },
    dataBound: onDataBound
});
scheduleObj.appendTo('#Schedule');

var btn = new ej.buttons.Button();
btn.appendTo('#clear');

document.getElementById('clear').onclick = function () {
    document.getElementById('EventLog').innerHTML = '';
};

function onDataBound(args) {
    var event = scheduleObj.getEvents();
    appendElement('Events present on scheduler <b>' + event.length + '<b><hr>');
}

function appendElement(html) {
    var span = document.createElement('span');
    span.innerHTML = html;
    var log = document.getElementById('EventLog');
    log.insertBefore(span, log.firstChild);
}
<!DOCTYPE html>
<html lang="en">
<head>
<title>Schedule Typescript Control</title>
<meta charset="utf-8">
<meta name="viewport" content="width=device-width, initial-scale=1.0">
<meta name="description" content="Typescript Schedule Control">
<meta name="author" content="Syncfusion">
<link href="index.css" rel="stylesheet">
<link href="https://cdn.syncfusion.com/ej2/35.1.37/bootstrap5.3.css" rel="stylesheet" />
<script src="https://cdn.syncfusion.com/ej2/35.1.37/dist/ej2.min.js" type="text/javascript"></script>
<script src="es5-datasource.js" type="text/javascript"></script>
<style>
.content-wrapper {
display: flex;
}
.control-section {
padding-right: 10px;
width: 70%;
}
</style>
</head>
<body>
<div id="container" class="col-lg-12">
<div class="content-wrapper">
<div class="col-lg-9 control-section">
<div id="Schedule"></div>
</div>
<div class="col-lg-3 property-section">
<table id="property" title="Event Trace">
<tbody>
<tr>
<td>
<div class="eventarea" style="height: 245px;overflow: auto">
<span class="EventLog" id="EventLog" style="word-break: normal;"></span>
</div>
</td>
</tr>
<tr>
<td>
<div class="evtbtn" style="padding-bottom: 10px">
<input id="clear" type="button" value="Clear">
</div>
</td>
</tr>
</tbody>
</table>
</div>
</div>
</div>
<script>
var ele = document.getElementById('container');
if (ele) {
ele.style.visibility = "visible";
}
</script>
<script src="index.js" type="text/javascript"></script>
</body>
</html>var eventData = [
{
Id: 1,
Subject: 'Explosion of Betelgeuse Star',
StartTime: new Date(2018, 1, 11, 9, 30),
EndTime: new Date(2018, 1, 11, 11, 0),
CategoryColor: '#1aaa55'
}, {
Id: 2,
Subject: 'Thule Air Crash Report',
StartTime: new Date(2018, 1, 12, 12, 0),
EndTime: new Date(2018, 1, 12, 14, 0),
CategoryColor: '#357cd2'
}, {
Id: 3,
Subject: 'Blue Moon Eclipse',
StartTime: new Date(2018, 1, 13, 9, 30),
EndTime: new Date(2018, 1, 13, 11, 0),
CategoryColor: '#7fa900'
}, {
Id: 4,
Subject: 'Meteor Showers in 2018',
StartTime: new Date(2018, 1, 14, 13, 0),
EndTime: new Date(2018, 1, 14, 14, 30),
CategoryColor: '#ea7a57'
}, {
Id: 5,
Subject: 'Milky Way as Melting pot',
StartTime: new Date(2018, 1, 15, 12, 0),
EndTime: new Date(2018, 1, 15, 14, 0),
CategoryColor: '#00bdae'
}, {
Id: 6,
Subject: 'Mysteries of Bermuda Triangle',
StartTime: new Date(2018, 1, 15, 9, 30),
EndTime: new Date(2018, 1, 15, 11, 0),
CategoryColor: '#f57f17'
}, {
Id: 7,
Subject: 'Glaciers and Snowflakes',
StartTime: new Date(2018, 1, 16, 11, 0),
EndTime: new Date(2018, 1, 16, 12, 30),
CategoryColor: '#1aaa55'
}, {
Id: 8,
Subject: 'Life on Mars',
StartTime: new Date(2018, 1, 17, 9, 0),
EndTime: new Date(2018, 1, 17, 10, 0),
CategoryColor: '#357cd2'
}, {
Id: 9,
Subject: 'Alien Civilization',
StartTime: new Date(2018, 1, 19, 11, 0),
EndTime: new Date(2018, 1, 19, 13, 0),
CategoryColor: '#7fa900'
}, {
Id: 10,
Subject: 'Wildlife Galleries',
StartTime: new Date(2018, 1, 21, 11, 0),
EndTime: new Date(2018, 1, 21, 13, 0),
CategoryColor: '#ea7a57'
}, {
Id: 11,
Subject: 'Best Photography 2018',
StartTime: new Date(2018, 1, 22, 9, 30),
EndTime: new Date(2018, 1, 22, 11, 0),
CategoryColor: '#00bdae'
}, {
Id: 12,
Subject: 'Smarter Puppies',
StartTime: new Date(2018, 1, 9, 10, 0),
EndTime: new Date(2018, 1, 9, 11, 30),
CategoryColor: '#f57f17'
}, {
Id: 13,
Subject: 'Myths of Andromeda Galaxy',
StartTime: new Date(2018, 1, 7, 10, 30),
EndTime: new Date(2018, 1, 7, 12, 30),
CategoryColor: '#1aaa55'
}, {
Id: 14,
Subject: 'Aliens vs Humans',
StartTime: new Date(2018, 1, 5, 10, 0),
EndTime: new Date(2018, 1, 5, 11, 30),
CategoryColor: '#357cd2'
}, {
Id: 15,
Subject: 'Facts of Humming Birds',
StartTime: new Date(2018, 1, 20, 9, 30),
EndTime: new Date(2018, 1, 20, 11, 0),
CategoryColor: '#7fa900'
}, {
Id: 16,
Subject: 'Sky Gazers',
StartTime: new Date(2018, 1, 23, 11, 0),
EndTime: new Date(2018, 1, 23, 13, 0),
CategoryColor: '#ea7a57'
}, {
Id: 17,
Subject: 'The Cycle of Seasons',
StartTime: new Date(2018, 1, 12, 5, 30),
EndTime: new Date(2018, 1, 12, 7, 30),
CategoryColor: '#00bdae'
}, {
Id: 18,
Subject: 'Space Galaxies and Planets',
StartTime: new Date(2018, 1, 12, 17, 0),
EndTime: new Date(2018, 1, 12, 18, 30),
CategoryColor: '#f57f17'
}, {
Id: 19,
Subject: 'Lifecycle of Bumblebee',
StartTime: new Date(2018, 1, 15, 6, 0),
EndTime: new Date(2018, 1, 15, 7, 30),
CategoryColor: '#7fa900'
}, {
Id: 20,
Subject: 'Sky Gazers',
StartTime: new Date(2018, 1, 15, 16, 0),
EndTime: new Date(2018, 1, 15, 18, 0),
CategoryColor: '#ea7a57'
}
];Refresh appointments
Update only the appointments without refreshing the entire Scheduler using the refreshEvents public method.
scheduleObj.refreshEvents();This method is useful when changes have been made to the appointment data and those changes need to be reflected in the UI without a full Scheduler refresh.
You can refer to our JavaScript Scheduler feature tour page for its groundbreaking feature representations. You can also explore our JavaScript Scheduler example to knows how to present and manipulate data.