CRUD Actions in ASP.NET MVC Scheduler
Events, a.k.a. Appointments, play an important role in Scheduler with which the users mostly interact. You can easily manipulate (add/edit/delete) the desired appointments as and when required either using the editor window or through the drag and resize action.
Add
Any kind of appointment, such as normal, all-day, spanned, or recurring events, can be easily added to the Scheduler using any of the following ways.
Creation using editor window
The default editor window opens when you double click on the Scheduler cells. It provides you with event related options such as Subject, Location, Start and End time, All-day, Timezone, Description and other recurrence options. With these available fields, you can choose to provide detailed information to the events. Once the fields are filled with proper values, enter the Save button to add an event.
If you want to simply provide the Subject alone for appointments, single-click on the required cells, which will open the quick popup, expecting you to enter the subject alone and save it. You can also select multiple cells and press the Enter key to open the quick popup for the selected time range and save the appointment for that time range.
If you need to add other fields to the editor window, you can opt for the custom editor window, which allows you to include fields as per your application needs. If you need to add just one or two additional fields to the existing default editor window, you can do so by defining it manually and then appending it to the editor window.
Creation using addEvent method
The appointments can be created dynamically by using addEvent method. Either you can add a single or a collection of appointment objects using addEvent method. The following code example shows you how to use the addEvent method to create multiple appointments simultaneously.
Inserting events into database at server-side
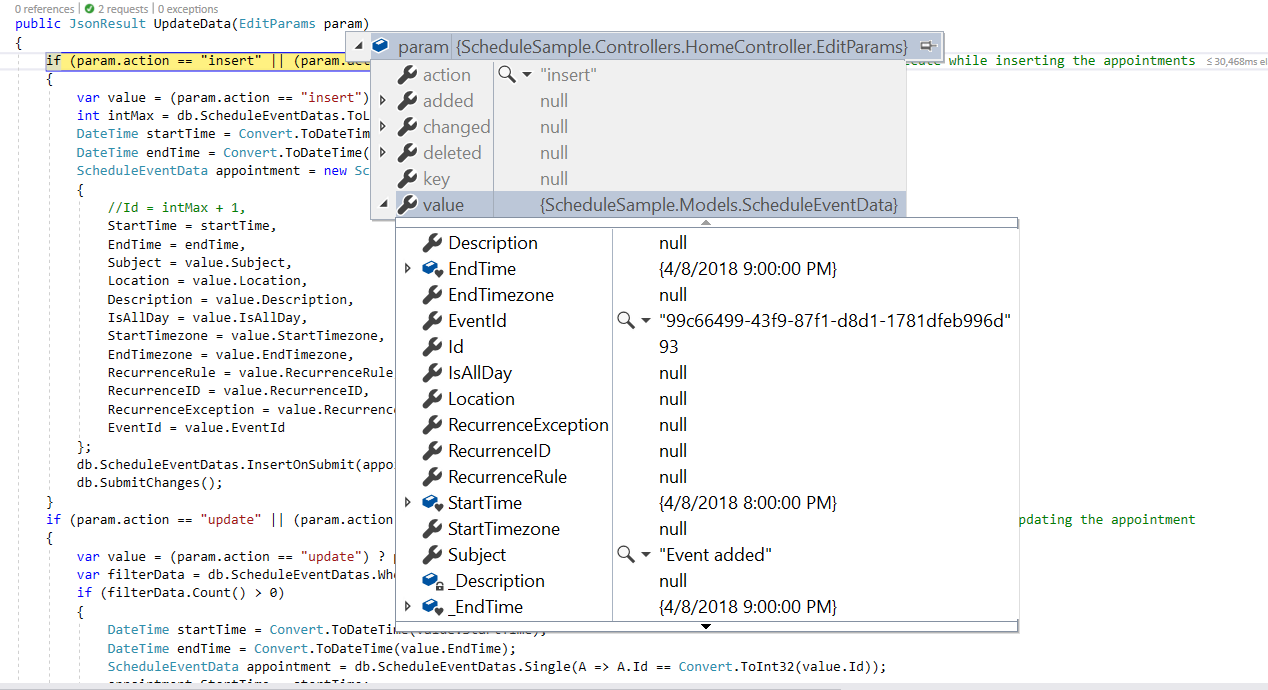
While adding the normal or recurring events to the Scheduler, insert action takes place and the following code example describes how to add a new event into database at server side.
if (param.action == "insert" || (param.action == "batch" && param.added != null)) // this block of code will execute while inserting the appointments
{
    var value = (param.action == "insert") ? param.value : param.added[0];
    int intMax = db.ScheduleEventDatas.ToList().Count > 0 ? db.ScheduleEventDatas.ToList().Max(p => p.Id) : 1;
    DateTime startTime = Convert.ToDateTime(value.StartTime);
    DateTime endTime = Convert.ToDateTime(value.EndTime);
    ScheduleEventData appointment = new ScheduleEventData()
    {
        Id = intMax + 1,
        StartTime = startTime,
        EndTime = endTime,
        Subject = value.Subject,
        IsAllDay = value.IsAllDay,
        StartTimezone = value.StartTimezone,
        EndTimezone = value.EndTimezone,
        RecurrenceRule = value.RecurrenceRule,
        RecurrenceID = value.RecurrenceID,
        RecurrenceException = value.RecurrenceException
    };
    db.ScheduleEventDatas.InsertOnSubmit(appointment);
    db.SubmitChanges();
}
Restricting add action based on specific criteria
In the following example, specific fields of the Scheduler editor window, such as Subject and Location, are validated. If they are left blank, the default required validation message will be displayed when clicking the Save button.
Additionally, a regex condition has been added to the Location field, so that if any special characters are typed into it, a custom validation message will be displayed.
You can also dynamically prevent the creation of appointments on the Scheduler. For example, if you want to prevent the creation of appointments on weekend days, you can check for the appropriate condition within the ActionBegin event.
Edit
Just as appointments such as normal, all-day, spanned, or recurring events can be created, they can be edited using any of the following ways.
Update using editor window
You can open the default editor window filled with appointment details by double clicking on the required events. It gets pre-filled with event options such as Subject, Location, Start and End time, All-day, timezone, description and other recurrence options, from which you can edit the desired field values and, then enter the Save button to update it.
NOTE
You can also single-click on appointments, which opens the quick info popup with edit and delete options. Clicking on the
editoption will open the default editor filled with event details, and thedeleteoption will prompt for delete confirmation.
Update using saveEvent method
The appointments can be edited and updated manually using the saveEvent method. The following code examples show how to edit the normal and recurring events.
Normal event - Here, an event with ID 3 is edited and its subject is changed with a new text. When the modified data object is passed onto the saveEvent method, the changes gets reflected onto the original event. The Id field is mandatory in this edit process, where the modified event object should hold the valid Id value that exists in the Scheduler data source.
Recurring event - The following code example shows how to edit a single occurrence of a recurring event. In this case, the modified data should hold an additional field namely RecurrenceID mapping to its parent recurring event’s Id value. Also, this modified occurrence will be considered as a new event in the Scheduler dataSource, where it is linked with its parent event through the RecurrenceID field value. The saveEvent method takes 2 arguments, first one accepting the modified event data object and second argument accepting either of the 2 text values - EditOccurrence or EditSeries.
When the second argument is passed as EditOccurrence, it means that the passed event data is a single modified occurrence. However, if the second argument is passed as EditSeries, the modified data needs to be edited as a whole series, and therefore no new event object will be maintained in the Scheduler dataSource.
In case of modifying the single occurrence, it is also necessary to update the RecurrenceException field of parent event altogether with the occurrence editing. To know more about how to set RecurrenceException values, refer the recurring events topic.
Updating events in database at server-side
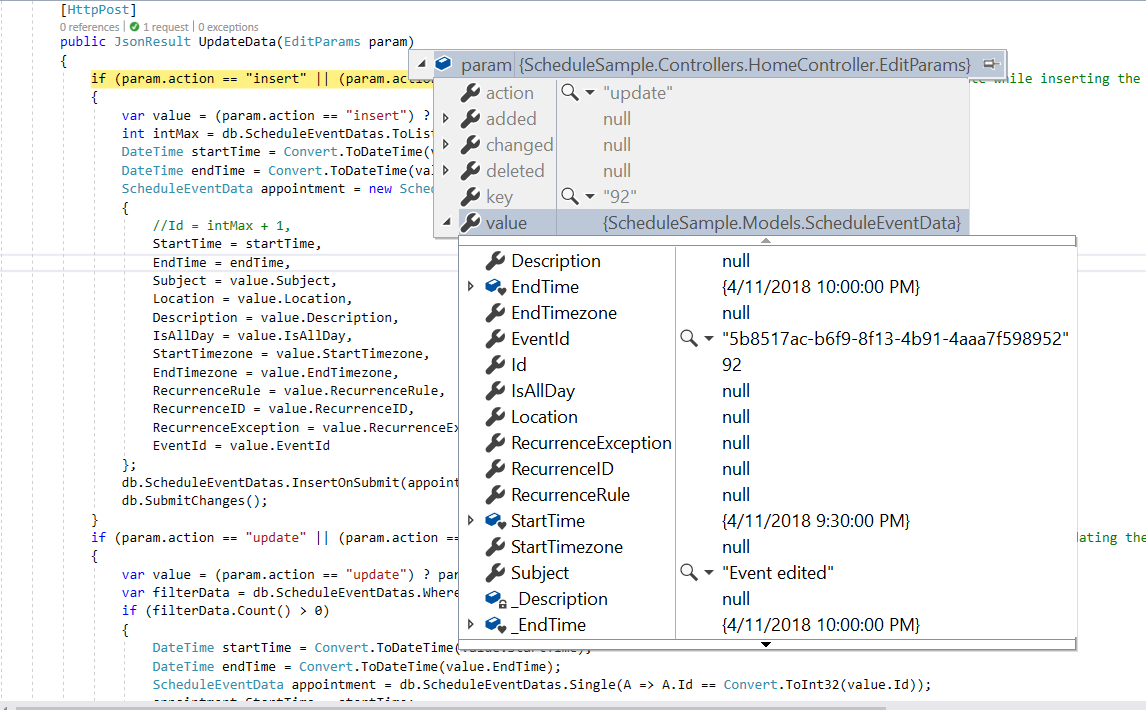
While editing the normal events in the Scheduler, update action takes place and the following code example describes how to update event into database at server side.
if (param.action == "update" || (param.action == "batch" && param.changed != null)) // this block of code will execute while updating the appointment
{
    var value = (param.action == "update") ? param.value : param.changed[0];
    var filterData = db.ScheduleEventDatas.Where(c => c.Id == Convert.ToInt32(value.Id));
    if (filterData.Count() > 0)
    {
        DateTime startTime = Convert.ToDateTime(value.StartTime);
        DateTime endTime = Convert.ToDateTime(value.EndTime);
        ScheduleEventData appointment = db.ScheduleEventDatas.Single(A => A.Id == Convert.ToInt32(value.Id));
        appointment.StartTime = startTime;
        appointment.EndTime = endTime;
        appointment.StartTimezone = value.StartTimezone;
        appointment.EndTimezone = value.EndTimezone;
        appointment.Subject = value.Subject;
        appointment.IsAllDay = value.IsAllDay;
        appointment.RecurrenceRule = value.RecurrenceRule;
        appointment.RecurrenceID = value.RecurrenceID;
        appointment.RecurrenceException = value.RecurrenceException;
    }
    db.SubmitChanges();
}
Editing a single occurrence or entire series
The recurring appointments can be edited in either of the following ways.
- Single occurrence
- Entire series
Editing single occurrence - When you double click on a recurring event, a popup prompts you to choose either to edit the single event or entire series. From this, if you choose to select EDIT EVENT option, a single occurrence of the recurring appointment alone will be edited. The following process takes place while editing a single occurrence,
-
A new event will be created from the parent event data and added to the Scheduler dataSource, with all its default field values overwritten with the newly modified data and additionally, the
RecurrenceIDfield will be added to it, that holds theIdvalue of the parent recurring event. Also, a newIdwill be generated for this event in the dataSource. -
The parent recurring event needs to be updated with appropriate
RecurrenceExceptionfield to hold the edited occurrence appointment’s date collection.
Therefore, when a single occurrence is edited from a recurring event, the batch action takes place, allowing both the Add and Edit action requests to occur together.
NOTE
If you edit an existing edited occurrence of a recurring event, only the edited occurrence that is present in the database as an individual event object will be updated. In this case, only the
updateaction takes place on the edited occurrence object in the database.
if (param.action == "insert" || (param.action == "batch" && param.added != null)) // this block of code will execute while inserting the appointments
{
    var value = (param.action == "insert") ? param.value : param.added[0];
   int intMax = db.ScheduleEventDatas.ToList().Count > 0 ? db.ScheduleEventDatas.ToList().Max(p => p.Id) : 1;
    DateTime startTime = Convert.ToDateTime(value.StartTime);
    DateTime endTime = Convert.ToDateTime(value.EndTime);
    ScheduleEventData appointment = new ScheduleEventData()
    {
        Id = intMax + 1,
        StartTime = startTime,
        EndTime = endTime,
        Subject = value.Subject,
        IsAllDay = value.IsAllDay,
        StartTimezone = value.StartTimezone,
        EndTimezone = value.EndTimezone,
        RecurrenceRule = value.RecurrenceRule,
        RecurrenceID = value.RecurrenceID,
        FollowingID = value.FollowingID,
        RecurrenceException = value.RecurrenceException
    };
    db.ScheduleEventDatas.InsertOnSubmit(appointment);
    db.SubmitChanges();
}
if (param.action == "update" || (param.action == "batch" && param.changed != null)) // this block of code will execute while updating the appointment
{
    var value = (param.action == "update") ? param.value : param.changed[0];
    var filterData = db.ScheduleEventDatas.Where(c => c.Id == Convert.ToInt32(value.Id));
    if (filterData.Count() > 0)
    {
        DateTime startTime = Convert.ToDateTime(value.StartTime);
        DateTime endTime = Convert.ToDateTime(value.EndTime);
        ScheduleEventData appointment = db.ScheduleEventDatas.Single(A => A.Id == Convert.ToInt32(value.Id));
        appointment.StartTime = startTime;
        appointment.EndTime = endTime;
        appointment.StartTimezone = value.StartTimezone;
        appointment.EndTimezone = value.EndTimezone;
        appointment.Subject = value.Subject;
        appointment.IsAllDay = value.IsAllDay;
        appointment.RecurrenceRule = value.RecurrenceRule;
        appointment.RecurrenceID = value.RecurrenceID;
        appointment.FollowingID = value.FollowingID;
        appointment.RecurrenceException = value.RecurrenceException;
    }
    db.SubmitChanges();
}
Editing entire series - When you select an option EDIT SERIES from the popup that opens on double clicking the recurring event, the whole recurring series will be updated with the newly provided value. When this option is chosen explicitly and if a parent event holds any edited occurrences, all its child occurrences will be removed from the dataSource, and the single parent data will be updated.
This action of editing the entire series also leads to the batch process, as both the Delete and Edit actions take place together.
if (param.action == "update" || (param.action == "batch" && param.changed != null)) // this block of code will execute while updating the appointment
{
    var value = (param.action == "update") ? param.value : param.changed[0];
    var filterData = db.ScheduleEventDatas.Where(c => c.Id == Convert.ToInt32(value.Id));
    if (filterData.Count() > 0)
    {
        DateTime startTime = Convert.ToDateTime(value.StartTime);
        DateTime endTime = Convert.ToDateTime(value.EndTime);
        ScheduleEventData appointment = db.ScheduleEventDatas.Single(A => A.Id == Convert.ToInt32(value.Id));
        appointment.StartTime = startTime;
        appointment.EndTime = endTime;
        appointment.StartTimezone = value.StartTimezone;
        appointment.EndTimezone = value.EndTimezone;
        appointment.Subject = value.Subject;
        appointment.IsAllDay = value.IsAllDay;
        appointment.RecurrenceRule = value.RecurrenceRule;
        appointment.RecurrenceID = value.RecurrenceID;
        appointment.RecurrenceException = value.RecurrenceException;
    }
    db.SubmitChanges();
}
if (param.action == "remove" || (param.action == "batch" && param.deleted != null)) // this block of code will execute while removing the appointment
{
    if (param.action == "remove")
    {
        int key = Convert.ToInt32(param.key);
        ScheduleEventData appointment = db.ScheduleEventDatas.Where(c => c.Id == key).FirstOrDefault();
        if (appointment != null) db.ScheduleEventDatas.DeleteOnSubmit(appointment);
    }
    else
    {
        foreach (var apps in param.deleted)
        {
            ScheduleEventData appointment = db.ScheduleEventDatas.Where(c => c.Id == apps.Id).FirstOrDefault();
            if (appointment != null) db.ScheduleEventDatas.DeleteOnSubmit(appointment);
        }
    }
    db.SubmitChanges();
}
NOTE
To know more about handling recurrence exceptions, refer the Adding exceptions topic.
Editing current and following events
The recurring appointments can be edited from current and following events when enable the property editFollowingEvents.
Editing Following Events - When you double click on a recurring event, a popup prompts you to choose either to edit the single event or Edit Following Events or entire series. From this, if you choose to select EDIT FOLLOWING EVENTS option, a current and following events of the recurring appointment will be edited. The following process takes place while editing a following events,
-
A new event will be created from the parent event data and added to the Scheduler dataSource, with all its default field values overwritten with the newly modified data and additionally, the
followingIDfield will be added to it, that holds theidvalue of the immediate parent recurring event. Also, a newIdwill be generated for this event in the dataSource. -
The parent recurring event needs to be updated with appropriate
recurrenceRulefield to hold the modified occurrence appointment’s end date.
Therefore, when the following events are edited from a recurring event, the batch action takes place, allowing the Add, Edit, and Delete action requests to occur together.
if (param.action == "insert" || (param.action == "batch" && param.added != null)) // this block of code will execute while inserting the appointments
{
    var value = (param.action == "insert") ? param.value : param.added[0];
    int intMax = db.ScheduleEventDatas.ToList().Count > 0 ? db.ScheduleEventDatas.ToList().Max(p => p.Id) : 1;
    DateTime startTime = Convert.ToDateTime(value.StartTime);
    DateTime endTime = Convert.ToDateTime(value.EndTime);
    ScheduleEventData appointment = new ScheduleEventData()
    {
        Id = intMax + 1,
        StartTime = startTime,
        EndTime = endTime,
        Subject = value.Subject,
        IsAllDay = value.IsAllDay,
        StartTimezone = value.StartTimezone,
        EndTimezone = value.EndTimezone,
        RecurrenceRule = value.RecurrenceRule,
        RecurrenceID = value.RecurrenceID,
        FollowingID = value.FollowingID,
        RecurrenceException = value.RecurrenceException
    };
    db.ScheduleEventDatas.InsertOnSubmit(appointment);
    db.SubmitChanges();
}
if (param.action == "update" || (param.action == "batch" && param.changed != null)) // this block of code will execute while updating the appointment
{
    var value = (param.action == "update") ? param.value : param.changed[0];
    var filterData = db.ScheduleEventDatas.Where(c => c.Id == Convert.ToInt32(value.Id));
    if (filterData.Count() > 0)
    {
        DateTime startTime = Convert.ToDateTime(value.StartTime);
        DateTime endTime = Convert.ToDateTime(value.EndTime);
        ScheduleEventData appointment = db.ScheduleEventDatas.Single(A => A.Id == Convert.ToInt32(value.Id));
        appointment.StartTime = startTime;
        appointment.EndTime = endTime;
        appointment.StartTimezone = value.StartTimezone;
        appointment.EndTimezone = value.EndTimezone;
        appointment.Subject = value.Subject;
        appointment.IsAllDay = value.IsAllDay;
        appointment.RecurrenceRule = value.RecurrenceRule;
        appointment.RecurrenceID = value.RecurrenceID;
        appointment.FollowingID = value.FollowingID;
        appointment.RecurrenceException = value.RecurrenceException;
    }
    db.SubmitChanges();
}
if (param.action == "remove" || (param.action == "batch" && param.deleted != null)) // this block of code will execute while removing the appointment
{
    if (param.action == "remove")
    {
        int key = Convert.ToInt32(param.key);
        ScheduleEventData appointment = db.ScheduleEventDatas.Where(c => c.Id == key).FirstOrDefault();
        if (appointment != null) db.ScheduleEventDatas.DeleteOnSubmit(appointment);
    }
    else
    {
        foreach (var apps in param.deleted)
        {
            ScheduleEventData appointment = db.ScheduleEventDatas.Where(c => c.Id == apps.Id).FirstOrDefault();
            if (appointment != null) db.ScheduleEventDatas.DeleteOnSubmit(appointment);
        }
    }
    db.SubmitChanges();
}
Restricting edit action based on specific criteria
You can also dynamically prevent the editing of appointments on the Scheduler. For example, if you want to prevent the updating of appointments on non-working hours, you can check for the appropriate condition within the ActionBegin event.
Delete
The appointments can be deleted in any of the following ways:
- Selecting an appointment and clicking the delete icon from the quick popup that opens.
- Selecting an appointment and pressing the
Deletekey. - Selecting multiple appointments by tapping and holding an event, then continuously single-clicking on other consecutive events, and then pressing the
Deletekey. - Double-clicking on an event which opens the default event editor pre-filled with event details, and then choosing the
Deletebutton in it.
While performing any of the above actions, a popup with a delete confirmation message will be displayed, prompting you to proceed with deleting the appointment.
Deletion using editor window
When you double click an event, the default editor window will be opened which includes a Delete button at the bottom left position to allow you to delete that particular appointment. When deleting an appointment through this editor window, the delete alert confirmation will not be asked and the event will be deleted immediately.
Deletion using deleteEvent method
The appointments can be removed manually using the deleteEvent method. The following code examples show how to delete normal and recurring events.
Normal event - You can delete the normal appointments of the Scheduler by simply passing its Id value or the entire event object collection to the deleteEvent method.
Recurring Event - The recurring events can be removed as an entire series or by removing a single occurrence using the deleteEvent method, which takes in either the DeleteSeries or DeleteOccurrence parameters. The following code example shows how to delete an entire series.
Removing events from database at server-side
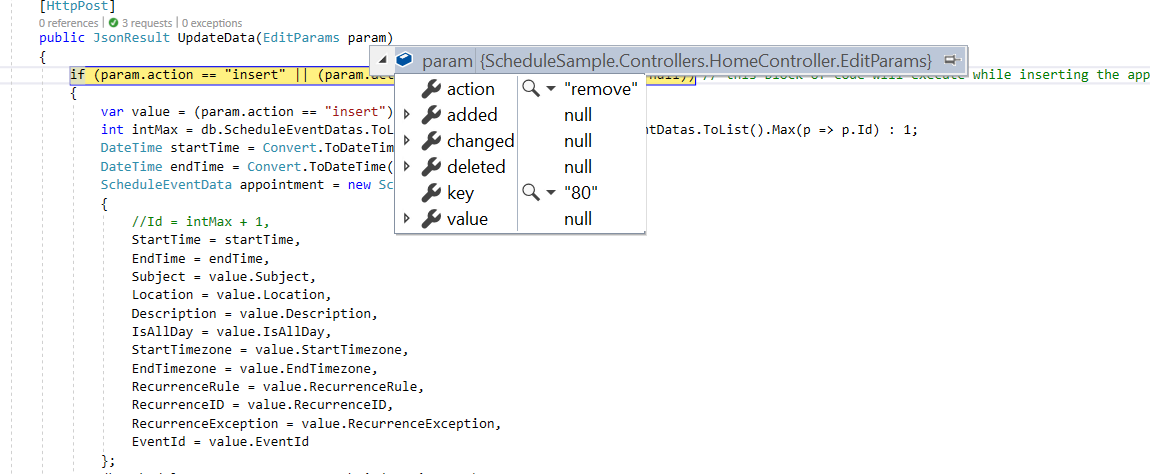
While deleting the event from the Scheduler, remove action takes place and the following code example describes how to delete event from database at server side.
if (param.action == "remove" || (param.action == "batch" && param.deleted != null)) // this block of code will execute while removing the appointment
{
    if (param.action == "remove")
    {
        int key = Convert.ToInt32(param.key);
        ScheduleEventData appointment = db.ScheduleEventDatas.Where(c => c.Id == key).FirstOrDefault();
        if (appointment != null) db.ScheduleEventDatas.DeleteOnSubmit(appointment);
    }
    else
    {
        foreach (var apps in param.deleted)
        {
            ScheduleEventData appointment = db.ScheduleEventDatas.Where(c => c.Id == apps.Id).FirstOrDefault();
            if (appointment != null) db.ScheduleEventDatas.DeleteOnSubmit(appointment);
        }
    }
    db.SubmitChanges();
}
Deleting a single occurrence or entire series
The recurring events can be deleted in either of the following ways.
- Single occurrence
- Entire series
Single occurrence - When you attempt to delete the recurring events, a popup prompts you to choose either to delete the single event or entire series. From this, if you choose to select DELETE EVENT option, a single occurrence of the recurring appointment alone will be removed. The following process takes place while removing a single occurrence,
- The selected occurrence will be deleted from the Scheduler user interface.
- In code, the parent recurring event object will be updated with appropriate
RecurrenceExceptionfield, to hold the deleted occurrence appointment’s date collection.
Therefore, when a single occurrence is deleted from a recurring event, the update action takes place on the parent recurring event, as shown in the following code example.
NOTE
If you delete an existing edited occurrence of a recurring event, only the edited occurrence that is present in the database as an individual event object will be removed. In this case, the
deleteaction takes place instead of theupdateaction, and the parent recurring event object remains unchanged.
if (param.action == "update" || (param.action == "batch" && param.changed != null)) // this block of code will execute while updating the appointment
{
    var value = (param.action == "update") ? param.value : param.changed[0];
    var filterData = db.ScheduleEventDatas.Where(c => c.Id == Convert.ToInt32(value.Id));
    if (filterData.Count() > 0)
    {
        DateTime startTime = Convert.ToDateTime(value.StartTime);
        DateTime endTime = Convert.ToDateTime(value.EndTime);
        ScheduleEventData appointment = db.ScheduleEventDatas.Single(A => A.Id == Convert.ToInt32(value.Id));
        appointment.StartTime = startTime;
        appointment.EndTime = endTime;
        appointment.StartTimezone = value.StartTimezone;
        appointment.EndTimezone = value.EndTimezone;
        appointment.Subject = value.Subject;
        appointment.IsAllDay = value.IsAllDay;
        appointment.RecurrenceRule = value.RecurrenceRule;
        appointment.RecurrenceID = value.RecurrenceID;
        appointment.RecurrenceException = value.RecurrenceException;
    }
    db.SubmitChanges();
}
Entire series - When you select an option DELETE SERIES from the popup, the whole recurring series will be deleted. When this option is chosen explicitly, if a parent event holds any edited occurrences - then all its child occurrences which are maintained as separate event objects will also be removed from the dataSource. This action of deleting entire series leads to remove action and removes one or more event objects at the same time.
if (param.action == "remove" || (param.action == "batch" && param.deleted != null)) // this block of code will execute while removing the appointment
{
    if (param.action == "remove")
    {
        int key = Convert.ToInt32(param.key);
        ScheduleEventData appointment = db.ScheduleEventDatas.Where(c => c.Id == key).FirstOrDefault();
        if (appointment != null) db.ScheduleEventDatas.DeleteOnSubmit(appointment);
    }
    else
    {
        foreach (var apps in param.deleted)
        {
            ScheduleEventData appointment = db.ScheduleEventDatas.Where(c => c.Id == apps.Id).FirstOrDefault();
            if (appointment != null) db.ScheduleEventDatas.DeleteOnSubmit(appointment);
        }
    }
    db.SubmitChanges();
}
Deleting only the current and following events
The recurring events can be deleted from current and following events only when enable editFollowingEvents property.
Delete Following Events - When you attempt to delete the recurring events, a popup prompts you to choose either to delete the single event or Following Events or entire series. From this, if you choose to select FOLLOWING EVENT option, a current and following events of the recurring appointment alone will be removed. The following process takes place while removing a single occurrence,
- The selected occurrence and the following events in same series will be deleted from the Scheduler user interface.
- In code, the parent recurring event object will be updated with appropriate
recurrenceRulefield, to update the end date of the recurring events.
Therefore, when the following events are deleted from a recurring event, the remove and update actions take place on the immediate parent recurring event, as shown in the following code example.
if (param.action == "update" || (param.action == "batch" && param.changed != null)) // this block of code will execute while updating the appointment
{
    var value = (param.action == "update") ? param.value : param.changed[0];
    var filterData = db.ScheduleEventDatas.Where(c => c.Id == Convert.ToInt32(value.Id));
    if (filterData.Count() > 0)
    {
        DateTime startTime = Convert.ToDateTime(value.StartTime);
        DateTime endTime = Convert.ToDateTime(value.EndTime);
        ScheduleEventData appointment = db.ScheduleEventDatas.Single(A => A.Id == Convert.ToInt32(value.Id));
        appointment.StartTime = startTime;
        appointment.EndTime = endTime;
        appointment.StartTimezone = value.StartTimezone;
        appointment.EndTimezone = value.EndTimezone;
        appointment.Subject = value.Subject;
        appointment.IsAllDay = value.IsAllDay;
        appointment.RecurrenceRule = value.RecurrenceRule;
        appointment.RecurrenceID = value.RecurrenceID;
        appointment.FollowingID = value.FollowingID;
        appointment.RecurrenceException = value.RecurrenceException;
    }
    db.SubmitChanges();
}
if (param.action == "remove" || (param.action == "batch" && param.deleted != null)) // this block of code will execute while removing the appointment
{
    if (param.action == "remove")
    {
        int key = Convert.ToInt32(param.key);
        ScheduleEventData appointment = db.ScheduleEventDatas.Where(c => c.Id == key).FirstOrDefault();
        if (appointment != null) db.ScheduleEventDatas.DeleteOnSubmit(appointment);
    }
    else
    {
        foreach (var apps in param.deleted)
        {
            ScheduleEventData appointment = db.ScheduleEventDatas.Where(c => c.Id == apps.Id).FirstOrDefault();
            if (appointment != null) db.ScheduleEventDatas.DeleteOnSubmit(appointment);
        }
    }
    db.SubmitChanges();
}
Restricting delete action based on specific criteria
You can also dynamically prevent the deletion of appointments on the Scheduler. For example, if you want to prevent the deletion of appointments on past dates, you can check for the appropriate condition within the ActionBegin event and cancel the action by setting args.cancel to true.
if (param.action == "remove" || (param.action == "batch" && param.deleted != null))
{
    foreach (var apps in (param.action == "remove") ? new[] { param } : param.deleted)
    {
        DateTime startTime = Convert.ToDateTime(apps.StartTime);
        if (startTime < DateTime.Now)
        {
            // Cancel the delete action by surfacing a message to the user
        }
    }
}
NOTE
The server-side examples in this document use
param.actionto identify the operation (insert,update,remove, orbatch). The Scheduler must be configured with theUrlandBatchUrlproperties that point to the controller action handling these requests. Foraspnet-core, the controller action receives theJsonpayload through a parameter (commonly namedparam) that contains theaction,value(forinsert/update),key(forremove), oradded/changed/deletedarrays (forbatch).
Drag and drop
When you drag and drop a normal event on the Scheduler, the event editing action takes place. When a recurring event is dragged and dropped on a desired time range, the batch action explained in the Editing a single occurrence process takes place, allowing both the Add and Edit actions to occur together.
NOTE
By default, when you drag a recurring instance, only the occurrence of the event gets edited, and not a whole series. The drag operation raises the
ActionBeginevent withargs.requestTypeset toeventChange.
Resize
When you resize a normal event on the Scheduler, the event editing action takes place. When a recurring event is resized to a new desired time, the batch action explained in the Editing a single occurrence process takes place, allowing both the Add and Edit actions to occur together.
NOTE
By default, when you resize a recurring instance, only the occurrence of the event gets edited, and not a whole series. The resize operation raises the
ActionBeginevent withargs.requestTypeset toeventChange.
NOTE
You can refer to our ASP.NET MVC Scheduler feature tour page for its groundbreaking feature representations. You can also explore our ASP.NET MVC Scheduler example to know how to present and manipulate data.