GraphQL Data Binding in Angular Scheduler
GraphQL is a query language that allows applications to request exactly the data they need, nothing more and nothing less. Unlike traditional REST APIs that return fixed data structures, GraphQL enables the client to specify the shape and content of the response.
Traditional REST APIs and GraphQL differ mainly in the way data is requested and returned: REST APIs expose multiple endpoints that return fixed data structures, often including unnecessary fields and requiring several requests to fetch related data, while GraphQL uses a single endpoint where queries define the exact fields needed, enabling precise responses and allowing related data to be retrieved efficiently in one request. This makes GraphQL especially useful for Angular Scheduler integration because data-centric UI components require well-structured, selective datasets to minimize network usage and ensure smooth, high-performance interactions.
Key GraphQL concepts:
- Queries: A query is a request to read data. Queries do not modify data; they only retrieve it.
- Mutations: A mutation is a request to modify data. Mutations create, update, or delete records.
- Resolvers: Each query or mutation is handled by a resolver, which is a function responsible for fetching data or executing an operation. Query resolvers handle read operations, while mutation resolvers handle write operations.
- Schema: Defines the structure of the API. The schema describes available data types, the fields within those types, and the operations that can be executed. Query definitions specify how data can be retrieved, and mutation definitions specify how data can be modified.
Node.js is a fast and efficient JavaScript runtime built on Google’s V8 engine. It enables JavaScript to run on the server, making it a popular platform for building web APIs, real‑time applications, and modern backend services. Node.js offers a non‑blocking, event‑driven architecture that supports high performance and scalability.
Prerequisites
| Software / Package | Recommended version |
|---|---|
| Node.js | 20.x LTS or later |
| npm | Latest (11.x+) |
| Angular CLI | 18.x or later |
Setting up the GraphQL backend using Node.js
The GraphQL backend acts as the central data service, handling queries and mutations that power the Syncfusion Angular Scheduler.
Step 1: Create the GraphQL server and install required packages
Before configuring the GraphQL API, a new folder must be created to host the GraphQL server. This folder will contain the server configuration, required dependencies, and sample data used for processing GraphQL queries.
For this guide, a GraphQL server named GraphQLServer is created using Node.js.
Create project folder
Open a terminal (for example, an integrated terminal in Visual Studio Code, Windows Command Prompt opened with (Win+R), or macOS Terminal launched with (Cmd+Space)) and run the following command to create and navigate to the project folder:
mkdir GraphQLServer
cd GraphQLServer
Initialize and Install required packages
The GraphQL server is set up using Graphpack, a lightweight development tool for building GraphQL APIs. The Syncfusion ej2-data package is included to support the Scheduler’s data operations, enabling structured and selective data retrieval that minimizes network usage and ensures smooth, high-performance event loading and updates.
Run the following commands in the terminal window to initialize and install the required packages:
npm init -y
npm i graphpack
npm install @syncfusion/ej2-data --save- npm init -y – Initializes a new Node.js project by automatically generating a default package.json file without prompting for user input.
-
graphpack – Lightweight
GraphQLserver and development environment. - @syncfusion/ej2-data – Provides data utilities for advanced data operations.
Add these lines to the scripts section in package.json to define the npm commands:
"scripts": {
      "dev": "graphpack --port 4400",
      "build": "graphpack build"
    }
Create the src folder
Open a terminal (for example, an integrated terminal in Visual Studio Code, Windows Command Prompt opened with (Win+R), or macOS Terminal launched with (Cmd+Space)) and run the following command to create and navigate to the src folder:
mkdir src
cd src
Create the sample data source
After installing the required packages, create a new file named db.js inside the src folder. This file acts as an in-memory data source for the GraphQL server.
[db.js]
export let eventsData = [
     {
       Id: 1,
       Subject: 'Server Maintenance',
       StartTime: new Date(2026, 1, 11, 10, 0).toISOString(),
       EndTime: new Date(2026, 1, 11, 11, 30).toISOString(),
       Location: 'Seattle'
     }, {
       Id: 2,
       Subject: 'Art & Painting Gallery',
       StartTime: new Date(2026, 1, 12, 12, 0).toISOString(),
       EndTime: new Date(2026, 1, 12, 14, 0).toISOString(),
       Location: 'Costa Rica'
     }, {
       Id: 3,
       Subject: 'Dany Birthday Celebration',
       StartTime: new Date(2026, 1, 13, 10, 0).toISOString(),
       EndTime: new Date(2026, 1, 13, 11, 30).toISOString(),
       Location: 'Kirkland'
     }
];
The GraphQLServer folder is now created, the required packages are installed, and a sample data source is configured. The project is ready for defining the GraphQL schema, resolvers, and server configuration.
Step 2: Configure the schema in GraphQL
The GraphQL schema defines the structure of the “Appointment” data model and the server‑side operations available for performing CRUD actions.
Instructions:
- Create a new schema file (src/schema.graphql) in the GraphQLServer folder.
-
Add type definition for “Appointment”.
# --- Appointment type definition --- type Appointment { Id: Int! Subject: String StartTime: String! EndTime: String! Location: String IsAllDay: Boolean RecurrenceRule: String StartTimezone: String EndTimezone: String RecurrenceID: Int RecurrenceException: String FollowingID: Int IsReadonly:String IsBlock:String } -
Add type definition for “ReturnType”.
type ReturnType { result: [Appointment] } -
Add the type definition for “DataManager”.
 # --- Syncfusion DataManager payload ---
 input DataManager {
     skip: Int
     take: Int
     sorted: [Sort]
     group: [String]
     table: String
     select: [String]
     where: String
     search: String
     requiresCounts: Boolean
     aggregates: [Aggregate]
     params: String
 }
For detailed information about the DataManager type, refer to Configuring Syncfusion DataManager schema.
-
Add the type definition for “Appointment field names”.
# --- Schedule Appointment field names --- input AppointmentFields { Id: Int! Subject: String StartTime: String! EndTime: String! Location: String IsAllDay: Boolean Guid: String RecurrenceRule: String StartTimezone: String EndTimezone: String RecurrenceID: Int RecurrenceException: String FollowingID: Int IsReadonly:String IsBlock:String } -
Define the Query type to expose the “getEvents” operation that returns the list of “Events”.
type Query { getEvents(datamanager: DataManager): ReturnType } -
Define Mutation types for CRUD operations.
 type Mutation {
   batchUpdate(added: [AppointmentFields],changed: [AppointmentFields],deleted: [AppointmentFields]): [Appointment]
 }
Step 3: Configure the Syncfusion DataManager schema
Syncfusion Scheduler sends all operation details as a single request object. GraphQL requires a clear, typed structure to understand these values.
Since Syncfusion’s DataManager already has a fixed structure for sending operation details, the GraphQL backend defines a matching input type.
DataManager serves as the input type that matches the structure of the DataManager request, ensuring that all operation details are correctly received by the GraphQL API.
Purpose:
The DataManager schema provides a standard format for delivering Scheduler operation parameters to the GraphQL server.
This structure allows the backend to return only the required records, improving performance, reducing payload size, and enabling efficient data handling.
Step 4: GraphQL query resolvers
A resolver in GraphQL is a function responsible for fetching the data for a specific field in a GraphQL schema.
When a client sends a GraphQL query, resolvers run behind the scenes to retrieve the requested information from a database, API, or any data source and return it in the format defined by the schema.
Instructions:
- Create a new resolver file (src/resolvers.js) inside the GraphQLServer folder.
- Import the required data source (for example, AppointmentDetails) from the data file.
- Implement the “getEvents” resolver to handle the logic for the “getEvents” query defined in the schema.
-
Ensure the resolver returns the processed list of “Appointments” in the structure specified by the schema.
[resolvers.js]
 import { eventsData } from "./db";
 Query: {
 getEvents: (parent, datamanager, context, info) => {
       const dataArgs = datamanager;
       const params = JSON.parse(dataArgs.datamanager.params);
       console.log('startDate: ' + params.StartDate + ' EndDate: ' + params.EndDate);
       var data = eventsData.filter(x => new Date(x.StartTime) >= new Date(params.StartDate) && new Date(x.EndTime) <= new Date(params.EndDate));
       return {result: data || eventsData};
     }
 },
Step 5: GraphQL Mutation resolvers
Mutations in GraphQL are used to modify data on the server, such as creating, updating, or deleting records.
Previously, the CRUD mutation types were defined in the (schema.graphql) file. The next step is to implement these mutation actions inside the (resolver.js) file.
Instructions:
- Open the (src/resolvers.js) file.
-
Implement the Scheduler Resolvers:
[resolvers.js]
import { eventsData } from "./db"; function sameId(a, b) { if (a === undefined || a === null || b === undefined || b === null) return false; return String(a) === String(b); } const resolvers = { Query: { getEvents: (parent, datamanager, context, info) => { const dataArgs = datamanager; const params = JSON.parse(dataArgs.datamanager.params); console.log('startDate: ' + params.StartDate + ' EndDate: ' + params.EndDate); var data = eventsData.filter(x => new Date(x.StartTime) >= new Date(params.StartDate) && new Date(x.EndTime) <= new Date(params.EndDate)); return {result: data || eventsData}; } }, Mutation: { batchUpdate: (argument, { added = [], changed = [], deleted = [] }) => { for (const item of [...added, ...changed]) { const id = item.Id; const recId = item.RecurrenceID; const start = item.StartTime; const idx = eventsData.findIndex(e => sameId(e.Id, id)); if (idx === -1) { if (recId) { const parent = eventsData.find(p => sameId(p.Id, recId)); if (parent && start) { const stamp = new Date(start).toISOString() .replace(/[-:T.]/g, '') .slice(0, 15) + 'Z'; let ex = (parent.RecurrenceException || '').split(',').filter(Boolean); if (!ex.includes(stamp)) { parent.RecurrenceException = ex.length ? ex.concat(stamp).join(',') : stamp; } } } eventsData.push({ ...item }); continue; } Object.assign(eventsData[idx], item); if (eventsData[idx].RecurrenceID && eventsData[idx].StartTime) { const parent = eventsData.find(p => sameId(p.Id, eventsData[idx].RecurrenceID)); if (parent) { const stamp = new Date(eventsData[idx].StartTime).toISOString() .replace(/[-:T.]/g, '') .slice(0, 15) + 'Z'; let ex = (parent.RecurrenceException || '').split(',').filter(Boolean); if (!ex.includes(stamp)) { parent.RecurrenceException = ex.length ? ex.concat(stamp).join(',') : stamp; } } } } for (const item of deleted) { let id = (typeof item === 'object' && item !== null) ? item.Id : item; if (!id) continue; const isOccurrenceDelete = (typeof item === 'object' && !!item.RecurrenceID); if (isOccurrenceDelete) { const idx = eventsData.findIndex(e => sameId(e.Id, id)); if (idx !== -1) eventsData.splice(idx, 1); } else { for (let i = eventsData.length - 1; i >= 0; i--) { const ev = eventsData[i]; if (sameId(ev.Id, id) || sameId(ev.RecurrenceID, id)) { eventsData.splice(i, 1); } } } } return eventsData; } } }; export default resolvers; - batchUpdate — Code Breakdown
This single mutation covers the three CRUD actions via three optional arrays: added, changed, deleted.
A) Added (Create)
| Step | Purpose | Definition |
|---|---|---|
| 1. Detect Added Items | Ensure the added array contains new records to process. | Validate that added exists and has length. |
| 2. Determine New vs Existing | Identify whether the incoming event is new or already exists by Id. | Use Id comparison to check if a record already exists. |
| 3. Handle New Normal Event | Insert a new event that is not part of a recurrence override. | Add the item directly into the event collection. |
| 4. Handle New Occurrence Override | When an added item belongs to a recurring series (RecurrenceID present). |
Find the parent event and mark the overridden occurrence as excluded by updating RecurrenceException. |
| 5. Insert Added Item | Persist the new event or override. | Push the new event into the collection. |
B) Changed (Update)
| Step | Purpose | Definition |
|---|---|---|
| 1. Detect Changed Items | Ensure the changed array contains updates to process. | Validate that changed exists and has length. |
| 2. Locate Event to Update | Identify the event to be updated using its Id. | Compare Ids to find the correct event. |
| 3. Handle Missing Target | Process an update even if the target does not exist (may be an override creation). | If the event doesn’t exist, treat it like a new insert. |
| 4. Merge Updates | Apply all fields from the incoming event to the existing event. | Perform shallow merge of updated fields. |
| 5. Handle Recurrence Override Update | Maintain correct exclusion list for modified occurrence. | Add/update the exception stamp in the parent’s RecurrenceException when RecurrenceID is present. |
C) Deleted (Delete)
| Step | Purpose | Definition |
|——|———-|————-|
| 1. Detect Deleted Items | Ensure the deleted array contains items to process. | Validate that deleted exists and has length. |
| 2. Normalize Input | Allow deletion via either a full event object or raw Id. | Extract Id whether the input is an object or primitive. |
| 3. Identify Occurrence Delete | Determine if deletion targets a single overridden instance. | Check if the deleted item has a RecurrenceID. |
| 4. Remove Occurrence | Safely remove only the overridden instance. | Delete only the row whose Id matches the override. |
| 5. Remove Normal Event or Entire Series | Cleanly delete one-time events or full recurrence parents. | Delete the parent event and all events whose RecurrenceID matches the parent Id. |
—
Integrating Syncfusion Angular Scheduler with GraphQL
Open a Visual Studio Code terminal or Command prompt and run the below command:
ng new SchedulerApp
cd SchedulerApp
This command creates a Angular application named SchedulerApp with the essential folder structure and files required to begin development immediately.
Step 1: Adding Syncfusion packages
Install the necessary Syncfusion packages using the below command in Visual Studio Code terminal or Command prompt:
npm install @syncfusion/ej2-angular-schedule --save- @syncfusion/ej2-angular-schedule – Required for using the Syncfusion Angular Scheduler component.
Step 2: Including required Syncfusion stylesheets
Once the dependencies are installed, the required CSS files are made available in the (../node_modules/@syncfusion) package directory, and the corresponding CSS references are included in the styles.css file.
[src/styles.css]
@import "../node_modules/@syncfusion/ej2-base/styles/tailwind3.css";
@import "../node_modules/@syncfusion/ej2-buttons/styles/tailwind3.css";
@import "../node_modules/@syncfusion/ej2-calendars/styles/tailwind3.css";
@import "../node_modules/@syncfusion/ej2-dropdowns/styles/tailwind3.css";
@import "../node_modules/@syncfusion/ej2-inputs/styles/tailwind3.css";
@import "../node_modules/@syncfusion/ej2-lists/styles/tailwind3.css";
@import "../node_modules/@syncfusion/ej2-navigations/styles/tailwind3.css";
@import "../node_modules/@syncfusion/ej2-popups/styles/tailwind3.css";
@import "../node_modules/@syncfusion/ej2-splitbuttons/styles/tailwind3.css";
@import "../node_modules/@syncfusion/ej2-angular-schedule/styles/tailwind3.css";
For this project, the “Tailwind” theme is used. A different theme can be selected or the existing theme can be customized based on project requirements. Refer to the Syncfusion Angular Components Appearance documentation to learn more about theming and customization options.
Step 3: Configure GraphQL Adaptor
Syncfusion provides a built‑in GraphQLAdaptor that translates the user interaction into GraphQL requests, enabling efficient communication with GraphQL servers which helps in integrating the Scheduler component with the GraphQL server.
What is a GraphQL Adaptor?
An adaptor is a translator between two different systems. The GraphQLAdaptor specifically:
- Receives interaction events from the Scheduler (user clicks Add, Edit, Delete).
- Converts these actions into
GraphQLquery or mutation syntax. - Sends the
GraphQLrequest to the backendGraphQLendpoint. - Receives the response data from the backend.
- Formats the response back into a structure the Scheduler understands.
- Updates the Scheduler display with the new data.
The adaptor enables bi-directional communication between the frontend (Scheduler) and backend (GraphQL server).
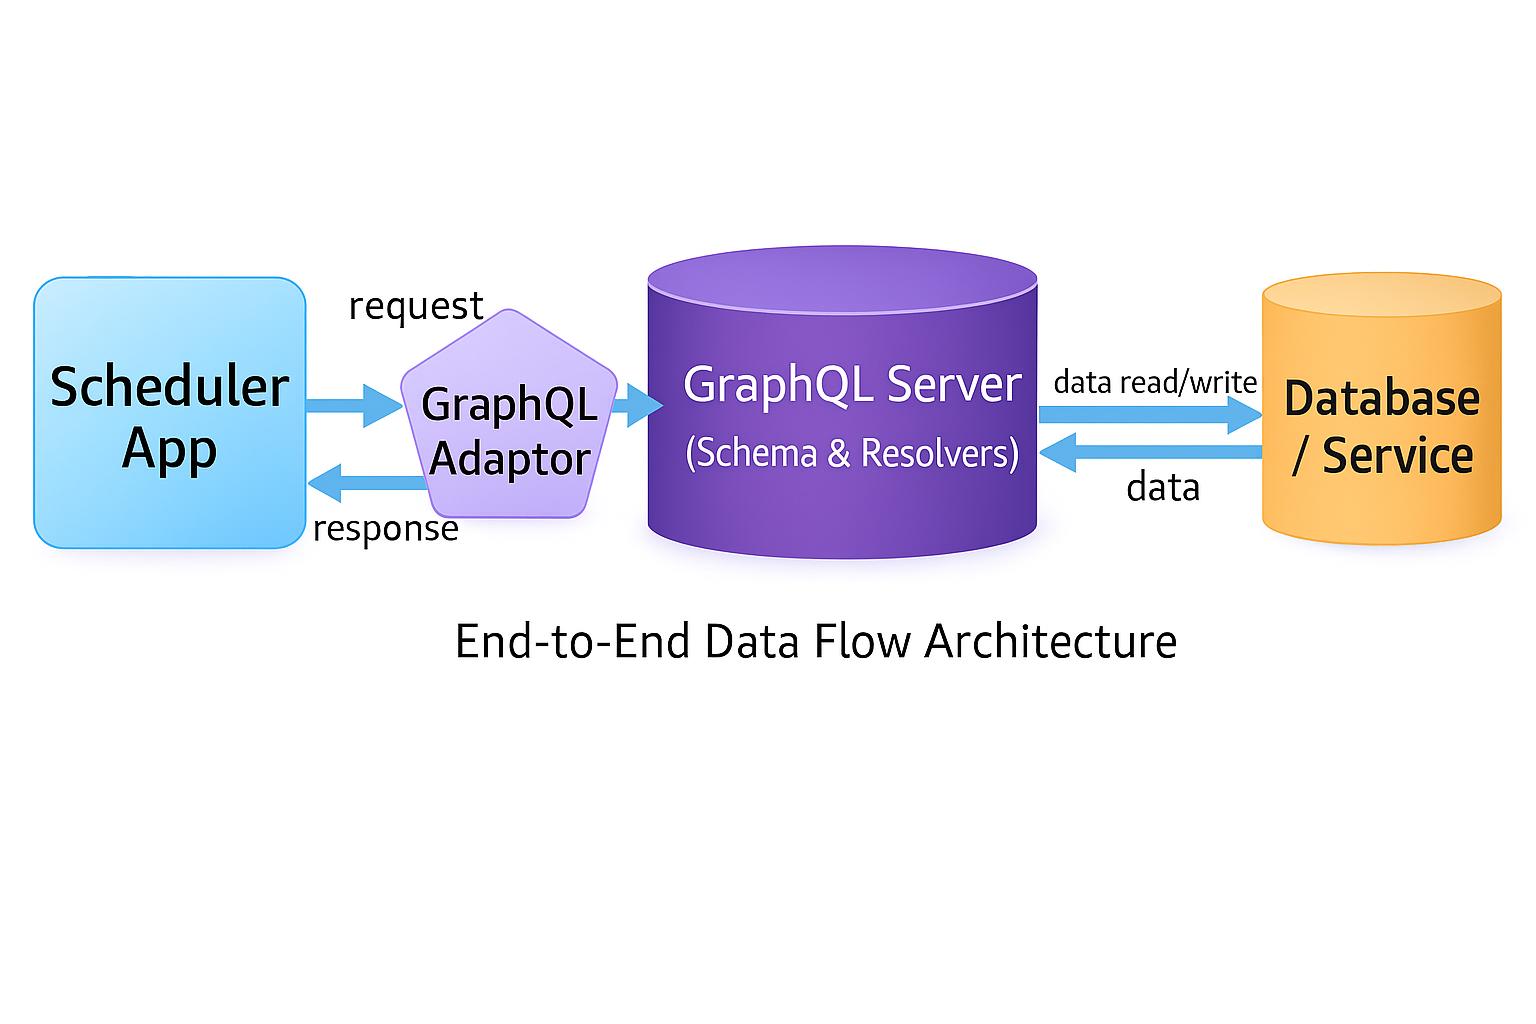
When using the GraphQLAdaptor, the Scheduler expects the response from the server in a specific structure so that the Scheduler can process and render the results correctly.
The required response format includes:
- result: The list of data to be displayed in the current Scheduler view.
The GraphQLAdaptor needs to be configured to the Syncfusion DataManager to convert the user interaction into GraphQL compatible requests. To enable this setup, configure the DataManager with the GraphQLAdaptor, specify the GraphQL server’s response format, and define the query. Finally, assign this DataManager instance to the Scheduler component.
Instructions:
-
In the (app.html) file render the Scheduler component.
[app.component.html]
<ejs-schedule #scheduleObj width="100%" height="650px" [(selectedDate)]="selectedDate" [eventSettings]="eventSettings" [allowDragAndDrop] = "true" [allowResizing] = "true"> </ejs-schedule> -
In the (app.ts) file to configure the
DataManagerwith theGraphQLAdaptor.[app.ts]
 import { Component, ViewChild } from '@angular/core';
 import { DataManager, GraphQLAdaptor } from '@syncfusion/ej2-data';
 import { DayService, WeekService, WorkWeekService, MonthService, AgendaService, ScheduleComponent, EventSettingsModel, ResizeService, DragAndDropService } from '@syncfusion/ej2-angular-schedule';

 @Component({
   selector: 'app-root',
   templateUrl: './app.component.html',
   styleUrls: ['./app.component.scss'],
   providers: [DayService, WeekService, WorkWeekService, MonthService, AgendaService, ResizeService, DragAndDropService]
 })
 export class AppComponent {
   @ViewChild('scheduleObj') scheduleObj: ScheduleComponent;
   public dataSource: DataManager;
   public eventSettings: EventSettingsModel;
   title: string;
   ngOnInit(): void {
     this.dataSource = new DataManager({
       url: 'http://localhost:xxxx/', //xxxx represents the port number.
       adaptor: new GraphQLAdaptor({
         query: `
       query getEvents($datamanager: DataManager) {
         getEvents(datamanager: $datamanager) {
           result {
             Id, Subject, StartTime, EndTime, Location, IsAllDay,
             StartTimezone, EndTimezone,
             RecurrenceRule, RecurrenceID, RecurrenceException, FollowingID,IsReadonly,IsBlock
           }
         }
       }
     `,
         response: {
           result: 'getEvents.result',
         },
         getMutation: (action: any): string => {
           if (action === 'batch') {
             return `
           mutation BatchUpdate($added: [AppointmentFields], $changed: [AppointmentFields], $deleted: [AppointmentFields]) {
             batchUpdate(added: $added, changed: $changed, deleted: $deleted) {
               Id, Subject, StartTime, EndTime, Location, IsAllDay,
               StartTimezone, EndTimezone,
               RecurrenceRule, RecurrenceID, RecurrenceException, FollowingID,IsReadonly,IsBlock
             }
           }
         `;
           }
           return '';
         }
       })
     });

     this.eventSettings = {
       dataSource: this.dataSource,
       fields: {
         id: 'Id',
         subject: { name: 'Subject' },
         startTime: { name: 'StartTime' },
         endTime: { name: 'EndTime' },
         isAllDay: { name: 'IsAllDay' },
         location: { name: 'Location' },
         startTimezone: { name: 'StartTimezone' },
         endTimezone: { name: 'EndTimezone' },
         recurrenceRule: { name: 'RecurrenceRule' },
         recurrenceID: { name: 'RecurrenceID' },
         recurrenceException: { name: 'RecurrenceException' },
         followingID: 'FollowingID',
         isReadonly: 'IsReadonly',
         isBlock: 'IsBlock'
       }
     };
   }
   public selectedDate: Date = new Date(2026, 1, 11);
 }
GraphQL Query structure explained in detail:
The Query property is critical for understanding the data flows. Let’s break down each component:
query getEvents($datamanager: DataManager) {}
Line breakdown:
-
getEvents(...)- Calls the resolver method in backend. -
dataManager: $dataManager- Passes the “$dataManager” variable to the resolver. - The resolver receives this object and uses it to apply filters, sorts, searches, and pagination.
result {
    Id, Subject, StartTime, EndTime, Location, IsAllDay,StartTimezone, EndTimezone,RecurrenceRule, RecurrenceID, RecurrenceException, FollowingID,IsReadonly,IsBlock
  }
Line breakdown:
-
result- Contains the array of event records.-
{ ... }- List of fields to return for each record. - Only requested fields are returned (no over-fetching).
"data": {
"getEvents": {
    "result": [
        {
            "Id": "1",
            "Subject": "Server Maintenance",
            "StartTime": "new Date(2026, 1, 11, 10, 0).toISOString()",
            "EndTime": "new Date(2026, 1, 11, 11, 30).toISOString()",
            "Location": "Seattle"
        },
    ]
}
}
-
Response structure explanation:
| Part | Purpose | Example |
|---|---|---|
data |
Root object returned for every successful GraphQL query. |
Always present in successful response |
getEvents |
Matches the GraphQL query name; contains event data. |
Contains result. |
result |
Array of “events” objects. | [ {…}, {…} ] |
| Each field in result | Matches GraphQL query field names. |
Field values from database. |
Perform CRUD operations
CRUD operations (Create, Read, Update, Delete) allow users to manage data through the Scheduler. The Scheduler provides built-in features to perform these operations, while the backend resolvers handle the actual data modifications.
The getMutation function in the GraphQLAdaptor handles the Scheduler CRUD actions by sending the appropriate mutation for each action (insert, update, or delete) to the GraphQL server.
Previously, the required mutation definitions and schema for CRUD operations were created in the (resolver.js) and (schema.graphql) files. The next step is to enable CRUD actions in the Data Scheduler by using the
GraphQLAdaptor.
Insert:
The insert operation enables adding new “Event” records to the existing list. When the user clicks on an empty time slot, the Scheduler opens the Add Event dialog. After the dialog is filled with the required event details and the dialog is saved.
After the required data is saved, the GraphQL mutation sends the new “Event” record to the backend for processing and storage.
Update:
The Update operation enables editing of existing “Event” records. When a user clicks on an event, an action menu is displayed with options such as Edit, Delete, and Cancel. Selecting the Edit option opens the Edit Event dialog, which is automatically populated with the current values of the selected event.Users can update one or more fields within the dialog and save the changes.
After the required modifications are submitted, a GraphQL mutation sends the updated record to the backend for processing.
Delete:
The Delete operation enables removal of “Event” records from the application. When a user clicks on an event, an action menu appears displaying options such as Delete, Edit, and Cancel. Upon selecting the Delete option, a confirmation prompt is shown to ensure that the deletion is intentional.
After confirmation, a GraphQL mutation sends a delete request to the backend containing only the primary key value.
Open the (app.ts) file and configure the getMutation function in the GraphQLAdaptor to return the GraphQL mutation for the insert, Update and Delete action.
[app.ts]
      // mutation to perform add, update, delete.
      this.dataSource = new DataManager({
          url: 'http://localhost:xxxx/', //xxxx represents the port number.
          adaptor: new GraphQLAdaptor({
            query: `
          query getEvents($datamanager: DataManager) {
            getEvents(datamanager: $datamanager) {
              result {
                Id, Subject, StartTime, EndTime, Location, IsAllDay,
                StartTimezone, EndTimezone,
                RecurrenceRule, RecurrenceID, RecurrenceException, FollowingID,IsReadonly,IsBlock
              }
            }
          }
        `,
            response: {
              result: 'getEvents.result',
            },
            getMutation: (action: any): string => {
              if (action === 'batch') {
                return `
              mutation BatchUpdate($added: [AppointmentFields], $changed: [AppointmentFields], $deleted: [AppointmentFields]) {
                batchUpdate(added: $added, changed: $changed, deleted: $deleted) {
                  Id, Subject, StartTime, EndTime, Location, IsAllDay,
                  StartTimezone, EndTimezone,
                  RecurrenceRule, RecurrenceID, RecurrenceException, FollowingID,IsReadonly,IsBlock
                }
              }
            `;
              }
              return '';
            }
          })
        });
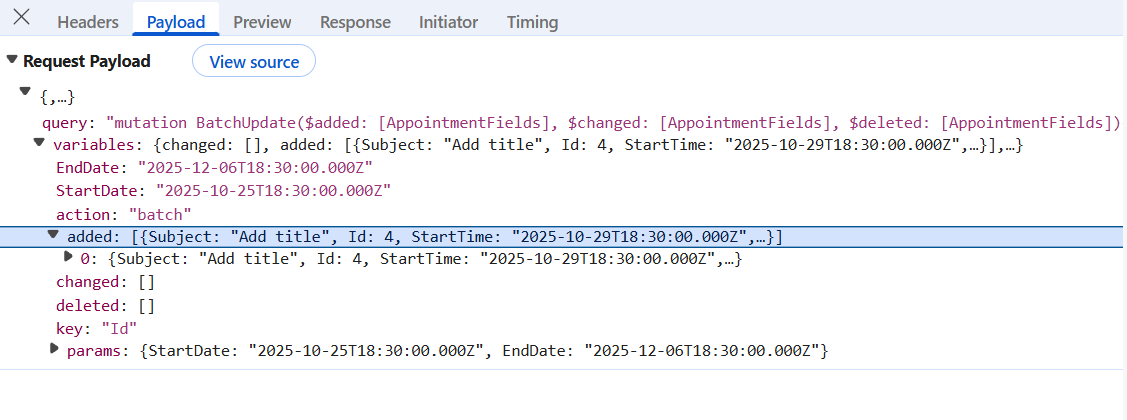
Insert mutation request parameters:
When the user clicks on an empty time slot, the dialog is filled, and the data is saved, the GraphQL adaptor constructs the mutation using these parameters:
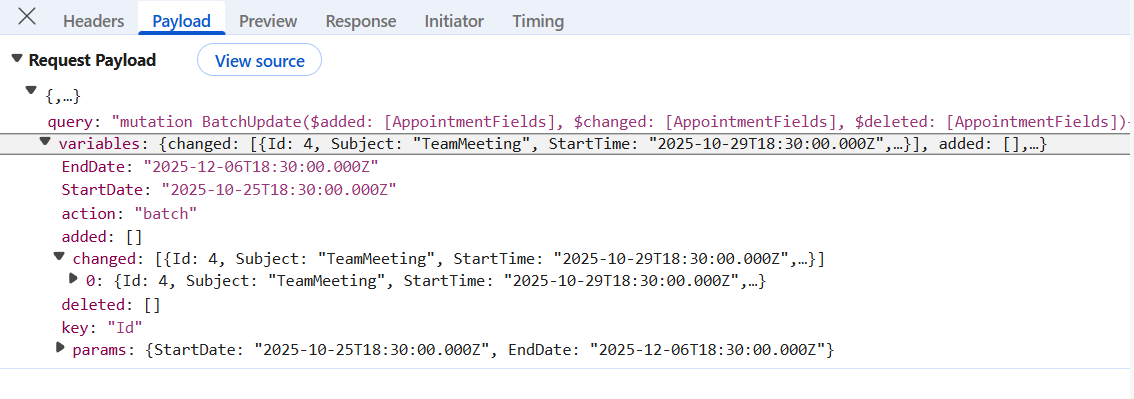
Update mutation request parameters:
When a user clicks on an event,Selecting the Edit option opens the Edit Event dialog, which is automatically populated with the current values of the selected event, the dialog is modified, and the changes are saved, the GraphQLAdaptor constructs the mutation using these parameters:
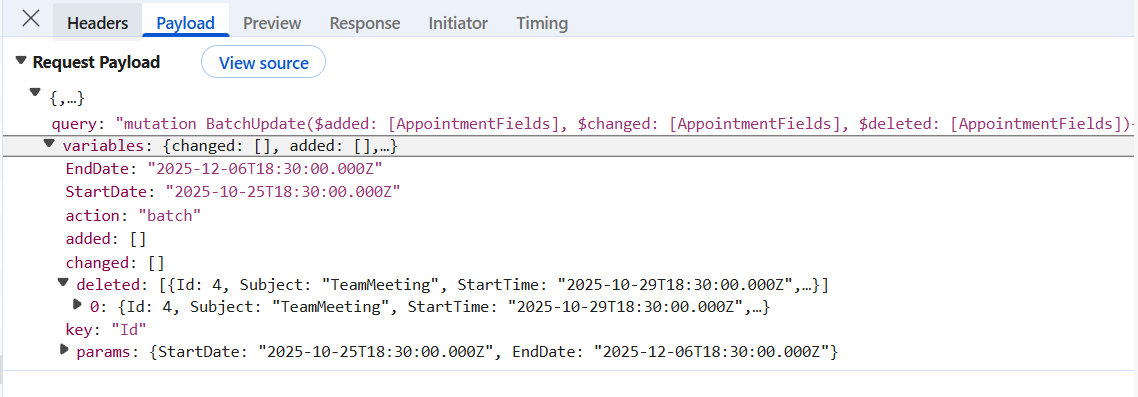
Delete mutation request parameters:
When a user clicks on an event,Selecting the Delete option, and the action is confirmed, the GraphQLAdaptor constructs the mutation using minimal parameters:
Running the application
Open a terminal or Command Prompt. Run the GraphQL server application first, then start the Scheduler application.
### Run the GraphQL server
- Run the following commands to start the server:
cd GraphQLServer npm run dev - The server is now running at http://localhost:4400/.
### Run the Scheduler
- Execute the below commands to run the Scheduler application:
cd SchedulerApp npm start - Open http://localhost:4200/ in the browser.
Complete Sample Repository
For a complete working implementation of this example, refer to the following GitHub repository:
Syncfusion Scheduler with GraphQL Sample
Summary
This guide demonstrates:
- Setting up and Configuring the
GraphQLbackend using Node.js. 🔗 - Integrating Syncfusion Angular Scheduler with
Graphql🔗 - Configure
GraphQLAdaptor. 🔗 - Perform CRUD operations. 🔗
The application now provides a fully integrated “Appointment” management workflow using the Syncfusion Angular Scheduler connected to a Node.js GraphQL backend.