Getting Started
18 Jul 201812 minutes to read
Create your first TreeGrid in PHP
The Essential PHP TreeGrid has been designed to represent and edit the hierarchical data.
This section explains how to create a TreeGrid widget in your application with hierarchical data source and enable sorting and editing. The following screenshot displays the output.

1.Create an HTML file and add the following necessary scripts and CSS files to the HTML file.
<!DOCTYPE html>
    <html xmlns="http://www.w3.org/1999/xhtml">
        <head>
            <meta name="viewport"content="width=device-width, initial-scale=1.0"/>
            <meta charset="utf-8" />
            <link href=" http://cdn.syncfusion.com/32.1.19/js/web/flat-azure/ej.web.all.min.css" rel="stylesheet"/>
            <script src="http://cdn.syncfusion.com/js/assets/external/jquery-1.10.2.min.js"></script>
            <script src="http://cdn.syncfusion.com/js/assets/external/jsrender.min.js"></script>
            <script src="http://cdn.syncfusion.com/js/assets/external/jquery.globalize.min.js"></script>
            <script src="http://cdn.syncfusion.com/js/assets/external/jquery.easing.1.3.min.js"></script>
            <script src="http://cdn.syncfusion.com/32.1.19/js/web/ej.web.all.min.js" type="text/javascript"></script>
        </head>
        <body>
        <!--Add TreeGrid control here -->
        </body>
    </html>
2.Create the TreeGrid with the empty data source.
<body style="width:100%;height:100%;position:static;">
      <?php
    $treeGrid=new EJ\TreeGrid("TreeGridDefault");
    //...
    echo $treeGrid -> render();
        ?>
</body>
TreeGrid with empty datasource
3.Initialize the TreeGrid with local data source.
<body style="width:100%;height:100%;position:static;">
      <?php
    $treeGrid=new EJ\TreeGrid("TreeGridDefault");
    $Json = [
     {
         taskID: 1,
         taskName: "Planning",
         startDate: "02/03/2014",
         endDate: "02/07/2014",
         progress: 100,
         duration: 5,
         priority: "Normal",
         approved: false,
         subtasks: [
             { taskID: 2, taskName: "Plan timeline", startDate: "02/03/2014", endDate: "02/07/2014", duration: 5, progress: 100, priority: "Normal", approved: false },
             { taskID: 3, taskName: "Plan budget", startDate: "02/03/2014", endDate: "02/07/2014", duration: 5, progress: 100, approved: true },
             { taskID: 4, taskName: "Allocate resources", startDate: "02/03/2014", endDate: "02/07/2014", duration: 5, progress: 100, priority: "Critical", approved: false },
             { taskID: 5, taskName: "Planning complete", startDate: "02/07/2014", endDate: "02/07/2014", duration: 0, progress: 0, priority: "Low", approved: true }
         ]
     },
     {
         taskID: 6,
         taskName: "Design",
         startDate: "02/10/2014",
         endDate: "02/14/2014",
         duration: 3,
         progress: 86,
         priority: "High",
         approved: false,
         subtasks: [
             { taskID: 7, taskName: "Software Specification", startDate: "02/10/2014", endDate: "02/12/2014", duration: 3, progress: 60, priority: "Normal", approved: false },
             { taskID: 8, taskName: "Develop prototype", startDate: "02/10/2014", endDate: "02/12/2014", duration: 3, progress: 100, priority: "Critical", approved: false },
             { taskID: 9, taskName: "Get approval from customer", startDate: "02/13/2014", endDate: "02/14/2014", duration: 2, progress: 100, approved: true },
             { taskID: 10, taskName: "Design Documentation", startDate: "02/13/2014", endDate: "02/14/2014", duration: 2, progress: 100, approved: true },
             { taskID: 11, taskName: "Design complete", startDate: "02/14/2014", endDate: "02/14/2014", duration: 0, progress: 0, priority: "Normal", approved: true }
         ]
     },

];
    $columns1= new EJ\TreeGrid\Column();
    $columns1 -> field="taskID";
    $columns1 -> headerText="Task ID";
    $columns2= new EJ\TreeGrid\Column();
    $columns2 -> field="taskName";
    $columns2 ->headerText ="Task Name";
    $columns3= new EJ\TreeGrid\Column();
    $columns3 -> field="startDate";
    $columns3 ->headerText="Start Date";
    $columns4= new EJ\TreeGrid\Column();
    $columns4 -> field="endDate";
    $columns4->headerText="End Date";
    $columns5= new EJ\TreeGrid\Column();
    $columns5 -> field="progress";
    $columns5 ->headerText ="Progress";
    $columns=array($columns1,$columns2,$columns3,$columns4,$columns5);
    echo $treeGrid -> isResponsive(true)-> columns($columns)-> childMapping("subtasks")->treeColumnIndex(1) -> dataSource($Json)->render();
        ?>
</body>
4.Initialize the TreeGrid with JSON data from external file.
<body style="width:100%;height:100%;position:static;">
      <?php
    $treeGrid=new EJ\TreeGrid("TreeGridDefault");
    $Json = json_decode(file_get_contents("Data.json"), true);
    $columns1= new EJ\TreeGrid\Column();
    $columns1 -> field="taskID";
    $columns1 -> headerText="Task ID";
    $columns2= new EJ\TreeGrid\Column();
    $columns2 -> field="taskName";
    $columns2 ->headerText ="Task Name";
    $columns3= new EJ\TreeGrid\Column();
    $columns3 -> field="startDate";
    $columns3 ->headerText="Start Date";
    $columns4= new EJ\TreeGrid\Column();
    $columns4 -> field="endDate";
    $columns4->headerText="End Date";
    $columns5= new EJ\TreeGrid\Column();
    $columns5 -> field="progress";
    $columns5 ->headerText ="Progress";
    $columns=array($columns1,$columns2,$columns3,$columns4,$columns5);
    echo $treeGrid -> isResponsive(true)-> columns($columns)-> childMapping("subtasks")->treeColumnIndex(1) -> dataSource($Json)->render();
        ?>
</body>
TreeGrid widget is displayed as the output in the following screenshot.

Enable Sorting
The TreeGrid control has sorting functionality, to arrange the data in ascending or descending order based on a particular column.
Multicolumn Sorting
Enable the multicolumn sorting in TreeGrid by setting allowMultiSorting as true. You can sort multiple columns in TreeGrid, by selecting the desired column header while holding the Ctrl key.
<body style="width:100%;height:100%;position:static;">
      <?php
    $treeGrid=new EJ\TreeGrid("TreeGridDefault");
    //...
    echo $treeGrid -> allowSorting(true) -> allowMultiSorting(true) -> render();
        ?>
</body>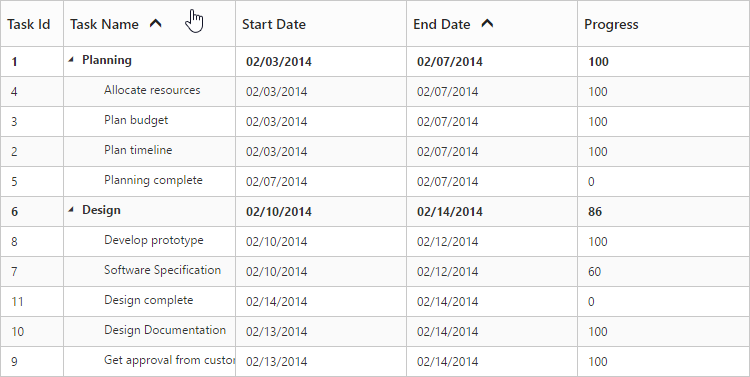
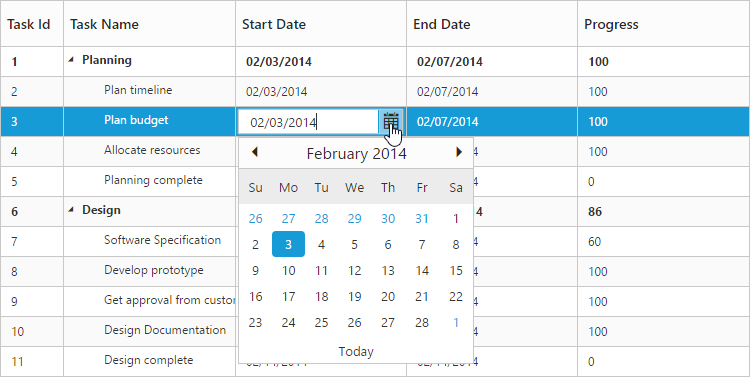
Enable Editing
You can enable Editing in TreeGrid by using the editSettings property as follows.
<body style="width:100%;height:100%;position:static;">
      <?php
    $treeGrid=new EJ\TreeGrid("TreeGridDefault");
    $edit=new EJ\TreeGrid\EditSetting();
    $edit->allowEditing(true)->allowAdding(true)->allowDeleting(true);

    //...
    echo $treeGrid -> editSettings($edit) -> render();
        ?>
</body>
And also, the following editors are provided for support in TreeGrid control.
- string
- boolean
- numeric
- dropdown
- datepicker
- dateTimePicker
You can set the editor type for a particular column as follows.
<body style="width:100%;height:100%;position:static;">
      <?php
    $treeGrid=new EJ\TreeGrid("TreeGridDefault");
    $Json = json_decode(file_get_contents("Data.json"), true);
    $columns1= new EJ\TreeGrid\Column();
    $columns1 -> field="startDate";
    $columns1 ->headerText="Start Date";
    $columns1->editType="datepicker";
    $columns2= new EJ\TreeGrid\Column();
    $columns2 -> field="endDate";
    $columns2->headerText="End Date";
    $columns2->editType="datepicker";
    $columns3= new EJ\TreeGrid\Column();
    $columns3 -> field="progress";
    $columns3 ->headerText ="Progress";
    $columns3->editType="numericedit";
    $columns=array($columns1,$columns2,$columns3);
    echo $treeGrid -> isResponsive(true)-> columns($columns)-> childMapping("subtasks")->treeColumnIndex(1) -> dataSource($Json)->render();
        ?>
</body>
The output of the DateTimePicker editor in TreeGrid control is as follows.