Appearance in .NET MAUI Smart Data Grid
18 Nov 201824 minutes to read
The SfSmartDataGrid provides options to customize the appearance of its toolbar, AssistView button, and AssistView popup. You can style elements such as background, stroke, and thickness, or replace default visuals with templates for complete control over the layout and design.
Toolbar
Styling
The toolbar’s visual style is driven by the following SmartAssistStyle properties:
- ToolbarBackground: Background color for the toolbar.
- ToolbarStroke: Border color of the toolbar.
- ToolbarStrokeThickness: Border thickness of the toolbar.
<smart:SfSmartDataGrid ItemsSource="{Binding OrderInfoCollection}">
  <smart:SfSmartDataGrid.AssistViewSettings>
    <smart:DataGridAssistViewSettings>
      <smart:DataGridAssistViewSettings.AssistStyle>
        <smart:SmartAssistStyle
          ToolbarBackground="#F7F2FB"
          ToolbarStroke="#CAC4D0"
          ToolbarStrokeThickness="1" />
      </smart:SmartAssistStyle>
    </smart:DataGridAssistViewSettings.AssistStyle>
    </smart:DataGridAssistViewSettings>
  </smart:SfSmartDataGrid.AssistViewSettings>
</smart:SfSmartDataGrid>
var style = SmartGrid.AssistViewSettings.AssistStyle;
style.ToolbarBackground = Color.FromArgb("#F7F2FB");
style.ToolbarStroke = Colors.Red;
style.ToolbarStrokeThickness = 2f;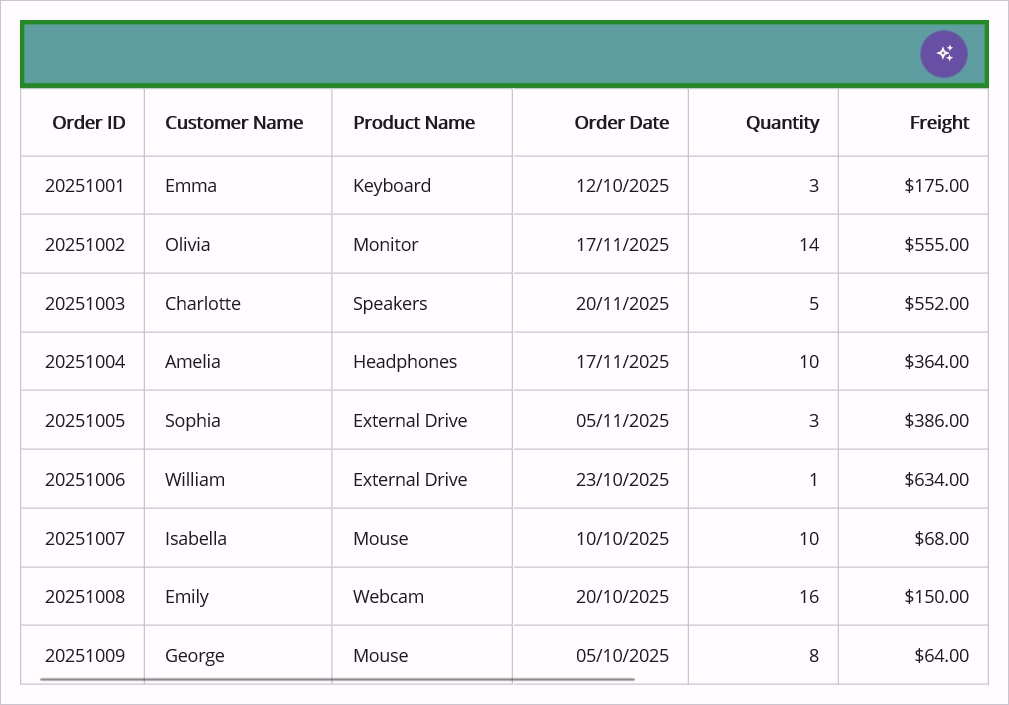
Toolbar Template
The SfSmartDataGrid control allows you to fully customize the toolbar appearance by using the ToolbarTemplate property. This property lets you define a custom layout and style for the toolbar.
<smart:SfSmartDataGrid ItemsSource="{Binding OrderInfoCollection}">
    <smart:SfSmartDataGrid.ToolbarTemplate>
      <DataTemplate>
          <Grid BackgroundColor="LightGray" Padding="8,8" ColumnDefinitions="*,Auto">
              <Label Text="My Custom Toolbar"
                     VerticalTextAlignment="Center"
                     FontAttributes="Bold" >
              </Label>
              <Button Text="Ask AI"
                      Grid.Column="1"
                      Clicked="OnAskAIClicked" >
              </Button>
          </Grid>
      </DataTemplate>
    </smart:SfSmartDataGrid.ToolbarTemplate>
</smart:SfSmartDataGrid>SmartGrid.ToolbarTemplate = new DataTemplate(() =>
{
var grid = new Grid
{
BackgroundColor = Colors.LightGray,
Padding = new Thickness(8, 8),
ColumnDefinitions =
{
new ColumnDefinition { Width = GridLength.Star },
new ColumnDefinition { Width = GridLength.Auto }
}
};
var label = new Label
{
Text = "My Custom Toolbar",
VerticalTextAlignment = TextAlignment.Center,
FontAttributes = FontAttributes.Bold
};
var button = new Button
{
Text = "Ask AI"
};
Grid.SetColumn(button, 1);
button.Clicked += OnAskAIClicked;
grid.Add(label, 0, 0);
grid.Add(button, 1, 0);
return grid;
});AssistView Button
Styling
The AssistView button’s visual style is driven by the following SmartAssistStyle properties:
- AssistButtonBackground: Background color for the AssistView button.
- AssistButtonIconColor: Color applied to the AssistView button icon.
- AssistButtonCornerRadius: Corner radius for the button shape.
<smart:SfSmartDataGrid ItemsSource="{Binding OrderInfoCollection}">
  <smart:SfSmartDataGrid.AssistViewSettings>
    <smart:DataGridAssistViewSettings>
      <smart:DataGridAssistViewSettings.AssistStyle>
        <smart:SmartAssistStyle
          AssistButtonBackground="#6750A4"
          AssistButtonIconColor="#FFFFFF"
          AssistButtonCornerRadius="10" />
      </smart:SmartAssistStyle>
    </smart:DataGridAssistViewSettings.AssistStyle>
    </smart:DataGridAssistViewSettings>
  </smart:SfSmartDataGrid.AssistViewSettings>
</smart:SfSmartDataGrid>
var style = SmartGrid.AssistViewSettings.AssistStyle;
style.AssistButtonBackground = Color.FromArgb("#6750A4");
style.AssistButtonIconColor = Colors.White;
style.AssistButtonCornerRadius = 10;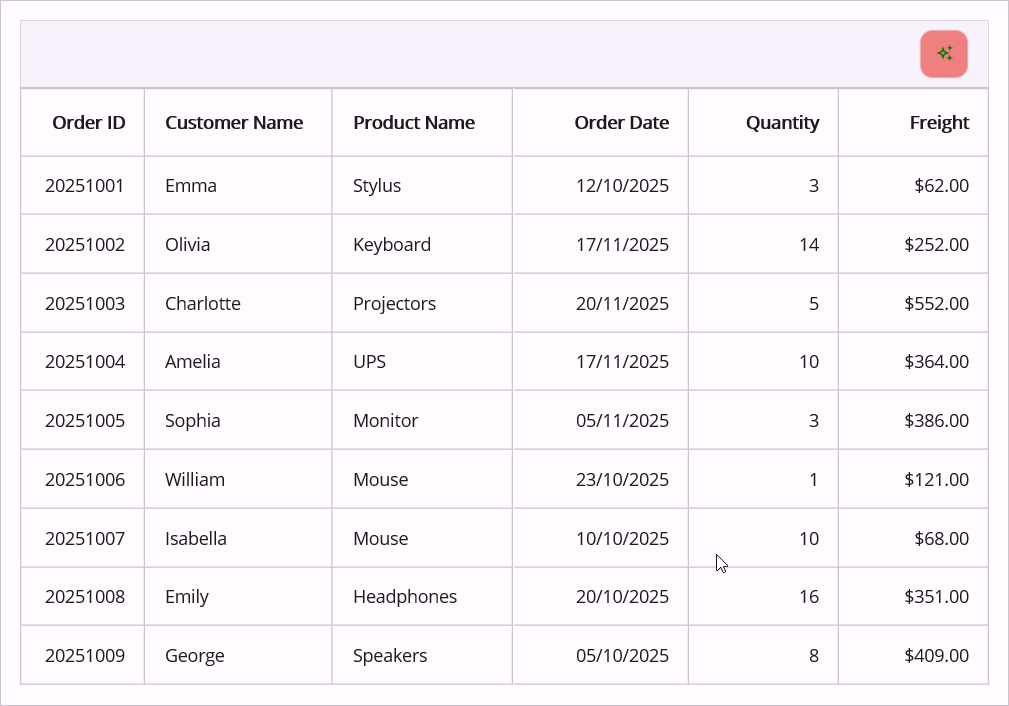
Tip: To customize the chat appearance and message styling within the AssistView, refer to the .NET MAUI AIAssistView documentation.
AssistViewButton Icon Visibility
The SfSmartDataGrid.ShowAssistButtonIcon property determines whether the AssistView button icon is displayed. By default, ShowAssistButtonIcon is set to true. To hide the icon, set this property to false.
<smart:SfSmartDataGrid ItemsSource="{Binding OrderInfoCollection}"
                        ShowAssistButtonIcon="False">
    </smart:SfSmartDataGrid>
// Hide the AssistView icon
SmartGrid.ShowAssistButtonIcon = false;AssistView Button Template
Use the AssistButtonTemplate property to replace the entire button with a custom layout. To customize only the icon, use AssistButtonIconTemplate instead (see below).
<smart:SfSmartDataGrid ItemsSource="{Binding OrderInfoCollection}">
    <smart:SfSmartDataGrid.AssistButtonTemplate>
        <DataTemplate>
            <Button Text="Ask" BackgroundColor="#6750A4" TextColor="White" CornerRadius="20" >
            </Button>
        </DataTemplate>
    </smart:SfSmartDataGrid.AssistButtonTemplate>
</smart:SfSmartDataGrid>SmartGrid.AssistButtonTemplate = new DataTemplate(() =>
{
return new Button
{
Text = "Ask",
BackgroundColor = Color.FromArgb("#6750A4"),
TextColor = Colors.White,
CornerRadius = 20
};
});AssistView Icon Template
Use the AssistButtonIconTemplate property to customize only the button’s icon. Place icon image files in the Resources/Images folder of your project.
Note:
AssistButtonIconTemplateonly applies whenAssistButtonTemplateis not set. If both are defined,AssistButtonTemplatetakes precedence.
<smart:SfSmartDataGrid ItemsSource="{Binding OrderInfoCollection}">
    <smart:SfSmartDataGrid.AssistButtonIconTemplate>
        <DataTemplate>
            <Image Source="assistant_icon.png"
                   HeightRequest="20"
                   WidthRequest="20"/>
        </DataTemplate>
    </smart:SfSmartDataGrid.AssistButtonIconTemplate>
</smart:SfSmartDataGrid>SmartGrid.AssistButtonIconTemplate = new DataTemplate(() =>
{
return new Image
{
Source = "assistant_icon.png",
HeightRequest = 20,
WidthRequest = 20
};
});AssistView
Styling
Use the SmartAssistStyle class to customize the AssistView popup appearance, header styling, and default highlight color.
- AssistPopupStroke: Border color of the AssistView popup.
- AssistPopupStrokeThickness: Border thickness of the AssistView popup.
- AssistViewHeaderTextColor:Text color of the header.
- AssistViewHeaderFontFamily: Font family used for the header text.
- AssistViewHeaderFontAttributes: Font attributes (e.g., Bold, Italic).
- AssistViewHeaderFontSize: Font size for header text.
- AssistViewHeaderBackground: Background color of the header.
- HighlightColor: Fallback color used by row/cell highlight actions when the prompt doesn’t specify a color.
<smart:SfSmartDataGrid ItemsSource="{Binding OrderInfoCollection}">
  <smart:SfSmartDataGrid.AssistViewSettings>
    <smart:DataGridAssistViewSettings>
      <smart:DataGridAssistViewSettings.AssistStyle>
        <smart:SmartAssistStyle
            AssistPopupStroke="#CAC4D0"
            AssistPopupStrokeThickness="1"
            AssistViewHeaderTextColor="#6750A4"
            AssistViewHeaderFontFamily="TimesNewRoman"
            AssistViewHeaderFontAttributes="Bold"
            AssistViewHeaderFontSize="16"
            AssistViewHeaderBackground="#FFFBFE"
            HighlightColor="Red" />
      </smart:DataGridAssistViewSettings.AssistStyle>
    </smart:DataGridAssistViewSettings>
  </smart:SfSmartDataGrid.AssistViewSettings>
</smart:SfSmartDataGrid>
var style = SmartGrid.AssistViewSettings.AssistStyle;
style.AssistPopupStroke = Color.FromArgb("#CAC4D0");
style.AssistPopupStrokeThickness = 2;
style.AssistViewHeaderTextColor = Color.FromArgb("#6750A4");
style.AssistViewHeaderFontFamily = "TimesNewRoman";
style.AssistViewHeaderFontAttributes = FontAttributes.Bold;
style.AssistViewHeaderFontSize = 16d;
style.AssistViewHeaderBackground = Color.FromArgb("#FFFBFE");
style.HighlightColor = Colors.Red;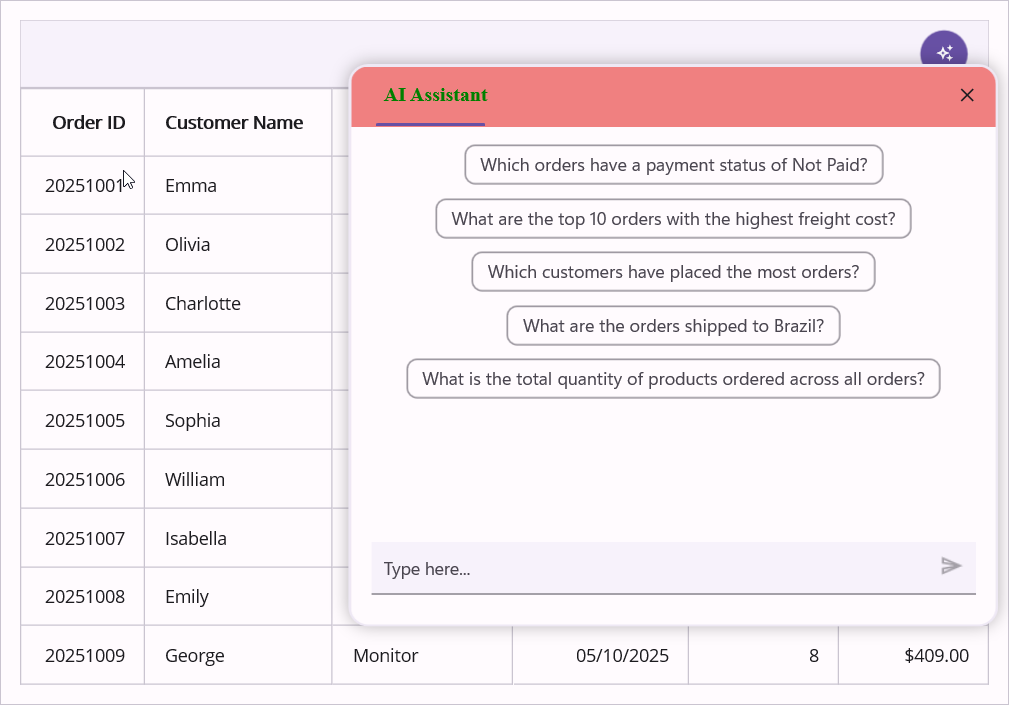
AssistView Header Text
The AssistViewHeaderText property in DataGridAssistViewSettings is used to change the default text displayed in the AssistView header. By default, the header text is “AI Assistant”.
<smart:SfSmartDataGrid ItemsSource="{Binding OrderInfoCollection}">
    <smart:SfSmartDataGrid.AssistViewSettings>
        <smart:DataGridAssistViewSettings AssistViewHeaderText="Smart Assistant" />
    </smart:SfSmartDataGrid.AssistViewSettings>
</smart:SfSmartDataGrid>SmartGrid.AssistViewSettings.AssistViewHeaderText = "Smart Assistant";Show AssistView Close Button
The ShowAssistViewCloseButton property in DataGridAssistViewSettings determines whether the close button in the AssistView header is displayed. By default, this property is set to true. To hide the close button, set this property to false.
<smart:SfSmartDataGrid ItemsSource="{Binding OrderInfoCollection}">
    <smart:SfSmartDataGrid.AssistViewSettings>
        <smart:DataGridAssistViewSettings ShowAssistViewCloseButton="False" />
    </smart:SfSmartDataGrid.AssistViewSettings>
</smart:SfSmartDataGrid>SmartGrid.AssistViewSettings.ShowAssistViewCloseButton = false;Show AssistView Banner
The ShowAssistViewBanner property in DataGridAssistViewSettings determines whether the banner area and suggestions are displayed in the AssistView. By default, this property is set to true.
Note: To display the content defined in
AssistViewBannerTemplateand suggestions,ShowAssistViewBannermust be set totrue.
<smart:SfSmartDataGrid ItemsSource="{Binding OrderInfoCollection}">
    <smart:SfSmartDataGrid.AssistViewSettings>
        <smart:DataGridAssistViewSettings ShowAssistViewBanner="True" />
    </smart:SfSmartDataGrid.AssistViewSettings>
</smart:SfSmartDataGrid>SmartGrid.AssistViewSettings.ShowAssistViewBanner = true;AssistView Header Template
Use the AssistViewHeaderTemplate property to replace the header with a custom layout. The example below demonstrates how to add a close button using the CloseAssistView() method.
<smart:SfSmartDataGrid ItemsSource="{Binding OrderInfoCollection}">
        <smart:AssistViewSettings>
            <smart:DataGridAssistViewSettings.AssistViewHeaderTemplate>
                <DataTemplate>
                    <Grid Padding="10" BackgroundColor="#F5F5F5">
                        <Grid.ColumnDefinitions>
                            <ColumnDefinition Width="*" />
                            <ColumnDefinition Width="Auto" />
                        </Grid.ColumnDefinitions>
                        <Label Text="My AI Assistant"
                               FontAttributes="Bold"
                               FontSize="18"
                               VerticalOptions="Center"
                               HorizontalOptions="Start" >
                        </Label>
                        <Button Grid.Column="1"
                                Text="✕"
                                TranslationY="-4"
                                TextColor="Red"
                                FontSize="16"
                                HeightRequest="18"
                                WidthRequest="18"
                                BackgroundColor="Transparent"
                                Clicked="OnAssistViewCloseClicked" >
                        </Button>
                    </Grid>
                </DataTemplate>
            </smart:DataGridAssistViewSettings.AssistViewHeaderTemplate>
        </smart:AssistViewSettings>
</smart:SfSmartDataGrid>SmartGrid.AssistViewSettings.AssistViewHeaderTemplate = new DataTemplate(() =>
{
var grid = new Grid
{
Padding = new Thickness(10),
BackgroundColor = Color.FromArgb("#F5F5F5"),
ColumnDefinitions =
{
new ColumnDefinition { Width = GridLength.Star },
new ColumnDefinition { Width = GridLength.Auto }
}
};
var titleLabel = new Label
{
Text = "My AI Assistant",
FontAttributes = FontAttributes.Bold,
FontSize = 18,
VerticalOptions = LayoutOptions.Center,
HorizontalOptions = LayoutOptions.Start
};
var closeButton = new Button
{
Text = "✕",
TranslationY = -4,
TextColor = Colors.Red,
FontSize = 16,
HeightRequest = 18,
WidthRequest = 18,
BackgroundColor = Colors.Transparent
};
closeButton.Clicked += (s, args) =>
{
SmartGrid.CloseAssistView();
};
grid.Add(titleLabel, 0, 0);
grid.Add(closeButton, 1, 0);
return grid;
});AssistView Banner Template
Use the AssistViewBannerTemplate property to customize the banner area. Set ShowAssistViewBanner to true to display this custom banner content.
Note: To display the content defined in
AssistViewBannerTemplate, you must setShowAssistViewBannerto true.
<smart:SfSmartDataGrid ItemsSource="{Binding OrderInfoCollection}">
        <smart:AssistViewSettings>
            <smart:DataGridAssistViewSettings.AssistViewBannerTemplate>
                <DataTemplate>
                    <Label Text="I'm Sync AI for you"
                        FontAttributes="Bold"
                        HorizontalOptions="Center"
                        VerticalOptions="Center"
                        HorizontalTextAlignment="Center"
                        VerticalTextAlignment="Center" >
                    </Label>
                </DataTemplate>
            </smart:DataGridAssistViewSettings.AssistViewBannerTemplate>
        </smart:AssistViewSettings>
</smart:SfSmartDataGrid>SmartGrid.AssistViewSettings.AssistViewBannerTemplate = new DataTemplate(() =>
{
return new Label
{
Text = "I'm Sync AI for you",
FontAttributes = FontAttributes.Bold,
HorizontalOptions = LayoutOptions.Center,
VerticalOptions = LayoutOptions.Center,
HorizontalTextAlignment = TextAlignment.Center,
VerticalTextAlignment = TextAlignment.Center
};
});AssistView Editor Template
Use the AssistViewEditorTemplate property to customize the text input editor area where users enter AI commands.
<smart:SfSmartDataGrid ItemsSource="{Binding OrderInfoCollection}">
        <smart:AssistViewSettings>
            <smart:DataGridAssistViewSettings.AssistViewEditorTemplate>
                <DataTemplate>
                    <Grid Padding="8" ColumnDefinitions="*,Auto">
                        <Entry x:Name="entry"
                                Placeholder="Ask the grid..."
                                Completed="Entry_Completed" >
                        </Entry>
                        <Button Text="Send"
                                Grid.Column="1"
                                Clicked="Button_Clicked" >
                        </Button>
                    </Grid>
                </DataTemplate>
            </smart:DataGridAssistViewSettings.AssistViewEditorTemplate>
        </smart:AssistViewSettings>
</smart:SfSmartDataGrid>SmartGrid.AssistViewSettings.AssistViewEditorTemplate = new DataTemplate(() =>
{
var grid = new Grid
{
Padding = new Thickness(8),
ColumnDefinitions =
{
new ColumnDefinition { Width = GridLength.Star },
new ColumnDefinition { Width = GridLength.Auto }
}
};
var entry = new Entry
{
Placeholder = "Ask the grid..."
};
entry.Completed += Entry_Completed;
var sendButton = new Button
{
Text = "Send"
};
Grid.SetColumn(sendButton, 1);
sendButton.Clicked += Button_Clicked;
grid.Add(entry, 0, 0);
grid.Add(sendButton, 1, 0);
return grid;
});