AI-Powered Smart Searching in .NET MAUI ComboBox
18 Nov 201823 minutes to read
This article walks you through the implementation of an advanced search experience in the Syncfusion .NET MAUI ComboBox control. The example uses Azure OpenAI to provide an intelligent, AI-driven search experience.
Prerequisites
Before you begin, ensure you have the following:
- A working .NET MAUI application with the
Syncfusion.Maui.Inputspackage installed. - An active Azure subscription with access to Azure OpenAI and a deployed model. If you don’t have access, refer to the create and deploy Azure OpenAI service guide to set up a new account. Note down the deployment name, endpoint URL, and API key.
-
The Azure.AI.OpenAI NuGet package (version 2.x recommended for the
IChatClientAPI used in this sample). Install it by running the following command in the Visual Studio Package Manager Console:Install-Package Azure.AI.OpenAI -Version 2.0.0Or using the .NET CLI:
dotnet add package Azure.AI.OpenAI --version 2.0.0
Integrating Azure OpenAI with your .NET MAUI App
First, ensure that you have access to Azure OpenAI and have created a deployment in the Azure portal.
If you do not have access, refer to the Create and deploy an Azure OpenAI service guide to set up a new account.
Note down the deployment name, endpoint URL, and API key.
We will use the Azure.AI.OpenAI NuGet package from the NuGet Gallery. Before getting started, install the Azure.AI.OpenAI NuGet package in your .NET MAUI app.
In your base service class (AzureBaseService), initialize the OpenAIClient. Replace the Endpoint, DeploymentName, Key with actual values from your Azure OpenAI resource.
This creates a chat client using your endpoint, API key, and deployment name. It’s stored in the Client property for use in other methods.
The ComboBoxAzureAIService uses this client to send prompts and receive completions.
In the GetCompletion method, we construct the prompt and send it to the Azure OpenAI service. The chat history helps maintain context, but it is cleared for each new prompt in this implementation to keep each search independent.
// AzureBaseService.cs
    public abstract class AzureBaseService
    {
        internal const string Endpoint = "YOUR_END_POINT_NAME";

        internal const string DeploymentName = "DEPLOYMENT_NAME";

        internal const string Key = "API_KEY";

        public AzureBaseService()
        {

        }

        /// <summary>
        /// To get the Azure open ai kernal method
        /// </summary>
        private void GetAzureOpenAIKernal()
        {
            try
            {
                var client = new AzureOpenAIClient(new Uri(Endpoint), new AzureKeyCredential(Key)).AsChatClient(modelId: DeploymentName);
                this.Client = client;
            }
            catch (Exception)
            {
            }
        }

}//ComboBoxAzureAIService.cs
public class ComboBoxAzureAIService : AzureBaseService
{
/// <summary>
/// Gets a completion response from the AzureAI service based on the provided prompt.
/// </summary>
/// <param name="prompt"></param>
/// <param name="cancellationToken"></param>
/// <returns></returns>
public async Task<string> GetCompletion(string prompt, CancellationToken cancellationToken)
{
ChatHistory = string.Empty;
if (ChatHistory != null && Client != null)
{
ChatHistory = ChatHistory + "You are a filtering assistant.";
// Add the user message to the options
ChatHistory = ChatHistory + prompt;
try
{
cancellationToken.ThrowIfCancellationRequested();
var chatresponse = await Client.CompleteAsync(ChatHistory);
cancellationToken.ThrowIfCancellationRequested();
return chatresponse.ToString();
}
catch (RequestFailedException ex)
{
// Log the error message and rethrow the exception or handle it appropriately
Debug.WriteLine($"Request failed: {ex.Message}");
throw;
}
catch (Exception ex)
{
// Handle other potential exceptions
Debug.WriteLine($"An error occurred: {ex.Message}");
throw;
}
}
return "";
}
}Implementing custom filtering in .NET MAUI ComboBox
The .NET MAUI ComboBox control allows you to apply custom filter logic to suggest items based on your specific filter criteria by utilizing the FilterBehavior property, which is the entry point for our smart search logic.
Step 1: Let’s create a new business model to search country names. Refer to the following code example.
// Model.cs
public class ComboBoxModel
{
    public string? Name { get; set; }
}

//ViewModel.cs
public class ComboBoxViewModel : INotifyPropertyChanged
{
        private ObservableCollection<ComboBoxModel> foods;

        public ObservableCollection<ComboBoxModel> Foods
        {
            get { return foods; }
            set { foods = value; OnPropertyChanged(nameof(Foods)); }
        }
        public ComboBoxViewModel()
        {
             foods = new ObservableCollection<ComboBoxModel>
             {
                new ComboBoxModel { Name = "Acai Bowl" },
                new ComboBoxModel { Name = "Aloo Gobi" },
                new ComboBoxModel { Name = "Arepas" },
                new ComboBoxModel { Name = "Baba Ganoush" },
                new ComboBoxModel { Name = "Bagels" },
                new ComboBoxModel { Name = "Bahn Xeo" },
                ....
            }
        }

        public event PropertyChangedEventHandler? PropertyChanged;

        private void OnPropertyChanged(string propertyName)
        {
            PropertyChanged?.Invoke(this, new PropertyChangedEventArgs(propertyName));
        }
}
Step 2: Connecting the custom filter to Azure OpenAI
Implement the GetMatchingIndexes method from the interface. This method is the heart of the custom filter. It is invoked every time the text in the ComboBox control changes.
The logic in GetMatchingIndexes performs an online AI search based on the availability of Azure credentials.
To get accurate and structured results from the AI, we must provide a detailed prompt. This prompt is constructed inside the FilterItemsUsingAzureAI method.
The FilterItemsUsingAzureAI method uses prompt engineering to instruct the AI on how to filter the results, including asking it to handle spelling mistakes and provide the response in a clean format.
//ComboBoxCustomFilter.cs

public class ComboBoxCustomFilter : IComboBoxFilterBehavior
{
        private readonly ComboBoxAzureAIService _azureAIService;
        public ObservableCollection<ComboBoxModel> Items { get; set; }
        public ObservableCollection<ComboBoxModel> FilteredItems { get; set; } = new ObservableCollection<ComboBoxModel>();
        private CancellationTokenSource? _cancellationTokenSource;
        private SoundexAndLevensteinAlgorithm soundexAndLevensteinAlgorithm;

        public ComboBoxCustomFilter()
        {
            _azureAIService = new ComboBoxAzureAIService();
            Items = new ObservableCollection<ComboBoxModel>();
            _cancellationTokenSource = new CancellationTokenSource();
            soundexAndLevensteinAlgorithm = new SoundexAndLevensteinAlgorithm();
        }

        public async Task<object?> GetMatchingIndexes(SfComboBox source, ComboBoxFilterInfo filterInfo)
        {
            Items = (ObservableCollection<ComboBoxModel>)source.ItemsSource;

            if (string.IsNullOrEmpty(filterInfo.Text))
            {
                _cancellationTokenSource?.Cancel();
                return await Task.FromResult(Items);
            }

            // If the Azure API credential is invalid, perform an offline search using Soundex and Levenshtein algorithms.
            if (!AzureBaseService.IsCredentialValid)
            {
                foreach (ComboBoxModel item in Items)
                {
                    soundexAndLevensteinAlgorithm.FilterItemsBySoundexAndLevenshtein(filterInfo.Text, item.Name!);
                }
                var filteredItemsInOrder = soundexAndLevensteinAlgorithm.GetOrder();
                return await Task.FromResult(filteredItemsInOrder);
            }

            string listItems = string.Join(", ", Items!.Select(c => c.Name));

            // Join the first five items with newline characters for demo output template for AI.
            string outputTemplate = string.Join("\n", Items.Take(5).Select(c => c.Name));

            //The cancellationToken was used for cancelling the API request if user types continuously.
            _cancellationTokenSource?.Cancel();
            _cancellationTokenSource = new CancellationTokenSource();
            var cancellationToken = _cancellationTokenSource.Token;

            //Passing the User Input, ItemsSource, Reference output and CancellationToken
            var filteredItems = await FilterItemsUsingAzureAI(filterInfo.Text, listItems, outputTemplate, cancellationToken);

            return await Task.FromResult(filteredItems);
        }

        public async Task<ObservableCollection<ComboBoxModel>> FilterItemsUsingAzureAI(string userInput, string itemsList, string outputTemplate, CancellationToken cancellationToken)
        {
            if (!string.IsNullOrEmpty(userInput))
            {
                var prompt = $"Filter the list items based on the user input using character Starting with and Phonetic algorithms like Soundex or Damerau-Levenshtein Distance. " +
                           $"The filter should ignore spelling mistakes and be case insensitive. " +
                           $"Return only the filtered items with each item in new line without any additional content like explanations, Hyphen, Numberings and - Minus sign. Ignore the content 'Here are the filtered items or similar things' " +
                           $"Only return items that are present in the List Items. " +
                           $"Ensure that each filtered item is returned in its entirety without missing any part of its content. " +
                           $"Arrange the filtered items that starting with the user input's first letter are at the first index, followed by other matches. " +
                           $"Examples of filtering behavior: " +
                           $" userInput: a, filter the items starting with A " +
                           $" userInput: b, filter items starting with B " +
                           $" userInput: c, filter items starting with C " +
                           $" userInput: d, filter items starting with D " +
                           $" userInput: e, filter items starting with E " +
                           $" userInput: f, filter items starting with F " +
                           $" userInput: i, filter items starting with I " +
                           $" userInput: z, filter items starting with Z " +
                           $" userInput: l, filter items starting with L " +
                           $" userInput: q, filter items starting with Q " +
                           $" userInput: o, filter items starting with O " +
                           $" userInput: in, filter items starting with In " +
                           $" userInput: pa, filter items starting with Pa " +
                           $" userInput: em, filter items starting with Em " +
                           $"The example data are for reference, dont provide these as output. Filter the item from list items properly" +
                           $"Here is the User input: {userInput}, " +
                           $"List of Items: {itemsList}" +
                           $"If no items found, return \"Empty\" " +
                           $"Dont use 'Here are the filtered items:' in the output. Check this demo output template, you should return output like this: {outputTemplate} ";

                var completion = await _azureAIService.GetCompletion(prompt, cancellationToken);

                var filteredItems = completion.Split('\n').Select(x => x.Trim()).Where(x => !string.IsNullOrEmpty(x)).ToList();

                if (FilteredItems.Count > 0)
                    FilteredItems.Clear();
                FilteredItems.AddRange(
                        Items
                        .Where(i => filteredItems.Any(item => i.Name!.StartsWith(item))));

                cancellationToken.ThrowIfCancellationRequested();
            }
            return FilteredItems;
        }
}
Step 3: Applying custom filtering to ComboBox
Apply custom filtering to the ComboBox control by using the FilterBehavior property.
<editors:SfComboBox x:Name="comboBox"
    DropDownPlacement="Bottom"
    MaxDropDownHeight="200"
    IsEditable="True"
    TextSearchMode="StartsWith"
    IsFilteringEnabled="True"
    DisplayMemberPath="Name"
    TextMemberPath="Name"
    ItemsSource="{Binding Foods}">
<editors:SfComboBox.FilterBehavior>
  <local:ComboBoxCustomFilter/>
</editors:SfComboBox.FilterBehavior>

</editors:SfComboBox>
The following image demonstrates the output of the above AI-based search using a custom filtering sample.
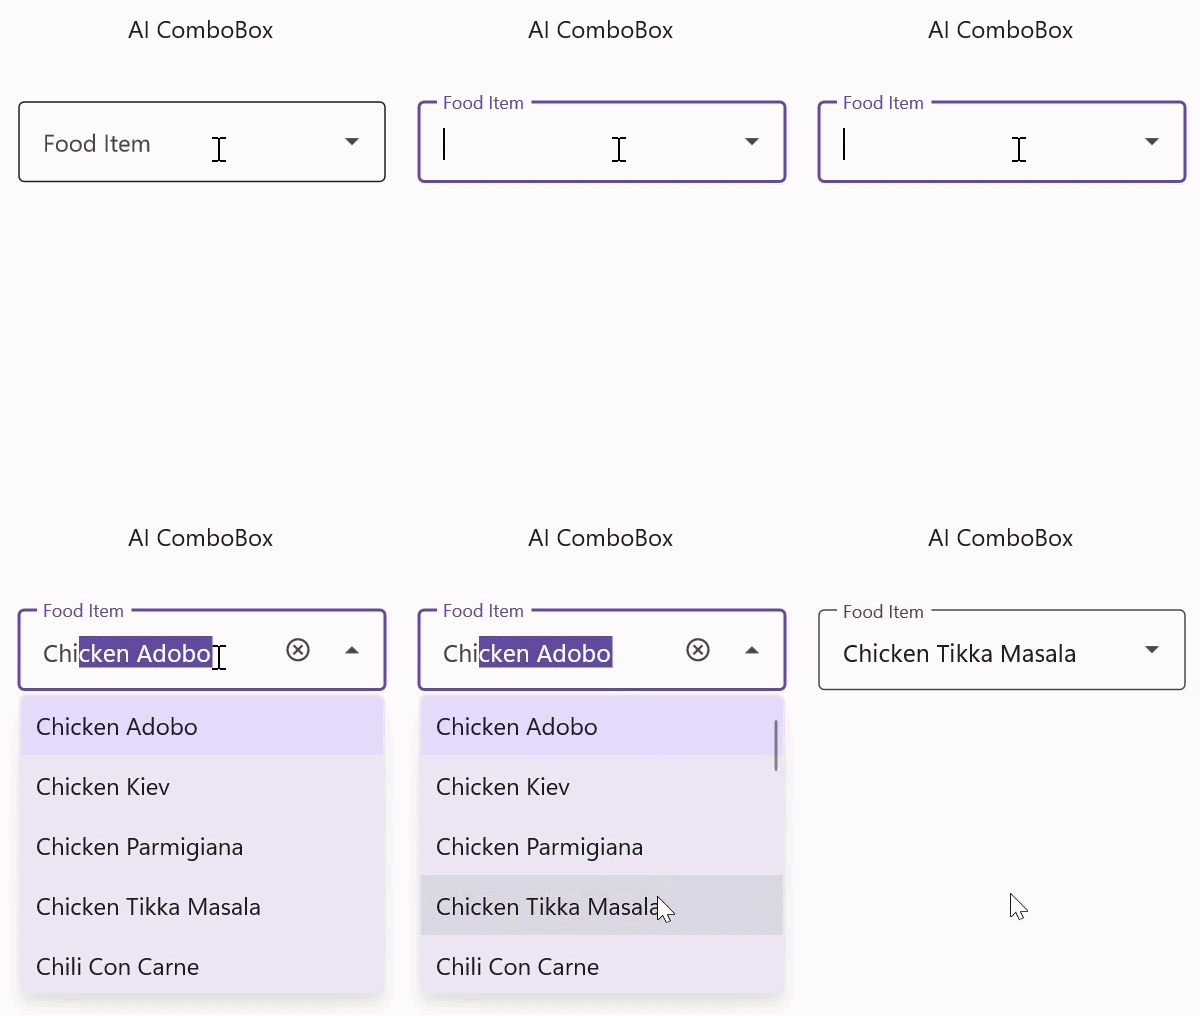
You can find the complete sample from this link.