How can I help you?
Getting Started with JavaScript TimePicker
This section explains briefly about how to create a TimePicker in your application with JavaScript. The Essential JavaScript TimePicker provides support to display a TimePicker in your web page and allows you to pick a time from the given TimePicker. Here, you can learn how to customize two dates and TimePickers in a real-time hotel table booking application.
The following screenshot illustrates the functionality of a TimePicker with a time range of morning to evening. You can select a time to book a table, from a period of 9.00 AM to 6.00 PM for the current day. This avoids selecting a time prior to the morning.

Create a TimePicker
Essential JavaScript TimePicker widget renders built-in features such as keyboard navigation, other time navigation with animations and flexible APIs. You can easily create the TimePicker widget by using simple input textbox element as follows.
Create an HTML file and add the following template to the HTML file.
<!DOCTYPE html>
<html>
<head>
    <meta name="viewport" content="width=device-width, initial-scale=1.0" charset="utf-8" />
    <!-- Style sheet for default theme (flat azure) -->
    <link href="http://cdn.syncfusion.com/33.1.44/js/web/flat-azure/ej.web.all.min.css" rel="stylesheet" />
    <!--Scripts-->
    <script src="http://cdn.syncfusion.com/js/assets/external/jquery-1.10.2.min.js"></script>
    <script src="http://cdn.syncfusion.com/33.1.44/js/web/ej.web.all.min.js"></script>
    <!--Add custom scripts here -->
</head>
<body>
    <!-- add time picker element here -->
</body>
</html>
NOTE
jQuery.easing external dependency has been removed from version 14.3.0.49 onwards. Kindly include this jQuery.easing dependency for versions lesser than 14.3.0.49 in order to support animation effects.
Add input element to render a TimePicker.
<table>
    <tr>
        <td class="tdclass">Select date</td>
        <td class="tdclass">Select time</td>
        <td class="tdclass">Select party size</td>
    </tr>
    <tr>
        <td class="tdclass">
            <span class="innerdp">
                <input id="datePicker" type="text" />
            </span>
        </td>
        <td class="tdclass">
            <span class="innerdp">
                <input id="time" type="text" />
            </span>
        </td>
        <td class="tdclass">
            <span class="innerdp">
                <select name="party_size">
                    <option name="party_size" value="default">select people</option>
                    <option name="party_size" value="5">5 people</option>
                    <option name="party_size" value="10">10 people</option>
                    <option name="party_size" value="15">15 people</option>
                    <option name="party_size" value="20">20 people</option>
                </select>
            </span>
        </td>
    </tr>
    <tr>
        <td class="tdclass">
            <button class="book">Book</button>
        </td>
    </tr>
</table>
Initialize TimePicker using the following code example.
$(function () {
        // document ready
        // simple time picker creation
        $("#datePicker").ejDatePicker();
        $("#time").ejTimePicker();
    });
Add the following styles to show Time Picker control.
<style type="text/css" class="cssStyles">
.tdclass {
width: 200px;
font-weight: bold;
}
.innerdp {
display: inline-block;
}
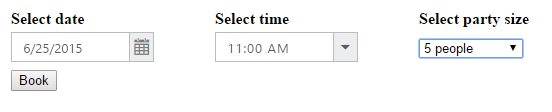
</style>The following screenshot displays a TimePicker control.
Set the Min and Max Values
In a real-time hotel table booking scenario, the booking is open only for a limited time and limited number of days. You have to select a time and date from the given range. This is achieved by using the properties minTime and maxTime, minDate and maxDate. By this way, only times ranging between minTime and maxTime, minDate and maxDate are enabled in the TimePicker.
var currentDate = new Date();// mentions the current date.
    var minimumTime = "9:00 AM"; // mentions the start time.
    var maximumTime = "6:00 PM"; // mentions the start time.
    // the following code sets the date range to 30 days from the current date.
    var rangeDate = new Date(currentDate.getFullYear(), currentDate.getMonth(), currentDate.getDate() + 30);
    $(function () {
        // declaration
        $("#datePicker").ejDatePicker({
            value: currentDate, // the current date is used as default value
            minDate: currentDate,// Default date as minDate.
            maxDate: rangeDate // 30 –days of interval from min date.
        });
        $("#time").ejTimePicker({
            minTime: minimumTime, // Start time as minimumTime.
            maxTime: maximumTime // End time as maximumTime.
        });
    });
The above code example displays the following output.
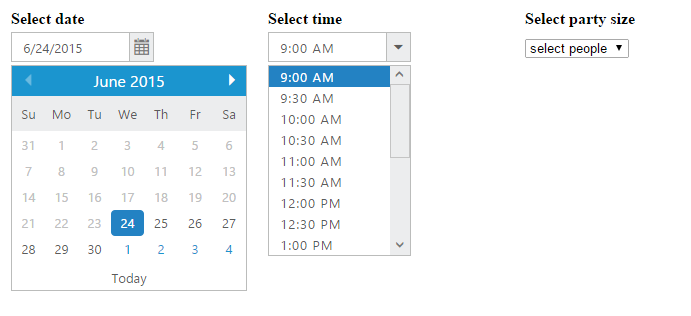
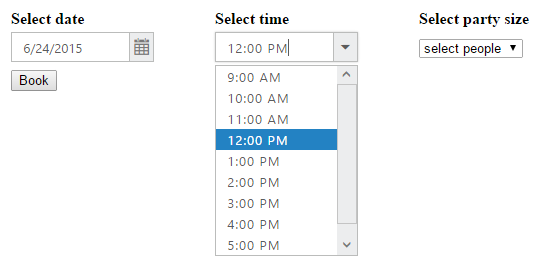
Set Time Interval
You can select the Time in TimePicker with the interval of one hour. You need to set the property interval as 60.
The following code example shows how to set Time interval.
var currentDate = new Date();// mentions the current date.
    var minimumTime = "9:00 AM"; // mentions the start time.
    var maximumTime = "6:00 PM"; // mentions the start time.
    // the following code sets the date range to 30 days from the current date.
    var rangeDate = new Date(currentDate.getFullYear(), currentDate.getMonth(), currentDate.getDate() + 30);
    $(function () {
        // declaration
        $("#datePicker").ejDatePicker({
            value: currentDate, // the current date is used as default value
            minDate: currentDate,// Default date as minDate.
            maxDate: rangeDate // 30 –days of interval from min date.
        });
        $("#time").ejTimePicker({
            minTime: minimumTime, // Start time as minimumTime.
            maxTime: maximumTime, // End time as maximumTime.
            interval: 60
        });
    });
Execute the above code to achieve the desired result. You can select the date and time in TimePicker within the given range of one hour interval. This scenario is illustrated in the following screenshot.
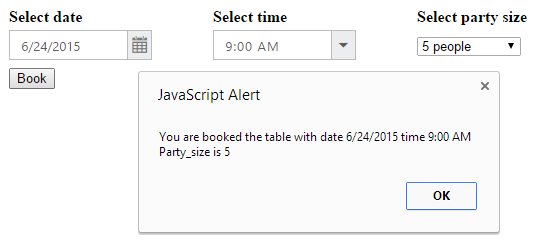
Display the Acknowledgment Message
The acknowledgment message is displayed when you click the Book button.
The following code example shows how to display the acknowledgment message.
var currentDate = new Date();// mentions the current date.
    var minimumTime = "9:00 AM"; // mentions the start time.
    var maximumTime = "6:00 PM"; // mentions the start time.
    // the following code sets the date range to 30 days from the current date.
    var rangeDate = new Date(currentDate.getFullYear(), currentDate.getMonth(), currentDate.getDate() + 30);
    $(function () {
        // declaration
        $("#datePicker").ejDatePicker({
            value: currentDate, // the current date is used as default value
            minDate: currentDate,// Default date as minDate.
            maxDate: rangeDate // 30 –days of interval from min date.
        });
        $("#time").ejTimePicker({
            minTime: minimumTime, // Start time as minimumTime.
            maxTime: maximumTime, // End time as maximumTime.
            interval: 60
        });
    });
    $(document).ready(function () {
        $('.book').click(function () {
            var a = $('#datePicker').val();
            var b = $('#time').val();
            var c = $('select').val();
            alert("You are booked the table with date " + a + " time " + b + " Party_size is " + c);
        });
    });
The following screenshot displays the acknowledgment message.
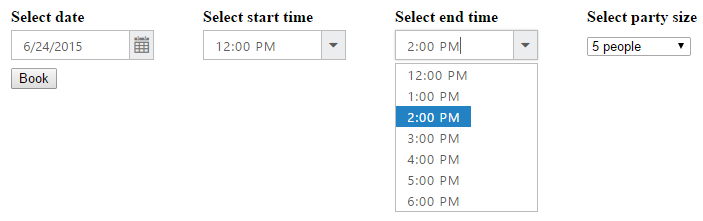
Create Two TimePickers
You can select the Start time in the first TimePicker and then the End time in the second TimePicker. The validation process is done after the selection of Start time and the changes are reflected in the End time selection TimePicker. You can manipulate this process in the Select event of Start Time selection TimePicker.
Add input element to render Two TimePickers.
<table>
    <tr>
        <td class="tdclass">Select date</td>
        <td class="tdclass">Select start time</td>
        <td class="tdclass">Select end time</td>
        <td class="tdclass">Select party size</td>
    </tr>
    <tr>
        <td class="tdclass">
            <span class="innerdp">
                <input id="datePicker" type="text" />
            </span>
        </td>
        <td class="tdclass">
            <span class="innerdp">
                <input id="time" type="text" />
            </span>
        </td>
        <td class="tdclass">
            <span class="innerdp">
                <input id="timeEnd" type="text" />
            </span>
        </td>
        <td class="tdclass">
            <span class="innerdp">
                <select name="party_size">
                    <option name="party_size" value="default">select people</option>
                    <option name="party_size" value="5">5 people</option>
                    <option name="party_size" value="10">10 people</option>
                    <option name="party_size" value="15">15 people</option>
                    <option name="party_size" value="20">20 people</option>
                </select>
            </span>
        </td>
    </tr>
    <tr>
        <td class="tdclass">
            <button class="book">Book</button>
        </td>
    </tr>
</table>
Initialize Two TimePickers using the following code example.
var currentDate = new Date();// mentions the current date.
    var minimumTime = "9:00 AM"; // mentions the start time.
    var maximumTime = "6:00 PM"; // mentions the start time.
    var minimumTimepicker;
    // the following code sets the date range to 30 days from the current date.
    var rangeDate = new Date(currentDate.getFullYear(), currentDate.getMonth(), currentDate.getDate() + 30);
    $(function () {
        // declaration
        $("#datePicker").ejDatePicker({
            value: currentDate, // the current date is used as default value
            minDate: currentDate,// Default date as minDate.
            maxDate: rangeDate // 30 –days of interval from min date.
        });
        $("#time").ejTimePicker({
            minTime: minimumTime, // Start time as minimumTime.
            maxTime: maximumTime, // End time as maximumTime.
            interval: 60,
            select: "selectedStartTime"
        });
        $('#timeEnd').ejTimePicker({
            minTime: minimumTime,
            maxTime: maximumTime,
            interval: 60,
        });
    });
    function selectedStartTime(sender) {
        var selDate = sender.value; // mentions the selected time.
        minimumTimepicker = $("#timeEnd").data("ejTimePicker");// creating TimePicker object
        minimumTimepicker.setModel({ "minTime": selDate });// setting minimumTime property through setModel of TimePicker object.
    }
    $(document).ready(function () {
        $('.book').click(function () {
            var a = $('#datePicker').val();
            var b = $('#time').val();
            var c = $('select').val();
            alert("You are booked the table with date " + a + " time " + b + " Party_size is " + c);
        });
    });
Execute the above code to achieve the desired result. By selecting the Start Time in the first TimePicker, you can select the End Time within the given range. This restricts you from selecting false time. This scenario is illustrated in the following screenshot.
You can also add additional functionalities such as localization and time formats to the TimePicker.