Connecting PHP Laravel data to Syncfusion Grid with PHP
Laravel is a modern PHP framework that provides a clean, elegant syntax and powerful features for building web applications. The Syncfusion JavaScript Grid component seamlessly integrates with the Laravel framework and MySQL Server, providing strong support for RESTful APIs. By combining Laravel’s robust backend with the Grid’s rich frontend features enables the creation of interactive, responsive data management interfaces with minimal custom code.
Why Integrate Laravel with Syncfusion Grid?
-
Streamlined Data Connectivity: Syncfusion Grid easily consumes RESTful API endpoints, enabling smooth communication with any backend service.
-
Simplified Data Handling: It provides built‑in support for CRUD operations, enabling records to be managed directly in the Grid without complex setup.
-
Scalable Performance: With server‑side processing for filtering, sorting, and paging, Syncfusion Grid ensures responsive performance even with large datasets.
-
Rich Feature Set: Syncfusion Grid provides an extensive collection of advanced features such as grouping, exporting, column customization, and responsive layouts. These capabilities make it a versatile and scalable solution for enterprise‑grade data management.
Prerequisites
Before proceeding, ensure that the following tools are installed and configured:
| Requirement | Version | Purpose |
|---|---|---|
| PHP | 8.1 or higher | Laravel runtime environment |
| Composer | 2.0+ | PHP package manager for dependencies |
| Node.js | 14.x or higher | JavaScript runtime for frontend tools |
| MySQL | 8.0 or higher | Database server (or PostgreSQL, SQLite) |
| Laravel | 10.x or 11.x | PHP web application framework |
| Git | 2.30+ | Version control system |
Recommended development tools:
- Visual Studio Code or another preferred editor.
- Postman or Insomnia for API testing.
- MySQL Workbench or phpMyAdmin for database management.
Verifying Installation
Open a terminal (for example, an integrated terminal in Visual Studio Code or Windows Command Prompt opened with Win+R, or macOS Terminal launched with Cmd+Space) and run the following command to verify installation:
# Check PHP version
php -v

# Check Composer version
composer --version

# Check Node.js version
node --version

# Check MySQL version
mysql --version
Error during command execution. The corresponding tool may not be installed or configured correctly. See the troubleshooting section at the end of this guide for installation help.
Key topics
| # | Topics | Link |
|---|---|---|
| 1 | Create a Laravel project, configure the database, and set up models with migrations | View |
| 2 | Create Blade templates and configure UrlAdaptor for seamless Grid integration |
View |
| 3 | Handle server-side filtering, searching, sorting, and paging for efficient data processing | View |
| 4 | Enable insert, read, update, and delete operations from the Grid using UrlAdaptor
|
View |
| 5 | Run the Laravel development server and access the application locally | View |
| 6 | Explore a complete working sample on GitHub | View |
Building the Laravel application
Follow these steps to create a new Laravel application:
Open the terminal in Visual Studio Code or Command Prompt before running the steps and commands below to create a new Laravel application.
Step 1: Create a new PHP with Laravel project
Run the following command to create a new Laravel project using Composer:
composer create-project laravel/laravel grid-demo
cd grid-demo
This command creates a folder named grid-demo containing the default Laravel application structure, including configuration files, directories, and dependency management.
Step 2: Configure the database
Create a new database for the application by running the following commands:
# For MySQL using command line
mysql -u root -p
CREATE DATABASE students_db CHARACTER SET utf8mb4 COLLATE utf8mb4_unicode_ci;
EXIT;
This command creates a database named “students_db” with UTF-8 character set and Unicode collation for proper text handling.
Update the .env file in the project root with database credentials:
DB_CONNECTION=mysql
DB_HOST=127.0.0.1
DB_PORT=3306
DB_DATABASE=students_db
DB_USERNAME=root
DB_PASSWORD=your_password
Note: The
.envfile stores sensitive configuration. Never commit it to version control. Database credentials inDB_USERNAMEandDB_PASSWORDmust match the MySQL configuration.
Step 3: Create a model with migration
Generate a model with migration for managing student data:
php artisan make:model Student -mThis command creates two files:
- Model: (app/Models/Student.php) — represents the students table and allows object‑oriented interaction with the database.
- Migration: (database/migrations/xxxx_xx_xx_create_students_table.php) — a schema file used to define or modify database tables.
The xxxx_xx_xx part is a timestamp automatically added by Laravel. It ensures migrations run in the correct order. Even though the name looks like a “version” this file is simply the first definition of the “students” table.
Update the migration file (database/migrations/xxxx_xx_xx_create_students_table.php) with the following schema:
<?php

use Illuminate\Database\Migrations\Migration;
use Illuminate\Database\Schema\Blueprint;
use Illuminate\Support\Facades\Schema;

return new class extends Migration
{
    public function up(): void
    {
        Schema::create('students', function (Blueprint $table) {
            $table->id('StudentID');
            $table->string('FirstName');
            $table->string('LastName')->nullable();
            $table->string('Email')->unique();
            $table->string('Course')->nullable();
            $table->enum('Status', ['Active', 'Inactive', 'Graduated'])->default('Active');
            $table->enum('Campus', ['Main', 'Downtown', 'North', 'South'])->default('Main');
            $table->timestamps();

            // Add indexes for better query performance
            $table->index('FirstName');
            $table->index('Course');
        });
    }

    public function down(): void
    {
        Schema::dropIfExists('students');
    }
};
Run the following migration command to apply the schema (with its columns, indexes, and constraints) and create the “students” table:
php artisan migrateStep 4: Update the student model
Update the student model (app/Models/Student.php) to configure Eloquent ORM for database interactions:
<?php

namespace App\Models;

use Illuminate\Database\Eloquent\Model;

class Student extends Model
{
    protected $primaryKey = 'StudentID';
    public $timestamps = true;

    protected $fillable = [
        'FirstName',
        'LastName',
        'Email',
        'Course',
        'Status',
        'Campus'
    ];

    protected $casts = [
        'created_at' => 'datetime',
        'updated_at' => 'datetime',
    ];
}
Key Details:
- The “$fillable” array specifies which fields can be mass‑assigned using methods like “create()” or “fill()”.
- The “$primaryKey” property tells Laravel that “StudentID” is the unique identifier for this model.
- The “$timestamps” property enables automatic tracking of the “created_at” and “updated_at” fields.
- The “$casts” property ensures timestamp fields are treated as proper datetime objects in PHP.
Primary Key: A primary key (“StudentID”) uniquely identifies each record in the table and enables efficient lookups and relationships.
Step 5: Create a server controller
Generate a controller by executing the following command. The controller will handle server‑side operations:
php artisan make:controller ServerControllerThis command creates the ServerController.php file inside the (app/Http/Controllers) folder. It will manage data operations such as reading, inserting, updating, and deleting records.
<?php

namespace App\Http\Controllers;

use Illuminate\Http\Request;
use App\Models\Student;
use Illuminate\Support\Facades\Validator;

class ServerController extends Controller
{
    /**
     * Read/Query handler
     */
    public function read(Request $request)
    {
        try {
            $query = Student::query();
            $count = $query->count();  // Get total BEFORE pagination

            // ...filtering, sorting, searching logic...

            $result = $query->get();

            return response()->json([
                'result' => $result,
                'count'  => $count
            ]);
        } catch (\Exception $e) {
            return response()->json(['error' => $e->getMessage()], 500);
        }
    }
}
This example demonstrates only basic data retrieval. Filtering, searching, sorting, and paging will be covered later in performing data operations section.
Step 6: Define API routes
After creating the ServerController, API routes must be defined to connect client requests to its methods. Open the existing (routes/api.php) file and add the following routes:
<?php

use Illuminate\Http\Request;
use Illuminate\Support\Facades\Route;
use App\Http\Controllers\ServerController;

Route::middleware('auth:sanctum')->get('/user', function (Request $request) {
    return $request->user();
});

Route::post('/read', [ServerController::class, 'read']);            // Read/Query
Route::post('/insert', [ServerController::class, 'insert']);        // Insert
Route::post('/update', [ServerController::class, 'update']);        // Update
Route::post('/remove', [ServerController::class, 'remove']);        // Delete
These routes map Grid actions to specific controller methods. Each route listens for a POST request (/read, /insert, /update, /remove) and directs it to the corresponding method in ServerController.
Step 7: Configure the CORS
Configure Cross-Origin Resource Sharing (CORS) in the (config/cors.php) file. CORS controls which external domains are permitted to access the API. Without CORS configuration, the frontend Grid will receive blocked requests and fail to load or update data.
'allowed_origins' => ['*'],
'allowed_methods' => ['*'],
'allowed_headers' => ['*'],
'exposed_headers' => [],
'max_age' => 0,
'supports_credentials' => false,
Allowing all origins (‘*’) is fine for development. In production, replace this with the actual domain for security.
Step 8: Creating the database seeder
Update the (database/seeders/DatabaseSeeder.php) file to populate the database with sample student data for testing.
Seeders: Seeders are Laravel classes that automatically fill database tables with test data. They are useful during development and testing because they save time compared to entering records manually.
<?php

namespace Database\Seeders;

use Illuminate\Database\Seeder;
use App\Models\Student;

class DatabaseSeeder extends Seeder
{
    /**
     * Seed the application's database.
     * This generates 1000 student records dynamically for testing the Grid with large datasets
     */
    public function run(): void
    {
        // Clear existing students
        Student::truncate();

        // Generate 1000 student records dynamically
        $firstNames = ['John', 'Emily', 'Michael', 'Olivia', 'Daniel', 'Ethan', 'Madison', 'Logan', 'Chloe', 'Jackson', 'William', 'Abigail', 'Henry', 'Victoria', 'Samuel', 'Charles', 'Megan', 'Jason', 'Lily', 'Alexander', 'Jacob', 'Emma', 'Lucas', 'Amelia', 'Mason', 'Liam', 'Ava', 'Noah', 'Sophie', 'Elijah', 'Isabella', 'Benjamin', 'Harper', 'Evelyn', 'James', 'Scarlett', 'Caroline', 'Hudson', 'Paisley', 'Charlotte', 'Oliver', 'Avery', 'Julia', 'Aiden', 'Nathan', 'Sophia', 'David'];

        $lastNames = ['Miller', 'Johnson', 'Anderson', 'Harris', 'Thompson', 'Carter', 'Rivera', 'Brooks', 'Ward', 'Bailey', 'Clark', 'Lewis', 'Allen', 'Young', 'King', 'Green', 'Hall', 'Adams', 'Baker', 'Nelson', 'Murphy', 'Davis', 'Garcia', 'Martinez', 'Lee', 'Taylor', 'Thomas', 'Jackson', 'White', 'Martin', 'Rodriguez', 'Wilson', 'Moore', 'Williams', 'Myers', 'Kelley', 'Watts', 'Barrett', 'Shaw', 'Bennett', 'Scott', 'Pierce', 'Reed', 'Henderson'];

        $courses = ['Banking', 'Finance', 'Investment Banking', 'E-Commerce', 'Healthcare Management', 'Environmental Science', 'Retail Management', 'Logistics', 'Supply Chain', 'Philosophy', 'Hospitality', 'Graphic Design', 'Media & Entertainment'];

        $statuses = ['Active', 'Graduated', 'Inactive'];

        $campuses = ['Main', 'Downtown', 'North', 'South'];

        $students = [];

        for ($i = 1; $i <= 1000; $i++) {
            $firstName = $firstNames[array_rand($firstNames)];
            $lastName = $lastNames[array_rand($lastNames)];

            $students[] = [
                'FirstName' => $firstName,
                'LastName' => $lastName,
                'Email' => strtolower($firstName . '.' . $lastName . $i . '@example.com'),
                'Course' => $courses[array_rand($courses)],
                'Status' => $statuses[array_rand($statuses)],
                'Campus' => $campuses[array_rand($campuses)]
            ];
        }

        // Insert all student records into database
        foreach ($students as $student) {
            Student::create($student);
        }

        // Log completion
        $this->command->info('Successfully seeded ' . count($students) . ' students into the database.');
    }
}
Run the seeder with the following command in the Visual Studio Code terminal or Command Prompt:
php artisan migrate:fresh --seedThis command executes the DatabaseSeeder, which populates the database with 1,000 dynamically generated student records. Each record contains a first name, last name, email, course, status, and campus assignment, and is assigned a unique auto‑incremented “StudentID”.
Integrating Syncfusion Grid with PHP and Laravel API
The following steps outline the process to integrate and connect the Syncfusion® Grid with a Laravel API.
Step 1: Create the main Blade view file
Laravel uses Blade as its templating engine. Blade makes it easy to mix PHP with HTML using a simple and safe syntax. For example, variables can be displayed with “”, and control structures like @if or @foreach can be used without writing long PHP tags.
Create a new Blade file at (resources/views/grid.blade.php). This file will serve as the main HTML page where the Syncfusion Grid will be rendered:
<!DOCTYPE html>
<html lang="en">
<head>
    <meta charset="UTF-8">
    <meta name="viewport" content="width=device-width, initial-scale=1.0">
    <title>Student Management Grid</title>
</head>
<body>
    <div class="container">
        <h1>Student Management System</h1>
        <div id="Grid"></div>
    </div>

    <script>
        document.addEventListener('DOMContentLoaded', function() {
            // Initialize the component here
        });
    </script>
</body>
</html>
Step 2: Add Syncfusion references
Include Syncfusion’s CSS and JavaScript libraries using CDN links:
<!-- Syncfusion EJ2 CSS Theme (Material 3 Light) -->
<link rel="stylesheet" href="https://cdn.syncfusion.com/ej2/32.1.24/material3.css">
<!-- Syncfusion EJ2 JavaScript Library -->
<script src="https://cdn.syncfusion.com/ej2/32.1.24/dist/ej2.min.js"></script>
These Syncfusion CDN links load all EJ2 components and styles, enabling the Syncfusion Grid and other integrated components in the application. For projects that prefer local installation, use local script and style references.
In this example, the “Material 3” theme is applied. Other themes can be chosen or customized as needed. For more details, refer to the Syncfusion React Components Appearance documentation.
Step 3: Connect the Grid and Laravel API by using the DataManager
The Syncfusion DataManager acts as the data layer and serves as a bridge between the Syncfusion Grid and the backend. Every action performed in the Grid such as fetching records, sorting, filtering, searching, paging, or performing CRUD (Create, Read, Update, Delete) operations is routed through the DataManager. It standardizes communication with remote services and ensures that queries are properly serialized before reaching the server.
The UrlAdaptor is a built‑in adaptor specifically designed for custom RESTful APIs like Laravel. It defines the format of requests and the processing of responses. The UrlAdaptor converts Grid actions into HTTP POST requests and manages the JSON responses returned by the server, enabling the Grid to display and handle data seamlessly.
If the UrlAdaptor does not meet the requirements of a project, other adaptors can be used. For example, the WebApiAdaptor is available for scenarios where APIs follow different conventions.
The UrlAdaptor expects the server to respond with a JSON object containing:
- result: An array of data records for the current page (records to be displayed on demand).
- count: The total number of records available on the server (required for accurate pagination).
const dataManager = new ej.data.DataManager({
    url: "",              // POST endpoint for featching data with filters, sort, paging
    insertUrl: "",      // POST endpoint for inserting new records
    updateUrl: "",      // POST endpoint for updating records
    removeUrl: "",      // POST endpoint for deleting records
    adaptor: new ej.data.UrlAdaptor(),          // Activates the UrlAdaptor
});
API Interaction Flow:
This section describes the communication between the Syncfusion Grid and the existing ServerController(ServerController.php), where requests are sent through the DataManager and processed responses are returned for data operations.
-
Read Request - When Grid loads or performs data operations:
- Client sends
POSTto/api/readwithDataManagerstate (where, sorted, search, skip, take). - ServerController processes and returns:
{ result: [...], count: total }.
- Client sends
-
Insert Request - When adding a new record:
- Client sends
POSTto/api/insertwith new record invalueproperty. - ServerController inserts the record and returns the saved record.
- Client sends
-
Update Request - When updating a record:
- Client sends
POSTto/api/updatewith modified record invalueproperty. - ServerController updates and returns the updated record.
- Client sends
-
Remove Request - When deleting a record:
- Client sends
POSTto/api/removewith primary key. - ServerController deletes and returns confirmation.
- Client sends
Step 4: Initialize Grid with UrlAdaptor
Add the Grid initialization in the Blade template’s script section and set the dataSource with the already created DataManager instance.
document.addEventListener('DOMContentLoaded', function() {

    // Initialize Grid
    const grid = new ej.grids.Grid({
        dataSource: dataManager,
        allowPaging: true,
        pageSettings: { pageSize: 10 },
        allowSorting: true,
        allowFiltering: true,
        editSettings: { allowEditing: true, allowAdding: true, allowDeleting: true, mode: 'Normal' },
        toolbar: ['Add', 'Edit', 'Delete', 'Update', 'Cancel', 'Search'],
        columns: [
            { field: 'StudentID', headerText: 'ID', width: '100', isPrimaryKey: true, allowEditing: false },
            { field: 'FirstName', headerText: 'First Name', width: 150, validationRules: { required: true } },
            { field: 'LastName', headerText: 'Last Name', width: '150' },
            { field: 'Email', headerText: 'Email', width: '200', validationRules: { required: true, email: true } },
            { field: 'Course', headerText: 'Course', width: '200' },
            { field: 'Status', headerText: 'Status', width: '120' }
        ],
        actionFailure: function(args) {
            console.error('Grid action failed:', args.error);
        }
    });

    // Render the Grid
    grid.appendTo('#Grid');
});
Step 5: Define web route
In Laravel, routes are used to map incoming HTTP requests to specific views or controller actions. By default, all routes are defined inside the (routes/web.php) file for web‑based requests.
A simple route is defined to load the Grid view when the root URL (/) of the application is visited.
<?php

use Illuminate\Support\Facades\Route;

Route::get('/', function () {
    return view('grid');
});
Performing data operations
The ServerController (ServerController.php) works with the UrlAdaptor to handle all Grid data operations. Actions such as filtering, searching, sorting, and paging are sent through the single /api/read endpoint. The “read” method in the controller receives these requests, applies the conditions to the database query, and returns the results back to the Grid.
For detailed DataManager request parameter documentation, refer to the DataManager documentation.
Filtering
When the Grid performs a filtering action, the UrlAdaptor sends filter conditions to the /api/read endpoint in a where parameter. The “applyWhere()” and “applyOperator()” methods handle these conditions and build the database filter query.
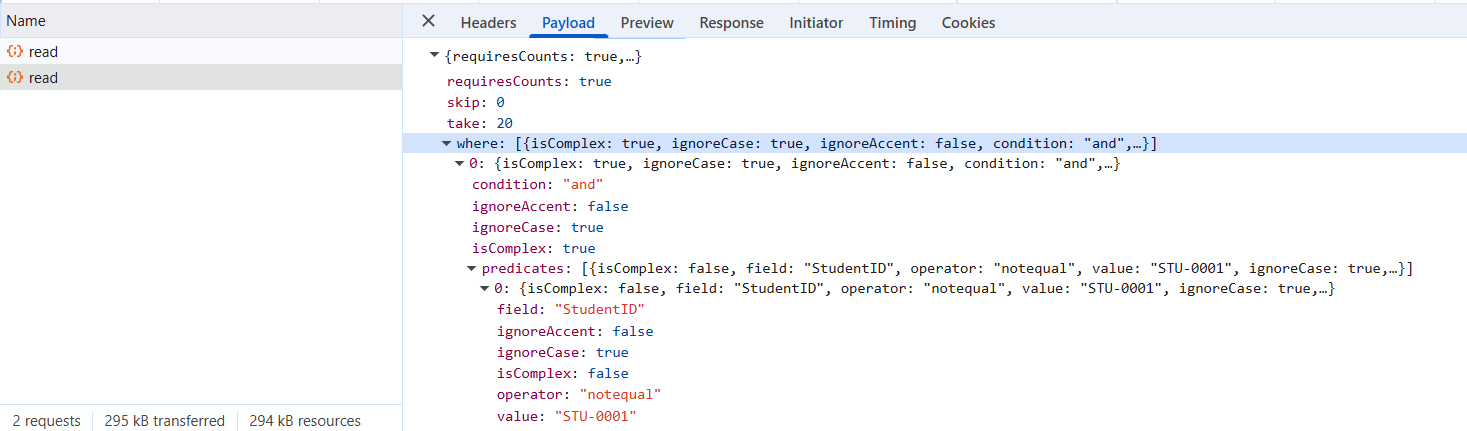
Client-to-server communication:
- Grid sends
POSTto/api/readwithwhereparameter containing filter predicates (field, operator, value). - The ServerController receives the request and calls “applyWhere()” method.
- “applyWhere()” processes predicates and applies WHERE clauses to the database query.
- “applyOperator()” converts Grid operators to SQL operations.
- Supported operators: equal, notequal, greaterthan, lessthan, contains, startswith, endswith, in, notin.
- The filtered results are returned to the Grid in JSON format containing the “result” records and the “count” of total available records.
class ServerController extends Controller
{
    public function read(Request $dm)
    {
        try {
            $query = Student::query();
            $count = $query->count();

            // Apply filtering
            if (!empty($dm['where'])) {
                $this->applyWhere($query, $dm['where']);
            }

            $result = $query->get();

            return response()->json([
                'result' => $result,
                'count'  => $dm['requiresCounts'] ? $count : $result->count()
            ]);
        } catch (\Exception $e) {
            return response()->json(['error' => $e->getMessage()], 500);
        }
    }
}
The “applyWhere()” method processes filter predicates and applies WHERE clauses to the database query. It handles both simple and complex filter conditions with multiple predicates and nested AND/OR logic.
private function applyWhere($query, array $where)
{
    $applyGroup = function($q, $group, $logic = 'and') use (&$applyGroup) {
        $method = strtolower($logic) === 'or' ? 'orWhere' : 'where';

        foreach ($group as $pred) {
            // Handle complex (nested) predicates
            if (!empty($pred['isComplex']) && !empty($pred['predicates'])) {
                $q->$method(function($nested) use ($pred, $applyGroup) {
                    $applyGroup($nested, $pred['predicates'], $pred['condition'] ?? 'and');
                });
                continue;
            }

            // Simple predicate
            $field = $pred['field'] ?? null;
            $operator = $pred['operator'] ?? 'equal';
            $value = $pred['value'] ?? null;
            $ignoreCase = $pred['ignoreCase'] ?? true;

            if (!$field) continue;

            $this->applyOperator($q, $method, $field, $operator, $value, $ignoreCase);
        }
    };

    $applyGroup($query, $where, 'and');
}
For the complete implementation, refer to the applyWhere() method.
The “applyOperator()” method maps individual Grid filter operators to SQL operations, applying them to the database query and supporting all standard comparison types.
Supported Operators:
- equal, notequal - Equality comparisons
- contains, startswith, endswith - String pattern matching
- greaterthan, greaterthanorequal, lessthan, lessthanorequal - Numeric comparisons
- in, notin - Array value checks
private function applyOperator($q, $method, $field, $operator, $value, $ignoreCase)
{
    switch ($operator) {
        case 'equal':
            $q->$method($field, '=', $value);
            break;
        case 'notequal':
            $q->$method($field, '!=', $value);
            break;
        case 'greaterthan':
            $q->$method($field, '>', $value);
            break;
        case 'greaterthanorequal':
            $q->$method($field, '>=', $value);
            break;
        case 'lessthan':
            $q->$method($field, '<', $value);
            break;
        case 'lessthanorequal':
            $q->$method($field, '<=', $value);
            break;
        case 'contains':
            if ($ignoreCase) {
                if ($method === 'orWhere') {
                    $q->orWhereRaw("LOWER($field) LIKE ?", [mb_strtolower('%' . $value . '%')]);
                } else {
                    $q->whereRaw("LOWER($field) LIKE ?", [mb_strtolower('%' . $value . '%')]);
                }
            } else {
                $q->$method($field, 'LIKE', '%' . $value . '%');
            }
            break;
        case 'startswith':
            if ($ignoreCase) {
                if ($method === 'orWhere') {
                    $q->orWhereRaw("LOWER($field) LIKE ?", [mb_strtolower($value . '%')]);
                } else {
                    $q->whereRaw("LOWER($field) LIKE ?", [mb_strtolower($value . '%')]);
                }
            } else {
                $q->$method($field, 'LIKE', $value . '%');
            }
            break;
        case 'endswith':
            if ($ignoreCase) {
                if ($method === 'orWhere') {
                    $q->orWhereRaw("LOWER($field) LIKE ?", [mb_strtolower('%' . $value)]);
                } else {
                    $q->whereRaw("LOWER($field) LIKE ?", [mb_strtolower('%' . $value)]);
                }
            } else {
                $q->$method($field, 'LIKE', '%' . $value);
            }
            break;
        case 'in':
            $methodName = $method . 'In';
            $q->$methodName($field, is_array($value) ? $value : [$value]);
            break;
        case 'notin':
            $methodName = $method . 'NotIn';
            $q->$methodName($field, is_array($value) ? $value : [$value]);
            break;
        case 'isnull':
            $q->$method . 'Null'($field);
            break;
        case 'isnotnull':
            $q->$method . 'NotNull'($field);
            break;
        default:
            $q->$method($field, '=', $value);
    }
}
For the complete implementation, refer to the applyOperator() method.
Searching
During the search action, UrlAdaptor sends the search text along with the target columns to the /api/read endpoint of the ServerController in a parameter named search.
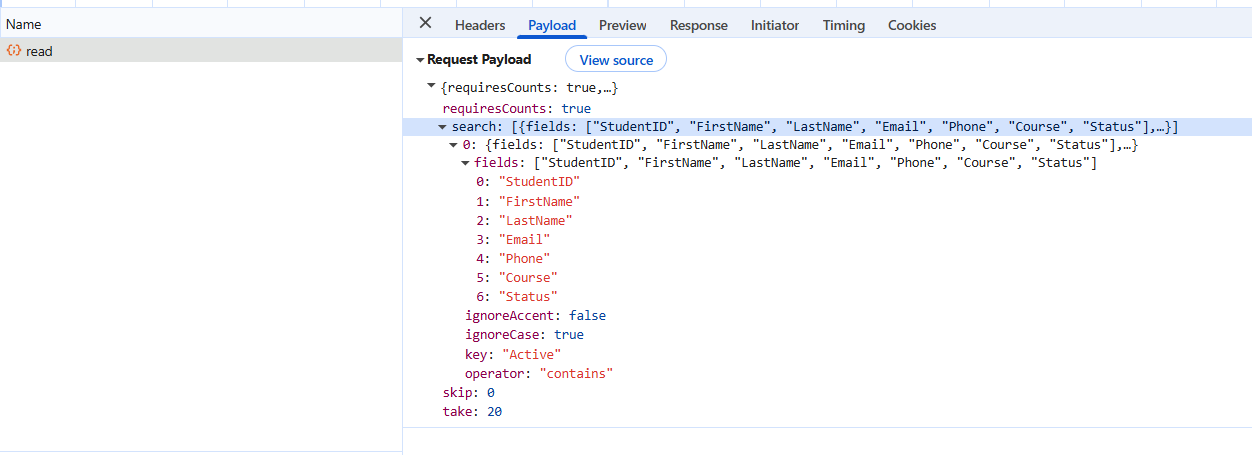
Client-to-server communication:
- The Grid sends a
POSTrequest to/api/readwith a “search” parameter that includes the search term and target fields. - Both case‑insensitive and case‑sensitive searches are supported.
- The matching results are returned to the Grid in JSON format containing the “result” records and the “count” of total available records.
class ServerController extends Controller
{
    /**
     * Fetch students data with search
     */
    public function read(Request $dm)
    {
        try {
            $query = Student::query();

            // Get total count before applying filters
            $count = $query->count();

            // Apply search conditions
            if (!empty($dm['search'])) {
                foreach ($dm['search'] as $s) {
                    $fields = $s['fields'] ?? [];
                    $key = $s['key'] ?? '';

                    if (empty($fields) || !$key) continue;

                    $operator = $s['operator'] ?? 'contains';
                    $ignoreCase = $s['ignoreCase'] ?? true;

                    $query->where(function($q) use ($fields, $key, $operator, $ignoreCase) {
                        foreach ($fields as $i => $field) {
                            $method = $i === 0 ? 'where' : 'orWhere';

                            if ($operator === 'contains') {
                                if ($ignoreCase) {
                                    if ($method === 'orWhere') {
                                        $q->orWhereRaw("LOWER($field) LIKE ?", [mb_strtolower('%' . $key . '%')]);
                                    } else {
                                        $q->whereRaw("LOWER($field) LIKE ?", [mb_strtolower('%' . $key . '%')]);
                                    }
                                } else {
                                    $q->$method($field, 'LIKE', '%' . $key . '%');
                                }
                            } else {
                                $q->$method($field, '=', $key);
                            }
                        }
                    });
                }
            }

            $result = $query->get();

            return response()->json([
                'result' => $result,
                'count'  => $dm['requiresCounts'] ? $count : $result->count()
            ]);
        } catch (\Exception $e) {
            return response()->json(['error' => $e->getMessage()], 500);
        }
    }
}
Sorting
Sorting operations are handled in the “read” method based on the sorted parameter received from the client. UrlAdaptor sends the column name and sort direction (ascending or descending) to the /api/read endpoint of the ServerController.
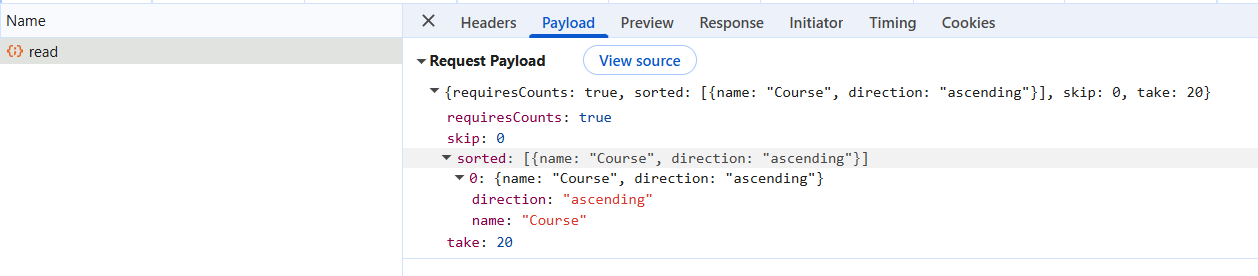
Client-to-server communication:
- The Grid sends a
POSTrequest to/api/readwith a sorted parameter that includes the column name and sort direction. - The ServerController receives this request and processes sorting in the read method.
- An
orderByclause is applied to sort results in ascending or descending order. - The sorted results are returned to the Grid in JSON format with the result records and the count of total available records.
class ServerController extends Controller
{
    /**
     * Fetch students data with sorting
     */
    public function read(Request $dm)
    {
        try {
            $query = Student::query();

            // Get total count before applying filters
            $count = $query->count();

            if (!empty($dm['sorted'])) {
                foreach ($dm['sorted'] as $sort) {
                    $direction = strtolower($sort['direction'] ?? 'ascending') === 'descending' ? 'desc' : 'asc';
                    $query->orderBy($sort['name'], $direction);
                }
            }

            $result = $query->get();

            return response()->json([
                'result' => $result,
                'count'  => $dm['requiresCounts'] ? $count : $result->count()
            ]);
        } catch (\Exception $e) {
            return response()->json(['error' => $e->getMessage()], 500);
        }
    }
}
Paging
Server-side pagination is implemented using the skip and take parameters received from the client in the /api/read endpoint. Instead of loading all records at once, the server retrieves only the current page data from the database.
Server-side pagination is implemented using the skip and take parameters sent from the client to the /api/read endpoint in the ServerController. Instead of loading all records at once, the server retrieves only the current page’s data from the database, improving performance and efficiency.

Client-to-server communication:
- The Grid sends a
POSTrequest to/api/readwith skip (offset) and take (limit) parameters. - The ServerController receives these parameters in the read method.
- The query applies
skip()to offset records andtake()to limit results based on the page size. - The total record count is calculated before paging to ensure correct pagination display.
- Paginated results are returned to the Grid in JSON format with the result records and the count of total available records.
class ServerController extends Controller
{
    /**
     * Fetch students data
     */
    public function read(Request $dm)
    {
        try {
            $query = Student::query();

            // Get total count before applying filters
            $count = $query->count();

            if (isset($dm['skip']) && $dm['skip'] != 0) {
                $query->skip((int) $dm['skip']);
            }
            if (isset($dm['take']) && $dm['take'] != 0) {
                $query->take((int) $dm['take']);
            }

            $result = $query->get();

            return response()->json([
                'result' => $result,
                'count'  => $dm['requiresCounts'] ? $count : $result->count()
            ]);
        } catch (\Exception $e) {
            return response()->json(['error' => $e->getMessage()], 500);
        }
    }
}
Performing CRUD operations
The ServerController handles insert, update, and delete operations triggered by UrlAdaptor with each action routed through its corresponding API endpoint.
Insert
The “insert” method handles creating new student records. When the “Add” button is clicked and the form is submitted, UrlAdaptor sends the new record data to /api/insert endpoint of the ServerController.
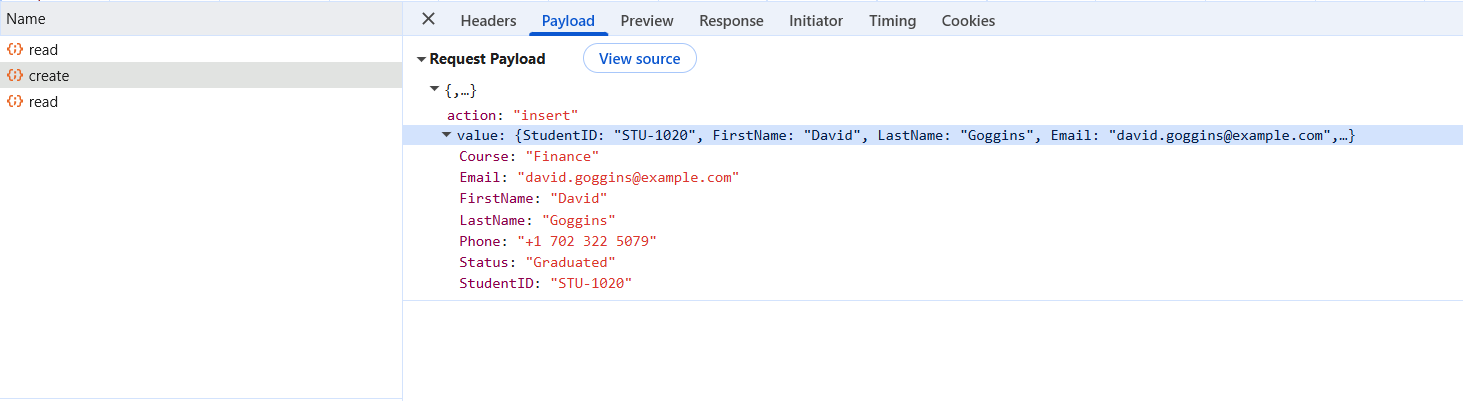
Client-to-server communication:
- The Grid sends a
POSTrequest to/api/insertwith new record data in the value property. - The ServerController’s insert method receives and validates the data.
- Required fields are checked (for example, “FirstName” is mandatory).
- A new student record is created using Eloquent ORM.
- The server returns the created record along with the generated ID.
- The Grid updates its table display with the newly created record returned from the server.
/**
 * Insert handler for new records
 */
public function insert(Request $request)
{
    try {
        $data = $request->json()->all() ?: $request->all();
        $updatedRecord = $data['value'] ?? $data;

        // Validate required fields - FirstName is mandatory
        if (empty($updatedRecord['FirstName'])) {
            return response()->json(['message' => 'FirstName is required'], 422);
        }

        $student = Student::create($updatedRecord);
        return response()->json($student, 201);
    } catch (\Exception $e) {
        return response()->json(['message' => 'Insert failed: ' . $e->getMessage()], 422);
    }
}
Update
The “update” method handles modifying existing student records. When a record is edited and submitted, the UrlAdaptor sends the updated data to the /api/update endpoint of the ServerController.
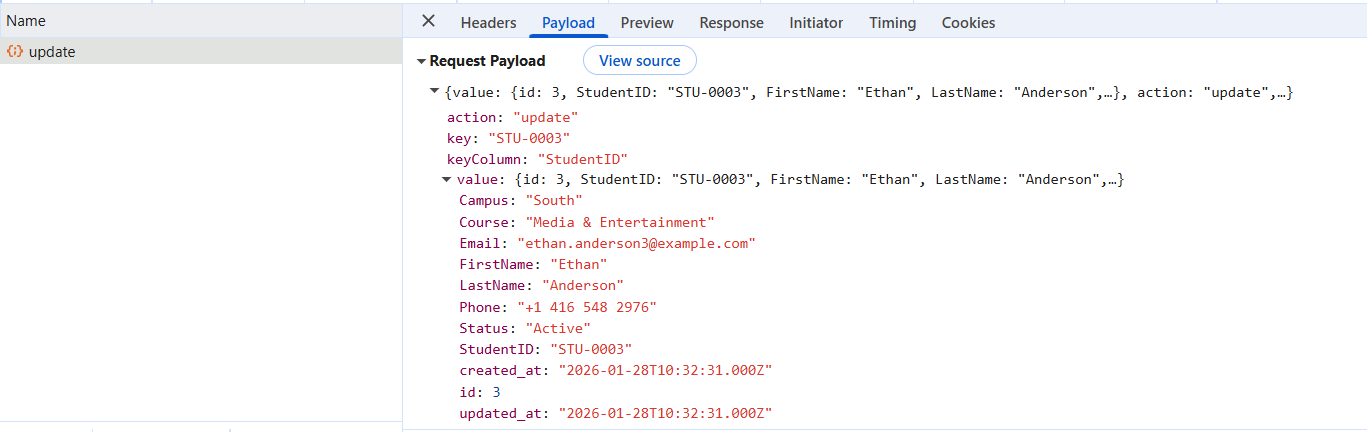
Client-to-server communication:
- The Grid sends a
POSTrequest to/api/updatewith modified record data in the value property. - The ServerController’s update method receives the request.
- The “StudentID” is extracted as the primary key to identify the record.
- The record is located using Eloquent’s “where()” method.
- All changed fields are updated using “fill()” and “save()”.
- The updated record is returned to refresh the Grid display.
/**
 * Update handler for existing records
 */
public function update(Request $request)
{
    try {
        // Retrieve updated record from request
        $requestData = $request->json()->all() ?: $request->all();
        $updatedRecord = $requestData['value'] ?? $requestData;

        // Grid sends StudentID as the key for updates
        $studentId = $updatedRecord['StudentID'] ?? null;

        if (empty($studentId)) {
            return response()->json(['message' => 'Missing StudentID'], 422);
        }

        $student = Student::where('StudentID', $studentId)->firstOrFail();

        $student->fill($updatedRecord)->save();

        // Retrieve and return updated record
        $updatedRecord = $student->fresh();
        return response()->json($updatedRecord);
    } catch (\Exception $e) {
        return response()->json(['message' => 'Update failed: ' . $e->getMessage()], 422);
    }
}
Delete
The “remove” method handles deleting student records from the database. When a record is selected and deleted, UrlAdaptor sends the primary key of that record to the /api/remove endpoint of the ServerController.
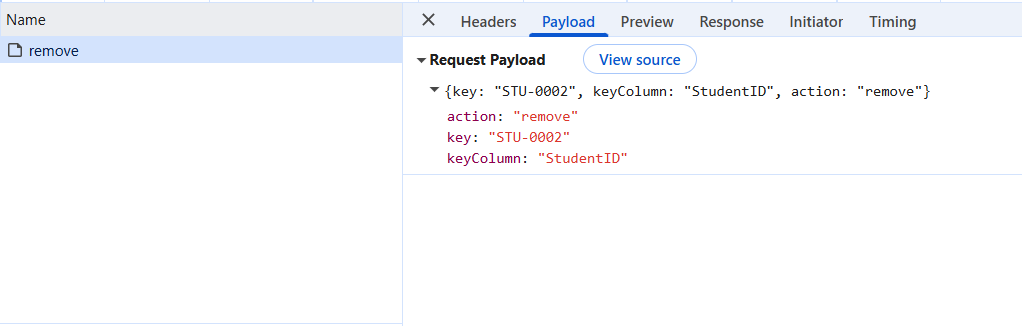
Client-to-server communication:
- The Grid sends a
POSTrequest to/api/removewith the primary key (StudentID). - The ServerController’s remove method receives the request.
- The “StudentID” is extracted from the request parameters.
- The corresponding record is located and deleted from the database.
- A confirmation response is returned to the client.
/**
 * Remove handler for deleting records
 */
public function remove(Request $request)
{
    try {
        $studentId = $request->json('key') ?: $request->input('key');

        if (!$studentId) {
            return response()->json(['message' => 'Missing StudentID'], 422);
        }

        Student::where('StudentID', $studentId)->firstOrFail()->delete();
        return response()->json(['deleted' => $studentId]);
    } catch (\Exception $e) {
        return response()->json(['message' => 'Delete failed: ' . $e->getMessage()], 422);
    }
}
Running the application
Start the Laravel development server by running the following command in the Visual Studio Code terminal or Command Prompt:
php artisan serveThe application is now accessible at http://localhost:8000. The Grid displays student data from the database and enables filtering, searching, sorting, paging, and CRUD operations through the UrlAdaptor and Laravel API endpoints.
Complete sample repository
A complete, working sample implementation is available in the GitHub repository.
The repository contains the complete Laravel backend implementation with all ServerController methods, API routes, database models, and migrations.
Troubleshooting
| Issue | Resolution |
|---|---|
| Command not found: php | PHP is not installed or not added to PATH. Download from php.net and install. Restart terminal after installation. |
| Command not found: composer | Composer is not installed. Download from getcomposer.org and follow installation steps. |
| SQLSTATE[HY000]: General error: 1030 Got error… | Database connection failed. Verify DB_HOST, DB_USERNAME, and DB_PASSWORD in .env. Ensure MySQL is running. |
| Class ‘App\Models\Student’ not found | Run: php artisan make:model Student -mto create the Student model. |
| The migration file was not found | Run migrations again: php artisan migrate. |
| GridDataManager is not defined / Grid not displaying data | Ensure Syncfusion CDN links are added correctly in HTML and URLs are accessible. |
| 403 Forbidden error when submitting form | CSRF token missing. Add `` in forms under (routes/web.php )(not API routes). |
| 419 error or ‘Page Expired’ when Grid performs CRUD | Do not add CSRF tokens to API routes. Verify API endpoints are in routes/api.php, remove CSRF headers from DataManager, and ensure /api/ prefix is used. |
| Grid shows data but filtering/sorting doesn’t work | Confirm API endpoints (/api/read, /api/insert, /api/update, /api/remove) exist in routes/api.php and ServerController methods are implemented. |
| Port 8000 is already in use | Run Laravel on another port: php artisan serve --port=8001. |
| CORS error: No ‘Access-Control-Allow-Origin’ header | Install fruitcake/laravel-cors, register HandleCors middleware in app/Http/Kernel.php, and configure config/cors.php with allowed origins. |
| Mass assignment exception | Add missing fields to $fillable in Student model: protected $fillable = ['FirstName','LastName','Email','Course','Status','Campus'];. |
| Edit/Delete buttons don’t work; ‘Editing failed’ | Ensure StudentID consistency: migration uses $table->id('StudentID'), Grid column defines { field: 'StudentID', isPrimaryKey: true }, seeder doesn’t set StudentID manually, and controller methods use where('StudentID', $studentId). |
| Grid loads but 404 error on CRUD | Verify routes/api.php contains:Route::post('/read', ...); Route::post('/insert', ...); Route::post('/update', ...); Route::post('/remove', ...);. |
| Filtering/Sorting/Paging shows no results or 500 error | Return response with both result array and count property: return response()->json(['result' => $records, 'count' => $total]);
|