Getting Started with Blazor Using Ollama Smart PDF Viewer
14 Aug 202610 minutes to read
This section explains how to include the Blazor Smart PDF Viewer component in your Blazor Web App using Visual Studio and Visual Studio Code, and configure Ollama as the self-hosted AI service that powers the document summarizer, smart redaction, and smart fill features.
Prerequisites
- System requirements for Blazor components
- Ollama installed on the host machine
The Blazor Smart PDF Viewer component supports Ollama as a self-hosted AI provider and works with Server interactivity mode apps.
Create a new Blazor Web App in Visual Studio
Create a Blazor Web App using Visual Studio 2022 via Microsoft Templates or the Syncfusion® Blazor Extension.
Install Blazor Smart PDF Viewer and Themes NuGet in the App
To add the Blazor Smart PDF Viewer component, open the NuGet Package Manager in Visual Studio (Tools → NuGet Package Manager → Manage NuGet Packages for Solution), search for and install Syncfusion.Blazor.SfSmartPdfViewer and Syncfusion.Blazor.Themes.
Alternatively, use the following package manager commands.
Install-Package Syncfusion.Blazor.SfSmartPdfViewer -Version 34.2.2
Install-Package Syncfusion.Blazor.Themes -Version 34.2.2Syncfusion® Blazor components are available on nuget.org. Refer to the NuGet packages topic for the full package list and component details. A valid Syncfusion license key must be registered in the application.
Prerequisites
- System requirements for Blazor components
- Ollama installed on the host machine
The Blazor Smart PDF Viewer component supports Ollama as a self-hosted AI provider and works with Server interactivity mode apps.
Create a new Blazor Web App in Visual Studio Code
Create a Blazor Web App using Visual Studio Code via Microsoft Templates or the Syncfusion® Blazor Extension.
Configure the appropriate Interactive render mode and Interactivity location when creating the Blazor Web App.
For example, in a Blazor Web App with the Server interactive render mode, use the following commands.
dotnet new blazor -o BlazorWebApp -int Server
cd BlazorWebApp
For more information on creating a Blazor Web App with various interactive modes and locations, refer to this guide.
Install Blazor Smart PDF Viewer and Themes NuGet in the App
When using the Server render mode in a Blazor Web App, install the Syncfusion® Blazor component packages in the server project where the components execute.
- Press Ctrl+` to open the integrated terminal in Visual Studio Code.
- Ensure the current directory contains the project
.csprojfile. - Run the following commands to install Syncfusion.Blazor.SfSmartPdfViewer and Syncfusion.Blazor.Themes, then restore the solution.
dotnet add package Syncfusion.Blazor.SfSmartPdfViewer -v 34.2.2
dotnet add package Syncfusion.Blazor.Themes -v 34.2.2
dotnet restoreSyncfusion® Blazor components are available on nuget.org. Refer to the NuGet packages topic for the full package list and component details.
Prerequisites
Install the latest version of .NET SDK. If you previously installed the SDK, you can determine the installed version by executing the following command in a command prompt (Windows) or terminal (macOS) or command shell (Linux).
dotnet --versionCreate a new Blazor Web App using .NET CLI
Run the following command to create a new Blazor Web App in a command prompt (Windows) or terminal (macOS) or command shell (Linux). For detailed instructions, refer to the Blazor Web App Getting Started documentation.
For example, in a Blazor Web App with the Server interactive render mode, use the following commands:
dotnet new blazor -o BlazorWebApp -int Server
cd BlazorWebApp
Install Blazor SfSmartPdfViewer and Themes NuGet in the App
- Open a command prompt, terminal, or shell.
- Ensure you’re in the project root directory where your
.csprojfile is located (or the Client project if applicable). - Run the following command to install a Syncfusion.Blazor.SfSmartPdfViewer and Syncfusion.Blazor.Themes NuGet package and ensure all dependencies are installed.
dotnet add package Syncfusion.Blazor.SfSmartPdfViewer -v 34.2.2
dotnet add package Syncfusion.Blazor.Themes -v 34.2.2
dotnet restore
Register Syncfusion® Blazor Service
| Interactive Render Mode | Description |
|---|---|
| Server | Open ~/_Imports.razor file, which is located in the Components folder. |
Import the Syncfusion.Blazor and Syncfusion.Blazor.SmartPdfViewer namespaces.
@using Syncfusion.Blazor
@using Syncfusion.Blazor.SmartPdfViewer
If the Interactive Render Mode is set to Server, the project contains a single ~/Program.cs file. Register the Syncfusion® Blazor service in that ~/Program.cs file. The configured SignalR maximum message size and memory cache support large document streaming and caching for better performance. Ensure the Syncfusion license is registered during application startup.
Add the Syncfusion.Blazor namespace to the Program.cs file.
using Syncfusion.Blazor;Register the Syncfusion® Blazor service in the ~/Program.cs file after the builder is created in the Blazor Web App.
// Configure SignalR (with increased message size) and enable memory caching
builder.Services.AddSignalR(o => { o.MaximumReceiveMessageSize = 102400000; });
builder.Services.AddMemoryCache();
// Register Syncfusion Blazor service
builder.Services.AddSyncfusionBlazor();
To Configure Ollama for Self-Hosted AI Models
Download and install Ollama
Install the Ollama application for your operating system from Ollama’s official website.
Install the desired model
Explore the available models in the Ollama Library (for example, llama2:13b, llama2:7b, mistral:7b).
To download and run a model (for example, llama2:7b), run the following command in a terminal or command prompt:
ollama run llama2:7bInstall OllamaSharp NuGet package
In Visual Studio, Go to Tools → NuGet Package Manager → Package Manager Console. Run this command:
Install-Package OllamaSharp -Version 5.3.6In Visual Studio Code, open the terminal in VS Code and run this command:
dotnet add package OllamaSharp --version 5.3.6Add namespaces to Program.cs
Add the Ollama and AI service namespaces to the Program.cs file.
using Microsoft.Extensions.AI;
using OllamaSharp;
using Syncfusion.Blazor;
using Syncfusion.Blazor.AI;
Configure Ollama in Program.cs
Add the following settings to the ~/Program.cs file in the Blazor Server app after the builder is created.
// Define the name of the AI model to use from Ollama (e.g., llama2:13b, mistral:7b, etc.)
string aiModel = "llama2:7b";

// By default, Ollama runs on port 11434, you can also customize this port manually.
HttpClient httpClient = new HttpClient
{
    BaseAddress = new Uri("http://localhost:11434"), // Ollama server address
    Timeout = Timeout.InfiniteTimeSpan // Supports extended processing time for AI responses
};

// Initialize the chat client using the Ollama API and the specified model
IChatClient chatClient = new OllamaApiClient(httpClient, aiModel);
builder.Services.AddChatClient(chatClient);
builder.Services.AddSingleton<IChatInferenceService, SyncfusionAIService>();
Here,
-
aiModel: Name of the Ollama model to use (for example,
llama2:7b,mistral:7b). -
httpClient.BaseAddress: Address of the local Ollama server. Defaults to
http://localhost:11434.
Running Ollama locally may lead to slower response times due to system resource usage. To accommodate this, the Syncfusion Smart PDF Viewer can disable timeout for AI Assist view operations by setting the timeout to 0. Learn more
Check the installed model and its details in Ollama
To verify which models are currently installed and available on the local Ollama server (for example, running on port 11434), run the following command in a terminal or command prompt:
curl http://localhost:11434/api/tagsAdd stylesheet and script resources
The theme stylesheet and script can be accessed from NuGet through Static Web Assets.
Include the stylesheet reference in the <head> section in the ~/Components/App.razor file.
<!-- Syncfusion Blazor Smart PDF Viewer control's theme style sheet -->
<link href="_content/Syncfusion.Blazor.Themes/fluent2.css" rel="stylesheet" />
Add script reference at the end of the <body> in the ~/Components/App.razor file as shown below.
<!-- Syncfusion Blazor Smart PDF Viewer control's scripts -->
<script src="_content/Syncfusion.Blazor.SfSmartPdfViewer/scripts/syncfusion-blazor-sfsmartpdfviewer.min.js" type="text/javascript"></script>
Review the Blazor Themes topic to discover various methods (Static Web Assets, CDN, and CRG) for referencing themes in a Blazor application. Also see Adding script reference for different approaches to include scripts.
Add Blazor Smart PDF Viewer component
If the interactivity location is set to Global and the render mode is set to Auto, WebAssembly, or Server, the render mode is configured in the
App.razorfile by default.
If the interactivity location is set to Per page/component, define a render mode at the top of the ~Pages/.razor component as follows:
@* Your App render mode define here *@
@rendermode InteractiveServer
Add the Blazor Smart PDF Viewer component in the ~Pages/Home.razor file.
@rendermode InteractiveServer

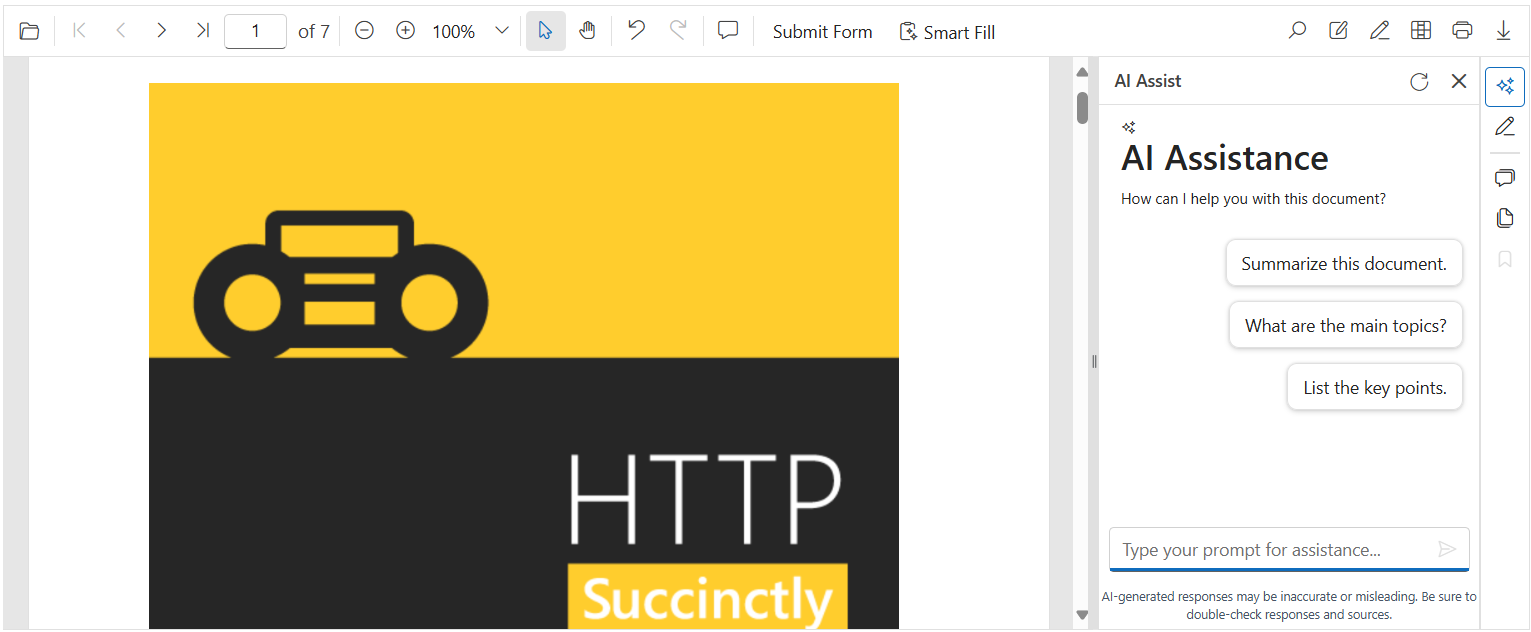
<SfSmartPdfViewer Height="100%" Width="100%" DocumentPath="https://cdn.syncfusion.com/content/pdf/http-succinctly.pdf">
</SfSmartPdfViewer>- Press Ctrl+F5 (Windows) or ⌘+F5 (macOS) to launch the application. This renders the Blazor Smart PDF Viewer component in the default web browser.