Syncfusion Big Data Platform Sandbox
Syncfusion Big Data Platform Sandbox is a user friendly Apache Hadoop Environment available in azure market place which can be accessed globally.
Prerequisite
Microsoft Azure account - You need to have azure account or create free azure account by following this link
Steps
Start by logging into the Azure Portal with your Azure account: https://portal.azure.com/
Search Syncfusion big data sandbox image in azure market place by following the below steps or directly navigate to the image creation prompt by using the URL
Syncfusion Big Data Platform Sandbox
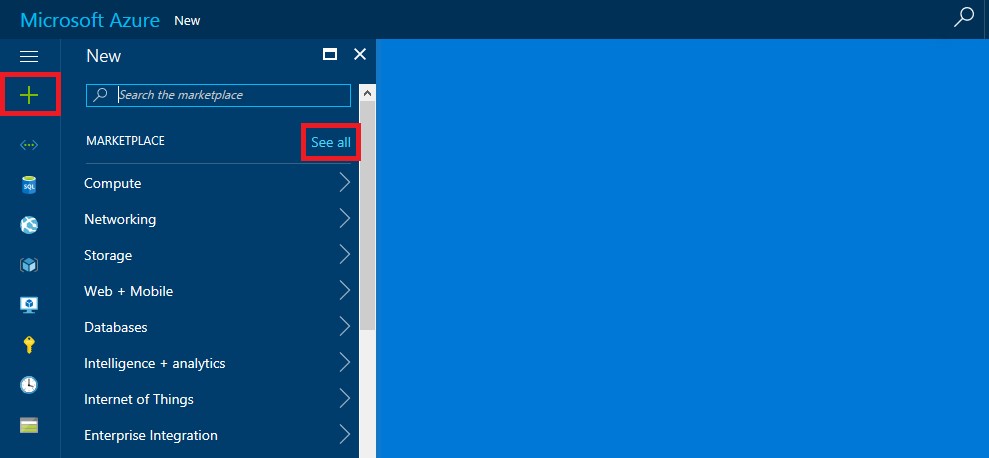
Step 1: Starting in the upper left, click New (+) > See all option as like below screenshot.
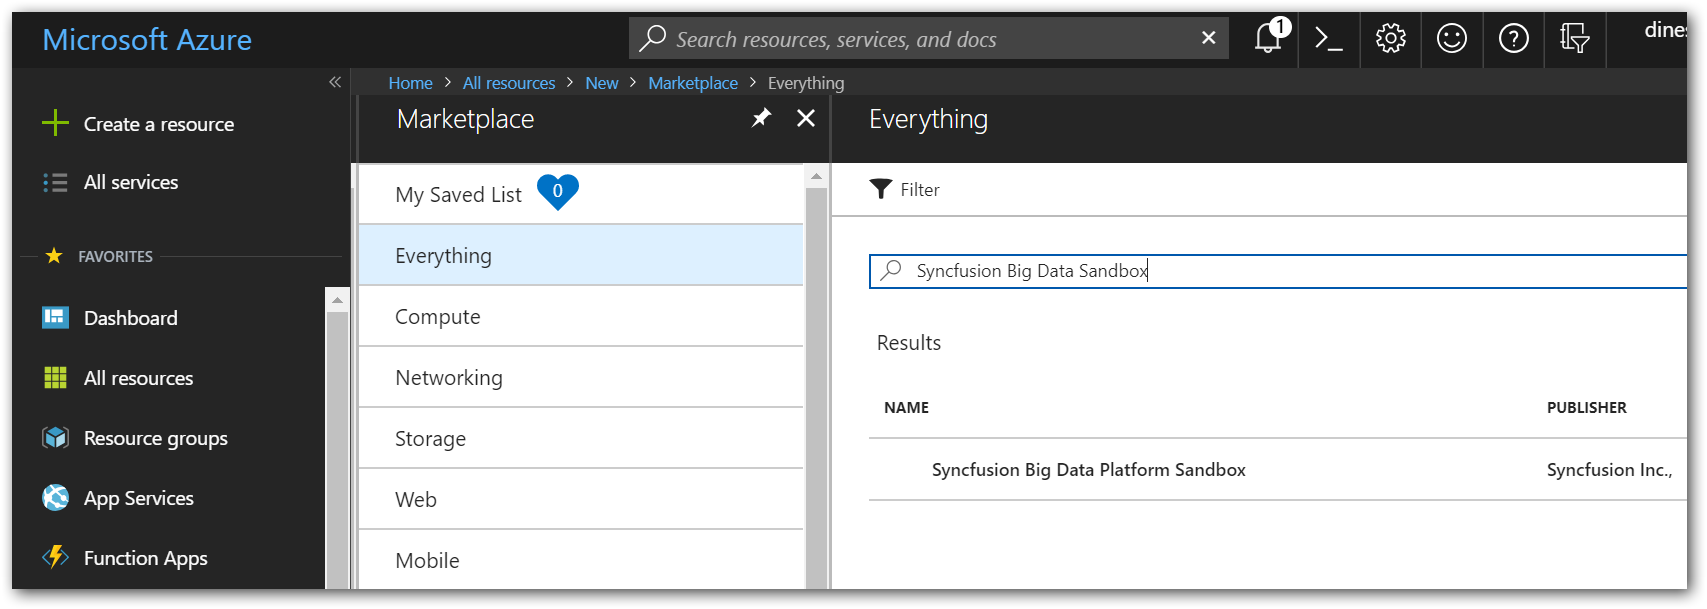
Step 2: Search “Syncfusion Big Data Sandbox” in the market place filter and select the Syncfusion sandbox.
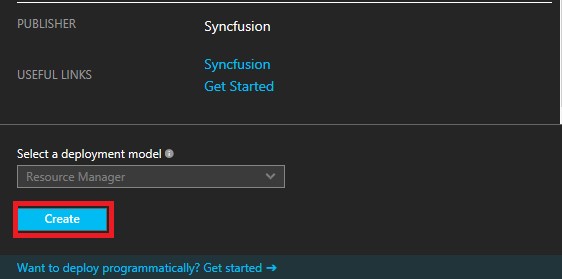
Step 3: Resource Manager is a constant deployment model for the Syncfusion Big Data Sandbox blade. Click Create.
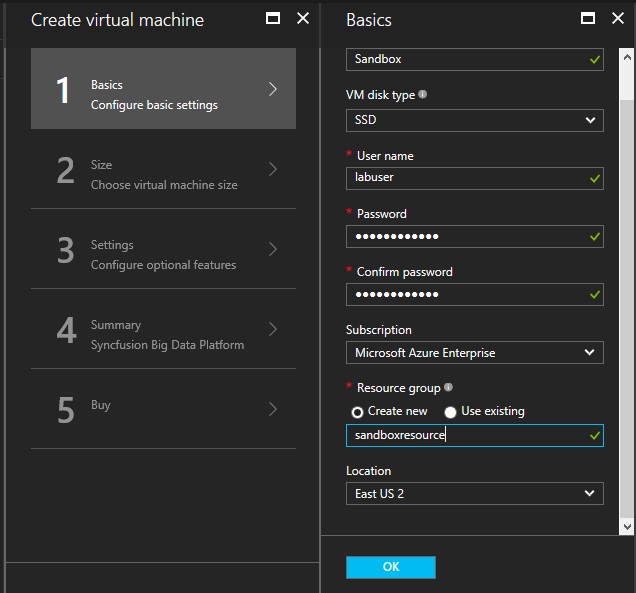
Step 4: In the basics blade, provide virtual machine details like name, login username, login password, select subscription, location and select an existing resource group or type the name for a new one , click OK to continue to the next section.
Step 5: Select a VM size from the list of sizes and click Select to continue.
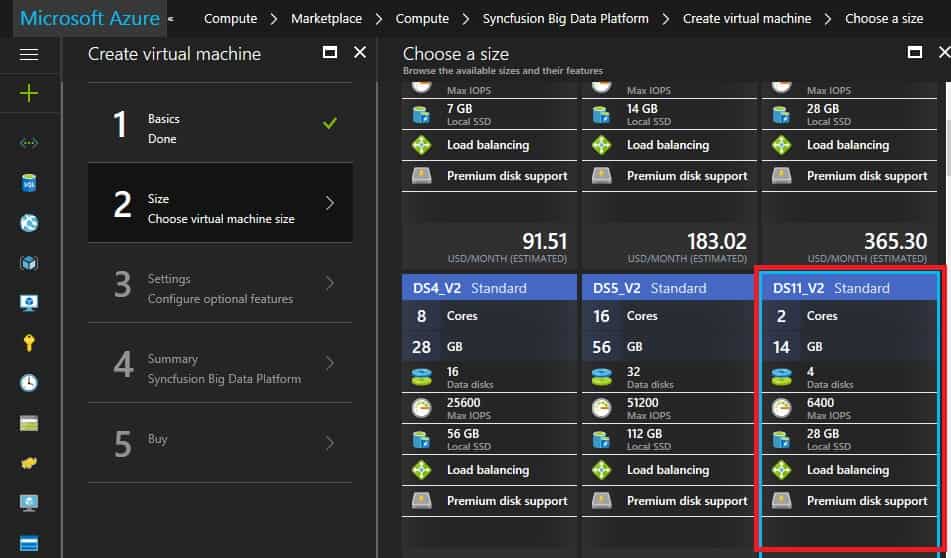
NOTE
Syncfusion sandbox requires minimum 14 GB RAM with 2 cores ex: Standard_DS11_v2.
Step 6: In Setting Blade VM contains default name for storage account, virtual network and security group. You can also change it manually and then click OK to continue.

NOTE
VM Creation with security group will affect the remote connection establishment of Hadoop cluster so that you need to add the remote accessing port number in azure security group or create VM with security group as None.
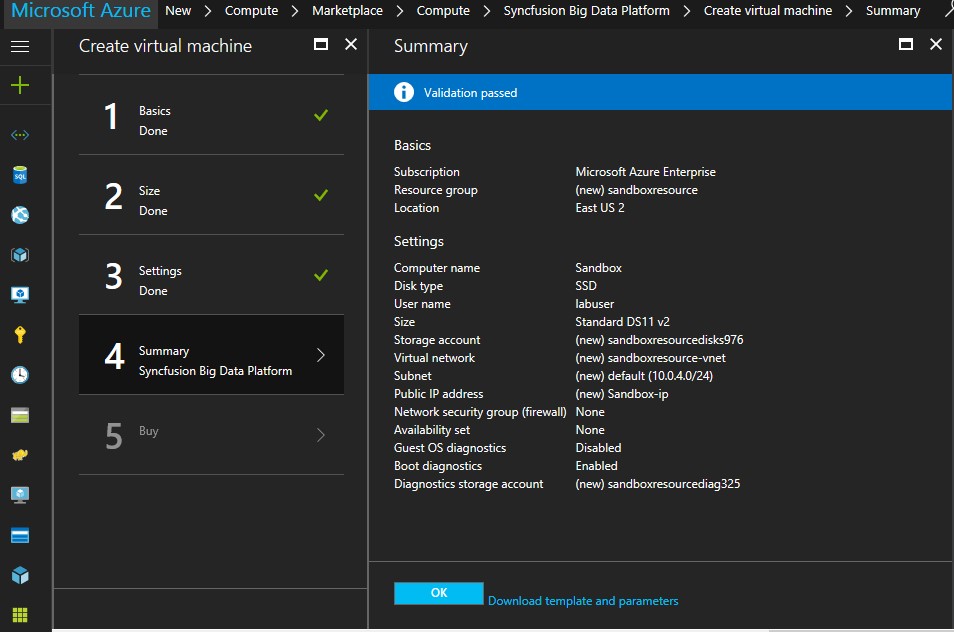
Step 7: Click OK when you see validation passed message in Summary of Syncfusion Big Data Sandbox.
Step 8: Purchase details blade contains offer details of sandbox image, Once read the section ‘Terms of use’, click Purchase to start deployment.

Step 9: While Azure creates the virtual machine, you can track the progress by clicking on Virtual Machines on left. When the VM has been created, the status will change to Running.
Step 10: On the blade for the virtual machine, click Connect. Start working on Syncfusion sandbox by login to the RDP.
Overview
Syncfusion Big Data Sandbox helps you to access Hadoop Environment in various aspects.
- Syncfusion Big Data Platform
- Syncfusion Big Data Studio
- Connect Hadoop Cluster on On-Premises Machine
Syncfusion Big Data Platform
The Syncfusion Big Data Platform includes a complete production environment that can helps you to run Hadoop jobs in a scalable manner on a full cluster. It allowing us to manage and monitor Hadoop clusters globally.
- Explore the Cluster Manager application URL http://localhost:81 in browser where you can see the Hadoop Pseudo Node Cluster running and also you can access the application globally through public IP-address of the virtual machine i.e. http://<publicip>:81.
To know more about Public IP click here.
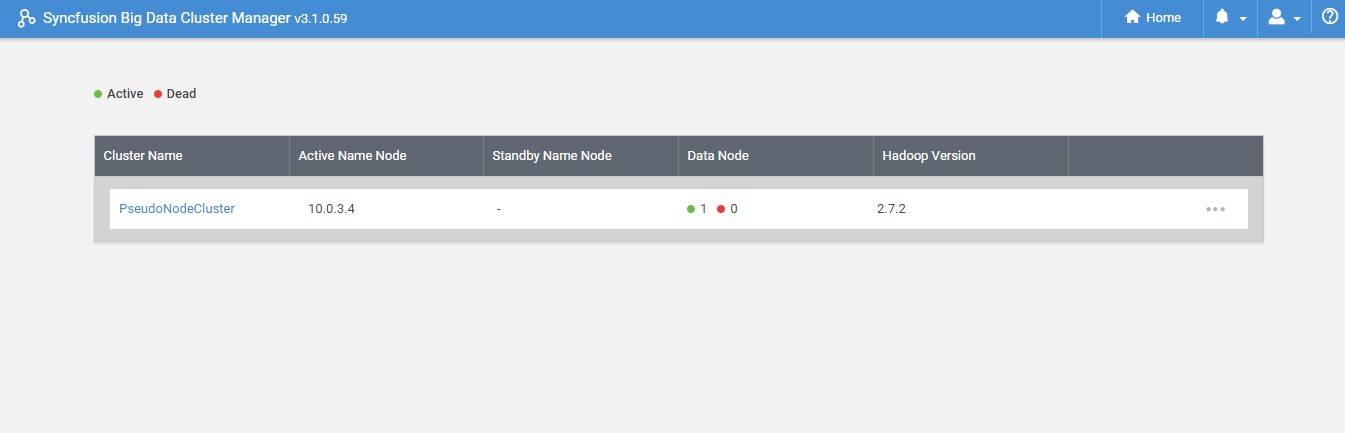
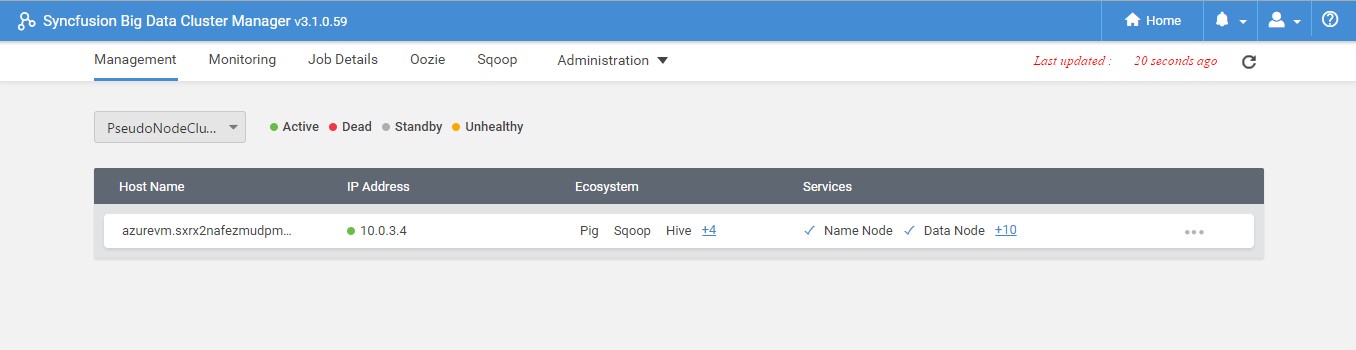
- Click on the Cluster Name which navigate you to the cluster management page where you can see the supported Hadoop ecosystem and running services of Syncfusion sandbox image.
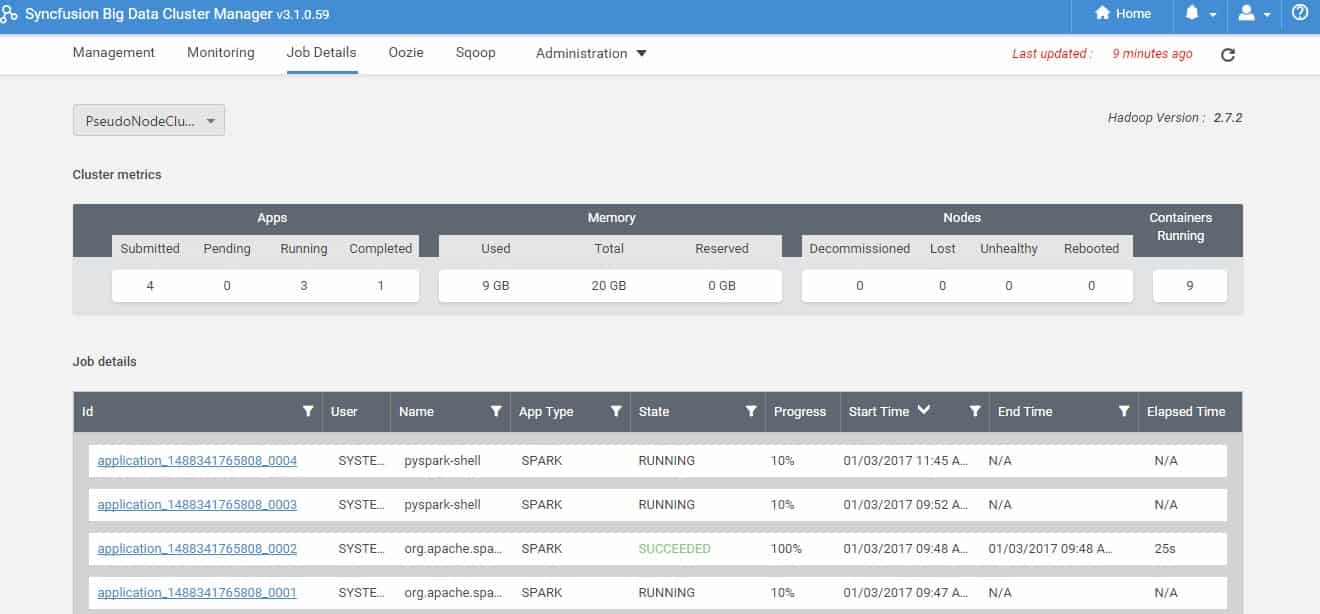
- You can view the job status like running job, failed job and other status using cluster manager application.
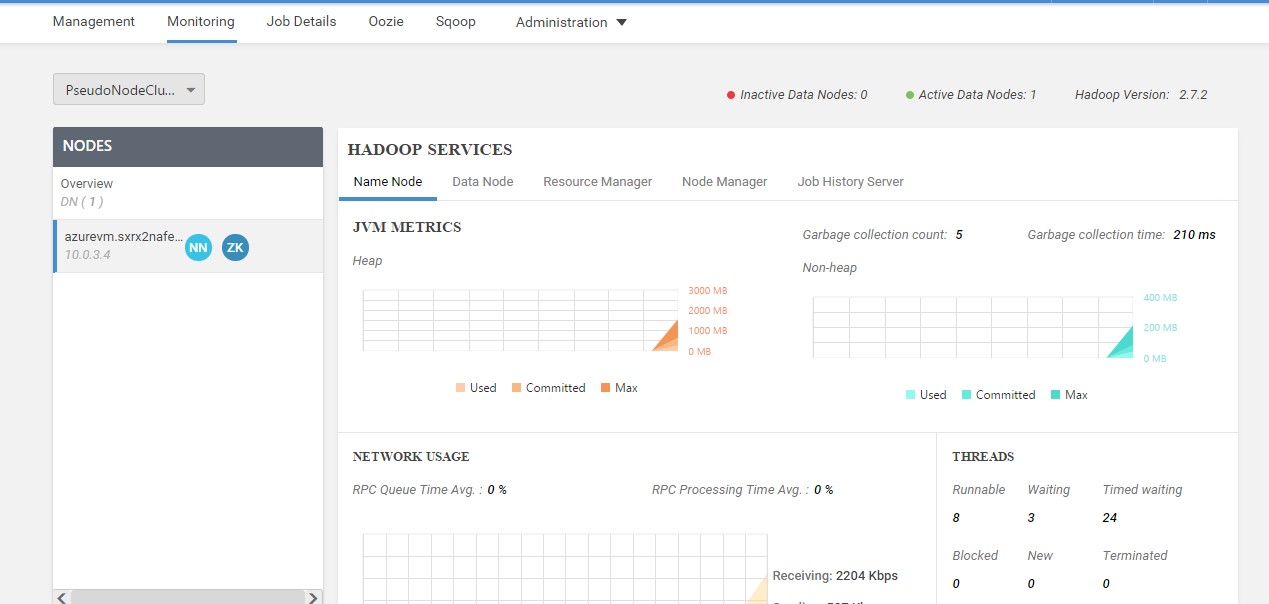
- Monitoring page in cluster manager application helps you to view the status of cluster like heap size used, running threads, capacity and other details of cluster.
-
Using Cluster Manager Application you can perform following operation easily.
- Start and stop the Hadoop services.
- Backup and Restore operations in HDFS and HBase.
- Job submission in Oozie.
- Job submission in Sqoop.
To know more click here
Big Data Management Studio
Big Data Management studio provides a user friendly Hadoop environment in windows machine, in sandbox when you start the machine this application is automatically started and connected with azure pseudo node cluster running in internal IP.
Using this Big Data Studio you can perform the following operation easily.
- Interactive shell for command execution in Hadoop, Pig, Hive, Spark, HBase.
- You can perform file operations such as create, copy, move, upload, download, and view file in HDFS.
To know more click here
Connect Hadoop Cluster on On-Premises Machine
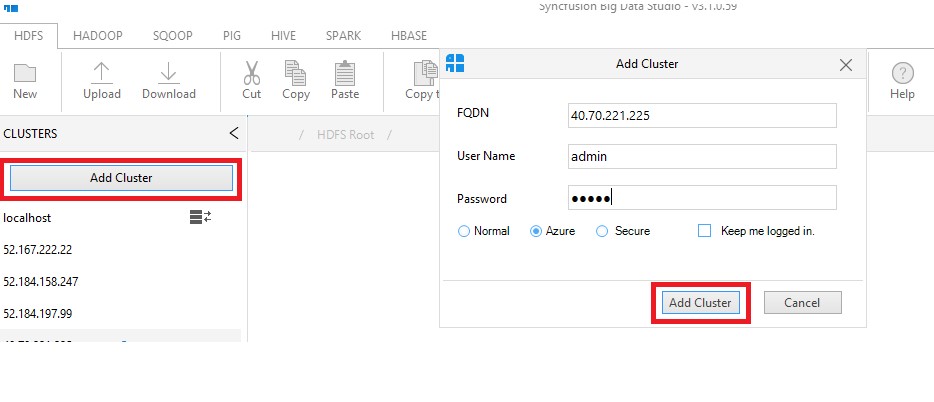
Install Big Data studio application in your on-premises machine from link https://www.syncfusion.com/. In Big Data studio Dashboard, start the Big Data Studio application manually by clicking on the LAUNCH STUDIO icon.
Click on Add Cluster button in left side panel, then popup will be open. In that popup select Azure option and enter the public IP address of sandbox and cluster manager username and password, and connect.
NOTE
For connecting sandbox cluster with on-premises machine you need to have Public IP address for the machine with DNS name and also make sure that Virtual machine security group is none otherwise you need to add the security group rule for following port.
| Application | Port number |
|---|---|
| Syncfusion Big Data Cluster Manager | 81,82 |
| Syncfusion Big Data Agent | 60008 |
| Syncfusion Big Data Remote Agent | 60006 |
To access Hadoop and its ecosystem services you have to add firewall rule in Azure virtual machine for the port and add inbound rule in network security group if it is created.
To know more about Hadoop port details please visit here
To know more about Firewall inbound rule creation please visit here
To know more about Azure network security group please visit here
Port details of Hadoop and its ecosystem services
Following are the ports used by Syncfusion Big Data Hadoop Cluster to communicate between Hadoop and its ecosystem services.
| Ecosystem | Services | PortNo |
|---|---|---|
|
Hadoop |
Name Node Web UI |
50070 |
|
Name Node |
9000 |
|
|
Data Node Web UI |
50075 |
|
|
Data Node |
50010 |
|
|
Data Node IPC |
50020 |
|
|
Journal Node |
8480 |
|
|
Journal Node RPC |
8485 |
|
|
Resource Manager Web UI |
8088 |
|
|
Resource Manager Tracker |
8031 |
|
|
Resource Manager |
8032 |
|
|
Resource Manager Admin |
8033 |
|
|
Node Manager |
8042 |
|
|
Node Manager Localizer |
8040 |
|
|
Job History Server Web UI |
19888 |
|
|
Job History |
10020 |
|
|
Job History Admin |
10033 |
|
|
Hive |
Hive Server 2 |
10000 |
|
Meta Store |
9083 |
|
|
Postgre SQL Server |
1527 |
|
|
Zookeeper |
Quorum Peer Main |
2181 |
|
ZookeeperServer1 |
3888 |
|
|
ZookeeperServer2 |
2888 |
|
|
ZKFC |
8019 |
|
|
Map reduce |
ShuffleR |
8080 |
|
ShuffleD |
13562 |
|
|
Oozie |
Rest Service |
11000 |
|
Spark |
Thrift service |
10001 |
|
HBase |
HMaster |
60000 |
|
HRegion Server |
60020 |
|
|
HBaseThriftServer |
10003 |
|
|
HBaseRestServer Web |
8085 |
|
|
HBase Rest NGINX Server |
14004 |
|
|
HBase Rest Server |
10005 |
|
|
IPython |
IPython Spark |
10002 |
|
IPython NGINX Server |
14002 |
|
|
SecureIPythonServer |
10012 |
|
|
Others |
HttpFS NGINX Server |
14002 |
|
HttpFS |
14000 |
|
|
Remote Agent |
60006 |
|
|
Installer Agent |
60008 |
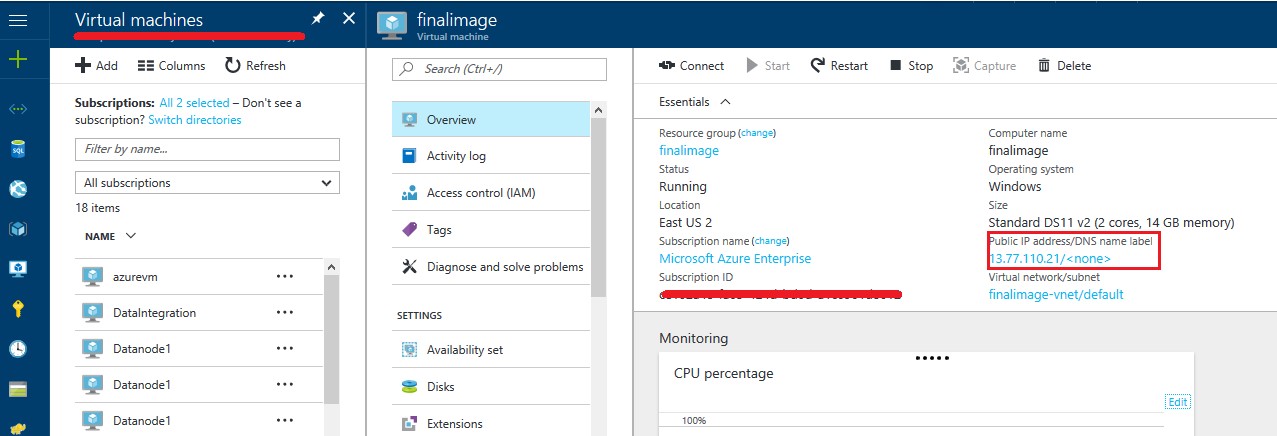
View public IP of virtual machine
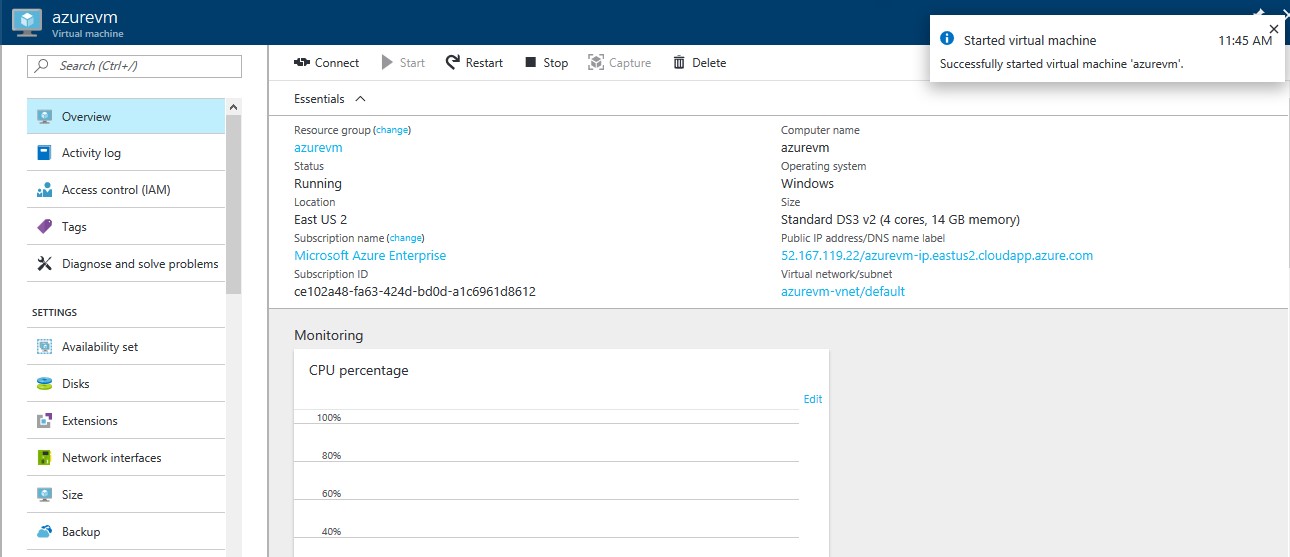
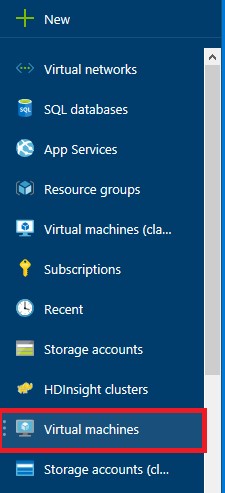
Step 1: Select “Virtual machines” from left side blade in Azure Portal.
Step 2: Select the virtual machine name from the list of virtual machines.
Step 3: Click “Overview”, where you can able to view the essentials of virtual machines. Public IP address section is high lightened in below screen shot.