Getting Started
5 Sep 20176 minutes to read
This section helps to understand the getting started of the ListBox widget with the step-by-step instructions.
Create an ASP Project and add the necessary DLL’s and scripts with the help of the given ASP Getting Started documentation.
Create ListBox
Create listbox wrapper with its listbox items as in the below code snippet.
<ej:ListBox ID="ListBox" runat="server">
        <Items>
            <ej:ListBoxItems Text="Audi A4"></ej:ListBoxItems>
            <ej:ListBoxItems Text="Audi A5"></ej:ListBoxItems>
            <ej:ListBoxItems Text="Audi A6"></ej:ListBoxItems>
            <ej:ListBoxItems Text="Audi A7"></ej:ListBoxItems>
            <ej:ListBoxItems Text="Audi A8"></ej:ListBoxItems>
            <ej:ListBoxItems Text="BMW 501"></ej:ListBoxItems>
            <ej:ListBoxItems Text="BMW 502"></ej:ListBoxItems>
            <ej:ListBoxItems Text="BMW 503"></ej:ListBoxItems>
            <ej:ListBoxItems Text="Batch"></ej:ListBoxItems>
            <ej:ListBoxItems Text="BMW 507"></ej:ListBoxItems>
        </Items>
    </ej:ListBox>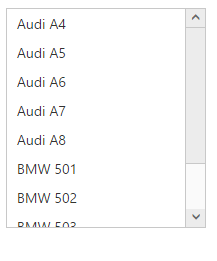
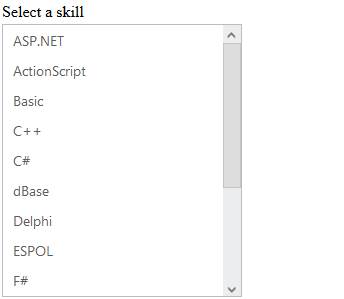
Data binding
We can populate data in the ListBox widget using using “DataSource” and “Fields” properties.
In the code behind, create and assign the data source to listbox as below.
protected void Page_Load(object sender, EventArgs e)
        {
            listBoxSample.DataSource = GetData();
        }
        private List<Languages> GetData()
        {

            List<Languages> data = new List<Languages>();

            data.Add(new Languages() { Name = "ASP.NET" });

            data.Add(new Languages() { Name = "ActionScript" });

            data.Add(new Languages() { Name = "Basic" });

            data.Add(new Languages() { Name = "C++" });

            data.Add(new Languages() { Name = "C#" });

            data.Add(new Languages() { Name = "dBase" });

            data.Add(new Languages() { Name = "Delphi" });

            data.Add(new Languages() { Name = "ESPOL" });

            data.Add(new Languages() { Name = "F#" });

            data.Add(new Languages() { Name = "FoxPro" });

            data.Add(new Languages() { Name = "Java" });

            data.Add(new Languages() { Name = "J#" });

            data.Add(new Languages() { Name = "Lisp" });

            data.Add(new Languages() { Name = "Logo" });

            data.Add(new Languages() { Name = "PHP" });

            return data;

        }
        public class Languages
        {
            public string Name;
        }
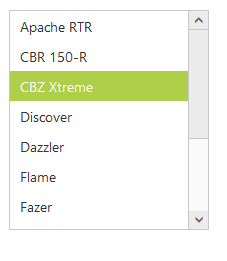
Selection
The ListBox widget supports item selection. We can select the items by its index value using SelectedIndex property.
<ej:ListBox ID="ListBox" runat="server" SelectedIndex="2">
        <Items>
            <ej:ListBoxItems Text="Apache RTR"></ej:ListBoxItems>
            <ej:ListBoxItems Text="CBR 150-R"></ej:ListBoxItems>
            <ej:ListBoxItems Text="CBZ Xtreme"></ej:ListBoxItems>
            <ej:ListBoxItems Text="Discover"></ej:ListBoxItems>
            <ej:ListBoxItems Text="Dazzler"></ej:ListBoxItems>
            <ej:ListBoxItems Text="Flame"></ej:ListBoxItems>
            <ej:ListBoxItems Text="Fazer"></ej:ListBoxItems>
            <ej:ListBoxItems Text="FZ-S"></ej:ListBoxItems>
            <ej:ListBoxItems Text="Pulsar"></ej:ListBoxItems>
            <ej:ListBoxItems Text="Shine"></ej:ListBoxItems>
            <ej:ListBoxItems Text="R15"></ej:ListBoxItems>
            <ej:ListBoxItems Text="Unicorn"></ej:ListBoxItems>
        </Items>
    </ej:ListBox>