How can I help you?
Getting Started with ASP.NET Core Spreadsheet
This section explains briefly about how to create Spreadsheet in your ASP.NET core application and also how to populate the Spreadsheet with data, formats and how to export Spreadsheet data as excel file.
Initialize Spreadsheet
The following steps explains how to create spreadsheet,
- Create Syncfusion ASP.NET Core application. You can refer ASP.NET core Getting started documentation to create new project and add necessary packages and script files.
- Add a Spreadsheet control in view page. Spreadsheet is rendered with default height and width. You can also customize Spreadsheet dimension by setting
heightandwidthproperty ine-scroll-settings.
<ej-spread-sheet id="Spreadsheet"></ej-spread-sheet>Now, the Spreadsheet is rendered with default row and column count.
Populate Spreadsheet with Data
Now, this section explains how to populate JSON data to the Spreadsheet. You can set datasource attribute in e-sheets tag to populate JSON data in Spreadsheet.
1) Create datasource for Spreadsheet control.
        public ActionResult Index()
        {
            var DataSource = GetAllItemDetails().ToList();
            ViewBag.Datasource = DataSource;
            return View();
        }

        public IEnumerable<object> GetAllItemDetails()
        {

            List<ItemDetail> lItems = new List<ItemDetail>();

            lItems.Add(new ItemDetail() { ItemName = "Casual Shoes", Date = new DateTime(2014, 02, 14), Time = new DateTime(2014, 02, 14, 11, 34, 32), Quantity = 10, Price = 20, Amount = 200, Discount = 1, Profit = 10 });
            lItems.Add(new ItemDetail() { ItemName = "Sports Shoes", Date = new DateTime(2014, 06, 11), Time = new DateTime(2014, 06, 11, 05, 56, 32), Quantity = 20, Price = 30, Amount = 600, Discount = 5, Profit = 50 });
            lItems.Add(new ItemDetail() { ItemName = "Formal Shoes", Date = new DateTime(2014, 07, 27), Time = new DateTime(2014, 07, 27, 03, 32, 44), Quantity = 20, Price = 15, Amount = 300, Discount = 7, Profit = 27 });
            lItems.Add(new ItemDetail() { ItemName = "Sandals & Floaters", Date = new DateTime(2014, 11, 21), Time = new DateTime(2014, 11, 21, 06, 23, 54), Quantity = 15, Price = 20, Amount = 300, Discount = 11, Profit = 67 });
            lItems.Add(new ItemDetail() { ItemName = "Flip- Flops & Slippers", Date = new DateTime(2014, 06, 23), Time = new DateTime(2014, 06, 23, 12, 43, 59), Quantity = 30, Price = 10, Amount = 300, Discount = 10, Profit = 70 });
            lItems.Add(new ItemDetail() { ItemName = "Sneakers", Date = new DateTime(2014, 07, 22), Time = new DateTime(2014, 07, 22, 10, 55, 53), Quantity = 40, Price = 20, Amount = 800, Discount = 13, Profit = 66 });
            lItems.Add(new ItemDetail() { ItemName = "Running Shoes", Date = new DateTime(2014, 02, 04), Time = new DateTime(2014, 02, 04, 03, 44, 34), Quantity = 20, Price = 10, Amount = 200, Discount = 3, Profit = 14 });
            lItems.Add(new ItemDetail() { ItemName = "Loafers", Date = new DateTime(2014, 11, 30), Time = new DateTime(2014, 11, 30, 03, 12, 52), Quantity = 31, Price = 10, Amount = 310, Discount = 6, Profit = 29 });
            lItems.Add(new ItemDetail() { ItemName = "Cricket Shoes", Date = new DateTime(2014, 07, 09), Time = new DateTime(2014, 07, 09, 11, 32, 14), Quantity = 41, Price = 30, Amount = 1210, Discount = 12, Profit = 166 });
            lItems.Add(new ItemDetail() { ItemName = "T-Shirts", Date = new DateTime(2014, 10, 31), Time = new DateTime(2014, 10, 31, 12, 01, 44), Quantity = 50, Price = 10, Amount = 500, Discount = 9, Profit = 55 });

            return lItems;

        }

        public class ItemDetail
        {
            public string ItemName { get; set; }
            public DateTime Date { get; set; }
            public DateTime Time { get; set; }
            public int Quantity { get; set; }
            public int Price { get; set; }
            public int Amount { get; set; }
            public int Discount { get; set; }
            public int Profit { get; set; }
        }
2) Initialize Spreadsheet with datasource.
<ej-spread-sheet id="Spreadsheet">
    <e-sheets>
         <e-sheet datasource=”ViewBag.Datasource”></e-sheet>
    </e-sheets>
</ej-spread-sheet>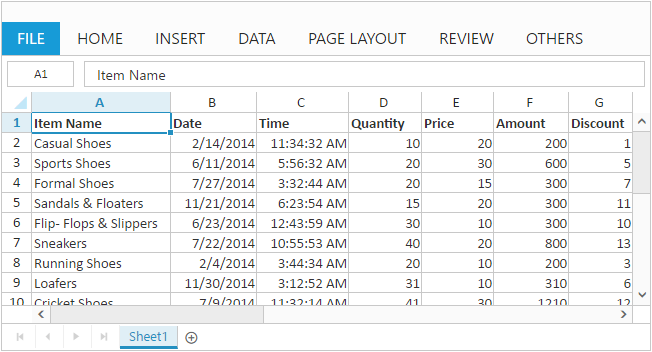
Apply Conditional Formatting
Conditional formatting helps you to apply formats to a cell or range with certain color based on the cells values. You can use allow-conditional-formats attribute to enable/disable conditional formats.
To apply conditional formats for a range use e-cformat-rules tag. The following code example illustrates this behavior,
<ej-spread-sheet id="Spreadsheet">
    <e-sheets>
        <e-sheet>
            <e-cformat-rules>
                <e-cformat-rule action="GreaterThan" inputs=@(new List<string>() { "10"}) color="RedFill" range="D2:D8"></e-cformat-rule>
            </e-cformat-rules>
        </e-sheet>
    </e-sheets>
</ej-spread-sheet>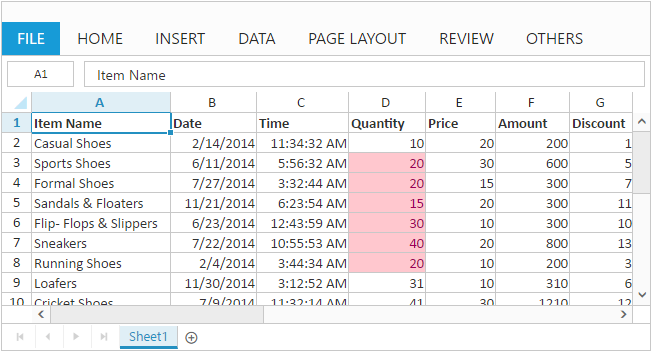
Export Spreadsheet as Excel File
The Spreadsheet can save its data, style, format into an excel file. To enable save option in Spreadsheet set allow-exporting option in e-export-settings as true. Since Spreadsheet uses server side helper to save documents set excel-url in e-export-settings option. The following code example illustrates this behavior,
<ej-spread-sheet id="Spreadsheet">
//...
    <e-export-settings excel-url="ExcelExport"></e-export-settings>
//...
</ej-spread-sheet>//...
public ActionResult ExcelExport(string sheetModel, string sheetData, string password)
{
return Spreadsheet.Save(sheetModel, sheetData, "sample", ExportFormat.XLSX);
}
//...Use shortcut Ctrl + S to save Spreadsheet as excel file.
NOTE