Layouts
20 Dec 202419 minutes to read
The SfDiagram supports auto-arranging the nodes in diagram area that is referred as layout.
The automatic layout with employee class and DataSourceSettings is explained and the initial steps for all the layouts are given as follows:
Create class for data
You have to create a class for data, employee with the properties to store employee’s information like team, role, ID, reporting person ID, and more. It is also required to create a collection, that stores collection of employees.
//Employee Business Object
public class Employee
{
    public string Team { get; set; }
    public string Role { get; set; }
    public int EmployeeId { get; set; }
}
//Employee Collection
public class Employees : ObservableCollection<Employee>
{
}
Initialize data source settings
The following code example illustrates the initialization of data source settings
// Initializes the DataSourceSettings
 DataSourceSettings setting = new DataSourceSettings();
 setting.DataSource = employee;
 setting.Id = "ID";
 setting.ParentId = "ReportingId";
 diagram.DataSourceSettings = setting;
Organization layout
An organizational chart is a diagram that displays the structure and relationship of an organization. To create an organizational chart, you should set the type as LayoutType.Organization. The following code example illustrates how to create an organizational chart:
//Employee Collection
ObservableCollection<Employee> employee = new ObservableCollection<Employee>();
employee.Add(new Employee { EmployeeId = 0, Role = "Project Management" });
employee.Add(new Employee { EmployeeId = 1,  Role = "R and D Team" ,Team = "0" });
employee.Add(new Employee { EmployeeId = 3 , Role = "Philosophy", Team = "1" });
employee.Add(new Employee { EmployeeId =4 , Role = "Organization", Team = "1" });
employee.Add(new Employee { EmployeeId = 5 , Role = "Technology", Team = "1" });
employee.Add(new Employee { EmployeeId = 7,  Role = "Funding" ,Team = "1" });
employee.Add(new Employee { EmployeeId = 8 , Role = "Resource Allocation" ,Team = "1" });
employee.Add(new Employee { EmployeeId = 9,  Role = "Targeting" ,Team = "1" });
employee.Add(new Employee { EmployeeId = 11,  Role = "Evaluation" ,Team = "1" });
employee.Add(new Employee { EmployeeId = 156 , Role = "HR Team", Team = "0" });
employee.Add(new Employee { EmployeeId = 13 , Role = "Recruitment", Team = "156" });
employee.Add(new Employee { EmployeeId = 113 , Role = "Training" ,Team = "156" });
employee.Add(new Employee { EmployeeId = 112 , Role = "Employee Relation" ,Team = "156" });
employee.Add(new Employee { EmployeeId = 14 , Role = "Record Keeping", Team = "156" });
employee.Add(new Employee { EmployeeId = 17 , Role = "Production and Sales Team" ,Team = "0" });
employee.Add(new Employee { EmployeeId = 119,  Role = "Design", Team = "17" });
employee.Add(new Employee { EmployeeId = 19 , Role = "Operation", Team = "17" });
employee.Add(new Employee { EmployeeId = 20 , Role = "Support" ,Team = "17" });
employee.Add(new Employee { EmployeeId = 21 , Role = "Quality Assurance" ,Team = "17" });
employee.Add(new Employee { EmployeeId = 23 , Role = "Customer Interaction" ,Team = "17" });
employee.Add(new Employee { EmployeeId = 24 , Role = "Support and Maintenance" ,Team = "17" });
employee.Add(new Employee { EmployeeId = 25 , Role = "Task Coordination", Team = "17" });
//Set parentId and id for DataSourceSettings
DataSourceSettings setting = new DataSourceSettings();
setting.DataSource = employee;
setting.Id = "EmployeeId";
setting.ParentId = "Team";
diagram.DataSourceSettings = setting;
diagram.LayoutManager = new LayoutManager() { Layout = new DirectedTreeLayout() { TreeOrientation = TreeOrientation.TopToBottom, Type = LayoutType.Organization } };
Organizational chart layout starts parsing from root and iterate through all its child elements. The “BeginNodeLayout” event provides necessary information of node’s children and the way to arrange (orientation, type, etc.) them.
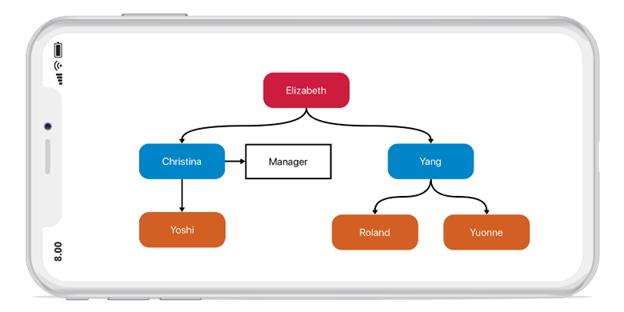
BeginNodeLayout
You can change the chart type and orientation by using BeginNodeLayout event of the SfDiagram. This event will fire for each node added in layout when the layout is getting updated. By default, chart type is alternate and orientation is vertical. The following code example illustrates how to register an event and how to change chart type and orientation:
// Registering an event
 diagram.BeginNodeLayout += Diagram_BeginNodeLayout;
private void Diagram_BeginNodeLayout(object sender, BeginNodeLayoutEventArgs args)
{
    if (!args.HasSubTree)
    {
        args.Type = ChartType.Left;
        args.Orientation = Orientation.Vertical;
    }
}
BeginNodeRender
You can change node content using BeginNodeRender event of the SfDiagram. This event will fire for each node added in layout when the layout is getting updated.
// Registering an event
diagram.BeginNodeRender += Diagram_BeginNodeRender;
private void Diagram_BeginNodeRender(object sender, BeginNodeRenderEventArgs args)
{
    Node node = args.Item as Node;
    node.Width = 150;
    node.Height = 60;
    node.ShapeType = ShapeType.Rectangle;
    Style style = new Style(){Brush = new SolidBrush(UIColor.OliveDrab) };
    node.Style = style;
    AnnotationCollection annotations = new AnnotationCollection();
    Annotation annotation = new Annotation()
    {
        Content = (node.Content as Employee).Role,
        HorizontalAlignment = HorizontalAlignment.Center,
        VerticalAlignment = VerticalAlignment.Center,
        TextBrush = new SolidBrush(UIColor.White)
    };
    annotations.Add(annotation);
    node.Annotations = annotations;
}
Expand and collapse node
You can expand and collapse the parent node using NodeClicked event of the SfDiagram. This event will fire when you click node in the Layout.
// Registering an event
diagram.BeginNodeLayout += Diagram_BeginNodeLayout;
void Diagram_NodeClicked(object sender, NodeClickedEventArgs args)
 {
     if ((args.Item.Content as Employee).HasChild && args.Item.IsExpanded)
         {
                args.Item.IsExpanded = false;
         }
     else if ((args.Item.Content as Employee).HasChild && !args.Item.IsExpanded)
         {
                args.Item.IsExpanded = true;
         }
  }
Drag-and-drop support for directed tree layout
It is easier to drag a child or parent node to some other node in the directed tree layout.The following code shows how to enable draggable option in layout.
(diagram.LayoutManager.Layout as DirectedTreeLayout).IsDraggable = true;The following code shows how to add the child of the dropped node while dragging the node using the LayoutNodeDropped event.
//Registering an event
  diagram.LayoutNodeDropped += Diagram_OnLayoutNodeDropped;

//Define the LayoutNodeDropped event

private void Diagram_OnLayoutNodeDropped(object sender, LayoutNodeDroppedEventArgs args)
        {
            Node draggedNode = args.DraggedItem as Node;
            Node droppedNode = args.DroppedItem as Node;
            bool contain = true;
            if (draggedNode != RootNode && draggedNode != droppedNode)
            {
                Node ParentNode = GetParent((droppedNode.Content as DiagramEmployee).ReportingPerson);
                do
                {

                    if (ParentNode != draggedNode)
                    {
                        contain = false;
                    }
                    else
                    {
                        contain = true;
                        break;

                    }
                    ParentNode = GetParent((ParentNode.Content as DiagramEmployee).ReportingPerson);
                } while (ParentNode != RootNode);

                if (!contain)
                {
                    Connector con;bool hasChild = false;
                    foreach (Connector connector in draggedNode.InConnectors)
                    {
                        con = connector;
                        con.SourceNode = droppedNode;
                        hasChild = true;

                    }
                    if (hasChild)
                    {
                        Node PrevParentNode = GetParent((draggedNode.Content as DiagramEmployee).ReportingPerson);
                        bool noChild = false;
                        foreach(Connector c in draggedNode.OutConnectors)
                        {
                            noChild = true;
                        }
                        if (PrevParentNode != null && noChild)
                        {
                            (PrevParentNode.Content as DiagramEmployee).HasChild = false;
                            DrawTemplate(PrevParentNode);
                        }
                        DiagramEmployee ParentEmployee = (droppedNode.Content as DiagramEmployee);
                        (draggedNode.Content as DiagramEmployee).ReportingPerson = ParentEmployee.Name;
                        ParentEmployee.HasChild = true;
                        DrawTemplate(droppedNode);
                    }
                    droppedNode.IsExpanded = true;
                    diagram.LayoutManager.Layout.UpdateLayout();

                }
		   }
		}

        private Node GetParent(string parentId)
        {
            foreach (Node node in diagram.Nodes)
            {
                if ((node.Content as DiagramEmployee).Name == parentId)
                {
                    return node;
                }
            }
            return RootNode;
        }
Layout sibling spacing
It is easier to provide spacing between sibling nodes of any branch on the directed tree layout. Nodes can also be excluded from the layout. You can provide space for each node by customizing the “SiblingSpace” property of the node. The following code illustrates how to add space to nodes using sibling spacing class instance.
//Define the sibling spacing for node
private void Diagram_BeginNodeRender(object sender, BeginNodeRenderEventArgs args)
        {
            Node node = (args.Item as Node);
            node.ShapeType = ShapeType.RoundedRectangle;
            node.Width = 90;
            node.Height = 50;
            SiblingSpace siblingSpacing = new SiblingSpace(100,100);
            node.SiblingSpace = siblingSpacing;
            node.Annotations.Add(new Annotation() { Content = ((args.Item as Node).Content as Employee).Name });
        }