Getting Started
1 Mar 202211 minutes to read
This section explains the steps required to configure the SFCircularGauge, and also explains the steps required to add basic elements to SFCircularGauge through various APIs available within it.
Create your first Circular Gauge in Xamarin.iOS
Essential Gauge for Xamarin.iOS allows you to visualize numeric values over a circular scale. The appearance of the gauge can be fully customized to seamlessly integrate with your applications.
This section provides a quick overview for working with Essential Gauge for Xamarin.iOS. It walks through the entire process of creating a real world gauge.
CircularGauge
Reference Essential Studio Components in your Solution
After installing Essential Studio for Xamarin, you can find all the required assemblies in the installation folders, typically:
{Syncfusion Installed location}\Essential Studio{version number}\lib
You have to add the following assembly reference to the iOS unified project
ios-unified \ Syncfusion.SfGauge.iOS.dll
NOTE
Assemblies are available in unzipped package location in Mac.
Adding namespace for the assemblies
using Syncfusion.SfGauge.iOS;Initialize gauge
You can initialize the SFCircularGauge control with a required optimal name by using the included namespace.
public override void ViewDidLoad()
		{
			base.ViewDidLoad();
            SFCircularGauge circularGauge = new SFCircularGauge();
            this.View.AddSubview(circularGauge);
		}
Initialize circular gauge from designer
SFCircularGauge allows users to drag the control from toolbox to designer window. The properties window will be displayed where you change the necessary functionalities to customize the circular gauge in designer.
Adding header
You can assign a unique header to SFCircularGauge by using the SFGaugeHeader property and position it by using the Position property as you want.
SFCircularGauge circularGauge = new SFCircularGauge();
            SFGaugeHeader header = new SFGaugeHeader();
            header.Text = (Foundation.NSString) "Speedometer";
            header.TextColor = UIColor.Black;
            circularGauge.Headers.Add(header);
            this.View.AddSubview(circularGauge);
Configuring scales
You can configure the SFCircularScale elements by using following APIs, which are available in SFCircularGauge:
StartAngleSweepAngleStartValueEndValueIntervalRimThicknessRimColor
ObservableCollection<SFCircularScale> scales = new ObservableCollection<SFCircularScale>();
            SFCircularScale scale = new SFCircularScale();
            scale.StartValue = 0;
            scale.EndValue = 100;
            scales.Add(scale);
            circularGauge.Scales = scales;
Adding ranges
You can add ranges to SFCircularGauge by creating ranges collection using the SFCircularRange property.
ObservableCollection<SFCircularScale> scales = new ObservableCollection<SFCircularScale>();
            SFCircularScale scale = new SFCircularScale();
            scale.StartValue = 0;
            scale.EndValue = 100;
            scales.Add(scale);
            circularGauge.Scales = scales;
            SFCircularRange range = new SFCircularRange();
            range.StartValue = 0;
            range.EndValue = 40;
            scale.Ranges.Add(range);
Adding a needle pointer
Create a SFNeedlePointer, and associate it with a scale that is to be displayed the current value.
ObservableCollection<SFCircularScale> scales = new ObservableCollection<SFCircularScale>();
            SFCircularScale scale = new SFCircularScale();
            scale.StartValue = 0;
            scale.EndValue = 100;
            scales.Add(scale);
            circularGauge.Scales = scales;
            SFNeedlePointer needlePointer = new SFNeedlePointer();
            needlePointer.Value = 60;
            scale.Pointers.Add(needlePointer);
Adding a range pointer
SFRangePointer provides an alternative way to indicate the current value.
ObservableCollection<SFCircularScale> scales = new ObservableCollection<SFCircularScale>();
            SFCircularScale scale = new SFCircularScale();
            scale.StartValue = 0;
            scale.EndValue = 100;
            scales.Add(scale);
            circularGauge.Scales = scales;
            SFRangePointer rangePointer = new SFRangePointer();
            rangePointer.Value = 60;
            scale.Pointers.Add(rangePointer);
Adding a marker pointer
SFMarkerPointer points the current value in scale.
ObservableCollection<SFCircularScale> scales = new ObservableCollection<SFCircularScale>();
            SFCircularScale scale = new SFCircularScale();
            scale.StartValue = 0;
            scale.EndValue = 100;
            scales.Add(scale);
            circularGauge.Scales = scales;
            SFMarkerPointer markerPointer = new SFMarkerPointer();
            markerPointer.Value = 70;
            scale.Pointers.Add(markerPointer);
The following code example gives you the complete code of above configurations.
using System.Collections.ObjectModel;
using Syncfusion.SfGauge.iOS;

namespace Gauge_GettingStarted
{
    public partial class ViewController : UIViewController
    {
        public override void ViewDidLoad()
        {
            base.ViewDidLoad();
            //Initializing circular gauge
            SFCircularGauge circularGauge = new SFCircularGauge();
            circularGauge.Frame = new CoreGraphics.CGRect(10, 10, View.Frame.Width-20, View.Frame.Height - 20);

            //Adding header
            SFGaugeHeader header = new SFGaugeHeader();
            header.Text = (Foundation.NSString)"Speedometer";
            header.TextColor = UIColor.Black;
            circularGauge.Headers.Add(header);

             //Initializing scales for circular gauge
            ObservableCollection<SFCircularScale> scales = new ObservableCollection<SFCircularScale>();
            SFCircularScale scale = new SFCircularScale();
            scale.StartValue = 0;
            scale.EndValue = 100;
            scales.Add(scale);

              //Adding range
            SFCircularRange range = new SFCircularRange();
            range.StartValue = 0;
            range.EndValue = 40;
            scale.Ranges.Add(range);

             //Adding needle pointer
            SFNeedlePointer needlePointer = new SFNeedlePointer();
            needlePointer.Value = 60;
            scale.Pointers.Add(needlePointer);

            //Adding range pointer
            SFRangePointer rangePointer = new SFRangePointer();
            rangePointer.Value = 60;
            scale.Pointers.Add(rangePointer);

             //Adding marker pointer
            SFMarkerPointer markerPointer = new SFMarkerPointer();
            markerPointer.Value = 70;
            scale.Pointers.Add(markerPointer);

            circularGauge.Scales = scales;
            this.View.AddSubview(circularGauge);

        }
    }
}
The following output is displayed as a result of the above code example.
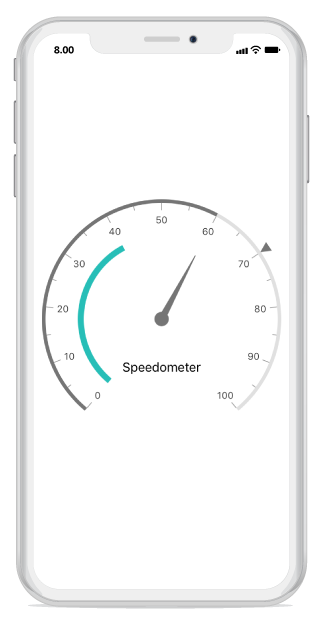
You can find the complete getting started sample from this link.