Color Selection in WPF Color Picker Palette
18 Nov 201824 minutes to read
This section explains the different types of colors available in the WPF Color Picker Palette and how to choose the colors and customize the panels.
Accessing a Color programmatically
You can get or change the selected color of the WPF Color Picker Palette programmatically by setting the Color property. To get the selected color’s name, use the ColorName property, which holds the name of the selected color item. The default value of Color is Black, and the default value of ColorName is the string "Color".
<syncfusion:ColorPickerPalette Color="Red"
                               Name="colorPickerPalette"
                               Width="60"
                               Height="40">
</syncfusion:ColorPickerPalette>
ColorPickerPalette colorPickerPalette = new ColorPickerPalette();
colorPickerPalette.Color = Colors.Red;
colorPickerPalette.Width = 60;
colorPickerPalette.Height = 40;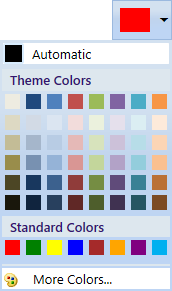
Here, Red is the selected color in the ColorPickerPalette.
Accessing a color brush programmatically
You can get or change the selected brush of the WPF Color Picker Palette programmatically by setting the SelectedBrush property. The default value of SelectedBrush is Black.
<syncfusion:ColorPickerPalette SelectedBrush="Yellow"
Name="colorPickerPalette"/>colorPickerPalette.SelectedBrush = Brushes.Yellow;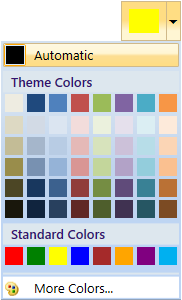
Here, the Yellow color brush is selected in the WPF Color Picker Palette.
Setting automatic color
To change the default selected color when the application launches, set the AutomaticColor property. If you have changed the selected color, you can return to the default color by clicking the automatic-color panel. You can hide the automatic color by setting the AutomaticColorVisibility property to Collapsed. The default value of AutomaticColor is Black, and the default value of AutomaticColorVisibility is Visible.
<syncfusion:ColorPickerPalette AutomaticColor="Green"
                               AutomaticColorVisibility="Visible"
                               Name="colorPickerPalette"
                               Width="60"
                               Height="40">
</syncfusion:ColorPickerPalette>
ColorPickerPalette colorPickerPalette = new ColorPickerPalette();
colorPickerPalette.AutomaticColor = Colors.Green;
colorPickerPalette.AutomaticColorVisibility = Visibility.Visible;
colorPickerPalette.Width = 60;
colorPickerPalette.Height = 40;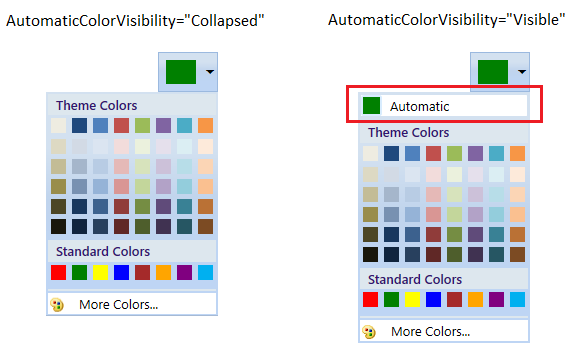
Select transparent color programmatically
You can set the selected color to transparent programmatically by setting the color code #00000000 or Colors.Transparent for the Color property.
<syncfusion:ColorPickerPalette Color="Transparent"
                               Name="colorPickerPalette"/>
ColorPickerPalette colorPickerPalette = new ColorPickerPalette();
colorPickerPalette.Color = Colors.Transparent;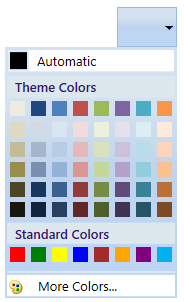
Select a predefined color
You can select a color from either the theme color items or the standard color items. You can show or hide each panel individually.
Select a color from theme color items
You can select various theme colors by setting the Themes property. Based on the Themes value, the corresponding base color items are displayed with their variants. To allow the user to select only base theme colors without their variants, set the GenerateThemeVariants property to false. You can hide the theme-color panel by setting the ThemePanelVisibility property to Collapsed. The default value of Themes is Office, and the default value of ThemePanelVisibility is Visible.
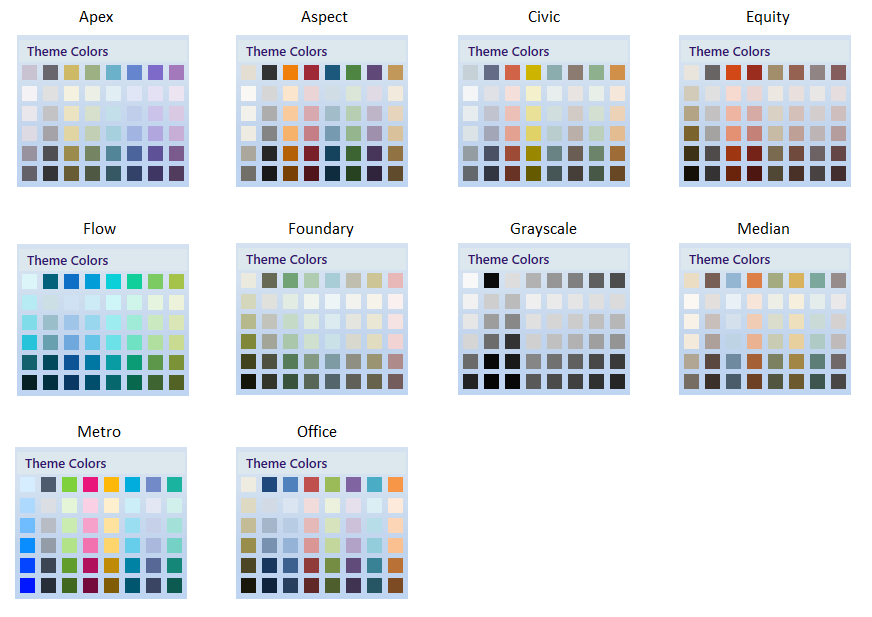
<syncfusion:ColorPickerPalette Themes="Metro"
                               GenerateThemeVariants="True"
                               ThemePanelVisibility="Visible"
                               Name="colorPickerPalette"
                               Width="60"
                               Height="40">
</syncfusion:ColorPickerPalette>
ColorPickerPalette colorPickerPalette = new ColorPickerPalette();
colorPickerPalette.Themes = PaletteTheme.Metro;
colorPickerPalette.GenerateThemeVariants = true;
colorPickerPalette.ThemePanelVisibility = Visibility.Visible;
colorPickerPalette.Width = 60;
colorPickerPalette.Height = 40;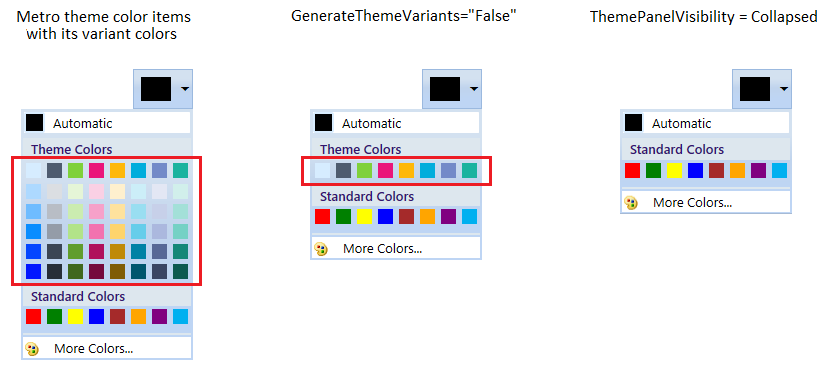
Select a color from standard color items
You can select standard colors from the standard-color panel. To allow the user to select standard colors along with their variants, set the GenerateStandardVariants property to true. You can hide the standard-color panel by setting the StandardPanelVisibility property to Collapsed. The default value of GenerateStandardVariants is false, and the default value of StandardPanelVisibility is Visible.
<syncfusion:ColorPickerPalette GenerateStandardVariants="True"
                               StandardPanelVisibility="Visible"
                               Name="colorPickerPalette"
                               Width="60"
                               Height="40">
</syncfusion:ColorPickerPalette>
ColorPickerPalette colorPickerPalette = new ColorPickerPalette();
colorPickerPalette.GenerateStandardVariants = true;
colorPickerPalette.StandardPanelVisibility = Visibility.Visible;
colorPickerPalette.Width = 60;
colorPickerPalette.Height = 40;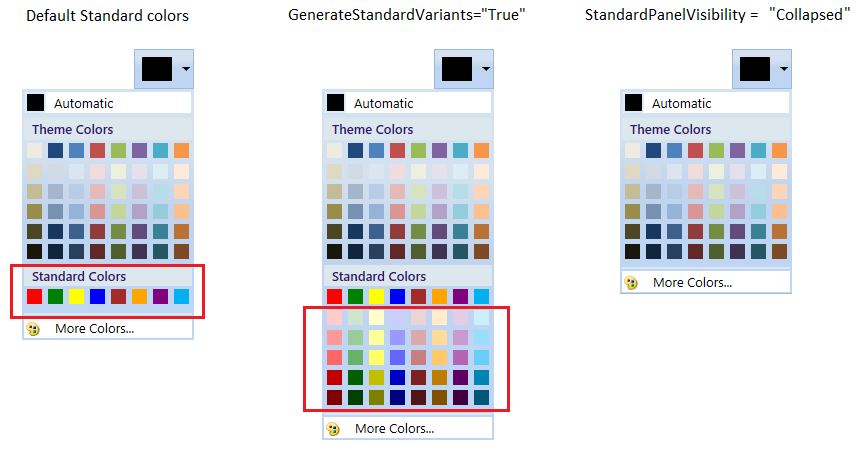
Show white and black color variants
To allow the user to select the theme color from white, black, or both variants, set the BlackWhiteVisibility property to White, Black, or Both. The default value of BlackWhiteVisibility is None.
<syncfusion:ColorPickerPalette BlackWhiteVisibility="Both"
                               Name="colorPickerPalette"
                               Width="60"
                               Height="40">
</syncfusion:ColorPickerPalette>
ColorPickerPalette colorPickerPalette = new ColorPickerPalette();
colorPickerPalette.BlackWhiteVisibility = BlackWhiteVisible.Both;
colorPickerPalette.Width = 60;
colorPickerPalette.Height = 40;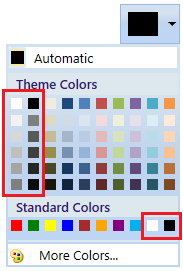
Add your own colors in the palette
To allow the user to select from your own colors, add the color and its name using CustomColor.ColorName and CustomColor.Color to the CustomColorsCollection, and set the SetCustomColors property to true. The CustomColor.ColorName is shown in the tooltip when the mouse hovers over the color item. You can change the custom-color panel header text and its visibility by using the CustomHeaderText and CustomHeaderVisibility properties. The default value of CustomHeaderText is CustomColors, and the default value of CustomHeaderVisibility is Visible.
// Required usings:
// using System.Collections.ObjectModel;
// using Syncfusion.Windows.Shared;  // for NotificationObject

public class ViewModel : NotificationObject {
    private ObservableCollection<CustomColor> newColorCollection;
    public ObservableCollection<CustomColor> NewColorCollection {
        get {
            return newColorCollection;
        }
        set {
            newColorCollection = value;
            this.RaisePropertyChanged("NewColorCollection");
        }
    }
    public ViewModel() {
        NewColorCollection = new ObservableCollection<CustomColor>();
    }
}<Window.Resources>
<local:ViewModel x:Key="viewModel">
<local:ViewModel.NewColorCollection>
<!-- Defining the color details -->
<syncfusion:CustomColor Color="#FF11EBF8" ColorName="Aqua" />
<syncfusion:CustomColor Color="#FFF80FA6" ColorName="Deep Pink" />
<syncfusion:CustomColor Color="#FF8BA7C2" ColorName="Dark Gray" />
<syncfusion:CustomColor Color="#F53CDF07" ColorName="Lime Green" />
<syncfusion:CustomColor Color="#C2929545" ColorName="Olive Drab" />
<syncfusion:CustomColor Color="#2E956145" ColorName="Sienna" />
<syncfusion:CustomColor Color="#78458E95" ColorName="Steel Blue" />
<syncfusion:CustomColor Color="#8B8220E4" ColorName="Blue Violet" />
</local:ViewModel.NewColorCollection>
</local:ViewModel>
</Window.Resources>
<syncfusion:ColorPickerPalette CustomColorsCollection="{Binding NewColorCollection}"
CustomHeaderText="New Colors"
CustomHeaderVisibility="Visible"
SetCustomColors="True"
DataContext="{StaticResource viewModel}"
Name="colorPickerPalette"
Width="60"
Height="40">
</syncfusion:ColorPickerPalette>The
local:xmlns used above refers to the namespace of yourViewModelclass. Addxmlns:local="clr-namespace:YourNamespace"to the root element of your XAML.
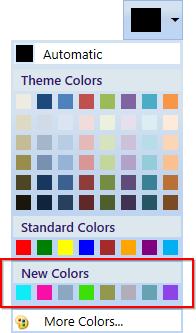
Click here to download the sample that showcases how to add your own color items into the palette.
Recently used color items
The recently selected colors are displayed in the RecentlyUsedPanel. To choose a color that was previously selected, use the RecentlyUsedPanel. You can hide the RecentlyUsedPanel by setting the RecentlyUsedPanelVisibility property to Collapsed. The default value of RecentlyUsedPanelVisibility is Visible.
<syncfusion:ColorPickerPalette RecentlyUsedPanelVisibility="Visible"
                               Name="colorPickerPalette"
                               Width="60"
                               Height="40">
</syncfusion:ColorPickerPalette>
ColorPickerPalette colorPickerPalette = new ColorPickerPalette();
colorPickerPalette.RecentlyUsedPanelVisibility = Visibility.Visible;
colorPickerPalette.Width = 60;
colorPickerPalette.Height = 40;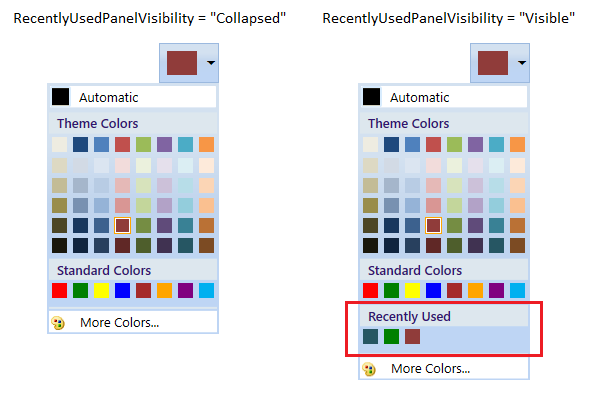
Choosing a color from MoreColor window
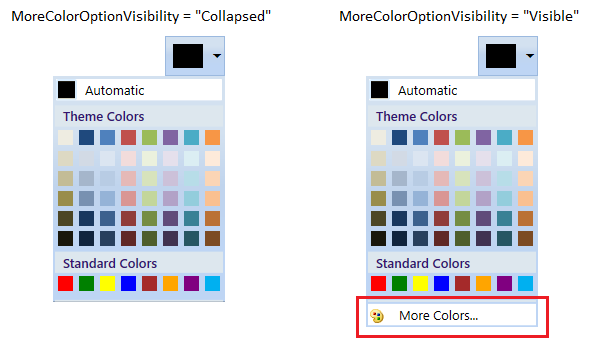
In addition to the Theme Colors and Standard Colors, the MoreColor feature allows you to select a wide range of color options. The MoreColor feature includes two categories: Standard Colors and Custom Colors. You can hide the MoreColor option by setting the MoreColorOptionVisibility property to Collapsed.
Selecting more standard colors
You can select from 140 standard colors clustered in the shape of a hexagon. To hide the Standard Colors tab, set the IsStandardTabVisible property to Collapsed. The color chosen from this cluster is also added to the RecentlyUsedPanel.
<syncfusion:ColorPickerPalette IsStandardTabVisible="Visible"
                               Name="colorPickerPalette"
                               Width="60"
                               Height="40">
</syncfusion:ColorPickerPalette>
ColorPickerPalette colorPickerPalette = new ColorPickerPalette();
colorPickerPalette.IsStandardTabVisible = Visibility.Visible;
colorPickerPalette.Width = 60;
colorPickerPalette.Height = 40;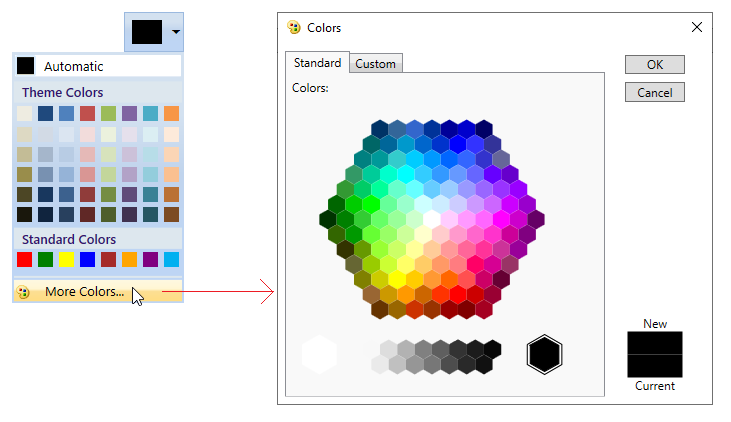
Selecting more custom colors
You can select any color and adjust its saturation level using the custom-color tab picker. To hide the Custom Colors tab, set the IsCustomTabVisible property to Collapsed. The color chosen from the custom-color picker is also added to the RecentlyUsedPanel.
<syncfusion:ColorPickerPalette IsCustomTabVisible="Visible"
                               Name="colorPickerPalette"
                               Width="60"
                               Height="40">
</syncfusion:ColorPickerPalette>
ColorPickerPalette colorPickerPalette = new ColorPickerPalette();
colorPickerPalette.IsCustomTabVisible = Visibility.Visible;
colorPickerPalette.Width = 60;
colorPickerPalette.Height = 40;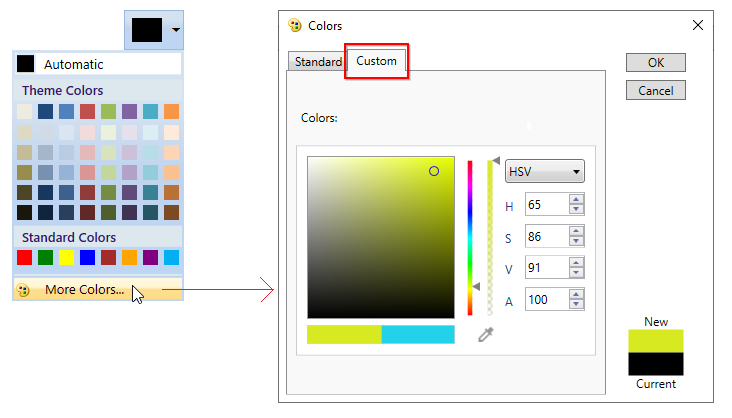
If you set both
IsCustomTabVisibleandIsStandardTabVisibletofalse, the MoreColor option is hidden automatically.
Clear the colour you picked with a transparent colour
To clear the selected color (set it to Transparent), click the No Color button. The No Color button is displayed only when the NoColorVisibility property is set to Visible. The default value of NoColorVisibility is Collapsed.
<syncfusion:ColorPickerPalette NoColorVisibility="Visible"
Name="colorPickerPalette"/>colorPickerPalette.NoColorVisibility = Visibility.Visible;
Selected brush or color changed notification
The selected brush or color in WPF Color Picker Palette can be observed using the SelectedBrushChanged event. The SelectedBrushChangedEventArgs contains the old and newly selected brush and its color values in the OldBrush, NewBrush, OldColor, and NewColor properties. You can also receive a notification when the selected brush or color changes by using the SelectedCommand property.
<syncfusion:ColorPickerPalette SelectedBrushChanged="ColorPickerPalette_SelectedBrushChanged"
                               Name="ColorPickerPalette"
                               Width="60"
                               Height="40">
</syncfusion:ColorPickerPalette>
ColorPickerPalette colorPickerPalette = new ColorPickerPalette();
colorPickerPalette.SelectedBrushChanged += ColorPickerPalette_SelectedBrushChanged;
colorPickerPalette.Width = 60;
colorPickerPalette.Height = 40;//Invoked when the selected color or brush is changed
private void ColorPickerPalette_SelectedBrushChanged(object sender, SelectedBrushChangedEventArgs e) {
//Old and newly selected brushes
var oldBrush = e.OldBrush;
var newBrush = e.NewBrush;
//Old and newly selected colors
var oldColor = e.OldColor;
var newColor = e.NewColor;
}Customize the header
You can customize the appearance of the WPF Color Picker Palette header and display the selected color name in it by using the HeaderTemplate property.
The
DataContextofHeaderTemplateis theWPF Color Picker Paletteinstance.
<Window.Resources>
    <DataTemplate x:Key="Custom_HeaderTemplate">
        <Grid>
            <Grid.ColumnDefinitions>
                <ColumnDefinition Width="auto"/>
                <ColumnDefinition Width="auto"/>
            </Grid.ColumnDefinitions>
            <Grid x:Name="IconGrid"
                  Margin="2">
                <Grid.RowDefinitions>
                    <RowDefinition Height="Auto"/>
                    <RowDefinition Height="*"/>
                </Grid.RowDefinitions>
                <Image x:Name="image"
                       Source="/images/fill.png"
                       Height="12"
                       Width="12"/>
                <Border Name="color_border"
                        Grid.Row="1"
                        Height="3">
                    <Border.Background>
                        <SolidColorBrush Color="{Binding Color,
                            RelativeSource={RelativeSource FindAncestor,
                                AncestorLevel=1,
                                AncestorType={x:Type syncfusion:ColorPickerPalette}},
                                UpdateSourceTrigger=PropertyChanged}"/>
                    </Border.Background>
                </Border>
            </Grid>
            <TextBlock Padding="1"
                       HorizontalAlignment="Left"
                       VerticalAlignment="Center"
                       TextAlignment="Center" Grid.Column="1"
                       Text="Shape Fill" FontSize="11"
                       Width="auto"/>
        </Grid>
    </DataTemplate>
</Window.Resources>
<Grid>
    <syncfusion:ColorPickerPalette HeaderTemplate="{DynamicResource Custom_HeaderTemplate}"
                                   Name="ColorPickerPallete2"
                                   Margin="10"
                                   Mode="Split"/>
</Grid>
View Sample in GitHub
Tooltip support
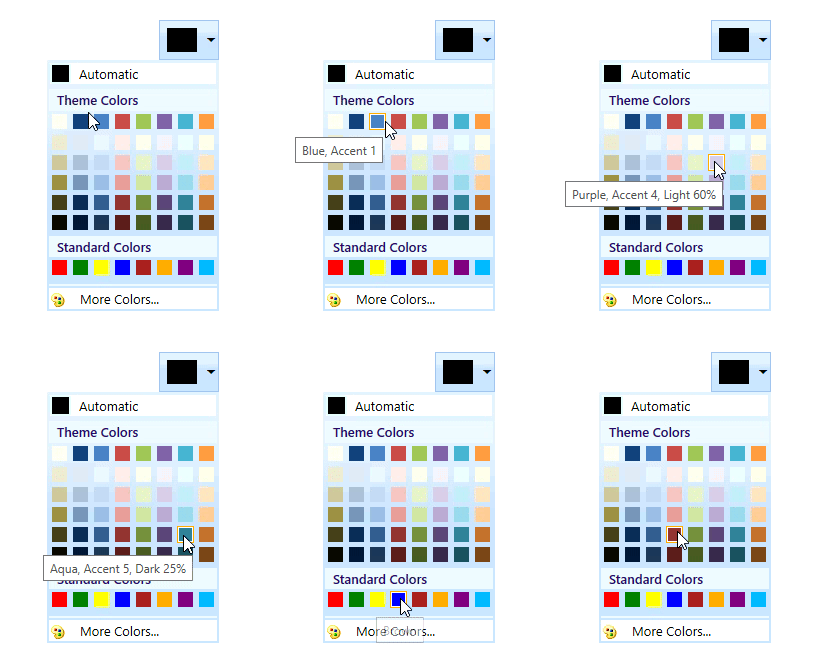
A tooltip is used to show information about a color item when the mouse hovers over it. The WPF Color Picker Palette displays the name of each color in the tooltip by default. No additional configuration is required.
Expanded mode
By default, WPF Color Picker Palette is shown as a drop-down button. To use the palette directly without a drop-down button, set the Mode property to Palette. To use the palette as both a button and a drop-down, set the Mode property to Split.
<syncfusion:ColorPickerPalette Mode="Palette"
                               Name="colorPickerPalette"/>
ColorPickerPalette colorPickerPalette = new ColorPickerPalette();
colorPickerPalette.Mode = PickerMode.Palette;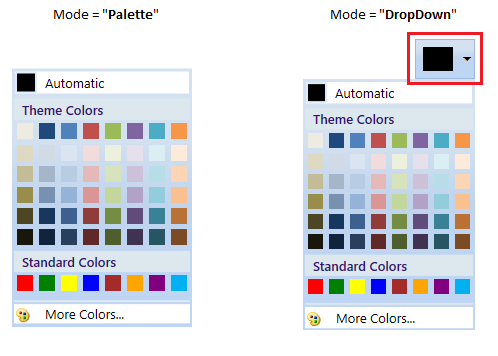
View Sample in GitHub
WPF Color Picker Palette as a command button
By default, WPF Color Picker Palette acts like a drop-down. It opens a color palette when you click anywhere on the header. By setting the Mode property to Split, it acts as both a button and a drop-down as explained below:
- When you click the drop-down arrow button, it acts like a drop-down.
- When you click the header area, it acts like a button and the SelectedCommand is triggered. Using this command, you can perform an action such as applying the selected color to the selected text.
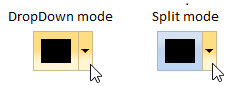
For example, if you want to apply the last selected color as a foreground to a TextEditor’s selected text, you can click the button directly instead of opening the drop-down and selecting an already selected color again.
//ViewModel.cs
// Required usings:
// using System.Windows.Documents;
// using System.Windows.Input;
// using Syncfusion.Windows.Shared;  // for NotificationObject, DelegateCommand
// using Syncfusion.Windows.Tools.Controls;  // for ColorSelectedCommandArgs

public class ViewModel : NotificationObject
{
    private ICommand selectionChangedCommand;
    private ICommand loadedChangedCommand;
    private RichTextBox TextBox;

    public ICommand SelectionChangedCommand {
        get {
            return selectionChangedCommand;
        }
    }

    public ICommand LoadedChangedCommand {
        get {
            return loadedChangedCommand;
        }
    }

    public void Loadedmethod(object param) {
        TextBox = param as RichTextBox;
    }
    public void PropertyChangedHandler(object param) {
        if (param != null && TextBox != null) {
            ColorSelectedCommandArgs groupItem = param as ColorSelectedCommandArgs;
            TextRange range = new TextRange(TextBox.Selection.Start, TextBox.Selection.End);
            range.ApplyPropertyValue(FlowDocument.ForegroundProperty, groupItem.Brush);
        }
    }
    public ViewModel() {
        selectionChangedCommand = new DelegateCommand<object>(PropertyChangedHandler);
        loadedChangedCommand = new DelegateCommand<object>(Loadedmethod);
    }
}<syncfusion:ColorPickerPalette Name="colorpickerpalette"
Mode="Split"
SelectedCommand="{Binding SelectionChangedCommand}"
Width="60"
Height="40">
</syncfusion:ColorPickerPalette>
<RichTextBox Name="richTextBox"
Height="297"
Width="331">
<i:Interaction.Triggers>
<i:EventTrigger EventName="Loaded">
<i:InvokeCommandAction Command="{Binding LoadedChangedCommand}"
CommandParameter="{Binding ElementName=richTextBox}"/>
</i:EventTrigger>
</i:Interaction.Triggers>
<FlowDocument>
<Paragraph FontSize="14">Hello, world!</Paragraph>
<Paragraph FontStyle="Italic"
TextAlignment="Left"
FontSize="14">Thanks to the RichTextBox control,
this FlowDocument is completely editable!</Paragraph>
</FlowDocument>
</RichTextBox>colorPickerPalette.Mode = PickerMode.Split;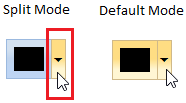
View Sample in GitHub
Change color item size
You can change each color item’s size by using the BorderWidth and BorderHeight properties. The palette is resized based on the color item size. The default value of both BorderWidth and BorderHeight is 17.
<syncfusion:ColorPickerPalette BorderWidth="30"
                               BorderHeight="30"
                               Name="colorPickerPalette"
                               Width="60"
                               Height="40">
</syncfusion:ColorPickerPalette>
ColorPickerPalette colorPickerPalette = new ColorPickerPalette();
colorPickerPalette.BorderWidth = 30;
colorPickerPalette.BorderHeight = 30;
colorPickerPalette.Width = 60;
colorPickerPalette.Height = 40;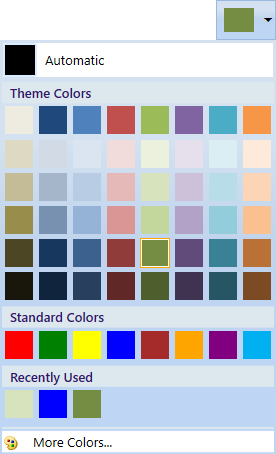
Change color palette size
You can change the pop-up size by using the PopupWidth and PopupHeight properties. The color items are resized based on the pop-up size. The default value of PopupWidth is 175, and the default value of PopupHeight is 200.
<syncfusion:ColorPickerPalette PopupWidth="120"
                               PopupHeight="100"
                               Name="colorPickerPalette"
                               Width="60"
                               Height="40">
</syncfusion:ColorPickerPalette>
ColorPickerPalette colorPickerPalette = new ColorPickerPalette();
colorPickerPalette.PopupWidth = 120;
colorPickerPalette.PopupHeight = 100;
colorPickerPalette.Width = 60;
colorPickerPalette.Height = 40;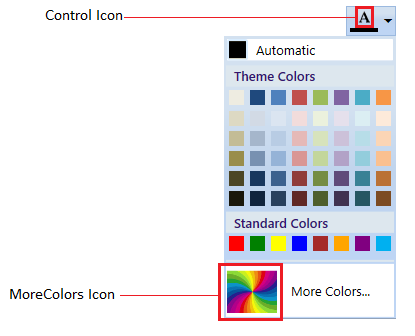
If you use both
PopupWidth/PopupHeightandBorderWidth/BorderHeight, theBorderWidth/BorderHeightproperties have higher priority.
Change header and more color icons
You can set the icons for the control header, which is placed to the left of the drop-down button, and for the more-color panel header by using the Icon and MoreColorsIcon properties. You can change the icon size for the control icon and the more-color icon by using the IconSize and MoreColorsIconSize properties. The IconSize and MoreColorsIconSize properties accept two comma-separated double values: width and height.
The image paths shown below assume the images are added to the project with a
Resourcebuild action. Add the images to your project, then reference them using apack://URI such aspack://application:,,,/Resources/Label.png.
<syncfusion:ColorPickerPalette Icon="pack://application:,,,/Resources/Label.png"
                               IconSize="18,18"
                               MoreColorsIcon="pack://application:,,,/Resources/MoreColor.png"
                               MoreColorsIconSize="50,50"
                               Name="colorPickerPalette"
                               Width="60"
                               Height="40">
</syncfusion:ColorPickerPalette>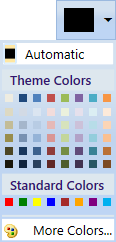
Click here to download the sample that showcases features and different type color items with its panel visibility customization.
Hide the drop-down button
You can hide the drop-down button in the WPF Color Picker Palette by setting its visibility to Collapsed. You can then open the pop-up palette by clicking the header area.
The example below uses the
UpDownBordertemplate part. Template-part names are subject to change between versions; if the part name does not match, inspect the default template using a tool such as XAML Spy or Snoop.
<syncfusion:ColorPickerPalette Loaded="ColorPickerPalette_Loaded"
                               Name="colorPickerPalette"/>
ColorPickerPalette colorPickerPalette = new ColorPickerPalette();
colorPickerPalette.Loaded += ColorPickerPalette_Loaded;private void ColorPickerPalette_Loaded(object sender, RoutedEventArgs e) {
var dropDown = (Border)(sender as ColorPickerPalette).Template.FindName("UpDownBorder", colorPickerPalette);
if (dropDown != null) {
dropDown.Visibility = Visibility.Collapsed;
}
}