Getting Started
15 Dec 20189 minutes to read
This section helps you to understand the getting started of the Navigation Drawer control with the step-by-step instructions.
Create a Navigation Drawer
The following steps guide you to add a Navigation Drawer control.
1) Refer the common Typescript Getting Started Documentation to create an application and add necessary scripts and styles for rendering the Navigation Drawer control.
2) Create an HTML page and add the scripts and css references in the order mentioned in the following code example.
<!DOCTYPE html>
<html>
<head>
<title>Typescript Application</title>
<link href="http://cdn.syncfusion.com/**28.1.33**/js/web/flat-azure/ej.web.all.min.css" rel="stylesheet" />
<script src="https://code.jquery.com/jquery-3.0.0.min.js"></script>
<script src="http://cdn.syncfusion.com/js/assets/external/jsrender.min.js" type="text/javascript"></script>
<script src="http://cdn.syncfusion.com/**28.1.33**/js/web/ej.web.all.min.js" type="text/javascript"></script>
</head>
<body>
<!--Add Navigation Drawer code here-->
</body>
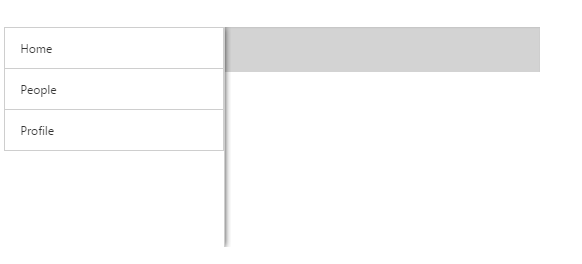
</html>3) To display the navigation list item by using items property and also you can access the ListView control properties by enabling the enableListView property. Add the following code with in the <body> tag to render the Navigation Drawer with the list view items.
<div id="navigationPane">
          <ul>
             <li data-ej-text="Home"></li>
             <li data-ej-text="People"></li>
             <li data-ej-text="Profile"></li>
          </ul>
       </div>
Create the target element as follows to display the list items by clicking target icon.
<div id="container">
        <div class="e-lv">
            <div class="e-header">
                <div id="butDrawer"
                     class="drawerIcon e-icon">
                </div>
            </div>
        </div>
    </div>
Initialize the Navigation Drawer in ts file by using the ej.NavigationDrawer method.
/// <reference path="tsfiles/jquery.d.ts" />
 /// <reference path="tsfiles/ej.web.all.d.ts" />\

module NavigationDrawerComponent {
    $(function () {
        var navigationdrawerInstance = new ej.NavigationDrawer($("#navigationPane"), {
            type: "overlay",
            direction: "left",
            enableListView: true,
            listViewSettings: {
                width: 300,
                selectedItemIndex: 0
            },
            position: "normal"
        });
    });
}
To set the target icon image and with the correct position as using the below mentioned styles .
<style>

      .drawerIcon {
        background-position: center center;
        background-repeat: no-repeat;
        height: 32px;
        width: 32px;
        background-size: 100% 100%;
        padding-right: 10px;
     }
     .drawerIcon:before {
        content: "\e76b";
        font-size: 28px;
        height: 26px;
     }

    </style>
To open the list items by clicking on target element using the targetId property.
/// <reference path="../tsfiles/jquery.d.ts" />
 /// <reference path="../tsfiles/ej.web.all.d.ts" />

module NavigationDrawerComponent {
    $(function () {
        var navigationdrawerInstance = new ej.NavigationDrawer($("#navigationPane"), {
           targetId: "butDrawer",
            type: "overlay",
            direction: "left",
            enableListView: true,
            listViewSettings: {
                width: 300,
                selectedItemIndex: 0
            },
            position: "normal"
        });
    });
}
To set the images for list items of the Navigation Drawer by using the [data-ej-imageclass] property as follows.
<div id="navigationPane">
        <ul>
            <li data-ej-imageclass="e-icon e-home" data-ej-text="Home"></li>
            <li data-ej-imageclass="e-icon e-photo" data-ej-text="Photos"></li>
            <li data-ej-imageclass="e-icon e-profile" data-ej-text="Profile"></li>
        </ul>
    </div>
You can set the images with the correct position by using the mentioned styles.
<style>

    @font-face {
        font-family: 'ej-font';
        src: url('../../common-images/tools/icons.eot');
        src: url('../../common-images/tools/icons.eot') format('embedded-opentype'), url('../../common-images/tools/icons.woff') format('woff'),url('../../common-images/tools/icons.woff') format('woff'), url('../../common-images/tools/icons.ttf') format('truetype'), url('../../common-images/tools/icons.svg') format('svg');
        font-weight: normal;
        font-style: normal;
    }

    .e-home:before {
        font-family: "ej-font";
        content: "\e900";
    }

    .e-profile:before {
        font-family: "ej-font";
        content: "\e901";
    }

    .e-photo:before {
        font-family: "ej-font";
        content: "\e903";
    }

    .e-location:before {
        font-family: "ej-font";
        content: "\e905";
    }

    .e-people:before {
        font-family: "ej-font";
        content: "\e902";
    }

    .e-communities:before {
        font-family: "ej-font";
        content: "\e904";
    }

    .e-home, .e-profile, .e-people, .e-photo, .e-communities, .e-location {
        font-size: 24px;
        color: black;
    }

    </style>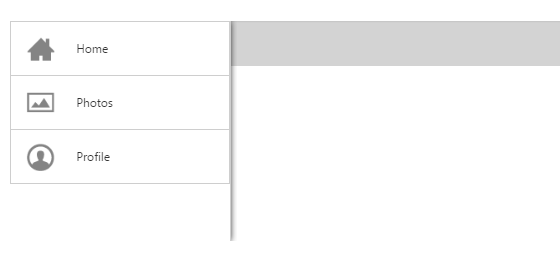
NOTE
You can find the Navigation Drawer control properties from the API reference.