Getting Started with React Scheduler and MongoDB
The React Scheduler combined with MongoDB provides a robust, scalable, and flexible data-driven architecture for modern event-management systems. This integration enables real-time CRUD operations, persistent event storage, and a clean separation between the UI and backend services.
MongoDB’s schema-less design seamlessly supports complex scheduling data, making it ideal for storing events, resources, recurrence rules, and user-specific calendar configurations.
Tip: Use MongoDB when your scheduling data structure may evolve over time or needs to support different event fields across multiple calendar workflows.
What is MongoDB?
MongoDB is a highly scalable, document-oriented NoSQL database designed to store and manage large volumes of flexible, JSON-like data. It enables developers to work with dynamic schemas, making it easy to model complex and evolving application data without rigid table structures.
Overview
This integration enables full CRUD (Create, Read, Update, Delete) operations for calendar events using:
- Frontend: React + Syncfusion React Scheduler
- Backend: Node.js + Express
- Database: MongoDB
- Communication: REST APIs via Syncfusion DataManager
Users can create, edit, and delete appointments in the Scheduler UI, with all changes persisted in MongoDB.
Important: The backend must return event records in a format that the Scheduler can deserialize, especially for
StartTimeandEndTimefields. Date conversion on the server is required before saving and after reading.
Prerequisites
Before getting started, ensure the following prerequisites are met:
-
Node.js ≥ 20.19.0
Required for optimal performance and full compatibility with MongoDB Node.js Driver v7.0 and modern ES features. -
MongoDB (Latest Stable Version)
Required for storing and retrieving application data. Supports both local installation and MongoDB Atlas.
Note: You can use either a local MongoDB instance or MongoDB Atlas. If you use Atlas, update the connection string in the server configuration accordingly.
Architecture Diagram
The following diagram shows how the React Scheduler communicates with the Node.js server and MongoDB database:

Tip: Keep the UI, API layer, and database responsibilities separate. This makes the application easier to maintain and scale.
Database setup
Follow the steps below to set up the MongoDB database for the application:
- Download the MongoDB Community Edition from the official website: MongoDB
- Install MongoDB by following the platform-specific installation instructions for Windows, macOS, or Linux.
- Launch MongoDB Compass after successful installation.
-
Open MongoDB Compass and connect using the default connection string:
mongodb://localhost:27017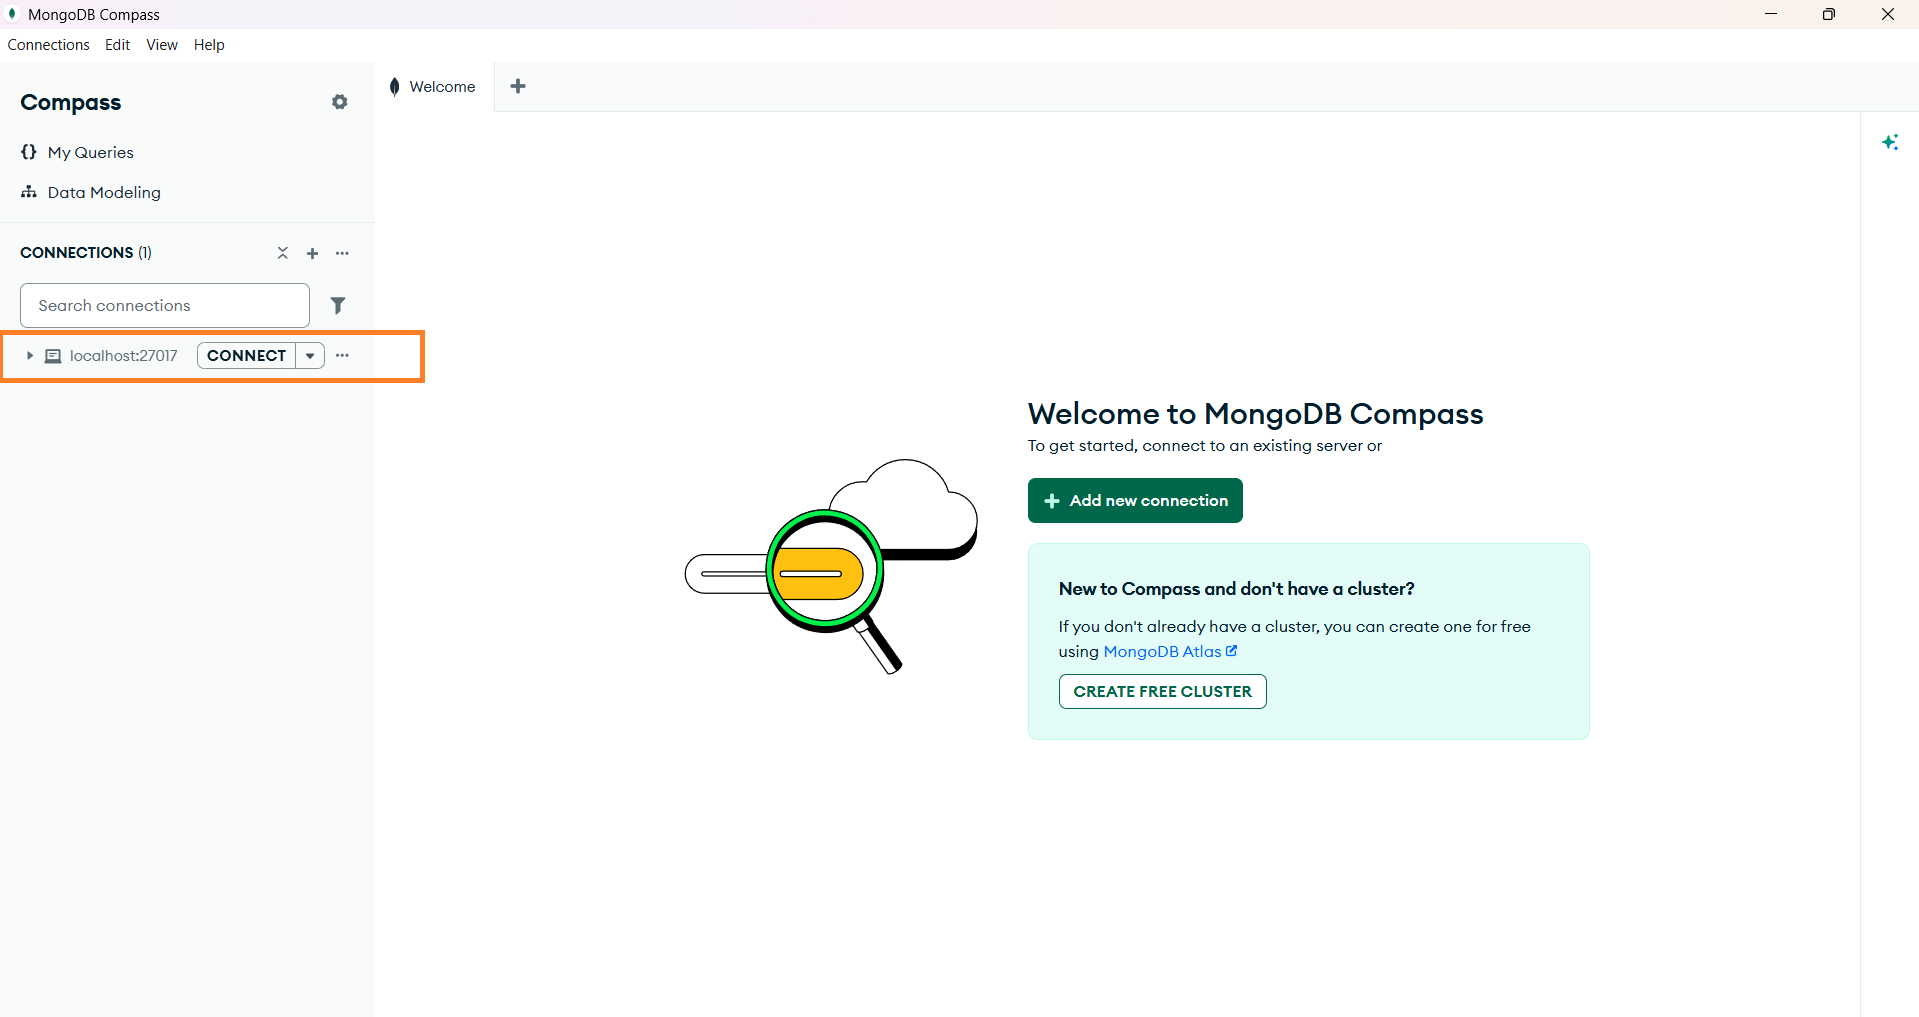
Image illustrating the MongoDB connection string
-
Create a new database named
mydband a collection namedScheduleDatain the default connection.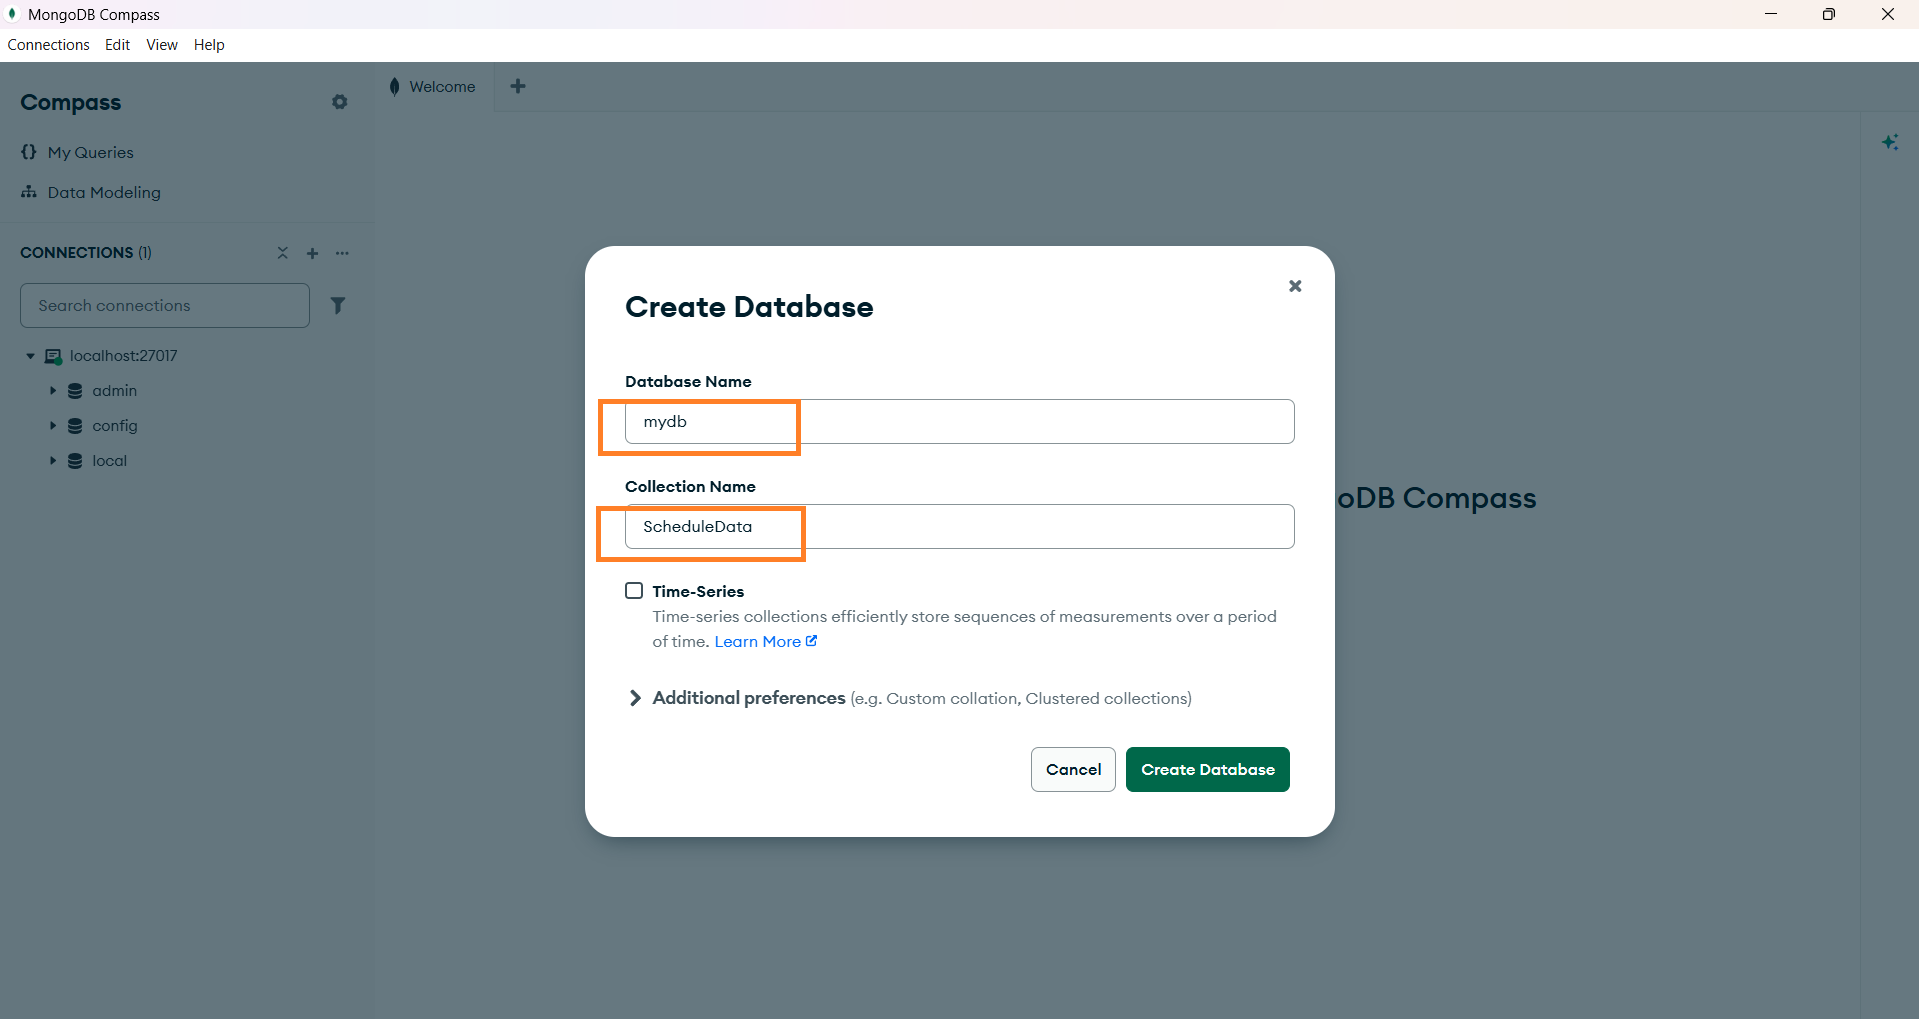
Image illustrating the MongoDB database and collection
-
Confirm that MongoDB Compass shows the database in the connected state, as illustrated in the screenshot.
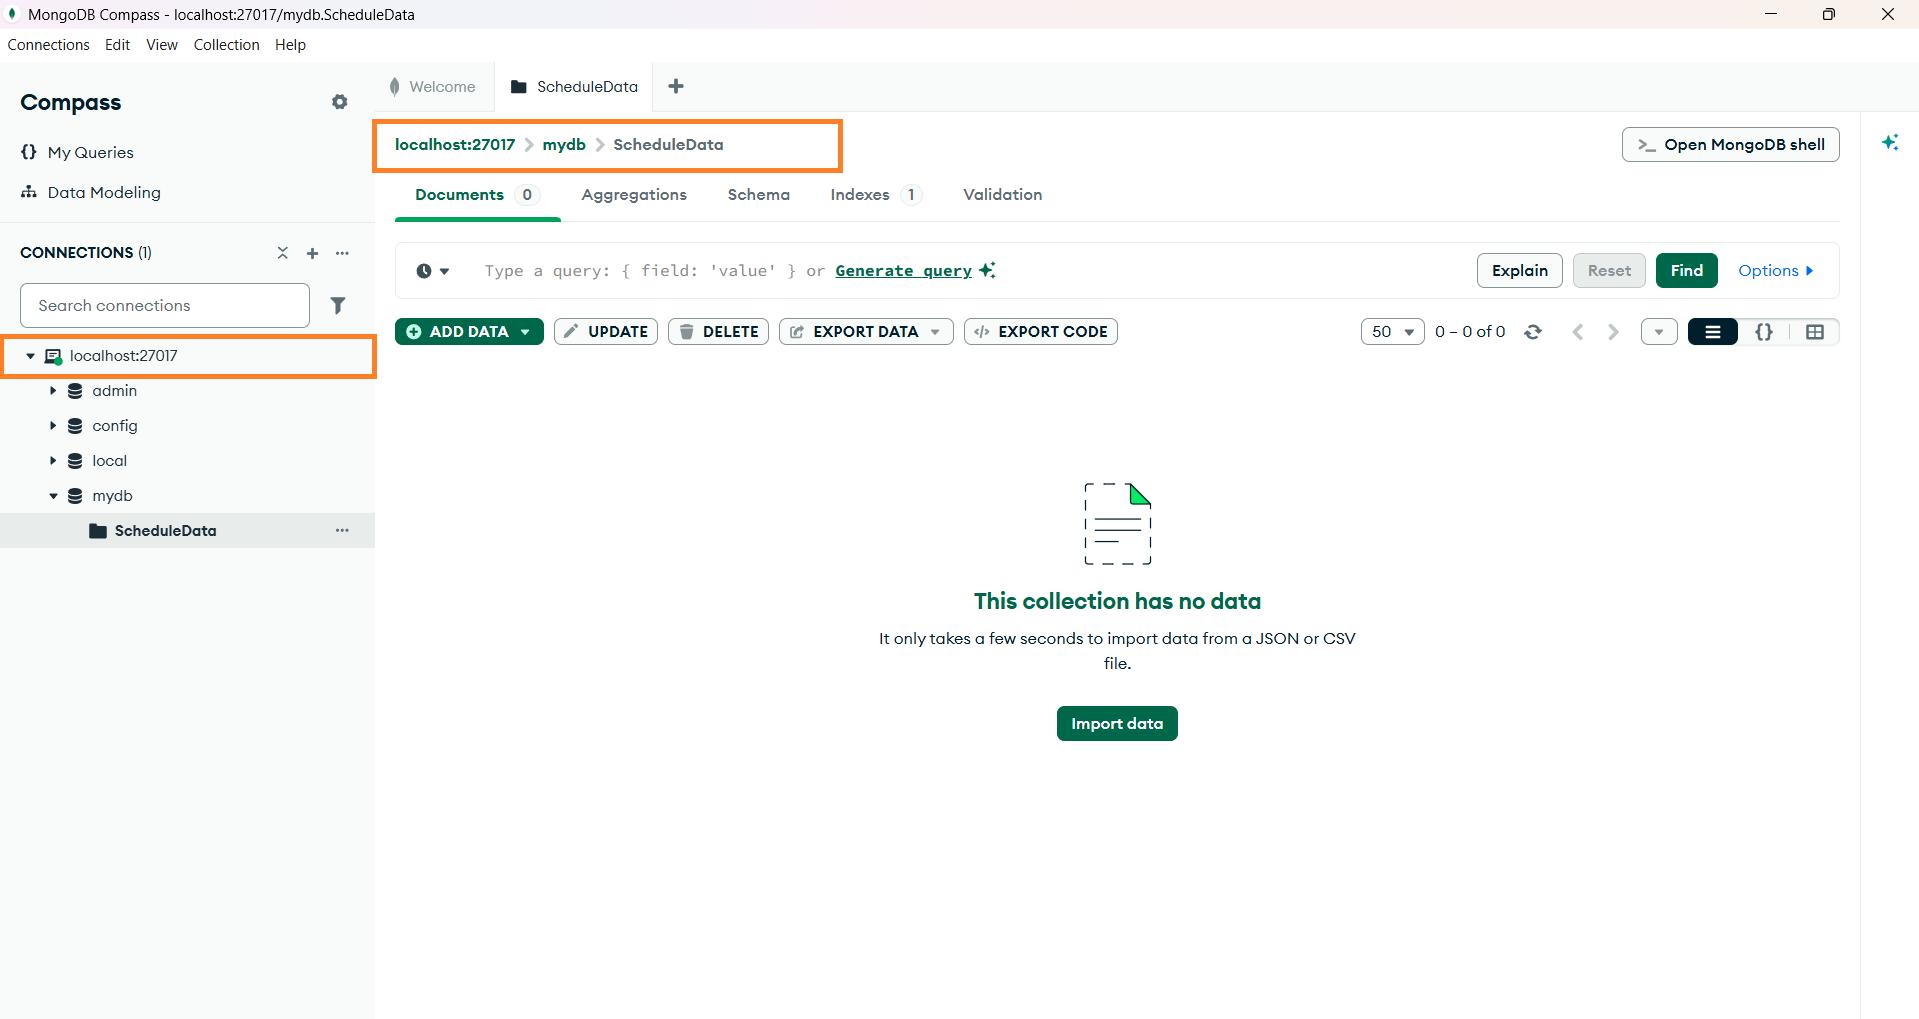
Image illustrating the MongoDB connectivity
Important: Use the same database and collection names in your backend server code. A mismatch between MongoDB Compass and the server configuration will prevent data from loading correctly.
Create a React Application
To create a new React application, use the Vite build tool, which provides faster startup, hot reload, and better performance for modern React applications. Vite is recommended for this sample because it offers a lightweight development experience and modern build output.
Tip: If you already have a React application, you can skip the project scaffolding step and proceed directly to the Scheduler integration.
npm create vite@latestyarn create viteRunning one of the above commands will prompt you to configure the project as shown below.
Step 1: Define the project name
For example, let us name the project react-app.
√ Project name: » **react-app**Step 2: Select the required configurations
Choose React as the framework and TypeScript as the variant for better type safety and maintainability.
√ Select a framework: » **React**
√ Select a variant: » **TypeScript**
Note:
You can also create the React application with TypeScript directly using the Vite template, as shown below.
npm create vite@latest react-app -- --template react-tsyarn create vite react-app --template react-tsStep 3: Confirm additional Vite options
√ Use rolldown-vite (Experimental)?: » **No**
√ Install with npm and start now? » **Yes**
After executing the above commands, the application will be available at: http://localhost:5173
The React application is now created and running with default settings.
Next, we will proceed with integrating Syncfusion® React Scheduler component into the project after setting up the server.
Step 4: Terminate & navigate to the project directory
Once the project is created successfully, stop the running state of the application and move into the application folder using the following command.
ctrl + c
cd react-app
Create a Server Application
The server layer is responsible for handling API requests and communicating with MongoDB. It runs separately from the React application and exposes endpoints for Scheduler data operations.
Step 1: Install required libraries
To set up the backend for the application, install the required packages and create a new directory for the server inside the React project folder react-app/.
npm install express mongodb cors- Express – A minimal and flexible web framework used to build API endpoints
- MongoDB (Node.js Driver) – The official MongoDB driver that allows your server to communicate with the database
- CORS – A package that enables your application, running on a different port, to access the server’s API
Note: Installing these packages in the React project root keeps the backend sample simple for demonstration purposes. In a production app, you may want to separate client and server into different repositories or folders.
mkdir serverStep 2: Create a file server.js
Create a new file named server.js inside the directory server created above and add the following code to set up the server.
const { MongoClient } = require('mongodb');
const express = require('express');
const cors = require('cors');

const app = express();
const mongoUrl = 'mongodb://127.0.0.1:27017/';
const PORT = 5000;

app.use(express.json());
app.use(express.urlencoded({ extended: false }));

// CORS configuration
app.use(cors({
origin: 'http://localhost:5173',
methods: ['GET', 'POST', 'PUT', 'PATCH', 'DELETE'],
allowedHeaders: ['Content-Type'],
credentials: false
}));

app.listen(PORT, () => {
console.log(`✅ Server running on http://localhost:${PORT}`);
});

(async () => {
const client = new MongoClient(mongoUrl);
await client.connect();
const db = client.db('mydb');
const collection = db.collection('ScheduleData');

// Fetch all scheduler events
app.post('/GetData', async (req, res) => {
    try {
    const data = await collection.find({}).toArray();
    res.json(data);
    } catch (err) {
    res.status(500).json({ error: err.message });
    }
});

// Handle batch CRUD operations
app.post('/BatchData', async (req, res) => {
    try {
        const body = req.body;
        let events = [];

        // INSERT
        if (body.action === 'insert' || (body.added && body.added.length)) {
            events = body.added || [body.value];
            for (const e of events) {
            e.StartTime = new Date(e.StartTime);
            e.EndTime = new Date(e.EndTime);
            await collection.insertOne(e);
            }
        }

        // UPDATE
        if (body.action === 'update' || (body.changed && body.changed.length)) {
            events = body.changed || [body.value];
            for (const e of events) {
            delete e._id;  // Critical: remove _id to avoid immutable field error
            e.StartTime = new Date(e.StartTime);
            e.EndTime = new Date(e.EndTime);
            await collection.updateOne(
                { Id: e.Id },
                { $set: e }
            );
            }
        }

        // DELETE
        if (body.action === 'remove' || (body.deleted && body.deleted.length)) {
            events = body.deleted || [{ Id: body.key }];
            for (const e of events) {
            await collection.deleteOne({ Id: e.Id });
            }
        }

        res.json(body);
    } catch (err) {
        res.status(500).json({ error: err.message });
    }
});
})();
Here database name is mydb and collection name is ScheduleData, both were previously created during the database setup process
Step 3: Add server script to package.json
To enable running the Node.js backend directly from the React project’s root, add the following script inside your root package.json under the “scripts” section.
"scripts": {
    "server": "node ./server/server.js"
}
Integrating Syncfusion React Scheduler
This section integrates Syncfusion React Scheduler into the application created above. The Scheduler uses DataManager to communicate with the backend and synchronize event data with MongoDB.
Step 1: Install required libraries
Install the required Syncfusion React Scheduler package by the following command.
npm install @syncfusion/ej2-react-scheduleyarn add @syncfusion/ej2-react-scheduleStep 2: Add CSS references
Add CSS references for the Scheduler in src/App.css.
@import "../node_modules/@syncfusion/ej2-tailwind3-theme/styles/schedule/index.css";Step 3: Add the Schedule component
In the src/App.tsx file, use the following code snippet to render the Syncfusion React Schedule component and import App.css to apply styles to the scheduler.
import React from 'react';
import { ScheduleComponent, ViewsDirective, ViewDirective, Day, Week, WorkWeek, Month, Agenda, Inject } from '@syncfusion/ej2-react-schedule';
import './App.css';

export default class App extends React.Component<{}, {}> {
    public scheduleObj: ScheduleComponent = new ScheduleComponent({});

    public render() {
        return (

            <div className="control-section">
                <div className="schedule-control">
                    <ScheduleComponent
                        id="schedule"
                        ref={(schedule: ScheduleComponent | null) => {
                                this.scheduleObj = schedule!;
                            }}
                        height="550px"
                        selectedDate={new Date(2026, 0, 1)}
                        currentView="Month" >

                        <ViewsDirective>
                            <ViewDirective option="Day" />
                            <ViewDirective option="Week" />
                            <ViewDirective option="WorkWeek" />
                            <ViewDirective option="Month" />
                            <ViewDirective option="Agenda" />
                        </ViewsDirective>
                        <Inject services={[Day, Week, WorkWeek, Month, Agenda]} />
                    </ScheduleComponent>
                </div>
            </div>

        );
    }
}
Step 4: Perform CRUD operations using Syncfusion’s DataManager URL Adaptor
This connects the Scheduler to your backend through REST endpoints and enables create, read, update, and delete operations from the UI. The UrlAdaptor sends standard HTTP requests to the server and keeps the Scheduler synchronized with MongoDB.
import React from 'react';
import { DataManager, UrlAdaptor } from '@syncfusion/ej2-data';
import { ScheduleComponent, ViewsDirective, ViewDirective, Day, Week, WorkWeek, Month, Agenda, Inject } from '@syncfusion/ej2-react-schedule';
import './App.css';

export default class App extends React.Component<{}, {}> {
    public scheduleObj: ScheduleComponent = new ScheduleComponent({});
    private dataManager: DataManager = new DataManager({
        url: 'http://localhost:5000/GetData',
        crudUrl: 'http://localhost:5000/BatchData',
        adaptor: new UrlAdaptor(),
        crossDomain: true
    });

    public render() {
        return (

        <div className="control-section">
            <div className="schedule-control">
            <ScheduleComponent
                id="schedule"
                ref={(schedule: ScheduleComponent | null) => {
                        this.scheduleObj = schedule!;
                    }}
                height="550px"
                selectedDate={new Date(2026, 0, 1)}
                currentView="Month"
                eventSettings={ {dataSource: this.dataManager }}>
                <ViewsDirective>
                    <ViewDirective option="Day" />
                    <ViewDirective option="Week" />
                    <ViewDirective option="WorkWeek" />
                    <ViewDirective option="Month" />
                    <ViewDirective option="Agenda" />
                </ViewsDirective>
                <Inject services={[Day, Week, WorkWeek, Month, Agenda]} />
            </ScheduleComponent>
            </div>
        </div>
        );
    }
}- The Scheduler is connected to a backend service using Syncfusion’s DataManager, a powerful data-handling component built to seamlessly manage remote data operations.
- DataManager is configured with two API endpoints:
- url → to read event data
- crudUrl → to handle create, update, and delete actions
- The UrlAdaptor ensures standard REST-style communication with your server.
- Once this is set, the Scheduler automatically sends requests when users add, edit, drag, resize, or delete events.
- The server processes these operations and returns updated event data, allowing the Scheduler to stay perfectly in sync with the backend.
Run the Application
Important: If your project’s
package.jsoncontains"type": "module", remove it before running the server. This sample uses CommonJS (require), not ES modules. Keeping"type": "module"will cause Node.js to throw arequire is not defined in ES module scopeerror.
Step 1: Start the backend server
From the project directory react-app/, start the backend server.
npm run serveryarn serverOnce started, the Node.js backend will be available at: http://localhost:5000/
Step 2: Start the React application
Open a new terminal window from the same react-app/ directory and run the React application.
npm run devyarn run devAfter the build completes, the React application will run at: http://localhost:5173/
You can now create, read, update, and delete events directly in the Syncfusion React Scheduler.
All changes will be reflected in the connected MongoDB database in real time.
Output Preview
The following screenshots show the Scheduler UI and the corresponding MongoDB records after CRUD operations:
Syncfusion React Scheduler
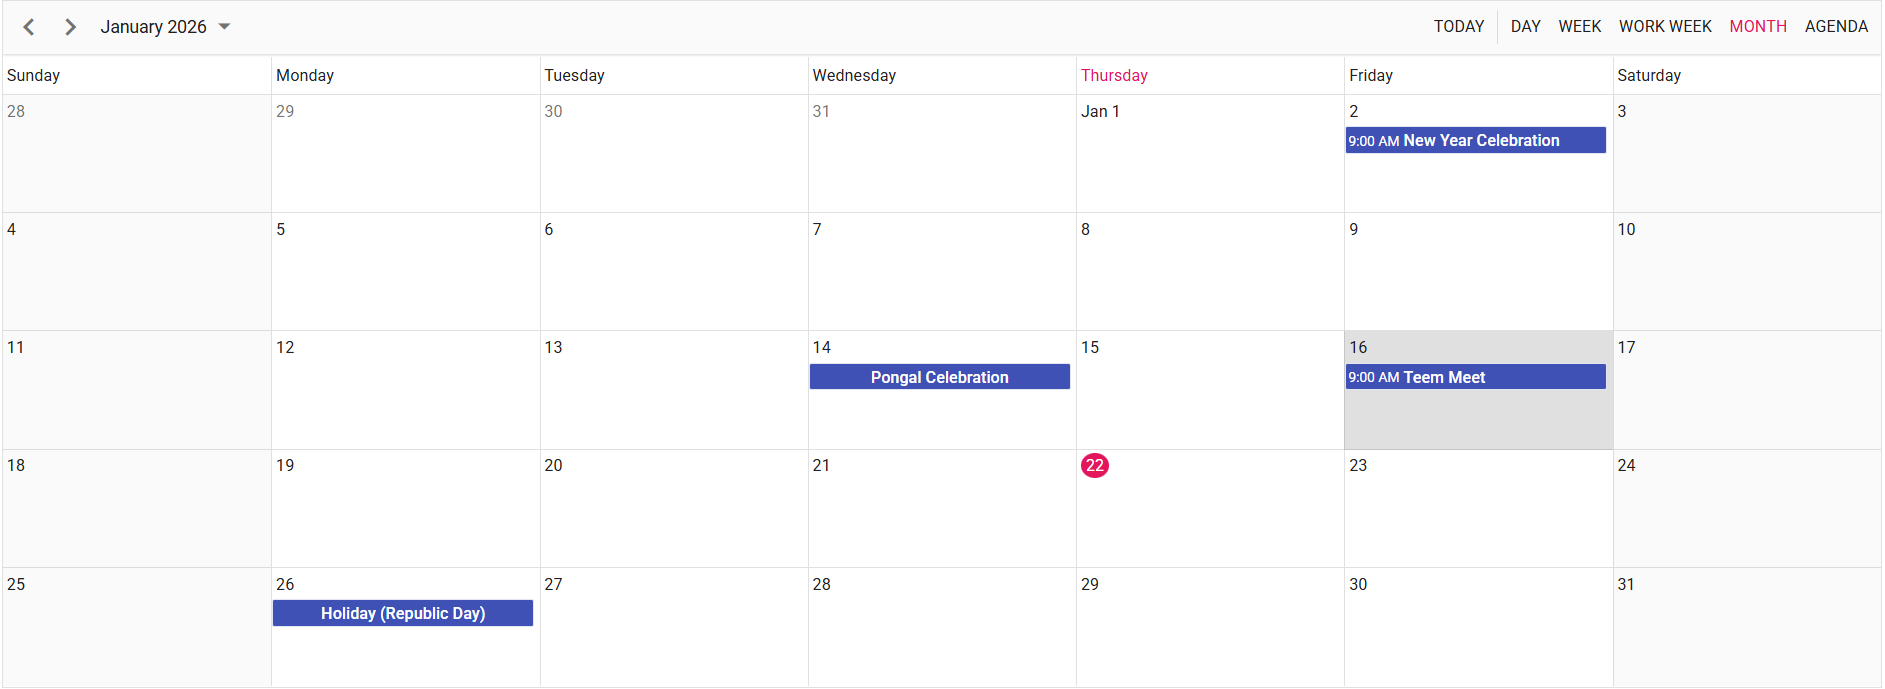
Image illustrating the Syncfusion React Scheduler
Syncfusion React Scheduler Events in MongoDB
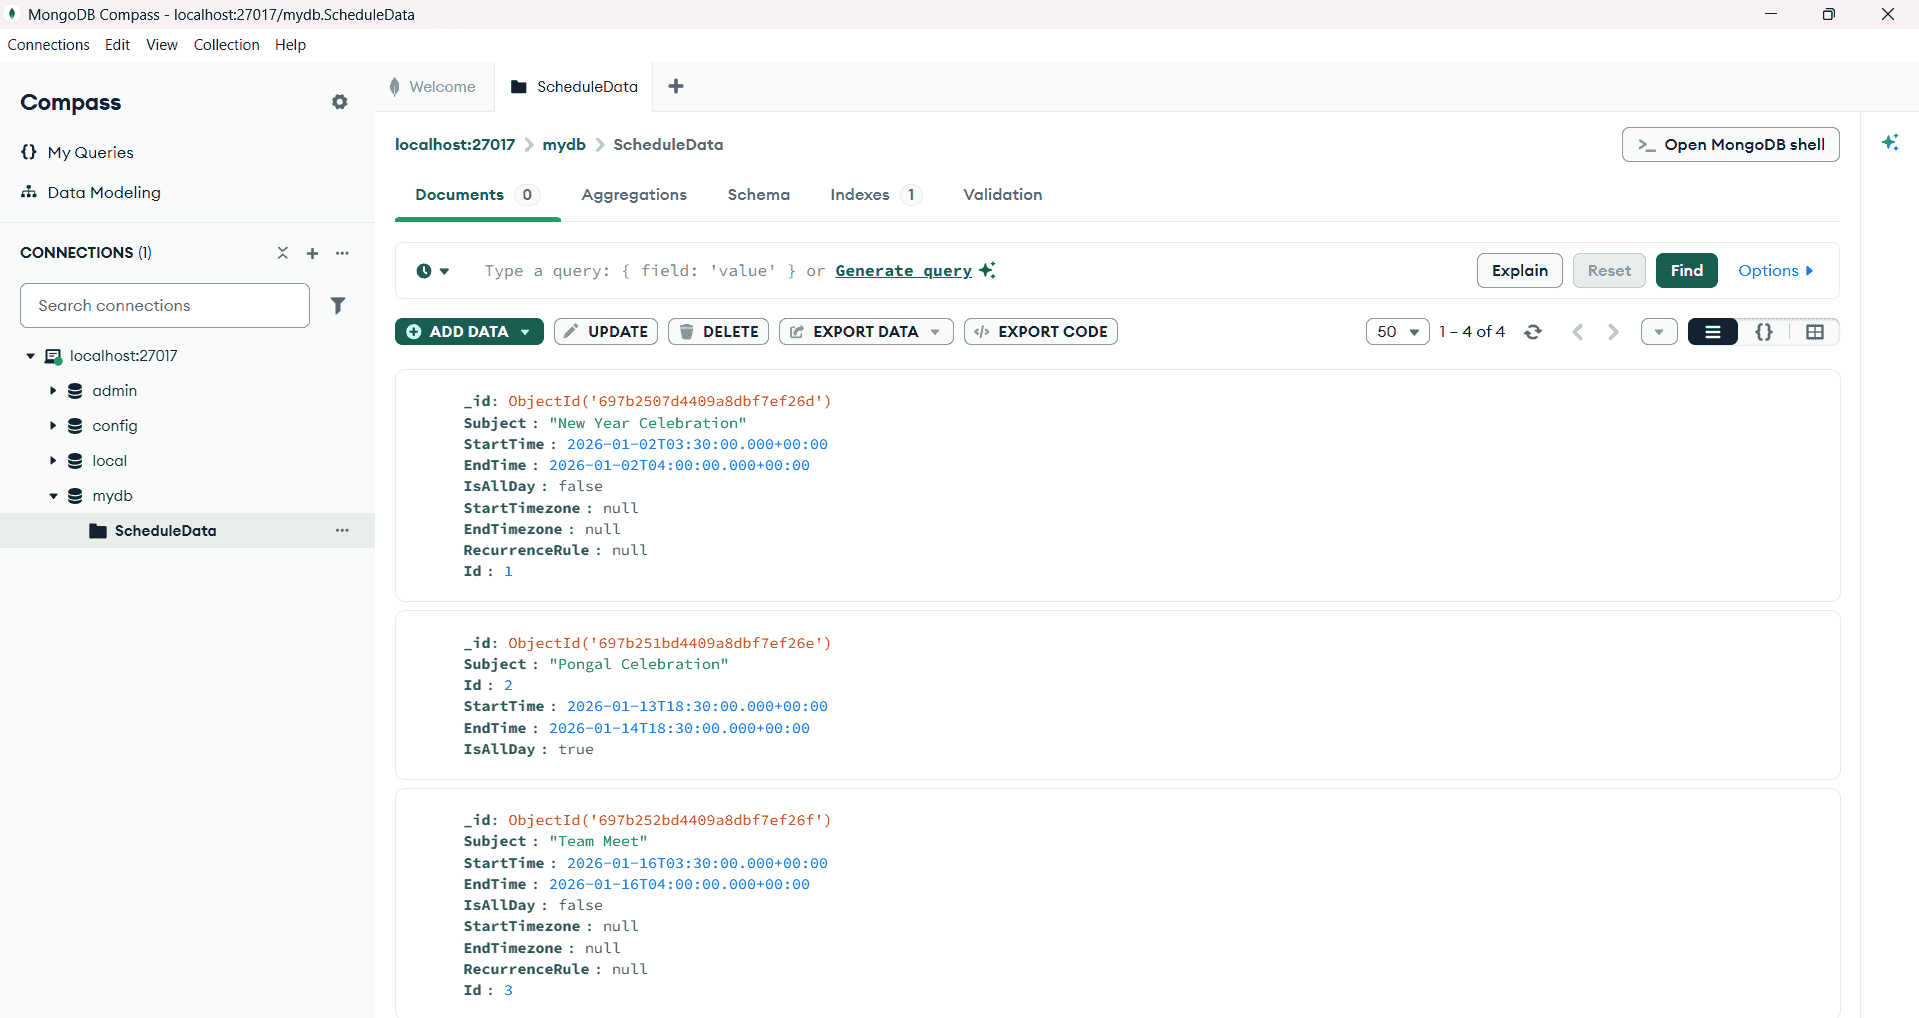
Image illustrating the Syncfusion React Scheduler Events in MongoDB
Tip: Verify both the Scheduler UI and the MongoDB collection after testing create, update, and delete actions to confirm that data is synchronized correctly.
Common Pitfalls & Solutions
-
CORS issues (blocked by CORS): Ensure
app.use(cors(...))is registered before routes and that theoriginmatches your React development URL. Setcredentials: trueonly if you send cookies or authorization headers, and configureDataManageraccordingly. -
Dates stored as strings: Convert
StartTimeandEndTimetoDateobjects on the server before inserting or updating. Otherwise, Scheduler rendering and timezone calculations may be incorrect. -
Immutable
_iderror on updates: Delete_idfrom the payload before callingupdateOne. MongoDB does not allow changing the_idfield. -
Missing CSS → broken layout: Import all required CSS bundles for EJ2 controls; otherwise, the editor and picker controls will not render correctly.
Note: If events are not appearing after a save, check the browser network tab and server console for request or parsing errors first.
Please find the sample in this GitHub location
See also
- Syncfusion React Scheduler - Component homepage
- Scheduler API Reference - Complete API documentation
- DataManager Documentation - Remote data operations
- MongoDB Documentation - Database reference
- React Scheduler Live Examples - Interactive examples