Integrating React Scheduler with Google Calendar
This integration allows users to manage their Google Calendar events directly within the React Scheduler. Changes made in the Scheduler are synced to Google Calendar, and existing Google events are displayed in the Scheduler interface.
Prerequisites
Before integrating Google Calendar with the React Scheduler, ensure you have:
- Node.js and npm - Version 14+ installed on your local machine for React project creation and management
- Google Account - Required to access Google Cloud Console and create OAuth 2.0 credentials
- Basic React knowledge - Familiarity with React components, state management, and hooks
- Text Editor or IDE - Any code editor (VS Code recommended) for project development
Integration flow overview
The integration follows this sequence:
- Event Display - Scheduler displays events loaded from your Google Calendar
- Authentication - App uses Google Identity Services (GIS) to obtain OAuth access tokens
- CRUD Mapping - Any create/update/delete operations in Scheduler are converted to Google Calendar API calls
- Synchronization - After each operation, events are reloaded from Google Calendar to keep data in sync
Important: This integration uses OAuth 2.0 authentication. Users must authorize the application to access their Google Calendar data.
Create Google Cloud credentials
Step 1: Setup Google Calendar API
- Open https://console.cloud.google.com.
- Click the Project Dropdown > New Project.
- Name it (e.g., Scheduler-Integration) and click Create.
Step 2: Enable the Google Calendar API
- Navigate to APIs & Services → Library → search “Calendar” → Click Enable.
Step 3: Configure OAuth consent screen (External or Internal depending on your audience).
- Navigate to APIs & Services → OAuth consent screen → select External → Click Create.
- Provide the App name and Support email
Step 4: Add Test Users
- Navigate to APIs & Services → Audience → Add mail in Test User → Click Save.
Step 5: Generate OAuth Credentials
- Navigate to APIs & Services → Credentials → Click Create Credentials → OAuth client ID
- Set Application Type to Web application
- Add
http://localhost:3000to Authorized JavaScript origins (for React development server) - For production, add your actual domain URL
Important: Copy and save the generated Client ID immediately. You’ll need it to configure your React application.
Create React project and install packages
Step 1: Create a new React application:
npx create-react-app sf-react-gcal
cd sf-react-gcal
Step 2: Install the Syncfusion Scheduler component:
npm install @syncfusion/ej2-react-scheduleTip: If you prefer Yarn, replace
npm installwithyarn addin all commands.
Add Google identity services script
The Google Identity Services (GIS) library handles OAuth authentication. Add the following script to the <head> section of your public/index.html file:
<script src="https://accounts.google.com/gsi/client" async defer></script>Note: The
async deferattributes ensure the script loads asynchronously without blocking page rendering.
Add Syncfusion CSS references
Import the required Syncfusion CSS stylesheets in your src/App.js file:
import '@syncfusion/ej2-tailwind3-theme/styles/schedule/index.css';Configuring the Syncfusion React Scheduler Component
1. Create the Scheduler Component
Create a new file src/Scheduler/schedule.js with the Syncfusion React Scheduler component. Replace the placeholder values with your actual Client ID and Calendar ID:
```js
import React from ‘react’;
import {
ScheduleComponent,
ViewsDirective,
ViewDirective,
Day,
Week,
WorkWeek,
Month,
Agenda,
Inject,
Resize,
DragAndDrop
} from ‘@syncfusion/ej2-react-schedule’;
class Schedule extends React.Component {
  constructor(props) {
    super(props);
    this.state = {
      gisReady: false,
      token: null,
      events: []
    };
    this.calendarId = 'primary'; // USE YOUR CALENDAR_ID OR 'primary'
    this.clientId =
      'YOUR CLIENT_ID'; // USE YOUR CLIENT_ID
  }
  render() {
    const { gisReady, token, events } = this.state;
    const eventSettings = { dataSource: events };

    return (
      <div className="schedule-control-section">
        <div className="col-lg-12 control-section">
          <div className="control-wrapper drag-sample-wrapper">
            <div>
              <button
                onClick={this.signIn}
                disabled={!gisReady}
              >
                {gisReady ? 'Authorize & Load' : 'Loading Google…'}
              </button>
              <button onClick={this.loadEvents} disabled={!token}>
                Reload Events
              </button>
            </div>

            <div className="schedule-container">
              <ScheduleComponent
                allowDragAndDrop={true}
                allowResizing={true}
                width="100%"
                height="650px"
                selectedDate={new Date()}
                eventSettings={ dataSource: eventSettings }
                actionBegin={this.onActionBegin}
              >
                <ViewsDirective>
                  <ViewDirective option="Day" />
                  <ViewDirective option="Week" />
                  <ViewDirective option="WorkWeek" />
                  <ViewDirective option="Month" />
                  <ViewDirective option="Agenda" />
                </ViewsDirective>
                <Inject services={[Day, Week, WorkWeek, Month, Agenda, Resize, DragAndDrop]} />
              </ScheduleComponent>
            </div>
          </div>
        </div>
      </div>
    );
  }
}

export default Schedule;
```
Important: Replace
'YOUR CLIENT_ID'with your actual Google OAuth Client ID from Step 5 of the credentials setup. Use'primary'for your default Google Calendar or replace with a specific calendar ID.
2. Add Google OAuth authorization
Add the authorization logic to the Schedule class in src/Scheduler/schedule.js:
```js
componentDidMount() {
const ready = () =>
!!(window.google && window.google.accounts && window.google.accounts.oauth2);
    if (ready()) {
      this.setState({ gisReady: true });
    } else {
      this._gisPoll = setInterval(() => {
        if (ready()) {
          clearInterval(this._gisPoll);
          this.setState({ gisReady: true });
        }
      }, 100);
    }
  }

  componentWillUnmount() {
    if (this._gisPoll) clearInterval(this._gisPoll);
  }

  signIn = () => {
    const tokenClient = window.google.accounts.oauth2.initTokenClient({
      client_id: this.clientId,
      scope: 'https://www.googleapis.com/auth/calendar',
      callback: async (resp) => {
        if (resp?.access_token) {
          this.setState({ token: resp.access_token }, async () => {
            await this.loadEvents();
          });
        }
      }
    });

    tokenClient.requestAccessToken();
  };
```
Tip: The
componentDidMountmethod polls for the Google Identity Services library availability. This ensures the GIS script has loaded before attempting to use it.
3. Add CRUD Operation handling
Handle create, update, and delete operations in the Schedule class. Add this code to src/Scheduler/schedule.js:
```js
onActionBegin = async (args) => {
const { token } = this.state;
    if (['eventCreate', 'eventChange', 'eventRemove'].includes(args.requestType)) {
      args.cancel = true;
    } else {
      return;
    }

    if (!token) return;

    const headers = {
      Authorization: `Bearer ${token}`,
      'Content-Type': 'application/json'
    };

    const pickApp = () => {
      if (Array.isArray(args.data)) return args.data[0];
      if (args.data) return args.data;
      if (Array.isArray(args.changedRecords) && args.changedRecords.length)
        return args.changedRecords[0];
      return null;
    };

    if (args.requestType === 'eventCreate') {
      const app = pickApp();
      if (!app) return;

      const resource = toGoogleEventResource(app);
      const res = await fetch(
        `https://www.googleapis.com/calendar/v3/calendars/${encodeURIComponent(
          this.calendarId
        )}/events`,
        { method: 'POST', headers, body: JSON.stringify(resource) }
      );
      if (!res.ok) return;
      await this.loadEvents();
    }

    if (args.requestType === 'eventChange') {
      const app = pickApp();
      if (!app) return;

      const resource = toGoogleEventResource(app);
      const res = await fetch(
        `https://www.googleapis.com/calendar/v3/calendars/${encodeURIComponent(
          this.calendarId
        )}/events/${encodeURIComponent(app.Id)}`,
        { method: 'PATCH', headers, body: JSON.stringify(resource) }
      );
      if (!res.ok) return;
      await this.loadEvents();
    }

    if (args.requestType === 'eventRemove') {
      const app = pickApp();
      if (!app) return;

      const res = await fetch(
        `https://www.googleapis.com/calendar/v3/calendars/${encodeURIComponent(
          this.calendarId
        )}/events/${encodeURIComponent(app.Id)}`,
        { method: 'DELETE', headers }
      );
      if (!res.ok) return;
      await this.loadEvents();
    }
  };
  ```
Note: The
args.cancel = trueprevents the default Scheduler update. Instead, the operation is sent to Google Calendar API, and events are reloaded to reflect the API response.
4. Add date conversion utilities
Google Calendar uses different date formats for all-day and timed events. Add these utility functions to handle conversions:
js
    function parseDateOnlyToLocal(dateStr) {
      const [y, m, d] = (dateStr || '').split('-').map(Number);
      return new Date(y, m - 1, d);
    }
    function formatDateOnlyFromLocal(d) {
      const y = d.getFullYear();
      const m = String(d.getMonth() + 1).padStart(2, '0');
      const day = String(d.getDate()).padStart(2, '0');
      return `${y}-${m}-${day}`;
    }
Data mapping: Google Calendar ↔ Syncfusion React Scheduler
1. Map Google Calendar Data to Scheduler
Convert events from Google Calendar API format to Scheduler format. Add this function to src/Scheduler/schedule.js:
```js
function mapGoogleToScheduler(items) {
return (items || [])
.map((evt) => {
const isAllDay = Boolean(evt.start?.date && !evt.start?.dateTime);
      if (isAllDay) {
        const start = parseDateOnlyToLocal(evt.start.date);
        const end = parseDateOnlyToLocal(evt.end.date);
        return {
          Id: evt.id,
          Subject: evt.summary || '(No title)',
          StartTime: start,
          EndTime: end,
          IsAllDay: true,
          Location: evt.location,
          Description: evt.description
        };
      }

      const start = evt.start?.dateTime;
      const end = evt.end?.dateTime;
      if (!start || !end) return null;

      return {
        Id: evt.id,
        Subject: evt.summary || '(No title)',
        StartTime: new Date(start),
        EndTime: new Date(end),
        IsAllDay: false,
        Location: evt.location,
        Description: evt.description
      };
    })
    .filter(Boolean);
}
```
Important: The mapping handles both all-day events (which use date-only format) and timed events (which use datetime format) correctly.
2. Map Scheduler Data to Google Calendar
Convert events from Scheduler format to Google Calendar API format. Add this function to src/Scheduler/schedule.js:
```js
function toGoogleEventResource(app) {
if (app.IsAllDay) {
const startDate = new Date(
app.StartTime.getFullYear(),
app.StartTime.getMonth(),
app.StartTime.getDate()
);
let endDate = new Date(
app.EndTime.getFullYear(),
app.EndTime.getMonth(),
app.EndTime.getDate()
);
if (+endDate <= +startDate) {
endDate = new Date(startDate);
endDate.setDate(endDate.getDate() + 1);
}
const resource = {
summary: app.Subject,
location: app.Location,
description: app.Description,
start: { date: formatDateOnlyFromLocal(startDate) },
end: { date: formatDateOnlyFromLocal(endDate) }
};
if (app.RecurrenceRule) resource.recurrence = [RRULE:${app.RecurrenceRule}];
return resource;
}
  const tz = Intl.DateTimeFormat().resolvedOptions().timeZone;
  const resource = {
    summary: app.Subject,
    location: app.Location,
    description: app.Description,
    start: { dateTime: new Date(app.StartTime).toISOString() },
    end: { dateTime: new Date(app.EndTime).toISOString() }
  };
  if (app.RecurrenceRule) {
    resource.start.timeZone = tz;
    resource.end.timeZone = tz;
    resource.recurrence = [`RRULE:${app.RecurrenceRule}`];
  }
  return resource;
}
```
Tip: Recurring events are preserved by including the
RecurrenceRule(RRULE) in the Google Calendar API request.
3. Load Google Calendar Events
Fetch all events from Google Calendar and update the Scheduler. Add this method to the Schedule class in src/Scheduler/schedule.js:
```js
loadEvents = async () => {
const { token } = this.state;
if (!token) return;
    const url = new URL(
      `https://www.googleapis.com/calendar/v3/calendars/${encodeURIComponent(
        this.calendarId
      )}/events`
    );
    url.searchParams.set('singleEvents', 'true');
    url.searchParams.set('orderBy', 'startTime');
    url.searchParams.set('maxResults', '2500');
    url.searchParams.set('timeMin', new Date(2020, 0, 1).toISOString());

    const res = await fetch(url.toString(), {
      headers: { Authorization: `Bearer ${token}` }
    });
    if (!res.ok) throw new Error('Failed to load events');

    const data = await res.json();
    const mapped = mapGoogleToScheduler(data.items || []);
    this.setState({ events: mapped });
  };
``` ## Rendering the Scheduler in the App Component
Update your main App.js file to render the Schedule component:
import React from 'react';
import Schedule from './Scheduler/schedule';

function App() {
  return (
    <div className="App">
      <Schedule />
    </div>
  );
}

export default App;
Running the Application
Start the development server:
npm startThe application will open at http://localhost:3000.
Output
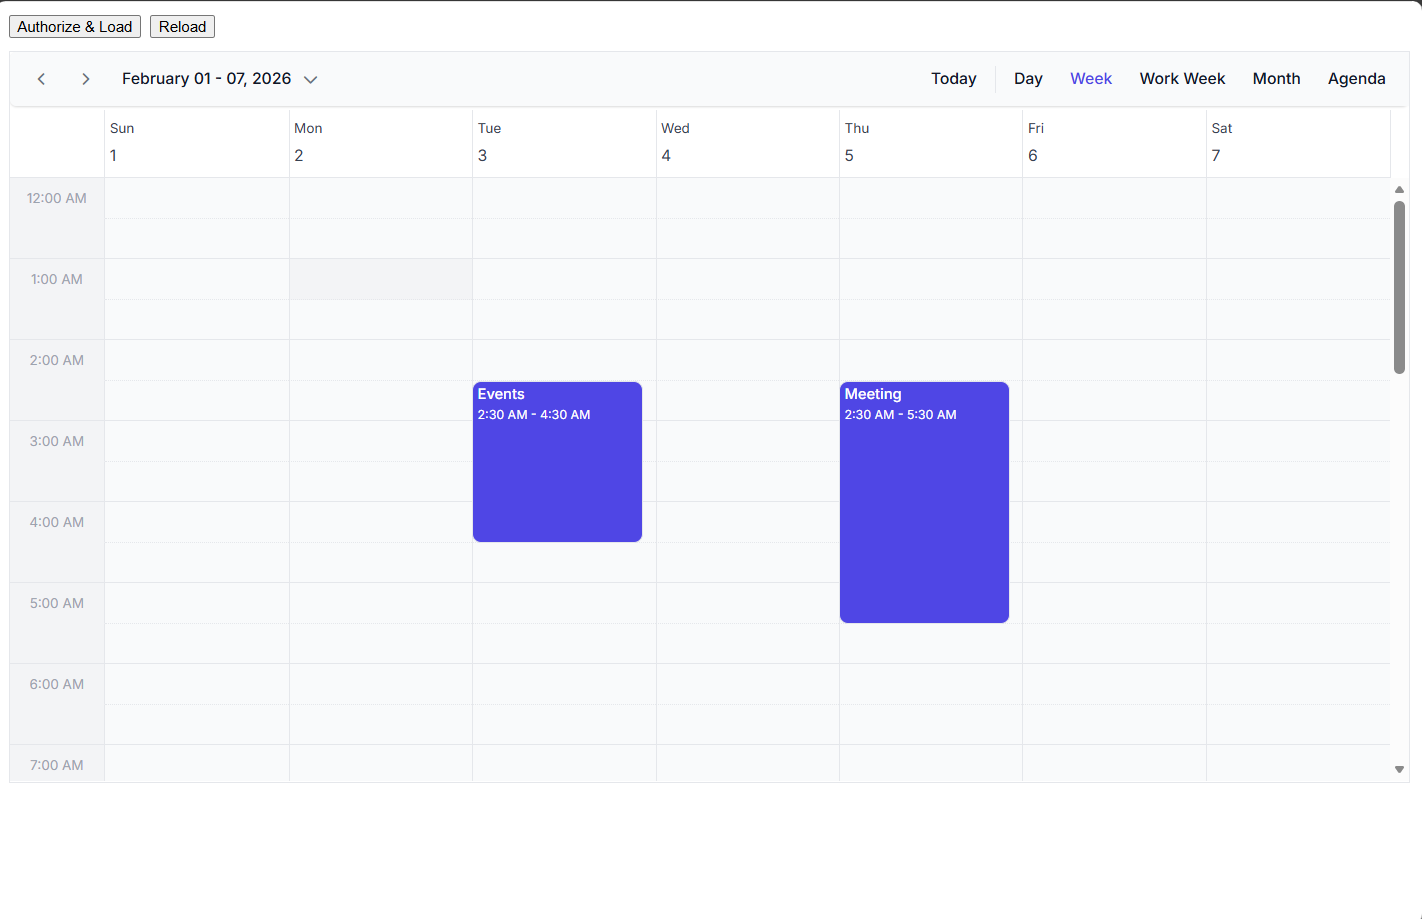
The Scheduler will now display your Google Calendar events and allow you to create, update, and delete events directly.
Testing and verification
Before testing, verify:
- ✅ Your Client ID is correctly configured in
schedule.js - ✅
http://localhost:3000is added to Authorized JavaScript origins in Google Cloud Console - ✅ Google Calendar API is enabled in your Google Cloud project
- ✅ The GIS script has loaded (check browser console for errors)
To test the integration:
- Click “Authorize & Load” button
- Authenticate with your Google account
- Verify your Google Calendar events appear in the Scheduler
- Create a new event in the Scheduler - it should sync to Google Calendar
- Edit or delete events and confirm changes sync to Google Calendar
Troubleshooting: If events don’t load, check the browser console (F12) for API errors. Common issues include incorrect Client ID, missing API permissions, or origin URL mismatch.
Additional resources
- Google Calendar Integration Sample on GitHub - Complete working example
- Google Identity Services Documentation
- Google Calendar API Documentation