React Scheduler with Django REST Framework
The Syncfusion React Scheduler combined with Django REST Framework and MySQL provides a robust, scalable data‑driven application architecture. The Syncfusion React Scheduler delivers a rich, high‑performance client‑side experience.
What is Django REST Framework?
Django is a high‑level Python web framework used to build secure and scalable backend applications quickly. It includes built‑in features such as database ORM, URL routing, authentication, and security, allowing developers to focus on application logic instead of repetitive setup.
Django REST Framework (DRF) extends Django to build RESTful APIs that return data in JSON format. It simplifies creating APIs with support for serializers, authentication, and CRUD operations, making it well suited for frontend applications like React.
What is MySQL?
MySQL is an open‑source relational database management system (RDBMS) used to store and manage structured data efficiently. It enables applications to perform core database operations such as creating, reading, updating, and deleting data using SQL, making it a popular choice for web applications, enterprise systems, and backend services. MySQL is known for its reliability, performance, scalability, and ease of integration with modern programming languages and frameworks.
Prerequisites
- Node.js LTS (v20.19.6+), npm/yarn.
- React 18+ (Vite).
- Python 3.11+.
- Django 5.2+, Django REST Framework.
- MySQL 5.7+.
Setting up the Django REST Framework for MySQL
The Django REST Framework backend serves as the core data service, managing API requests that provide the data powering the Syncfusion React Scheduler.
Step 1: Set up the Django REST Framework server and install required packages
Instructions:
-
Open a terminal (for example, an integrated terminal in Visual Studio Code or Windows Command prompt opened with Win+R, or macOS Terminal launched with Cmd+Space ).
-
Before creating the
Djangoproject, Create a folder namedbackendand set up a virtual environment. A virtual environment keeps project dependencies isolated, ensuring that package installations do not affect other projects.The following commands create and activate the environment:
mkdir backend cd backend python -m venv .venv .venv\Scripts\activate # Mac/Linux: source .venv/bin/activate -
Once the virtual environment is active, install the required packages for Django REST Framework and MySQL support:
pip install django-cors-headers djangorestframework pymysql dj-database-url mysqlclient-
mysqlclientenablesDjangoto connect to MySQL usingnative Cextensions. - For
Djangosettings reference, see databases.
-
-
Initialize the
Djangoproject and Application:For this guide, a
Djangoproject named scheduler is created, along with a new application module, using the following commands:python -m django startproject scheduler . python manage.py startapp schedulerCrudThe schedulerCrud folder is now created. This initializes the project structure and creates the scheduler app, which will contain the models, views, and API logic for the Django REST Framework backend.
Step 2: Configure Django settings
The file scheduler/settings.py is automatically generated when a Django project is created.
This step updates the file to establish the MySQL connection and enable essential Django REST Framework features such as CORS and REST APIs.
Instructions:
- Open the scheduler/settings.py file.
-
Define the MySQL database connection:
The DATABASES section configure Django to connect to MySQL.
[settings.py]
 DATABASES = {
     "default": {
         "ENGINE": "django.db.backends.mysql",
         "NAME": "eventsdb",
         "USER": "django_user",
         "PASSWORD": "Django@123",
         'HOST': 'localhost',   # Or an IP Address that your DB is hosted on
         'PORT': '3306',
         },
     }
Line breakdown:
-
ENGINE: Database backend; for MySQL in Django, set to
"django.db.backends.mysql". This tells Django to use the MySQL database engine. - NAME: Name of the MySQL database to connect to (e.g., eventsdb).
- USER: MySQL database user that Django will use to authenticate (e.g., django_user).
- PASSWORD: Password for the specified MySQL user.
- HOST: Hostname or IP address where the MySQL server is running (commonly localhost for local development).
- PORT: Port number on which the MySQL server listens (default is 3306).
-
ENGINE: Database backend; for MySQL in Django, set to
-
Add required applications:
Add the required packages to the INSTALLED_APPS list to enable REST APIs, CORS, and the schedulerCrud application:
[settings.py]
 INSTALLED_APPS = [
     'django.contrib.admin',
     'django.contrib.auth',
     'django.contrib.contenttypes',
     'django.contrib.sessions',
     'django.contrib.messages',
     'django.contrib.staticfiles',
     'corsheaders',
     'rest_framework',
     'schedulerCrud.apps.SchedulercrudConfig'
 ]
Purpose of key apps:
- rest_framework - Core Django REST Framework functionality support.
- corsheaders - Cross‑origin access for frontend frameworks.
- schedulerCrud - Handles the backend logic for creating, reading, updating, and deleting scheduler-related data (events) and exposes these operations through REST APIs.
-
Configure middleware:
Middleware processes incoming requests before reaching your views.
[settings.py]
 MIDDLEWARE = [
     'corsheaders.middleware.CorsMiddleware',
     'django.middleware.security.SecurityMiddleware',
     'django.contrib.sessions.middleware.SessionMiddleware',
     'django.middleware.common.CommonMiddleware',
     'django.contrib.auth.middleware.AuthenticationMiddleware',
     'django.contrib.messages.middleware.MessageMiddleware',
     'django.middleware.clickjacking.XFrameOptionsMiddleware',
 ]
Important: Place the “CORS” middleware near the top of the list to ensure preflight requests are handled correctly before other middleware processes them.
-
Enable “CORS” for the React development server:
Add the React dev origin so the browser can call the API during development.
[settings.py]
 CORS_ALLOWED_ORIGINS = [
     "http://localhost:5173",
 ]
Note: This configuration prevents cross‑origin access errors while the frontend calls backend APIs during development. Adjust the port number if your React app uses a different development server port.
Step 3: Define models
A Django model defines the way data is stored and accessed in the database. Each model maps to a database table and exposes its fields as structured records that can be queried, created, updated, and deleted by the application and API.
Instructions:
-
Open the (schedulerCrud/models.py) file. This file contains the model definitions for the scheduler app.
-
Add the “ScheduleEvents” model.
The model describes the table structure, including fields for Id, Subject, StartTime, EndTime and Description.
[schedulerCrud/models.py]
from django.db import models class ScheduleEvents(models.Model): Id = models.IntegerField(primary_key=True) Subject = models.CharField(max_length=200, null=True, blank=True) StartTime = models.DateTimeField() EndTime = models.DateTimeField() StartTimezone = models.CharField(max_length=200, null=True, blank=True) EndTimezone = models.CharField(max_length=200, null=True, blank=True) Location = models.CharField(max_length=200, null=True, blank=True) Description = models.CharField(max_length=200, null=True, blank=True) IsAllDay = models.BooleanField() RecurrenceID = models.IntegerField(null=True, blank=True) FollowingID = models.IntegerField(null=True, blank=True) RecurrenceRule = models.CharField(max_length=200, null=True, blank=True) RecurrenceException = models.CharField(max_length=200, null=True, blank=True) IsReadonly = models.BooleanField(null=True, blank=True) IsBlock = models.BooleanField(null=True, blank=True) class Meta: db_table = 'schedule_events' -
Create database migrations:
Django migrations are the mechanism that convert model definitions into real MySQL tables and columns. Whenever a model is created or modified, migrations ensure the database structure stays updated.
-
Generate a new migration
Open the Visual Studio Code Terminal, navigate to the
backendfolder and run the following command:python manage.py makemigrationsExplanation:
- Scans the models.py file for any new or updated models.
- Creates a migration file inside the (schedulerCrud/migrations) folder.
- This migration file acts as a blueprint describing the required database changes.
-
Apply the migration to the database
After the migration file is created, run the next command:
python manage.py migrateExplanation:
- Reads the migration blueprint created earlier.
- Creates the required MySQL tables.
- Adds all fields defined in the model.
- Updates or modifies existing tables if the model structure changed.
This step updates the actual database and ensures the structure matches the “ScheduleEvents” model.
-
Purpose of migrations:
Migrations act as a bridge between the
Pythonmodels and the MySQL database.- Every change in a model (new field, renamed field, removed field, new model) is recorded as a migration.
- These changes are applied safely without writing SQL manually.
- The database structure remains consistent across all environments (development, staging, production).
- Whenever a model is modified in the future:
makemigrations → migrateThis sequence updates the database schema automatically.
-
Step 4: Configure API routing
API routing defines the URLs through which the application exposes CRUD operations for schedule-events records.
A Django REST Framework router automatically generates RESTful routes for the scheduler application, allowing the API to handle retrieving, creating, updating, and deleting records under a single endpoint.
Instructions:
-
Open the following auto generated file named (scheduler/urls.py). This file controls all top‑level routes in the Django project.
-
Register the “GetData” and “UpdateData” with a Django REST Framework router:
[scheduler/urls.py]
 from django.urls import path, re_path
 from schedulerCrud import views
 from django.contrib import admin

 # urls.py
 urlpatterns = [
     path('Home/GetData', views.GetData),
     path('Home/UpdateData', views.UpdateData),
     path('admin/', admin.site.urls),
 ]
Step 5: Serializer implementation
-
Create the serializer that converts ScheduleEvents model instances to/from JSON and validates incoming API data. This enables Django REST Framework to reliably handle create, read, update, and delete operations.
-
Create a following file named serializers.py in schedulerCrud folder.
[schedulerCrud/serializers.py]
 from rest_framework import serializers
 from schedulerCrud.models import ScheduleEvents

 class ScheduleEventsSerializer(serializers.ModelSerializer):
     class Meta:
         model = ScheduleEvents
         fields = '__all__'
Step 6: View implementation
The final part is the Views, which receives all incoming requests and routes them to the appropriate custom services. Update (schedulerCrud/views.py) with the following code to properly wire all services to the views:
[schedulerCrud/views.py]
from rest_framework.parsers import JSONParser
from django.http.response import JsonResponse
from schedulerCrud.serializers import ScheduleEventsSerializer
from schedulerCrud.models import ScheduleEvents

def GetData(request):

        schedule_events = ScheduleEvents.objects.all()
        schedule_events_serializer=ScheduleEventsSerializer(schedule_events,many=True)
        return JsonResponse(schedule_events_serializer.data,safe=False)

def UpdateData(request):
    if request.method == 'POST':
        data = JSONParser().parse(request)
        if 'added' in data and len(data['added']) > 0:
            for item in data['added']:
                schedule_events_serializer = ScheduleEventsSerializer(data=item)
                if schedule_events_serializer.is_valid():
                    schedule_events_serializer.save()
                else:
                    return JsonResponse(schedule_events_serializer.errors, safe=False, status=400)

        if 'changed' in data and len(data['changed']) > 0:
            for item in data['changed']:
                event = ScheduleEvents.objects.get(pk=item['Id'])
                schedule_events_serializer = ScheduleEventsSerializer(event, data=item)
                if schedule_events_serializer.is_valid():
                    schedule_events_serializer.save()
                else:
                    return JsonResponse(schedule_events_serializer.errors, safe=False, status=400)

        if 'deleted' in data and len(data['deleted']) > 0:
            for item in data['deleted']:
                event = ScheduleEvents.objects.get(pk=item['Id'])
                event.delete()

        return GetData(request)

    else:
        return JsonResponse({"error": "Invalid method"}, status=405)
Integrate Syncfusion React Scheduler with Django REST Framework
The Syncfusion React Scheduler is a powerful, high‑performance component designed to display and manage time‑based data such as appointments, meetings, and events. It provides rich scheduling capabilities, including multiple calendar views, event editing, recurring events, drag‑and‑drop interactions, and date‑based navigation. Follow these steps to render the Scheduler and integrate it with a Django backend for seamless event management.
Step 1 : Creating the React Schedule application
Create a new React application using create vite@latest, which provides a faster development environment, smaller bundle sizes, and optimized builds.
Open a Visual Studio Code terminal or Command prompt and run the below command:
npm create vite@latest Schedule -- --template react-ts
cd Schedule
This command creates a React application named Schedule with the essential folder structure and files required to begin development immediately.
The integration process begins by installing the required Syncfusion React Scheduler packages before establishing the DRF API.
Step 2: Install Syncfusion Scheduler packages
Install the necessary Syncfusion packages using the below command in Visual Studio Code terminal or Command prompt:
npm install @syncfusion/ej2-react-schedule --save- @syncfusion/ej2-react-schedule – Required package for integrating the Syncfusion Scheduler component in React.
Step 3: Including required Syncfusion stylesheets
Once the dependencies are installed, the required CSS files are made available in the (../node_modules/@syncfusion) package directory, and the corresponding CSS references are included in the App.css file.
[src/App.css]
@import "../node_modules/@syncfusion/ej2-tailwind3-theme/styles/schedule/index.css";For this project, the tailwind3 theme is used. A different theme can be selected or the existing theme can be customized based on project requirements. Refer to the Syncfusion React Components Appearance documentation to learn more about theming and customization options.
Step 4: Configure DataManager with Django REST Framework (DRF)
The Syncfusion DataManager acts as a communication layer between the React Scheduler and backend services. It sends all Scheduler operations—such as reading data and performing CRUD actions to the server in a standardized format.
The UrlAdaptor is a built‑in adaptor that formats requests for REST-style endpoints, like the Django REST Framework API. It serializes all Scheduler actions and posts them to the DRF API endpoint, then processes the JSON responses returned by the server.
When using DataManager with UrlAdaptor, the server is expected to return a specific response structure:
- result: The list of data displayed in the current view, supporting on‑demand loading for large datasets.
This response format ensures seamless interaction between the React Scheduler and backend services, enabling all data operations to work consistently.
Instructions:
- Open the App.tsx file.
-
Create a
DataManagerinstance with theUrlAdaptorinside the React component and point it to the DRF endpoint. ThisDataManagerwill serialize all Scheduler interactions (data and CRUD) and post them to the DRF server.[App.tsx]
 import { DataManager, UrlAdaptor } from '@syncfusion/ej2-data';

 let dataManager: DataManager = new DataManager({
   url: 'http://127.0.0.1:8000/Home/GetData',
   crudUrl: 'http://127.0.0.1:8000/Home/UpdateData',
   adaptor: new UrlAdaptor(),
   crossDomain: true
 });
Explanation:
-
url – Base API endpoint used to fetch data. This endpoint returns the initial dataset displayed in the component (e.g., a
GETrequest to retrieve records). -
crudUrl – API endpoint used to perform Create, Update, and Delete operations. Insert, update, and delete requests are sent to this URL (often via
POSTwith action-specific payloads). -
adaptor – Specifies how component operations are translated into HTTP requests.
-
UrlAdaptorconverts scheduler operations into standard REST-like requests compatible with typical backends (e.g., Django/ASP.NET/Node).
-
- crossDomain – Enables communication with a backend running on a different port.
-
url – Base API endpoint used to fetch data. This endpoint returns the initial dataset displayed in the component (e.g., a
-
Configure the Scheduler Component.
[App.tsx]
 import React from 'react';
 import './App.css';
 import { ScheduleComponent, Day, Week, WorkWeek, Month, Agenda, Inject, DragAndDrop, Resize, type EventSettingsModel } from '@syncfusion/ej2-react-schedule';


 function App() {
   const eventSettings: EventSettingsModel= { dataSource: dataManager };
   return (
     <ScheduleComponent eventSettings={eventSettings} height="650px">
       <Inject services={[Day, Week, WorkWeek, Month, Agenda, DragAndDrop, Resize]}/>
     </ScheduleComponent>
   );
 }

 export default App;
Testing the integration
Before running the full application, verify that the Django backend and React frontend can communicate properly.
Verification Steps:
-
Verify Django server is running - Navigate to
http://127.0.0.1:8000/Home/GetDatain your browser. It should return a JSON array of schedule events (initially empty if no data is inserted). -
Verify React development server is running - The React app should be accessible at
http://localhost:5173. Check the browser console for any CORS or network errors. -
Check the Network tab - Open browser Developer Tools (F12) and navigate to the Network tab. Trigger a Scheduler action (like creating an event) and verify that the request is sent to the Django backend with a 200/201 status.
Troubleshooting: If you see CORS errors, verify that the
CORS_ALLOWED_ORIGINSin Django settings includes your React development server URL.
Performing CRUD operations
The Scheduler Application provides full CRUD (Create, Read, Update, Delete) capabilities for managing scheduling data. Users can create new schedule entries, modify existing records, or remove events. All operations are processed through the application’s interface and are reliably persisted to the backend database via Django REST Framework (DRF), ensuring accurate and up‑to‑date scheduling information across the system.
Insert
Insert creates a new schedule event in the database using the values provided from the Scheduler.
def UpdateData(request):
    if request.method == 'POST':
        data = JSONParser().parse(request)

        if 'added' in data and len(data['added']) > 0:
            for item in data['added']:
                schedule_events_serializer = ScheduleEventsSerializer(data=item)
                if schedule_events_serializer.is_valid():
                    schedule_events_serializer.save()
                else:
                    return JsonResponse(schedule_events_serializer.errors, safe=False, status=400)

        return GetData(request)

    else:
        return JsonResponse({"error": "Invalid method"}, status=405)
Explanation:
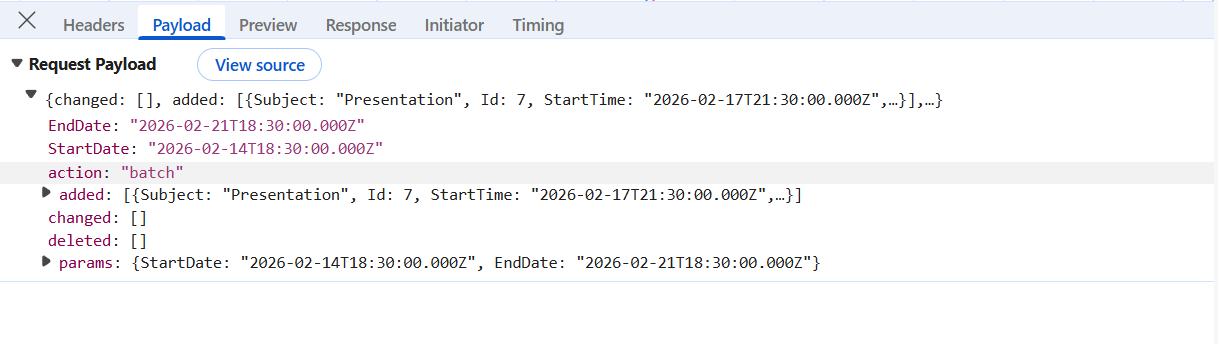
- When a user creates a new event in the Scheduler, it posts a payload that includes an added array with one or more new event objects.
- On the server, each object in added is validated by ScheduleEventsSerializer and saved inside a transaction to ensure consistency.
- After creation, the endpoint returns the latest event list, allowing the Scheduler to immediately show the server‑authoritative data (including any database defaults).
Tip: The
addedarray is generated automatically by the Scheduler whenever a user creates a new event. The backend validates the data and returns the updated full list of events.
Below image shows the inserted data passed to the DRF:
Update
Update modifies an existing schedule event using the edited values sent from the Scheduler.
def UpdateData(request):
    if request.method == 'POST':
        data = JSONParser().parse(request)

        if 'changed' in data and len(data['changed']) > 0:
            for item in data['changed']:
                event = ScheduleEvents.objects.get(pk=item['Id'])
                schedule_events_serializer = ScheduleEventsSerializer(event, data=item)
                if schedule_events_serializer.is_valid():
                    schedule_events_serializer.save()
                else:
                    return JsonResponse(schedule_events_serializer.errors, safe=False, status=400)

        return GetData(request)

    else:
        return JsonResponse({"error": "Invalid method"}, status=405)
Explanation:
- The endpoint locates the target event by its primary key
Id. - The serializer validates the new values and writes changes atomically within the same transaction as inserts.
- The endpoint returns the refreshed dataset so the Scheduler remains synchronized with server data.
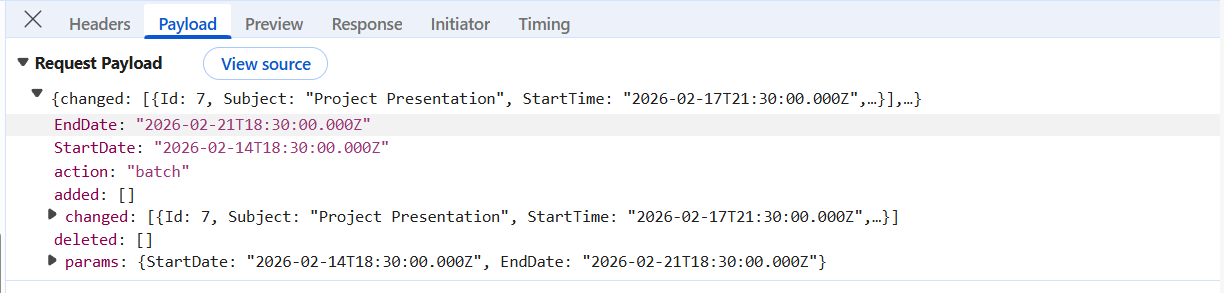
Note: Only the fields that have been modified are included in the
changedarray, allowing for efficient partial updates.
Below image shows the updated data passed to the DRF:
Delete
Delete removes an existing schedule event identified by its primary key sent by the Scheduler.
def UpdateData(request):
    if request.method == 'POST':
        data = JSONParser().parse(request)

        if 'deleted' in data and len(data['deleted']) > 0:
            for item in data['deleted']:
                event = ScheduleEvents.objects.get(pk=item['Id'])
                event.delete()

        return GetData(request)

    else:
return JsonResponse({"error": "Invalid method"}, status=405)Explanation:
- The Scheduler posts a
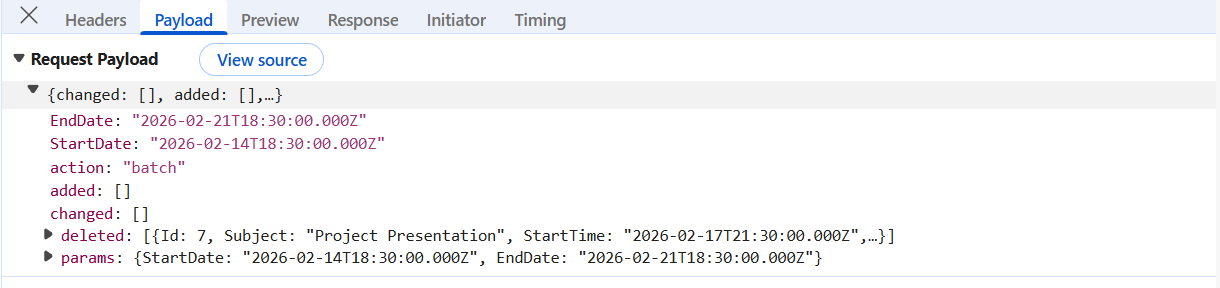
deletedarray with one or more items containing the identifierId. - The endpoint deletes each matching event inside the same transaction, ensuring the operation is consistent with any other changes posted together.
- After deletion, the endpoint returns the updated event list for immediate UI refresh.
Warning: Delete operations cannot be undone. Ensure proper validation and user confirmation before removing events from the database.
Below image shows the deleted key passed to the DRF:
Running the application
Open a terminal or Command prompt. Start the backend server first, and then run the React Schedule.
Run the backend
Run the following commands to start the server:
python manage.py makemigrations
python manage.py migrate
python manage.py runserver 8000
Run the schedule
Execute the below commands to run the Scheduler application:
npm run devPlease find the sample in this GitHub location.
Summary
This guide walks through the following key areas:
- Prerequisites. 🔗
- Setting up the Django REST Framework for MySQL. 🔗
- Create and configure the React application with the Syncfusion React Scheduler. 🔗
- Performing CRUD operations. 🔗
- Run the Django and React applications locally for development. 🔗
The application now offers a reliable, scalable solution for managing scheduler events with a robust Django REST API on MySQL and a Syncfusion React Scheduler front end.