PostgreSQL Data Binding in Blazor Scheduler
The Blazor Scheduler component supports binding data from a PostgreSQL database by using Entity Framework Core (EF Core). This approach provides a maintainable and type-safe alternative to raw SQL queries for managing appointments and calendar events.
What is Entity Framework Core?
Entity Framework Core (EF Core) is a software tool that simplifies database operations in .NET applications. It serves as a bridge between C# code and databases like PostgreSQL. The key benefits of EF Core are:
Automatic SQL Generation: Entity Framework Core generates optimized SQL queries automatically, eliminating the need to write raw SQL code.
Type Safety: Work with strongly-typed objects instead of raw SQL strings, reducing errors.
Built-in Security: Automatic parameterization prevents SQL injection attacks.
Version Control for Databases: Manage database schema changes version-by-version through migrations.
Familiar Syntax: Use LINQ (Language Integrated Query) syntax, which is more intuitive than raw SQL strings.
What is Npgsql Entity Framework Core Provider?
The Npgsql.EntityFrameworkCore.PostgreSQL package is the official Entity Framework Core provider for PostgreSQL. It acts as a bridge between EF Core and PostgreSQL, allowing applications to read, write, update, and delete appointment data in a PostgreSQL database.
Prerequisites
Ensure the following software and packages are installed before you proceed:
| Software/Package | Version | Purpose |
|---|---|---|
| Visual Studio 2026 | 18.0 or later | Development IDE with Blazor workload |
| .NET SDK | net10.0 or compatible | Runtime and build tools |
| PostgreSQL Server | 12 or later | Database server |
| pgAdmin 4 | Latest | PostgreSQL GUI management tool |
| Syncfusion.Blazor.Schedule | Latest Version | Blazor Scheduler and UI components |
| Syncfusion.Blazor.Themes | Latest Version | Styling for Blazor Scheduler components |
| Npgsql.EntityFrameworkCore.PostgreSQL | 10.0.2 or later | PostgreSQL provider for Entity Framework Core |
| Microsoft.EntityFrameworkCore.Design | 10.0.0 or later | Design-time tools for migrations |
Setting Up the PostgreSQL Environment for Entity Framework Core
Step 1: Create a Blazor Web App
Create a Blazor Web App by using Visual Studio 2026 or the .NET CLI.
Using Visual Studio 2026 or later:
- Open Visual Studio 2026
- Click Create a new project
- Search for Blazor Web App template
- Configure project name as BlazorSchedulerApp
- Select .NET 10.0 as the target framework
- Set Interactive render mode to Server
- Set Interactivity location to Per page/component
- Click Create
Using .NET CLI:
dotnet new blazor -n BlazorSchedulerApp --interactivity Server
cd BlazorSchedulerApp
Configure the interactive render mode to InteractiveServer during project creation, as the Blazor Scheduler requires interactivity for CRUD operations.
Step 2: Install Required NuGet Packages
Before installing the required NuGet packages, create a new Blazor Web Application by using the default template. This template automatically generates the starter files, such as Program.cs, appsettings.json, the wwwroot folder, and the Components folder.
For this guide, a Blazor application named BlazorSchedulerApp has been created. After the project is set up, install the required NuGet packages. These packages enable EF Core and PostgreSQL integration.
Method 1: Using Package Manager Console
- Open Visual Studio 2026.
- Navigate to Tools → NuGet Package Manager → Package Manager Console.
-
Run the following commands:
 Install-Package Syncfusion.Blazor.Schedule
 Install-Package Syncfusion.Blazor.Themes
 Install-Package Npgsql.EntityFrameworkCore.PostgreSQL
 Install-Package Microsoft.EntityFrameworkCore.Design
Method 2: Using .NET CLI
Open a terminal in the project directory and run:
dotnet add package Syncfusion.Blazor.Schedule
dotnet add package Syncfusion.Blazor.Themes
dotnet add package Npgsql.EntityFrameworkCore.PostgreSQL
dotnet add package Microsoft.EntityFrameworkCore.Design
Project File Reference
The installed packages appear in the BlazorSchedulerApp.csproj file:
<ItemGroup>
    <PackageReference Include="Npgsql.EntityFrameworkCore.PostgreSQL" Version="10.0.2" />
    <PackageReference Include="Microsoft.EntityFrameworkCore.Design" Version="10.0.0">
      <IncludeAssets>runtime; build; native; contentfiles; analyzers; buildtransitive</IncludeAssets>
      <PrivateAssets>all</PrivateAssets>
    </PackageReference>
    <PackageReference Include="Syncfusion.Blazor.Schedule" Version="*" />
    <PackageReference Include="Syncfusion.Blazor.Themes" Version="*" />
</ItemGroup>
All required packages are now installed.
Note: After installing the packages, build the project to ensure that all dependencies are restored correctly:
dotnet build
Step 3: Create the Data Model
A data model is a C# class that represents the structure of a database table. This model defines the properties that correspond to the columns in the Appointments table.
Instructions:
- Create a new folder named Models in the Blazor application project.
- Inside the Models folder, create a new file named
Appointment.cs. -
Define the
Appointmentclass with the following code:[Appointment.cs]
 using System.ComponentModel.DataAnnotations;

 namespace BlazorSchedulerApp.Models
 {
     /// <summary>
     /// Represents an appointment record mapped to the 'Appointments' table in the database.
     /// This model defines the structure of appointment-related data used throughout the application.
     /// </summary>
     public class Appointment
     {
         /// <summary>
         /// Gets or sets the unique identifier for the appointment record.
         /// This is the primary key and auto-incremented by the database.
         /// </summary>
         [Key]
         public int Id { get; set; }

         /// <summary>
         /// Gets or sets the subject or title of the appointment.
         /// Maximum length of 200 characters.
         /// </summary>
         [StringLength(200)]
         public string Subject { get; set; } = string.Empty;

         /// <summary>
         /// Gets or sets the detailed description of the appointment.
         /// Maximum length of 500 characters.
         /// </summary>
         [StringLength(500)]
         public string Description { get; set; } = string.Empty;

         /// <summary>
         /// Gets or sets the start date and time of the appointment.
         /// This field is required.
         /// </summary>
         [Required]
         public DateTime StartTime { get; set; }

         /// <summary>
         /// Gets or sets the end date and time of the appointment.
         /// This field is required.
         /// </summary>
         [Required]
         public DateTime EndTime { get; set; }

         /// <summary>
         /// Gets or sets the location where the appointment takes place.
         /// Maximum length of 200 characters.
         /// </summary>
         [StringLength(200)]
         public string Location { get; set; } = string.Empty;

         /// <summary>
         /// Gets or sets a value indicating whether the appointment spans the entire day.
         /// </summary>
         public bool IsAllDay { get; set; }

         /// <summary>
         /// Gets or sets the recurrence rule for repeating appointments.
         /// Uses iCalendar RRULE format (e.g., "FREQ=DAILY;INTERVAL=1").
         /// Maximum length of 50 characters.
         /// </summary>
         [StringLength(50)]
         public string RecurrenceRule { get; set; } = string.Empty;

         /// <summary>
         /// Gets or sets the ID of the parent appointment in a recurrence series.
         /// Links recurring appointment instances to their parent.
         /// </summary>
         public int? RecurrenceID { get; set; }

         /// <summary>
         /// Gets or sets the exception dates for recurring appointments.
         /// Stores dates when the recurring appointment should not occur.
         /// </summary>
         public string? RecurrenceException { get; set; }

         /// <summary>
         /// points to parent series Id
         /// </summary>
         public int? FollowingID { get; set; }
     }
 }
Explanation:
- The
[Key]attribute marks theIdproperty as the primary key, which is a unique identifier for each record. - Each property represents a column in the database table.
- The
?symbol indicates that a property is nullable (can be empty). - The model includes comprehensive XML documentation for each property.
-
StringLengthattributes enforce maximum character limits for text fields. - The model supports recurring appointments through
RecurrenceRule,RecurrenceID, andRecurrenceExceptionproperties.
The data model has been successfully created.
Note: The
Subjectproperty does not have the[Required]attribute so that empty titles are allowed. The service layer provides the default value “Add Title” when the subject is empty.
Step 4: Configure the DbContext
A DbContext is a special class that manages the connection between the application and the PostgreSQL database. It handles database operations such as saving, updating, deleting, and retrieving appointment data.
Instructions:
- Create a new folder named Data in the Blazor application project.
- Inside the Data folder, create a new file named
ApplicationDbContext.cs. -
Define the
ApplicationDbContextclass with the following code:[ApplicationDbContext.cs]
 using Microsoft.EntityFrameworkCore;
 using BlazorSchedulerApp.Models;

 namespace BlazorSchedulerApp.Data
 {
     /// <summary>
     /// DbContext for Appointment entity
     /// Manages database connections and entity configurations for the Appointment Scheduler
     /// This context bridges the application with PostgreSQL database
     /// </summary>
     public class ApplicationDbContext : DbContext
     {
         /// <summary>
         /// Initializes a new instance of the ApplicationDbContext class.
         /// </summary>
         /// <param name="options">The options to be used by a DbContext</param>
         public ApplicationDbContext(DbContextOptions<ApplicationDbContext> options)
             : base(options)
         {
         }

         /// <summary>
         /// Gets or sets the DbSet for Appointment entities.
         /// Represents the collection of all appointments in the database.
         /// </summary>
         public DbSet<Appointment> Appointments { get; set; } = null!;

         /// <summary>
         /// Configures the entity mappings, constraints, and database-specific configurations.
         /// This method is called by Entity Framework Core during model creation.
         /// </summary>
         /// <param name="modelBuilder">Provides a simple API for configuring the EF model</param>
         protected override void OnModelCreating(ModelBuilder modelBuilder)
         {
             base.OnModelCreating(modelBuilder);

             // Configure the Appointment entity
             modelBuilder.Entity<Appointment>(entity =>
             {
                 // Define primary key
                 entity.HasKey(e => e.Id);

                 // Configure string properties with max length constraints
                 entity.Property(e => e.Subject)
                     .IsRequired()
                     .HasMaxLength(200);

                 entity.Property(e => e.Description)
                     .HasMaxLength(500);

                 entity.Property(e => e.Location)
                     .HasMaxLength(200);

                 // Configure required date/time properties
                 entity.Property(e => e.StartTime)
                     .IsRequired();

                 entity.Property(e => e.EndTime)
                     .IsRequired();

                 // Configure recurrence-related properties
                 entity.Property(e => e.RecurrenceRule)
                     .HasMaxLength(50);
                 // Helpful index: find all edited occurrences for a parent quickly
                 entity.HasIndex(e => e.RecurrenceID);

                 entity.Property(x => x.FollowingID);

                 entity.HasIndex(x => x.FollowingID);
             });
         }
     }
 }
Explanation:
- The
DbContextclass inherits from Entity Framework’sDbContextbase class. - The
Appointmentsproperty represents theAppointmentstable in the database. - The
OnModelCreatingmethod configures how the database columns should behave (maximum length, required/optional). - By convention, Entity Framework Core will create a table named
Appointmentsbased on theDbSet<Appointment>property name.
Why the DbContext is required:
- It connects the application to the PostgreSQL database.
- It manages all database operations.
- It maps C# models to actual database tables.
- It configures how data should be validated and stored.
Without this class, Entity Framework Core will not know where to save data or how to interact with the Appointments table. The DbContext has been successfully configured.
Step 5: Configure the Connection String
A connection string contains the information needed to connect the application to the PostgreSQL database, including the server address, database name, and authentication credentials.
Instructions:
- Open the
appsettings.jsonfile in the project root. -
Update the
ConnectionStringssection with the PostgreSQL connection details:{ "ConnectionStrings": { "DefaultConnection": "Host=localhost;Port=5432;Database=SchedulerEvents;Username=postgres;Password=your_password" }, "Logging": { "LogLevel": { "Default": "Information", "Microsoft.AspNetCore": "Warning" } }, "AllowedHosts": "*" }
Connection String Components:
| Component | Description |
|---|---|
| Host | The address of the PostgreSQL server (localhost for local development) |
| Port | The port number on which PostgreSQL is running (default is 5432) |
| Database | The database name (in this case, SchedulerEvents) |
| Username | The PostgreSQL username (default is postgres) |
| Password | The password for the PostgreSQL user account |
Important: Replace
your_passwordwith your actual PostgreSQL password.
Security Note: For production environments, store sensitive credentials in environment variables or Azure Key Vault instead of storing them in
appsettings.json. For example, usePassword=${DB_PASSWORD}and set theDB_PASSWORDenvironment variable on the deployment server.
The database connection string has been configured successfully.
Step 6: Create the Service Class
A service class is an intermediary layer that handles all database operations. This class uses Entity Framework Core to communicate with the PostgreSQL database.
Instructions:
- Create a new folder named Services in the Blazor application project.
- Inside the Services folder, create a new file named
AppointmentService.cs. -
Define the
AppointmentServiceclass with the following code:[AppointmentService.cs]
 using Microsoft.EntityFrameworkCore;
 using BlazorSchedulerApp.Data;
 using BlazorSchedulerApp.Models;

 namespace BlazorSchedulerApp.Services
 {
     /// <summary>
     /// Service class for Appointment entity using Entity Framework Core
     /// Handles all CRUD operations and business logic for appointments
     /// Communicates with PostgreSQL database through ApplicationDbContext
     /// </summary>
     public class AppointmentService
     {
         private readonly ApplicationDbContext _context;

         public AppointmentService(ApplicationDbContext context)
         {
             _context = context;
         }

         /// <summary>
         /// Retrieves all appointments from the database
         /// </summary>
         /// <returns>List of all appointments</returns>
         public async Task<List<Appointment>> GetAllAppointmentsAsync()
         {
             try
             {
                 return await _context.Appointments.ToListAsync();
             }
             catch (Exception ex)
             {
                 Console.WriteLine($"Error getting appointments: {ex.Message}");
                 return new List<Appointment>();
             }
         }

         /// <summary>
         /// Retrieves a single appointment by ID
         /// </summary>
         /// <param name="id">The appointment ID to retrieve</param>
         /// <returns>The appointment if found, otherwise null</returns>
         public async Task<Appointment?> GetAppointmentByIdAsync(int id)
         {
             try
             {
                 return await _context.Appointments.FindAsync(id);
             }
             catch (Exception ex)
             {
                 Console.WriteLine($"Error getting appointment: {ex.Message}");
                 return null;
             }
         }

         /// <summary>
         /// Creates a new appointment in the database
         /// </summary>
         /// <param name="appointment">The appointment model to add</param>
         /// <returns>The created appointment with database-generated ID</returns>
         public async Task<Appointment> CreateAppointmentAsync(Appointment appointment)
         {
             try
             {
                 // Reset Id to 0 to let database generate it
                 appointment.Id = 0;

                 // Provide default subject if empty
                 if (string.IsNullOrWhiteSpace(appointment.Subject))
                 {
                     appointment.Subject = "Add Title";
                 }

                 _context.Appointments.Add(appointment);
                 await _context.SaveChangesAsync();
                 return appointment;
             }
             catch (Exception ex)
             {
                 Console.WriteLine($"Error creating appointment: {ex.Message}");
                 throw;
             }
         }

         /// <summary>
         /// Updates an existing appointment in the database
         /// </summary>
         /// <param name="appointment">The appointment model with updated values</param>
         /// <returns>The updated appointment</returns>
         public async Task<Appointment> UpdateAppointmentAsync(Appointment appointment)
         {
             try
             {
                 // Provide default subject if empty
                 if (string.IsNullOrWhiteSpace(appointment.Subject))
                 {
                     appointment.Subject = "Add Title";
                 }

                 // Detach any existing tracked entity with same Id to avoid tracking conflicts
                 var existingEntity = _context.Appointments.Local
                     .FirstOrDefault(e => e.Id == appointment.Id);
                 if (existingEntity != null)
                 {
                     _context.Entry(existingEntity).State = EntityState.Detached;
                 }

                 _context.Entry(appointment).State = EntityState.Modified;
                 await _context.SaveChangesAsync();
                 return appointment;
             }
             catch (Exception ex)
             {
                 Console.WriteLine($"Error updating appointment: {ex.Message}");
                 throw;
             }
         }

         /// <summary>
         /// Deletes an appointment from the database
         /// </summary>
         /// <param name="id">The appointment ID to delete</param>
         /// <returns>True if deletion was successful, otherwise false</returns>
         public async Task<bool> DeleteAppointmentAsync(int id)
         {
             try
             {
                 var appointment = await _context.Appointments.FindAsync(id);
                 if (appointment != null)
                 {
                     _context.Appointments.Remove(appointment);
                     await _context.SaveChangesAsync();
                     return true;
                 }
                 return false;
             }
             catch (Exception ex)
             {
                 Console.WriteLine($"Error deleting appointment: {ex.Message}");
                 return false;
             }
         }
     }
 }
Service Layer Benefits:
- Encapsulates database logic away from UI components
- Provides error handling and logging
- Allows for easier testing and maintenance
- Handles Entity Framework change tracking issues
Error Handling in Service:
Each method includes try-catch blocks to:
- Log errors to console for debugging
- Prevent application crashes
- Return safe default values (empty list, null, false)
The service class has been created successfully.
Step 7: Register Services in Program.cs
The Program.cs file is where application services are registered and configured. Update this file to enable EF Core with PostgreSQL and the service pattern.
Instructions:
- Open the
Program.csfile at the project root. -
Add the following code:
[Program.cs]
 using BlazorSchedulerApp.Components;
 using BlazorSchedulerApp.Data;
 using BlazorSchedulerApp.Services;
 using Microsoft.EntityFrameworkCore;
 using Syncfusion.Blazor;

 // Configure AppContext to handle DateTime timestamps for PostgreSQL

 AppContext.SetSwitch("Npgsql.EnableLegacyTimestampBehavior", true);

 var builder = WebApplication.CreateBuilder(args);

 // Add services to the container

 builder.Services.AddRazorComponents()
     .AddInteractiveServerComponents();

 // Register Blazor service

 builder.Services.AddSyncfusionBlazor();

 // Get the connection string from appsettings.json

 var connectionString = builder.Configuration.GetConnectionString("DefaultConnection");

 if (string.IsNullOrEmpty(connectionString))
 {
     throw new InvalidOperationException("Connection string 'DefaultConnection' not found in configuration.");
 }

 builder.Services.AddDbContext<ApplicationDbContext>(options =>
 {
     options.UseNpgsql(connectionString);

     if (builder.Environment.IsDevelopment())
     {
         options.EnableSensitiveDataLogging();
         options.EnableDetailedErrors();
     }
 });

 builder.Services.AddScoped<AppointmentService>();

 var app = builder.Build();

 AppServices.Root = app.Services;

 // Configure the HTTP request pipeline
 if (!app.Environment.IsDevelopment())
 {
     app.UseExceptionHandler("/Error", createScopeForErrors: true);
     app.UseHsts();
 }

 app.UseHttpsRedirection();
 app.UseAntiforgery();

 app.MapStaticAssets();
 app.MapRazorComponents<App>()
     .AddInteractiveServerRenderMode();

 app.Run();

 public static class AppServices
 {
     public static IServiceProvider? Root { get; set; }
 }
Explanation:
-
AppContext.SetSwitch("Npgsql.EnableLegacyTimestampBehavior", true): Prevents PostgreSQL from automatically convertingDateTimevalues to UTC, avoiding timezone offset issues. -
AddSyncfusionBlazor(): Registers Blazor components (Scheduler, themes, etc.). -
AddDbContext<ApplicationDbContext>: Registers the DbContext with PostgreSQL as the database provider usingUseNpgsql(). - Connection String Validation: Ensures the connection string is configured before attempting to connect.
-
EnableSensitiveDataLogging(): Enabled in development to log detailed information about database operations (useful for debugging). -
EnableDetailedErrors(): Provides more detailed error messages during development. -
AddScoped<AppointmentService>: Registers the service as a scoped service, creating a new instance for each HTTP request. -
AddRazorComponents()andAddInteractiveServerComponents(): Enables Blazor server-side rendering with interactive components. -
AppServices.Root:app.Servicesstores the application’s root service provider so theCustomAdaptorcan create new DI scopes for resolving services at runtime.
The service registration has been completed successfully.
Integrating Blazor Scheduler
Step 1: Install and Configure Blazor Scheduler Components
Syncfusion provides pre-built UI components such as Scheduler, which is used to display and manage calendar events and appointments.
Instructions:
-
The
Syncfusion.Blazor.Schedulepackage was installed in Step 2 of the previous section. -
Import the required namespaces in the
Components/_Imports.razorfile:@using BlazorSchedulerApp.Models @using BlazorSchedulerApp.Services @using Syncfusion.Blazor @using Syncfusion.Blazor.Schedule @using Syncfusion.Blazor.Data -
Add the stylesheet and scripts in the
Components/App.razorfile. Find the<head>and<body>sections and add the following:<head> <!-- Blazor Stylesheet --> <link href="_content/Syncfusion.Blazor.Themes/bootstrap5.3.css" rel="stylesheet" /> </head> <body> <!-- Blazor Scripts --> <script src="_content/Syncfusion.Blazor.Core/scripts/syncfusion-blazor.min.js" type="text/javascript"></script> </body>
Theme Options:
-
bootstrap5.3.css- Bootstrap 5.3 theme (used in this example) -
material3.css- Material Design 3 theme -
fluent.css- Microsoft Fluent Design theme -
tailwind3.css- Tailwind CSS theme
For this project, the bootstrap5.3 theme is used. A different theme can be selected or the existing theme can be customized based on project requirements. Refer to the Blazor Components Appearance documentation to learn more about theming and customization options.
Critical: The Syncfusion JavaScript file (
syncfusion-blazor.min.js) is required for Blazor components to work with InteractiveServer render mode. Without this script, you will see JavaScript interop errors.
Blazor components are now configured and ready to use. For additional guidance, refer to the Scheduler component’s getting-started documentation.
Step 2: Create and Apply Database Migrations
Before creating the Blazor Scheduler component, generate Entity Framework Core migrations to create the database schema.
Instructions:
-
Use pgAdmin or psql to create the database:
CREATE DATABASE "SchedulerEvents"; -
Generate the migration:
Open a terminal in the project directory and run:
 cd BlazorSchedulerApp
 dotnet ef migrations add InitialCreate
This creates three files in the
Migrations/folder:-
<timestamp>_InitialCreate.cs- Contains Up() and Down() methods for schema changes -
<timestamp>_InitialCreate.Designer.cs- Migration metadata -
ApplicationDbContextModelSnapshot.cs- Current model state snapshot
Note: The
<timestamp>is automatically generated by EF Core based on the current date and time. Your files will have a different timestamp. -
-
Apply the migration to create tables in the database:
dotnet ef database update
What happens during update:
- Connects to PostgreSQL using connection string from
appsettings.json - Creates
__EFMigrationsHistorytable to track applied migrations - Executes the Up() method from InitialCreate migration
-
Creates
Appointmentstable with all columns and constraintsNote: The “Failed executing DbCommand” message on the first run is normal. It means the
__EFMigrationsHistorytable does not exist yet. EF Core creates it automatically. -
Verify migration success using pgAdmin or psql:
psql -U postgres -d SchedulerEvents -c "\dt"
The database schema has been created successfully.
Step 3: Create the Blazor Scheduler Component
The Blazor Scheduler component displays appointment data in a Blazor Scheduler with full CRUD (Create, Read, Update, Delete) capabilities and multiple calendar views.
Instructions:
-
Replace the contents of
Home.razorin theComponents/Pagesfolder with the following Blazor Scheduler component.[Home.razor]
 @page "/"
 @rendermode InteractiveServer

 <PageTitle>Appointment Scheduler</PageTitle>

 <SfSchedule TValue="Appointment"
             @ref="scheduleRef"
             Height="650px"
             @bind-SelectedDate="@currentDate"
             @bind-CurrentView="@currentView"
             ShowQuickInfo="true">

     <ScheduleViews>
         <ScheduleView Option="View.Day"></ScheduleView>
         <ScheduleView Option="View.Week"></ScheduleView>
         <ScheduleView Option="View.WorkWeek"></ScheduleView>
         <ScheduleView Option="View.Month"></ScheduleView>
         <ScheduleView Option="View.Agenda"></ScheduleView>
     </ScheduleViews>

     <ScheduleEventSettings TValue="Appointment">
         <SfDataManager Adaptor="Adaptors.CustomAdaptor" AdaptorInstance="@typeof(CustomAdaptor)">
         </SfDataManager>
     </ScheduleEventSettings>

 </SfSchedule>

 @code {
     private SfSchedule<Appointment>? scheduleRef;
     private DateTime currentDate = DateTime.Today;
     private View currentView = View.Week;

     public class CustomAdaptor : DataAdaptor
     {
         public override async Task<object> ReadAsync(DataManagerRequest dm, string? key = null)
         {
             if (AppServices.Root is null)
                 throw new InvalidOperationException("AppServices.Root is not initialized. Ensure Program.cs sets it after building the app.");

             using var scope = AppServices.Root.CreateScope();
             var svc = scope.ServiceProvider.GetRequiredService<AppointmentService>();

             var data = await svc.GetAllAppointmentsAsync();

             return dm.RequiresCounts
                 ? new DataResult { Result = data, Count = data.Count }
                 : (object)data;
         }

         public override async Task<object> InsertAsync(DataManager mgr, object data, string key)
         {
             if (AppServices.Root is null)
                 throw new InvalidOperationException("AppServices.Root is not initialized.");

             using var scope = AppServices.Root.CreateScope();
             var svc = scope.ServiceProvider.GetRequiredService<AppointmentService>();

             var item = data as Appointment ?? throw new ArgumentException("InsertAsync received invalid data type.");
             var created = await svc.CreateAppointmentAsync(item);
             return created;
         }

         public override async Task<object> UpdateAsync(DataManager mgr, object data, string keyField, string key)
         {
             if (AppServices.Root is null)
                 throw new InvalidOperationException("AppServices.Root is not initialized.");

             using var scope = AppServices.Root.CreateScope();
             var svc = scope.ServiceProvider.GetRequiredService<AppointmentService>();

             var item = data as Appointment ?? throw new ArgumentException("UpdateAsync received invalid data type.");
             if (item.EndTime < item.StartTime)
                 throw new ArgumentException("End time cannot be earlier than start time.");

             var updated = await svc.UpdateAppointmentAsync(item);
             return updated;
         }

         public override async Task<object> RemoveAsync(DataManager mgr, object data, string keyField, string key)
         {
             if (AppServices.Root is null)
                 throw new InvalidOperationException("AppServices.Root is not initialized.");

             using var scope = AppServices.Root.CreateScope();
             var svc = scope.ServiceProvider.GetRequiredService<AppointmentService>();

             int id;
             if (data is int directId)
             {
                 id = directId;
             }
             else if (!int.TryParse(data?.ToString(), out id))
             {
                 throw new ArgumentException("RemoveAsync received invalid key value.");
             }

             await svc.DeleteAppointmentAsync(id);
             return data;
         }

         public override async Task<object> BatchUpdateAsync(
             DataManager mgr,
             object changedRecords,
             object addedRecords,
             object deletedRecords,
             string keyField,
             string key,
             int? dropIndex)
         {
             if (AppServices.Root is null)
                 throw new InvalidOperationException("AppServices.Root is not initialized.");

             using var scope = AppServices.Root.CreateScope();
             var svc = scope.ServiceProvider.GetRequiredService<AppointmentService>();

             var changed = (changedRecords as IEnumerable<object>)?.Cast<Appointment>()?.ToList() ?? new();
             var added = (addedRecords as IEnumerable<object>)?.Cast<Appointment>()?.ToList() ?? new();
             var deleted = (deletedRecords as IEnumerable<object>)?.Cast<Appointment>()?.ToList() ?? new();

             foreach (var a in changed)
                 await svc.UpdateAppointmentAsync(a);

             foreach (var a in added)
                 await svc.CreateAppointmentAsync(a);

             foreach (var a in deleted)
                 await svc.DeleteAppointmentAsync(a.Id);

             var data = await svc.GetAllAppointmentsAsync();
             return new DataResult { Result = data, Count = data.Count };
         }
     }
 }
Component Explanation:
-
<SfSchedule>
The main Blazor Scheduler component that displays appointments in calendar format and supports multiple view modes. -
<ScheduleViews>
Defines the list of calendar views (Day, Week, WorkWeek, Month, Agenda) available for selection. -
<ScheduleEventSettings>
Configures the appointment model, enables create, edit, and delete actions, and connects the Blazor Scheduler to the data source. -
<SfDataManager>
Binds the Blazor Scheduler to the CustomAdaptor, which handles data communication.
It enables automatic calls for read, insert, update, and delete operations. -
CustomAdaptor
A custom class derived fromDataAdaptorthat executes all database operations by using theAppointmentService.
It handlesReadAsync,InsertAsync,UpdateAsync,RemoveAsync, andBatchUpdateAsync.
Key Implementation Details:
- CustomAdaptor: Handles all database operations (read, insert, update, and delete) directly through EF Core
- SfDataManager: Automatically triggers the adaptor methods whenever the Blazor Scheduler performs an action
- Scheduler UI: Updates immediately, while the adaptor persists changes to PostgreSQL
Event Flow:
- User creates, edits, or deletes an appointment in the Blazor Scheduler
- SfDataManager detects the action and triggers the corresponding method in the CustomAdaptor
- The Blazor Scheduler UI updates immediately without waiting for any database response
-
CustomAdaptor executes the required database operation (
InsertAsync,UpdateAsync,RemoveAsync,andBatchUpdateAsync) throughAppointmentService - After saving, the updated appointment data, including the database-generated ID, is returned to the Blazor Scheduler for syncing.
The Blazor Scheduler component has been created successfully.
Step 4: Build and Run the Application
With the Blazor Scheduler component created and database configured, you’re ready to run the application.
Build the Application
Ensure there are no compilation errors:
dotnet buildRun the Application
Start the application:
dotnet runOr use watch mode for automatic reload during development:
dotnet watchAccess the Scheduler
The application will start on a port configured in launchSettings.json (typically http://localhost:xxxx).
Open your browser and navigate to:
http://localhost:xxxx
Note: Replace
xxxxwith the actual port number shown in the terminal output when the application starts.
You can now perform CRUD operations on the scheduler:
- Create: Click on a time slot or use the “+” button
- Edit: Double-click an appointment or click and select “Edit”
- Delete: Click an appointment and select “Delete”
- Drag & Drop: Move appointments to different time slots
- Resize: Extend or shorten appointment duration
All operations are automatically saved to the PostgreSQL database.
Output Preview
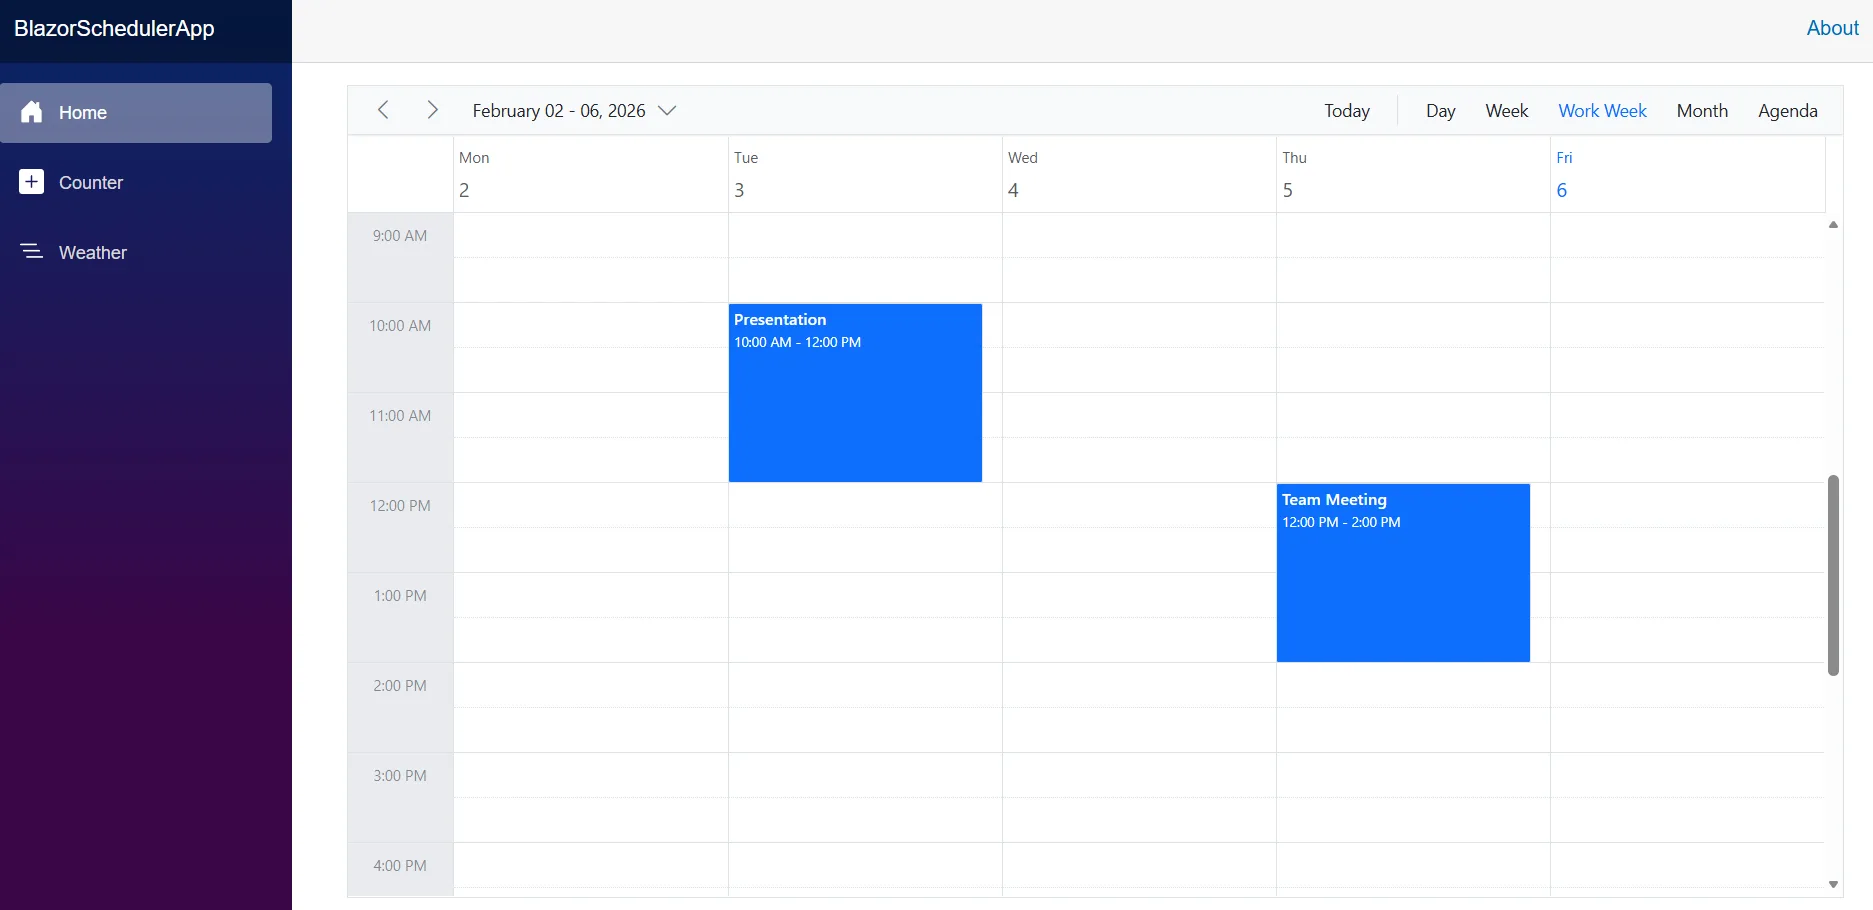
Image illustrating the Blazor Scheduler
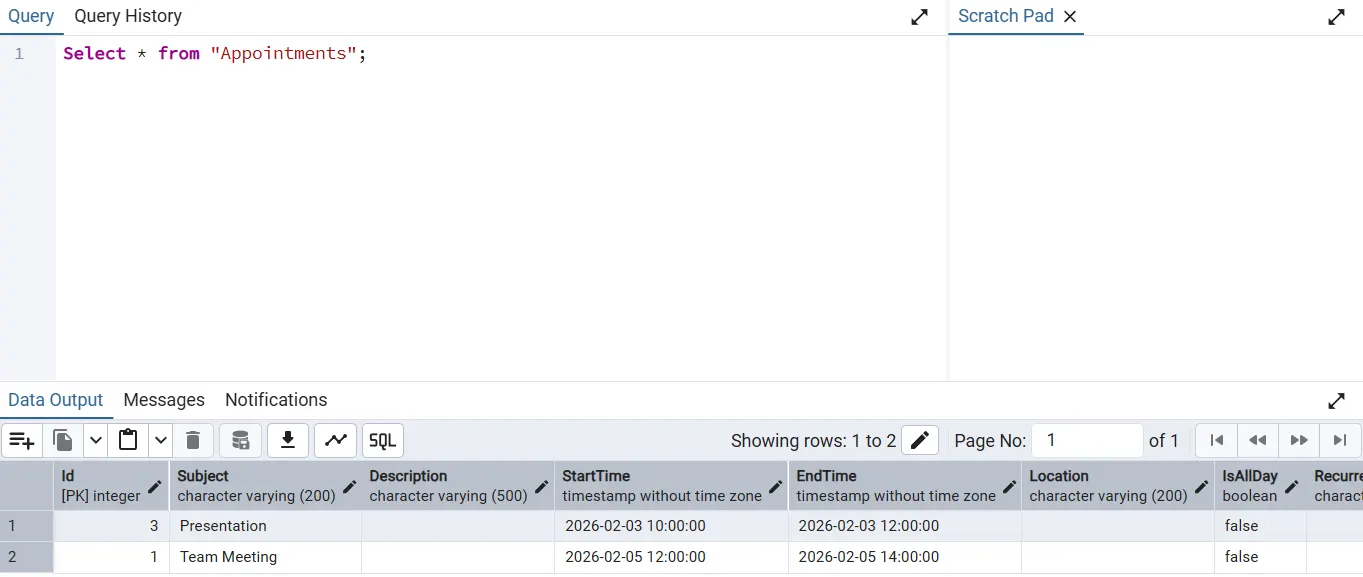
Image illustrating the events of the Blazor Scheduler stored in PostgreSQL
Complete Sample Repository
A complete, working sample implementation is available in the GitHub repository.
Troubleshooting
JavaScript Interop Errors
Error: Could not find 'sfBlazor.Toolbar.initialize' or 'sfBlazor' was undefined
Solution: Add JavaScript file in App.razor before closing </body> tag:
<script src="_content/Syncfusion.Blazor.Core/scripts/syncfusion-blazor.min.js" type="text/javascript"></script>Database Connection Failed
Error: Cannot connect to PostgreSQL database
Solutions:
- Verify PostgreSQL service is running:
pg_ctl status - Check connection string in
appsettings.json - Ensure
SchedulerEventsdatabase exists - Confirm username and password are correct
- Test connection using pgAdmin
Migration Errors
Error: dotnet ef database update fails
Solutions:
- Ensure PostgreSQL is running and database exists
- Verify user has CREATE TABLE permissions
- Check password in connection string
- Delete
Migrationsfolder and run:dotnet ef migrations add InitialCreate(if corrupted)
Note: The error
relation "__EFMigrationsHistory" does not existon first run is normal.
Timezone Issues
Error: Appointment times are incorrect (offset by several hours)
Solution: Add this line at the top of Program.cs:
AppContext.SetSwitch("Npgsql.EnableLegacyTimestampBehavior", true);Summary
This documentation has demonstrated how to:
- Set up a PostgreSQL database and integrate it with Entity Framework Core
- Create the
Appointmentdata model and configure theApplicationDbContext - Configure the PostgreSQL connection string in
appsettings.json - Implement a service layer (
AppointmentService) for all CRUD operations - Register Syncfusion, DbContext, and services in
Program.cs - Build a Blazor Scheduler component connected through
SfDataManager - Use a CustomAdaptor to handle all database persistence while keeping the Blazor Scheduler UI responsive
The application now provides a professional appointment scheduling system with:
- Multiple calendar views (Day, Week, Month, Agenda)
- Full CRUD operations
- Database persistence with PostgreSQL
- Type-safe queries with Entity Framework Core
- Responsive UI without page refreshes
Additional Resources
- Blazor Scheduler Documentation
- Entity Framework Core Documentation
- Npgsql Entity Framework Core Provider
- PostgreSQL Documentation