GraphQL Data Binding in Blazor Scheduler
GraphQL is a query language that lets applications request exactly the data they need. Unlike traditional REST APIs that return fixed data structures, GraphQL enables the client to specify the shape and content of the response.
Traditional REST APIs and GraphQL differ mainly in how data is requested and returned. REST APIs expose multiple endpoints that return fixed data structures, often including unnecessary fields and requiring several requests to fetch related data. GraphQL uses a single endpoint where queries define the exact fields needed, enabling precise responses and efficient retrieval in one request. This makes GraphQL especially useful for Blazor Scheduler integration because data-centric UI components need well-structured, selective datasets to support efficient operations, reduce network calls, and improve overall performance.
Key GraphQL Concepts
- Queries: A query is a request to read data. Queries do not modify data; they only retrieve it.
- Mutations: A mutation is a request to modify data. Mutations create, update, or delete records.
- Resolvers: Each query or mutation is handled by a resolver, which is a function responsible for fetching data or executing an operation. Query resolvers handle read operations, while mutation resolvers handle write operations.
- Schema: Defines the structure of the API. The schema describes available data types, the fields within those types, and the operations that can be executed. Query definitions specify how data can be retrieved, and mutation definitions specify how data can be modified.
Hot Chocolate is an open‑source GraphQL server framework for .NET. Hot Chocolate enables the creation of GraphQL APIs using ASP.NET Core and integrates seamlessly with modern .NET applications, including Blazor.
Prerequisites
System requirements for Blazor components
| Software/Package | Version | Purpose |
|---|---|---|
| HotChocolate.AspNetCore | 15.1.12 or later | GraphQL server framework |
| Syncfusion.Blazor.Schedule | Latest Version | Blazor Scheduler component |
| Syncfusion.Blazor.Themes | Latest Version | Styling for Blazor Scheduler |
Setting Up the GraphQL Backend
Step 1: Create a New ASP.NET Core Project as the GraphQL Server
Create an ASP.NET Core Empty server project using Visual Studio.
- Open Visual Studio.
- Go to File → New → Project.
- Search for and select ASP.NET Core Empty (C#).
- Name the project (example:
GraphQLServer). - Select .NET 8.0 or compatible as the target framework.
- Click Create.
This creates a minimal ASP.NET Core app with just Program.cs.
Step 2: Install the required backend package
To add the HotChocolate package to the server project, open NuGet Package Manager in Visual Studio (Tools → NuGet Package Manager → Manage NuGet Packages for Solution), then search for and install HotChocolate.AspNetCore.
Alternatively, run the following commands in the Package Manager Console to achieve the same.
Install-Package HotChocolate.AspNetCore -Version 15.1.12
Step 3: Configuring the GraphQL server app
- Create GraphQLQuery and GraphQLMutation classes to define the GraphQL resolver and mutation methods, respectively.
-
Implement the following configuration code to set up GraphQL query and mutation types and enable CORS.
[program.cs]
 var builder = WebApplication.CreateBuilder(args);

 builder.Services.AddGraphQLServer()
     .AddQueryType<GraphQLQuery>()
     .AddMutationType<GraphQLMutation>();

 builder.Services.AddCors(options =>
 {
    options.AddPolicy("AllowSpecificOrigin", builder =>
    {
        builder.WithOrigins("http://localhost:5194") // 5194 represents Blazor app port no
        .AllowAnyHeader()
         .AllowAnyMethod()
         .AllowCredentials().Build();
     });
 });
 var app = builder.Build();

 app.UseCors("AllowSpecificOrigin");

 app.UseRouting();

 app.MapGraphQL();

 app.Run();
Step 4: Create a data source for appointments and define the resolver
The following code creates a simple in-memory data source with a list of Appointment objects in the GraphQLQuery class and defines the return type used to bind data to the Blazor Scheduler. The resolver must return data using the ReturnType<T> class with Count and Result properties.
This data is used to populate the Blazor Scheduler.
[GraphQLQuery.cs]
public class GraphQLQuery
{
    public static List<Appointment> Appointments { get; set; } = GetAppointmentsList();

    private static List<Appointment> GetAppointmentsList()
    {
        var data = new List<Appointment>();

        // IST offset (UTC+5:30)
        var istOffset = TimeSpan.FromHours(5.5);

        data.Add(new Appointment()
        {
            Id = 1,
            Subject = "Testing",
            StartTime = new DateTime(2026, 2, 10, 9, 30, 0) - istOffset,
            EndTime = new DateTime(2026, 2, 10, 10, 30, 0) - istOffset
        });

        data.Add(new Appointment()
        {
            Id = 2,
            Subject = "Conference",
            StartTime = new DateTime(2026, 2, 11, 10, 30, 0) - istOffset,
            EndTime = new DateTime(2026, 2, 11, 12, 0, 0) - istOffset
        });

        data.Add(new Appointment()
        {
            Id = 3,
            Subject = "Meeting",
            StartTime = new DateTime(2026, 2, 12, 9, 30, 0) - istOffset,
            EndTime = new DateTime(2026, 2, 12, 11, 30, 0) - istOffset
        });

        data.Add(new Appointment()
        {
            Id = 4,
            Subject = "Vacation",
            StartTime = new DateTime(2026, 2, 14, 11, 30, 0) - istOffset,
            EndTime = new DateTime(2026, 2, 14, 13, 0, 0) - istOffset
        });

        return data;
    }
    public ReturnType<Appointment> AppointmentsData(DataManagerRequest dataManager)
    {
        IEnumerable<Appointment> result = Appointments;
        int count = result.Count();
        return dataManager.RequiresCounts ? new ReturnType<Appointment>() { Result = result, Count = count } : new ReturnType<Appointment>() { Result = result };
    }
}
Explanation
-
Appointmentsis a static list that holds all appointment records. -
GetAppointmentsList()creates sample data with four appointments in February 2026. - Dates are adjusted to IST (Indian Standard Time) by subtracting the 5.5-hour offset from UTC.
- This in-memory list serves as the data source; later you can replace it with a database or external service.
- The Blazor Scheduler reads from this list through the GraphQL query resolver.
Step 5: Return data with required format
To bind data to the Blazor Scheduler component, the resolver function must return the data in a specific structure using the ReturnType<T> class. This class tells the Blazor Scheduler how many appointments exist (Count) and which appointments to show (Result).
[ReturnType.cs]
public class ReturnType<T>
{
    public int Count { get; set; }
    public IEnumerable<T> Result { get; set; }
}
Why this format is required
-
Counttells the Blazor Scheduler how many appointments match the current view or date range. -
Resultcontains the list of appointments the Blazor Scheduler shows as events on the calendar.
Step 6: Create resolver function argument classes
The GraphQL query is passed from the Blazor Scheduler through the dataManager property. To accept this parameter in the resolver function, create the DataManagerRequest class and the supporting classes required for its properties.
Refer to the following code examples.
[DataManagerRequest.cs]
DataManagerRequest class
public class DataManagerRequest {
 [GraphQLName("Skip")]
  public int Skip { get; set; }

  [GraphQLName("Take")]
  public int Take { get; set; }

  [GraphQLName("RequiresCounts")]
  public bool RequiresCounts { get; set; } = false;

  [GraphQLName("Params")]
  [GraphQLType(typeof(AnyType))]
  public IDictionary<string, object> Params { get; set; }

  [GraphQLName("Distinct")]
  public List<string>? Distinct { get; set; }

  [GraphQLName("ServerSideGroup")]
  public bool? ServerSideGroup { get; set; }

  [GraphQLName("LazyLoad")]
  public bool? LazyLoad { get; set; }

  [GraphQLName("LazyExpandAllGroup")]
  public bool? LazyExpandAllGroup { get; set; }
}
Appointment class
public class Appointment
{
    [GraphQLName("Id")]
    public int Id { get; set; }

    [GraphQLName("Subject")]
    public string Subject { get; set; }

    [GraphQLName("Location")]
    public string? Location { get; set; }

    [GraphQLName("StartTime")]
    public DateTime StartTime { get; set; }

    [GraphQLName("EndTime")]
    public DateTime EndTime { get; set; }

    [GraphQLName("Description")]
    public string? Description { get; set; }

    [GraphQLName("IsAllDay")]
    public bool? IsAllDay { get; set; }

    [GraphQLName("RecurrenceRule")]
    public string? RecurrenceRule { get; set; }

    [GraphQLName("RecurrenceException")]
    public string? RecurrenceException { get; set; }

    [GraphQLName("RecurrenceID")]
    public int? RecurrenceID { get; set; }
}
Step 7: GraphQL Mutation Resolvers
A GraphQL mutation resolver is a backend method that handles write requests from the client. While queries only read data, mutations create, update, or delete records. When the Blazor Scheduler performs add, edit, or delete operations, it sends a GraphQL mutation to the server. The mutation resolver receives the request, processes it, and persists the changes to the data source.
In simple terms, a GraphQL mutation asks for a change, and a resolver performs it.
[GraphQLMutation.cs]
public class GraphQLMutation
{
    // CREATE - Insert a new appointment
    public Appointment CreateAppointment(
        Appointment appointment,
        int index,
        string action,
        [GraphQLType(typeof(AnyType))] IDictionary<string, object>? additionalParameters)
    {
        if (appointment.Id <= 0)
        {
            appointment.Id = GraphQLQuery.Appointments
                .Select(a => a.Id)
                .DefaultIfEmpty(0)
                .Max() + 1;
        }
        GraphQLQuery.Appointments.Insert(index, appointment);
        return appointment;
    }

    // UPDATE - Update existing appointment by Id
    public Appointment UpdateAppointment(
        Appointment appointment,
        string action,
        string primaryColumnName,
        int primaryColumnValue,
        [GraphQLType(typeof(AnyType))] IDictionary<string, object>? additionalParameters)
    {
        var existing = GraphQLQuery.Appointments.FirstOrDefault(x => x.Id == primaryColumnValue);
        if (existing == null) return new Appointment();

        existing.Subject = appointment.Subject;
        existing.Location = appointment.Location;
        existing.StartTime = appointment.StartTime;
        existing.EndTime = appointment.EndTime;
        existing.Description = appointment.Description;
        existing.IsAllDay = appointment.IsAllDay;
        existing.RecurrenceID = appointment.RecurrenceID;
        existing.RecurrenceRule = appointment.RecurrenceRule ?? existing.RecurrenceRule;

        if (!string.IsNullOrEmpty(existing.RecurrenceRule))
        {
            var set = new HashSet<string>(StringComparer.Ordinal);
            if (!string.IsNullOrWhiteSpace(existing.RecurrenceException))
                foreach (var t in existing.RecurrenceException.Split(',', StringSplitOptions.RemoveEmptyEntries))
                    set.Add(t.Trim());
            if (!string.IsNullOrWhiteSpace(appointment.RecurrenceException))
                foreach (var t in appointment.RecurrenceException.Split(',', StringSplitOptions.RemoveEmptyEntries))
                    set.Add(t.Trim());

            existing.RecurrenceException = set.Count == 0 ? null : string.Join(",", set);
        }
        else
        {
            existing.RecurrenceException = appointment.RecurrenceException;
        }

        return existing;
    }

    // DELETE - Remove appointment by Id
    public Appointment DeleteAppointment(
        int primaryColumnValue,
        string action,
        string primaryColumnName,
        [GraphQLType(typeof(AnyType))] IDictionary<string, object>? additionalParameters)
    {
        var toDelete = GraphQLQuery.Appointments.FirstOrDefault(x => x.Id == primaryColumnValue);
        if (toDelete != null) GraphQLQuery.Appointments.Remove(toDelete);
        return toDelete ?? new Appointment();
    }

    // BATCH - Handle multiple adds, changes, and deletes in one call
    public List<Appointment> BatchAppointment(
        List<Appointment>? added,
        List<Appointment>? changed,
        List<Appointment>? deleted,
        string? action = null,
        string? primaryColumnName = null,
        [GraphQLType(typeof(AnyType))] IDictionary<string, object>? additionalParameters = null)
    {
        var results = new List<Appointment>();
        added ??= new List<Appointment>();
        changed ??= new List<Appointment>();
        deleted ??= new List<Appointment>();

        string? act = action;
        if (string.IsNullOrWhiteSpace(act) && additionalParameters != null)
        {
            if (additionalParameters.TryGetValue("currentAction", out var v1) && v1 is string s1 && !string.IsNullOrWhiteSpace(s1))
                act = s1;
            else if (additionalParameters.TryGetValue("requestType", out var v2) && v2 is string s2 && !string.IsNullOrWhiteSpace(s2))
                act = s2;
        }
        bool IsAction(string name) => !string.IsNullOrWhiteSpace(act) && act.Equals(name, StringComparison.OrdinalIgnoreCase);

        bool hasChangedParent = changed.Any(c =>
            !string.IsNullOrEmpty(c.RecurrenceRule) ||
            GraphQLQuery.Appointments.Any(p => p.Id == c.Id && !string.IsNullOrEmpty(p.RecurrenceRule)));

        bool hasDeletedEdited = deleted.Any(d => d.RecurrenceID.HasValue);
        bool isSeriesEdit = IsAction("EditSeries") || (hasChangedParent && hasDeletedEdited);

        // ---------------- DELETES ----------------
        foreach (var d in deleted)
        {
            var target = GraphQLQuery.Appointments.FirstOrDefault(a => a.Id == d.Id);
            if (target == null) continue;

            bool isEditedOccurrence = target.RecurrenceID.HasValue;
            bool isSeriesParent = !string.IsNullOrEmpty(target.RecurrenceRule);

            if (isSeriesEdit && isEditedOccurrence)
            {
                GraphQLQuery.Appointments.RemoveAll(a => a.Id == target.Id);

                var parent = GraphQLQuery.Appointments.FirstOrDefault(a => a.Id == target.RecurrenceID!.Value);
                if (parent != null && !string.IsNullOrWhiteSpace(parent.RecurrenceException))
                {
                    var tokens = parent.RecurrenceException
                        .Split(',', StringSplitOptions.RemoveEmptyEntries)
                        .Select(t => t.Trim())
                        .ToList();

                    var iso = (target.StartTime.Kind == DateTimeKind.Utc ? target.StartTime : target.StartTime.ToUniversalTime()).ToString("o");
                    tokens.RemoveAll(t => string.Equals(t, iso, StringComparison.Ordinal));

                    if (!string.IsNullOrWhiteSpace(target.RecurrenceException))
                    {
                        foreach (var tkn in target.RecurrenceException.Split(',', StringSplitOptions.RemoveEmptyEntries))
                        {
                            var tt = tkn.Trim();
                            tokens.RemoveAll(t => string.Equals(t, tt, StringComparison.Ordinal));
                        }
                    }

                    parent.RecurrenceException = tokens.Count == 0 ? null : string.Join(",", tokens);
                }

                results.Add(target);
                continue;
            }

            if (isEditedOccurrence && IsAction("DeleteOccurrence"))
            {
                GraphQLQuery.Appointments.RemoveAll(a => a.Id == target.Id);
                results.Add(target);
                continue;
            }

            if (isSeriesParent && IsAction("DeleteSeries"))
            {
                var removed = GraphQLQuery.Appointments
                    .Where(a => a.Id == target.Id || a.RecurrenceID == target.Id)
                    .ToList();

                GraphQLQuery.Appointments.RemoveAll(a => a.Id == target.Id || a.RecurrenceID == target.Id);
                results.AddRange(removed);
                continue;
            }

            if (!isSeriesEdit)
            {
                GraphQLQuery.Appointments.RemoveAll(a => a.Id == target.Id);
                results.Add(target);
            }
        }

        // ---------------- UPDATES ----------------
        foreach (var u in changed)
        {
            var existing = GraphQLQuery.Appointments.FirstOrDefault(x => x.Id == u.Id);

            if (existing == null)
            {
                if (u.Id <= 0)
                    u.Id = GraphQLQuery.Appointments.Select(a => a.Id).DefaultIfEmpty(0).Max() + 1;

                GraphQLQuery.Appointments.Add(u);
                results.Add(u);
                continue;
            }

            bool isParent = !string.IsNullOrEmpty(existing.RecurrenceRule) || !string.IsNullOrEmpty(u.RecurrenceRule);

            existing.Subject = u.Subject ?? existing.Subject;
            existing.Location = u.Location ?? existing.Location;
            existing.StartTime = u.StartTime;
            existing.EndTime = u.EndTime;
            existing.Description = u.Description ?? existing.Description;
            existing.IsAllDay = u.IsAllDay ?? existing.IsAllDay;
            existing.RecurrenceRule = u.RecurrenceRule ?? existing.RecurrenceRule;

            if (isParent)
            {
                if (!isSeriesEdit)
                    existing.RecurrenceException = u.RecurrenceException ?? existing.RecurrenceException;
            }
            else
            {
                existing.RecurrenceException = u.RecurrenceException ?? existing.RecurrenceException;
            }

            existing.RecurrenceID = u.RecurrenceID ?? existing.RecurrenceID;
            results.Add(existing);
        }

        // ---------------- ADDS ----------------
        foreach (var a in added)
        {
            if (a.Id <= 0)
            {
                a.Id = GraphQLQuery.Appointments
                    .Select(x => x.Id)
                    .DefaultIfEmpty(0)
                    .Max() + 1;
            }
            GraphQLQuery.Appointments.Add(a);
            results.Add(a);
        }

        return results;
    }
}
A mutation resolver is a C# method decorated with GraphQL attributes that:
- Receives input parameters from the Scheduler, such as new or modified appointment data and the primary key value.
- Processes the operation through validation, conflict checks, and data modification.
- Persists changes to the data source, such as an in-memory list, database, file, or external service.
- Returns results to the client, such as the updated appointment record or success or failure status.
Typical operations handled by mutation resolvers in Scheduler:
| Operation | Triggered when… | Resolver method example | Primary parameters received |
|---|---|---|---|
| Create | User clicks “Add” or double-clicks to create | CreateAppointment |
appointment (new record), index, action
|
| Update | User edits an existing appointment and saves | UpdateAppointment |
appointment (updated record), primaryColumnValue (Id), primaryColumnName
|
| Delete | User selects appointment and clicks “Delete” | DeleteAppointment |
primaryColumnValue (Id), primaryColumnName
|
| BatchUpdate | Editing or deleting a single occurrence of a recurring event | BatchAppointment |
added: [AppointmentInput!]changed: [AppointmentInput!]deleted: [AppointmentInput!]action: String (optional, e.g. “batch”)primaryColumnName: String (optional)additionalParameters: Any (optional) |
The GraphQL mutation class is now ready to handle all data modification operations from the Blazor Scheduler.
Integrating Blazor Scheduler
Step 1: Create a Blazor Web App using Visual Studio
- Open Visual Studio.
- Click Create a new project
- Search for the Blazor Web App template.
- Configure the project name as BlazorSchedulerApp.
- Select .NET 8.0 as the target framework.
- Set Interactive render mode to Server.
- Set Interactivity location to Per page/component.
- Click Create.
Configure the Interactive render mode as InteractiveServer during project creation because the Blazor Scheduler requires interactivity for CRUD operations.
Step 2: Install Required NuGet Packages and Configure Blazor Scheduler Component with GraphQL
Before installing the necessary NuGet packages, create a new Blazor Web App by using the default template. This template automatically generates essential starter files such as Program.cs, appsettings.json, the wwwroot folder, and the Components folder.
For this guide, a Blazor application named BlazorSchedulerApp has been created. Once the project is set up, install the required NuGet packages. NuGet packages are software libraries that add functionality to the application.
To add the Blazor Scheduler component to the app, open NuGet Package Manager in Visual Studio (Tools → NuGet Package Manager → Manage NuGet Packages for Solution), then search for and install Syncfusion.Blazor.Schedule and Syncfusion.Blazor.Themes.
Alternatively, run the following commands in the Package Manager Console to achieve the same.
Install-Package Syncfusion.Blazor.Schedule
Install-Package Syncfusion.Blazor.Themes
Project File Reference
The installed packages are reflected in the BlazorSchedulerApp.csproj file:
<ItemGroup>
    <PackageReference Include="Syncfusion.Blazor.Schedule" Version="*" />
    <PackageReference Include="Syncfusion.Blazor.Themes" Version="*" />
</ItemGroup>
All required packages are now installed.
Note: After installing the packages, build the project to ensure all dependencies are restored correctly:
dotnet build.
Import the required namespaces in the Components/_Imports.razor file
@using Syncfusion.Blazor
@using Syncfusion.Blazor.Schedule
@using Syncfusion.Blazor.Data
Add the stylesheet and scripts in the Components/App.razor file
Find the <head> and <body> sections and add the following:
<head>
    <!-- Blazor Stylesheet -->
    <link href="_content/Syncfusion.Blazor.Themes/bootstrap5.3.css" rel="stylesheet" />
</head>
<body>

    <!-- Blazor Scripts -->
    <script src="_content/Syncfusion.Blazor.Core/scripts/syncfusion-blazor.min.js" type="text/javascript"></script>

</body>
For this project, the bootstrap5.3 theme is used. You can select a different theme or customize the existing one based on project requirements. Refer to the Blazor Components Appearance documentation for more information about theming and customization options.
Register Blazor Service
Register the Blazor service in the Program.cs file of your Blazor Web App.
using Syncfusion.Blazor;

var builder = WebApplication.CreateBuilder(args);

// Add services to the container.
builder.Services.AddRazorComponents()
    .AddInteractiveServerComponents()
    .AddInteractiveWebAssemblyComponents();

builder.Services.AddSyncfusionBlazor();

var app = builder.Build();
Blazor components are now configured and ready to use. For additional guidance, refer to the Blazor Scheduler component’s getting-started documentation.
Step 3: Create the Data Model
A data model is a C# class that represents the structure of a database table. This model defines the properties that correspond to the columns in the Appointments table.
public class Appointment
{
    public int Id { get; set; }

    public string Subject { get; set; }

    public string? Location { get; set; }

    public DateTime StartTime { get; set; }

    public DateTime EndTime { get; set; }

    public string? Description { get; set; }

    public bool? IsAllDay { get; set; }

    public string? RecurrenceRule { get; set; }

    public string? RecurrenceException { get; set; }

    public int? RecurrenceID { get; set; }
}
Explanation
- The
[Key]attribute marks theIdproperty as the primary key, which is a unique identifier for each record. - Each property represents a column in the database table.
- The
?symbol indicates that a property is nullable (can be empty).
The data model has been successfully created.
Step 4: Update the Blazor Scheduler
The Home.razor component displays the appointment data in a Blazor Scheduler with CRUD operation support.
Instructions:
- Open the
Home.razorfile in theComponents/Pagesfolder. -
Add the following code to create a basic Scheduler:
[Home.razor]@page "/" @rendermode InteractiveServer <SfSchedule TValue="Appointment" @bind-SelectedDate="@CurrentDate" Width="100%" Height="650px"> <ScheduleViews> <ScheduleView Option="View.Day"></ScheduleView> <ScheduleView Option="View.Week"></ScheduleView> <ScheduleView Option="View.WorkWeek"></ScheduleView> <ScheduleView Option="View.Month"></ScheduleView> <ScheduleView Option="View.Agenda"></ScheduleView> </ScheduleViews> <ScheduleEventSettings TValue="Appointment" AllowEditFollowingEvents="true"> <SfDataManager Url="http://localhost:5070/graphql" Adaptor="Adaptors.GraphQLAdaptor" GraphQLAdaptorOptions="@adaptorOptions"> </SfDataManager> </ScheduleEventSettings> </SfSchedule> @code { // GraphQLAdaptorOptions will be added in the next step }
Component Explanation
-
@rendermode InteractiveServer: Enables interactive server-side rendering for the component and allows real-time updates and user interactions without full page reloads. -
<SfSchedule>: The main Blazor Scheduler component that displays appointments in calendar views such as Day, Week, Work Week, Month, and Agenda. -
<ScheduleViews>: Defines the available view options for the Scheduler. Each<ScheduleView>specifies a supported calendar layout. -
<ScheduleEventSettings>: Configures how events are bound and managed. This is where data binding throughSfDataManagerand CRUD settings are typically placed.
In Home.razor, the SfDataManager component connects the Blazor Scheduler to the GraphQL backend by using the adaptor options configured below:
<SfDataManager Url="http://localhost:5070/graphql"
               GraphQLAdaptorOptions="@adaptorOptions"
               Adaptor="Adaptors.GraphQLAdaptor">
</SfDataManager>
Component Attributes Explained:
| Attribute | Purpose | Value |
|---|---|---|
Url |
GraphQL endpoint location |
http://localhost:5070/graphql (must match backend port) |
GraphQLAdaptorOptions |
References the adaptor configuration object |
@adaptorOptions (defined in next heading) |
Adaptor |
Specifies adaptor type to use |
Adaptors.GraphQLAdaptor (tells Syncfusion to use GraphQL adaptor) |
Step 5: Configure GraphQL Adaptor and Data Binding
The GraphQL adaptor connects the Blazor Scheduler to the GraphQL backend. It translates Blazor Scheduler operations into GraphQL queries and mutations. When the user interacts with the Scheduler, the adaptor sends the appropriate GraphQL request to the backend, receives the response, and updates the Blazor Scheduler display.
What is a GraphQL Adaptor?
An adaptor is a translator between two different systems. The GraphQL adaptor specifically:
- Receives interaction events generated by the Scheduler, including add, edit, and delete operations.
- Converts these actions into GraphQL query or mutation syntax.
- Sends the GraphQL request to the backend GraphQL endpoint.
- Receives the response data from the backend.
- Formats the response back into a structure the Blazor Scheduler understands.
- Updates the Blazor Scheduler display with the new data.
The adaptor enables bidirectional communication between the frontend (Scheduler) and backend (GraphQL server).
GraphQL Adaptor Configuration
The @code block in Home.razor contains the C# code that configures how the adaptor behaves. This configuration defines:
- Which GraphQL query to use for reading data.
- Which GraphQL mutations to use for creating, updating, and deleting data.
- How to connect to the GraphQL backend endpoint.
Instructions:
- Open the
Home.razorfile inComponents/Pages/Home.razor. - Scroll to the
@codeblock at the bottom of the file. -
Add the following complete configuration:
[Home.razor]
 @code {
   private DateTime CurrentDate = new DateTime(2026, 2, 12);
   /// <summary>
   /// GraphQLAdaptorOptions configures how the Blazor Scheduler communicates with the GraphQL backend.
   /// This object contains the query, mutation operations, and endpoint URL.
   /// </summary>
   private GraphQLAdaptorOptions adaptorOptions = new GraphQLAdaptorOptions
   {
     Query = @"
             query appointmentsData($dataManager: DataManagerRequestInput!){
                 appointmentsData(dataManager: $dataManager) {
                     count,
                     result {
                         Id,
                         Subject,
                         Location,
                         StartTime,
                         EndTime,
                         Description,
                         IsAllDay,
                         RecurrenceRule,
                         RecurrenceException,
                         RecurrenceID

                     }
                 }
             }",

     Mutation = new GraphQLMutation
     {
       Insert = @"
                 mutation create($record: AppointmentInput!, $index: Int!, $action: String!, $additionalParameters: Any) {
                   createAppointment(appointment: $record, index: $index, action: $action, additionalParameters: $additionalParameters) {
                     Id, Subject, Location, StartTime, EndTime, Description, IsAllDay,RecurrenceRule,RecurrenceException,RecurrenceID
                   }
                 }",

       Update = @"
                 mutation update($record: AppointmentInput!, $action: String!, $primaryColumnName: String!, $primaryColumnValue: Int!, $additionalParameters: Any) {
                   updateAppointment(appointment: $record, action: $action, primaryColumnName: $primaryColumnName, primaryColumnValue: $primaryColumnValue, additionalParameters: $additionalParameters) {
                     Id, Subject, Location, StartTime, EndTime, Description, IsAllDay,RecurrenceRule,RecurrenceException,RecurrenceID
                   }
                 }",

       Delete = @"
                 mutation delete($primaryColumnValue: Int!, $action: String!, $primaryColumnName: String!, $additionalParameters: Any) {
                   deleteAppointment(primaryColumnValue: $primaryColumnValue, action: $action, primaryColumnName: $primaryColumnName, additionalParameters: $additionalParameters) {
                     Id, Subject, Location, StartTime, EndTime, Description, IsAllDay,RecurrenceRule,RecurrenceException,RecurrenceID
                   }
                 }",
       Batch = @"
     mutation batch(
       $added: [AppointmentInput!],
       $changed: [AppointmentInput!],
       $deleted: [AppointmentInput!],
       $action: String,
       $primaryColumnName: String,
       $additionalParameters: Any
     ) {
       batchAppointment(
         added: $added,
         changed: $changed,
         deleted: $deleted,
         action: $action,
         primaryColumnName: $primaryColumnName,
         additionalParameters: $additionalParameters
       ) {
         Id
         Subject
         Location
         StartTime
         EndTime
         Description
         IsAllDay
         RecurrenceRule
         RecurrenceException
         RecurrenceID
       }
     }"
     },


     ResolverName = "AppointmentsData"
   };
 }
GraphQL Query Structure Explained in Detail
The Query property is critical for understanding how data flows. Let’s break down each component:
query appointmentsData($dataManager: DataManagerRequestInput!){}
Line Breakdown:
-
query- GraphQL keyword indicating a read operation -
appointmentsData- Name of the query (must match resolver name with camelCase) -
($dataManager: DataManagerRequestInput!)- Parameter declaration-
$dataManager- Variable name (referenced as $dataManager throughout the query) -
: DataManagerRequestInput!- Type specification-
!- Exclamation mark means this parameter is required.
-
-
appointmentsData(dataManager: $dataManager) {}
Line Breakdown:
-
appointmentsData(...)- Calls the resolver method in backend -
dataManager: $dataManager- Passes the $dataManager variable to the resolvercount result { Id, Subject, Location, StartTime, EndTime, Description, IsAllDay } -
count
Returns the total number of appointments that match the current query criteria.- Example: If 30 appointments exist in the visible date range,
count = 30. - The Blazor Scheduler uses this to understand the scope of data, although it usually loads only the visible window and relies on date-range filtering.
- Example: If 30 appointments exist in the visible date range,
-
result
Contains the array of appointment records that match the current request, typically filtered by the visible date range.-
{ ... }indicates the fields returned for each appointment. -
Each field must exactly match the property names in your C#
Appointmentclass. - Only the requested fields are returned.
- The Blazor Scheduler binds these fields directly to render events on the calendar:
-
Id→ unique identifier -
Subject→ event title -
Location→ optional event location -
StartTime/EndTime→ event timing (must be in ISO 8601 format) -
Description→ optional event details -
IsAllDay→ determines whether the event spans the full day -
RecurrenceRule→ string that defines the repeat pattern (iCalendar RRULE format, for example, “FREQ=DAILY;INTERVAL=1;COUNT=10”) -
RecurrenceException→ string containing comma-separated dates or times in UTC format, such as yyyyMMdd or yyyyMMddTHHmmssZ, to exclude from the series -
RecurrenceID→ nullable integer (int?) that links an edited or deleted occurrence back to its parent recurring series
-
-
Response Structure Example
When the backend executes the query, it returns a JSON response in this exact structure:
{
  "data": {
    "appointmentsData": {
      "count": 4,
      "result": [
        {
          "Id": 1,
          "Subject": "Testing",
          "Location": null,
          "StartTime": "2026-02-10T09:30:00",
          "EndTime": "2026-02-10T10:30:00",
          "Description": null,
          "IsAllDay": false,
          "RecurrenceRule": null,
          "RecurrenceException": null,
          "RecurrenceID": null
        },
        {
          "Id": 2,
          "Subject": "Conference (Recurring)",
          "Location": null,
          "StartTime": "2026-02-11T10:30:00",
          "EndTime": "2026-02-11T12:00:00",
          "Description": null,
          "IsAllDay": false,
          "RecurrenceRule": "FREQ=DAILY;INTERVAL=1;COUNT=5",
          "RecurrenceException": null,
          "RecurrenceID": null
        },
        {
          "Id": 3,
          "Subject": "Meeting",
          "Location": null,
          "StartTime": "2026-02-12T09:30:00",
          "EndTime": "2026-02-12T11:30:00",
          "Description": null,
          "IsAllDay": false,
          "RecurrenceRule": null,
          "RecurrenceException": null,
          "RecurrenceID": null
        },
        {
          "Id": 4,
          "Subject": "Vacation",
          "Location": null,
          "StartTime": "2026-02-14T11:30:00",
          "EndTime": "2026-02-14T13:00:00",
          "Description": null,
          "IsAllDay": false,
          "RecurrenceRule": null,
          "RecurrenceException": null,
          "RecurrenceID": null
        }
      ]
    }
  }
}
Response Structure Explanation:
| Part | Purpose | Example |
|---|---|---|
data |
Root object containing the query result | Always present in successful response |
appointmentsData |
Matches the query name (camelCase) | Contains count and result |
count |
Total number of records available | 4 (in this example) |
result |
Array of appointment objects | [ {…}, {…}, {…}, {…} ] |
| Each field in result | Matches GraphQL query field names | Field values from database |
Understanding GraphQL Mutations for the Scheduler
What is a mutation?
A mutation is a way to change data on the server, such as adding a new appointment, editing one, or deleting one.
In your Blazor Scheduler app:
- When you create a new appointment → you use a create mutation.
- When you edit an existing appointment → you use an update mutation.
- When you delete an appointment → you use a delete mutation.
- When you create, edit, and delete collections of an appointment, you use a batch mutation.
Running the Application
Build the Application
- Open the terminal.
- Navigate to the GraphQL server project directory (for example,
GraphQLServer). -
Run the following command:
dotnet build - Navigate to the Blazor App project directory (for example,
BlazorSchedulerApp) and build the Blazor project:dotnet build
Run the Application
- First, run the GraphQL server. It must be running before the Blazor app:
- Navigate to the GraphQL server project folder (for example,
GraphQLServer). - Execute:
dotnet run- Now listening on: http://localhost:5070 (or similar; check the console output).
- Note the HTTP port (for example, 5070); you will need it for the Blazor app.
- Navigate to the GraphQL server project folder (for example,
- In a separate terminal, run the Blazor Scheduler application:
- Navigate to the Blazor project folder (for example,
BlazorSchedulerApp). - Execute:
dotnet run- The Blazor app usually starts on http://localhost:5194 (or similar; check the console output).
- Navigate to the Blazor project folder (for example,
Access the Application
- Open a web browser.
- Navigate to
https://localhost:5194(or the port shown in the terminal). -
The Blazor Scheduler application is now running and ready to use.
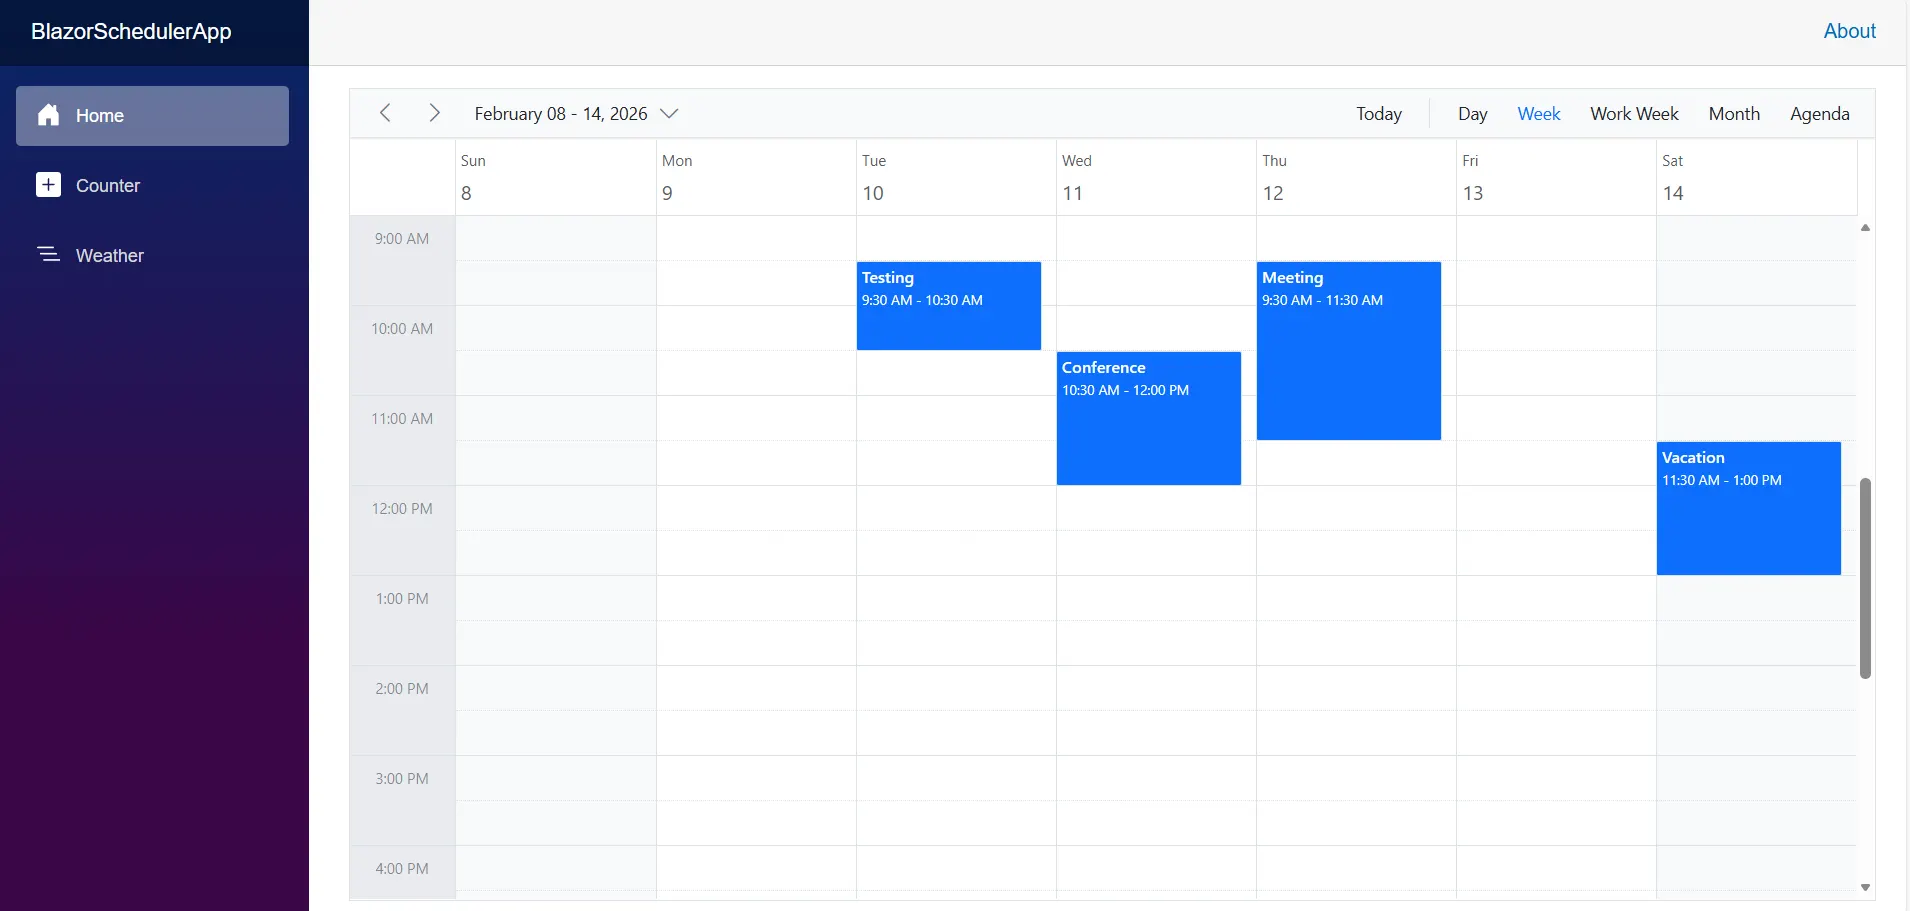
Complete Sample Repository
A complete, working sample implementation is available in the GitHub repository.
Summary
This guide demonstrates how to:
- Set up the GraphQL backend. 🔗
- Integrate Blazor Scheduler. 🔗
- Run the application. 🔗
- Open the complete sample repository. 🔗
The application now provides a complete solution for managing appointments with a modern Blazor Scheduler integrated with a Hot Chocolate GraphQL backend.