Exporting in Angular Scheduler
The Scheduler supports exporting appointments to Excel and ICS files on the client side. It provides client-side methods to export appointments in either Excel or iCal format. Explore how to implement exporting in the Scheduler.
Excel Exporting
The Scheduler allows you to export events to an Excel file by using the exportToExcel client-side method. By default, it exports all fields mapped through the eventSettings property.
Before enabling Excel export, import and inject the
ExcelExportmodule from@syncfusion/ej2-scheduleusing theInjectmethod of the Scheduler.
import { NgModule } from '@angular/core'
import { BrowserModule } from '@angular/platform-browser'
import { ScheduleModule } from '@syncfusion/ej2-angular-schedule'
import { ButtonModule } from '@syncfusion/ej2-angular-buttons'
import { DayService, WeekService, WorkWeekService, MonthService, AgendaService, MonthAgendaService} from '@syncfusion/ej2-angular-schedule'


import { Component, ViewChild, ViewEncapsulation } from '@angular/core';
import { ScheduleComponent, EventSettingsModel, View, ActionEventArgs, ToolbarActionArgs, ExportOptions, ExcelExportService  } from '@syncfusion/ej2-angular-schedule';
import { ItemModel } from '@syncfusion/ej2-angular-navigations';
import { scheduleData } from './datasource';

@Component({
imports: [

        ScheduleModule,
        ButtonModule
    ],

providers: [DayService,
                WeekService,
                WorkWeekService,
                MonthService,
                AgendaService,
                MonthAgendaService,
                ExcelExportService],
standalone: true,
  selector: 'app-root',
  // specifies the template string for the Schedule component
  template: `<ejs-schedule #scheduleObj width='100%' height='550px' [views]="scheduleViews" [selectedDate]="selectedDate" [eventSettings]="eventSettings"  cssClass='schedule-excel-export' [currentView]="currentView" (actionBegin)="onActionBegin($event)">
  <e-views><e-view option='Week' ></e-view></e-views></ejs-schedule>`,
  styleUrls: ['./index.css'],
  encapsulation: ViewEncapsulation.None
})
export class AppComponent {
  @ViewChild('scheduleObj')
  public scheduleObj?: ScheduleComponent;
  public selectedDate: Date = new Date(2019, 0, 10);
  public scheduleViews: View[] = ['Week'];
  public currentView: View = 'Week';
  public eventSettings: EventSettingsModel = { dataSource: scheduleData };
  public onActionBegin(args: ActionEventArgs & ToolbarActionArgs): void {
    if (args.requestType === 'toolbarItemRendering') {
      const exportItem: ItemModel = {
        align: 'Right', showTextOn: 'Both', prefixIcon: 'e-icon-schedule-excel-export',
        text: 'Excel Export', cssClass: 'e-excel-export', click: this.onExportClick.bind(this)
      };
      args.items?.push(exportItem);
    }
  }

  public onExportClick(): void {
    this.scheduleObj?.exportToExcel();
  }
 }
import { bootstrapApplication } from '@angular/platform-browser';
import { AppComponent } from './app.component';
import 'zone.js';
bootstrapApplication(AppComponent).catch((err) => console.error(err));
Exporting with custom fields
By default, the Scheduler exports all default event fields that are mapped through the eventSettings property. To limit the number of fields in the exported Excel file, you can export only the custom fields of the event data. To export only such custom fields, define the required fields through the ExportOptions interface and pass it as an argument to the exportToExcel method, as shown in the following example. For example, ['Id', 'Subject', 'StartTime', 'EndTime', 'Location'].
import { NgModule } from '@angular/core'
import { BrowserModule } from '@angular/platform-browser'
import { ScheduleModule } from '@syncfusion/ej2-angular-schedule'
import { ButtonModule } from '@syncfusion/ej2-angular-buttons'
import { DayService, WeekService, WorkWeekService, MonthService, AgendaService, MonthAgendaService} from '@syncfusion/ej2-angular-schedule'


import { Component, ViewChild, ViewEncapsulation } from '@angular/core';
import { ScheduleComponent, EventSettingsModel, View, ActionEventArgs, ToolbarActionArgs, ExportOptions, ExcelExportService  } from '@syncfusion/ej2-angular-schedule';
import { ItemModel } from '@syncfusion/ej2-angular-navigations';
import { scheduleData } from './datasource';

@Component({
imports: [

        ScheduleModule,
        ButtonModule
    ],

providers: [DayService,
                WeekService,
                WorkWeekService,
                MonthService,
                AgendaService,
                MonthAgendaService,
                ExcelExportService],
standalone: true,
  selector: 'app-root',
  // specifies the template string for the Schedule component
  template: `<ejs-schedule #scheduleObj width='100%' height='550px' [views]="scheduleViews" [selectedDate]="selectedDate" cssClass='schedule-excel-export'  [eventSettings]="eventSettings" [currentView]="currentView" (actionBegin)="onActionBegin($event)">
  <e-views><e-view option='Week' ></e-view></e-views></ejs-schedule>`,
  styleUrls: ['./index.css'],
  encapsulation: ViewEncapsulation.None
})
export class AppComponent {
  @ViewChild('scheduleObj')
  public scheduleObj?: ScheduleComponent;
  public selectedDate: Date = new Date(2019, 0, 10);
  public scheduleViews: View[] = ['Week'];
  public currentView: View = 'Week';
  public eventSettings: EventSettingsModel = { dataSource: scheduleData };
  public onActionBegin(args: ActionEventArgs & ToolbarActionArgs): void {
    if (args.requestType === 'toolbarItemRendering') {
      const exportItem: ItemModel = {
        align: 'Right', showTextOn: 'Both', prefixIcon: 'e-icon-schedule-excel-export',
        text: 'Excel Export', cssClass: 'e-excel-export', click: this.onExportClick.bind(this)
      };
      args.items?.push(exportItem);
    }
  }

  public onExportClick(): void {
    const exportValues: ExportOptions = { fields: ['Id', 'Subject', 'StartTime', 'EndTime', 'Location'] };
    this.scheduleObj?.exportToExcel(exportValues);
  }
 }
import { bootstrapApplication } from '@angular/platform-browser';
import { AppComponent } from './app.component';
import 'zone.js';
bootstrapApplication(AppComponent).catch((err) => console.error(err));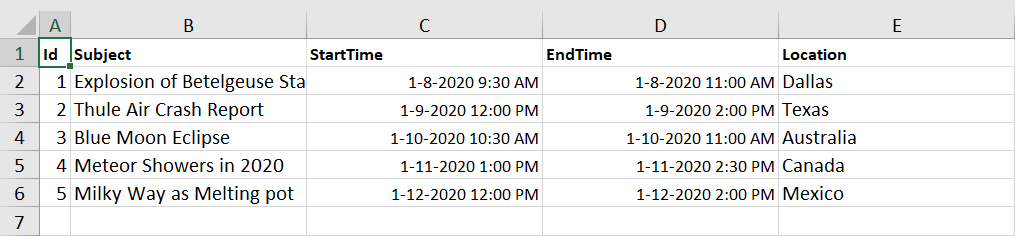
Exporting individual occurrences of a recurring series
By default, the Scheduler exports recurring events as a single record by exporting only the parent record to the Excel file. If you want to export each individual occurrence of a recurring series appointment as a separate record in an Excel file, define the includeOccurrences option as true through the ExportOptions interface and pass it as an argument to the exportToExcel method. By default, the includeOccurrences option is set to false.
import { NgModule } from '@angular/core'
import { BrowserModule } from '@angular/platform-browser'
import { ScheduleModule } from '@syncfusion/ej2-angular-schedule'
import { ButtonModule } from '@syncfusion/ej2-angular-buttons'
import { DayService, WeekService, WorkWeekService, MonthService, AgendaService, MonthAgendaService} from '@syncfusion/ej2-angular-schedule'


import { Component, ViewChild, ViewEncapsulation } from '@angular/core';
import { ScheduleComponent, EventSettingsModel,  View, ActionEventArgs, ToolbarActionArgs, ExportOptions, ExcelExportService  } from '@syncfusion/ej2-angular-schedule';
import { ItemModel } from '@syncfusion/ej2-angular-navigations';
import { scheduleData } from './datasource';

@Component({
imports: [

        ScheduleModule,
        ButtonModule
    ],

providers: [DayService,
                WeekService,
                WorkWeekService,
                MonthService,
                AgendaService,
                MonthAgendaService,
                ExcelExportService],
standalone: true,
  selector: 'app-root',
  // specifies the template string for the Schedule component
  template: `<ejs-schedule #scheduleObj width='100%' height='550px' [views]="scheduleViews" [selectedDate]="selectedDate" cssClass='schedule-excel-export'  [eventSettings]="eventSettings" [currentView]="currentView" (actionBegin)="onActionBegin($event)">
  <e-views><e-view option='Week' ></e-view></e-views></ejs-schedule>`,
  styleUrls: ['./index.css'],
  encapsulation: ViewEncapsulation.None
})
export class AppComponent {
  @ViewChild('scheduleObj')
  public scheduleObj?: ScheduleComponent;
  public selectedDate: Date = new Date(2019, 0, 10);
  public scheduleViews: View[] = ['Week'];
  public currentView: View = 'Week';
  public eventSettings: EventSettingsModel = { dataSource: scheduleData };
  public onActionBegin(args: ActionEventArgs & ToolbarActionArgs): void {
    if (args.requestType === 'toolbarItemRendering') {
      const exportItem: ItemModel = {
        align: 'Right', showTextOn: 'Both', prefixIcon: 'e-icon-schedule-excel-export',
        text: 'Excel Export', cssClass: 'e-excel-export', click: this.onExportClick.bind(this)
      };
      args.items?.push(exportItem);
    }
  }

  public onExportClick(): void {
    const exportValues: ExportOptions = { includeOccurrences: true };
    this.scheduleObj?.exportToExcel(exportValues);
  }
 }
import { bootstrapApplication } from '@angular/platform-browser';
import { AppComponent } from './app.component';
import 'zone.js';
bootstrapApplication(AppComponent).catch((err) => console.error(err));Exporting custom event data
By default, the whole event collection bound to the Scheduler is exported as an Excel file. To export only specific events from the Scheduler or a custom event collection, pass that custom data collection as a parameter to the exportToExcel method, as shown in the following example, through the customData option of the ExportOptions interface.
By default, event data are taken from the Scheduler
dataSource.
import { NgModule } from '@angular/core'
import { BrowserModule } from '@angular/platform-browser'
import { ScheduleModule } from '@syncfusion/ej2-angular-schedule'
import { ButtonModule } from '@syncfusion/ej2-angular-buttons'
import { DayService, WeekService, WorkWeekService, MonthService, AgendaService, MonthAgendaService} from '@syncfusion/ej2-angular-schedule'


import { Component, ViewChild, ViewEncapsulation } from '@angular/core';
import { ScheduleComponent, EventSettingsModel, View, ActionEventArgs, ToolbarActionArgs, ExportOptions, ExcelExportService  } from '@syncfusion/ej2-angular-schedule';
import { ItemModel } from '@syncfusion/ej2-angular-navigations';
import { scheduleData } from './datasource';

@Component({
imports: [

        ScheduleModule,
        ButtonModule
    ],

providers: [DayService,
                WeekService,
                WorkWeekService,
                MonthService,
                AgendaService,
                MonthAgendaService,
                ExcelExportService],
standalone: true,
  selector: 'app-root',
  // specifies the template string for the Schedule component
  template: `<ejs-schedule #scheduleObj width='100%' height='550px' [views]="scheduleViews" cssClass='schedule-excel-export' [selectedDate]="selectedDate" [eventSettings]="eventSettings" [currentView]="currentView" (actionBegin)="onActionBegin($event)">
  <e-views><e-view option='Week' ></e-view></e-views></ejs-schedule>`,
  styleUrls: ['./index.css'],
  encapsulation: ViewEncapsulation.None
})
export class AppComponent {
  @ViewChild('scheduleObj')
  public scheduleObj?: ScheduleComponent;
  public selectedDate: Date = new Date(2019, 0, 10);
  public scheduleViews: View[] = ['Week'];
  public currentView: View = 'Week';
  public eventSettings: EventSettingsModel = { dataSource: scheduleData };
  public onActionBegin(args: ActionEventArgs & ToolbarActionArgs): void {
    if (args.requestType === 'toolbarItemRendering') {
      const exportItem: ItemModel = {
        align: 'Right', showTextOn: 'Both', prefixIcon: 'e-icon-schedule-excel-export',
        text: 'Excel Export', cssClass: 'e-excel-export', click: this.onExportClick.bind(this)
      };
      args.items?.push(exportItem);
    }
  }

  public onExportClick(): void {
    const exportValues: ExportOptions = {
        customData: [{
            Id: 1,
            Subject: 'Explosion of Betelgeuse Star',
            Location: 'Space Centre USA',
            StartTime: new Date(2019, 0, 6, 9, 30),
            EndTime: new Date(2019, 0, 6, 11, 0),
            CategoryColor: '#1aaa55'
        }, {
            Id: 2,
            Subject: 'Thule Air Crash Report',
            Location: 'Newyork City',
            StartTime: new Date(2019, 0, 7, 12, 0),
            EndTime: new Date(2019, 0, 7, 14, 0),
            CategoryColor: '#357cd2'
        }]
     };
    this.scheduleObj?.exportToExcel(exportValues);
  }
 }
import { bootstrapApplication } from '@angular/platform-browser';
import { AppComponent } from './app.component';
import 'zone.js';
bootstrapApplication(AppComponent).catch((err) => console.error(err));Customizing column header with custom fields exporting
Using the fields property, you can export only the defined fields to Excel without customizing the header. You can also customize the header for custom field export by using the fieldsInfo option through the ExportFieldInfo interface and pass it as an argument to the exportToExcel method, as shown in the following example.
import { NgModule } from '@angular/core'
import { BrowserModule } from '@angular/platform-browser'
import { ScheduleModule } from '@syncfusion/ej2-angular-schedule'
import { ButtonModule } from '@syncfusion/ej2-angular-buttons'
import { DayService, WeekService, WorkWeekService, MonthService, AgendaService, MonthAgendaService} from '@syncfusion/ej2-angular-schedule'


import { Component, ViewChild, ViewEncapsulation } from '@angular/core';
import {
  ScheduleComponent, EventSettingsModel, View, ActionEventArgs, ToolbarActionArgs, ExportOptions,
  ExportFieldInfo, ExcelExportService
} from '@syncfusion/ej2-angular-schedule';
import { ItemModel } from '@syncfusion/ej2-angular-navigations';
import { scheduleData } from './datasource';

@Component({
imports: [

        ScheduleModule,
        ButtonModule
    ],

providers: [DayService,
                WeekService,
                WorkWeekService,
                MonthService,
                AgendaService,
                MonthAgendaService,
                ExcelExportService],
standalone: true,
  selector: 'app-root',
  // specifies the template string for the Schedule component
  template: `<ejs-schedule #scheduleObj width='100%' height='550px' [views]="scheduleViews" [selectedDate]="selectedDate" cssClass='schedule-excel-export'  [eventSettings]="eventSettings" [currentView]="currentView" (actionBegin)="onActionBegin($event)">
  <e-views><e-view option='Week'></e-view></e-views></ejs-schedule>`,
  styleUrls: ['./index.css'],
  encapsulation: ViewEncapsulation.None
})
export class AppComponent {
  @ViewChild('scheduleObj')
  public scheduleObj?: ScheduleComponent;
  public selectedDate: Date = new Date(2019, 0, 10);
  public scheduleViews: View[] = ['Week'];
  public currentView: View = 'Week';
  public eventSettings: EventSettingsModel = { dataSource: scheduleData };
  public onActionBegin(args: ActionEventArgs & ToolbarActionArgs): void {
    if (args.requestType === 'toolbarItemRendering') {
      const exportItem: ItemModel = {
        align: 'Right', showTextOn: 'Both', prefixIcon: 'e-icon-schedule-excel-export',
        text: 'Excel Export', cssClass: 'e-excel-export', click: this.onExportClick.bind(this)
      };
      args.items?.push(exportItem);
    }
  }

  public onExportClick(): void {
    const customFields: ExportFieldInfo[] = [
        { name: 'Subject', text: 'Summary' },
        { name: 'StartTime', text: 'First Date' },
        { name: 'EndTime', text: 'Last Date' },
        { name: 'Location', text: 'Place' },
        { name: 'OwnerId', text: 'Owners' }
    ];
    const exportValues: ExportOptions = { fieldsInfo: customFields };
    this.scheduleObj?.exportToExcel(exportValues);
  }
 }
import { bootstrapApplication } from '@angular/platform-browser';
import { AppComponent } from './app.component';
import 'zone.js';
bootstrapApplication(AppComponent).catch((err) => console.error(err));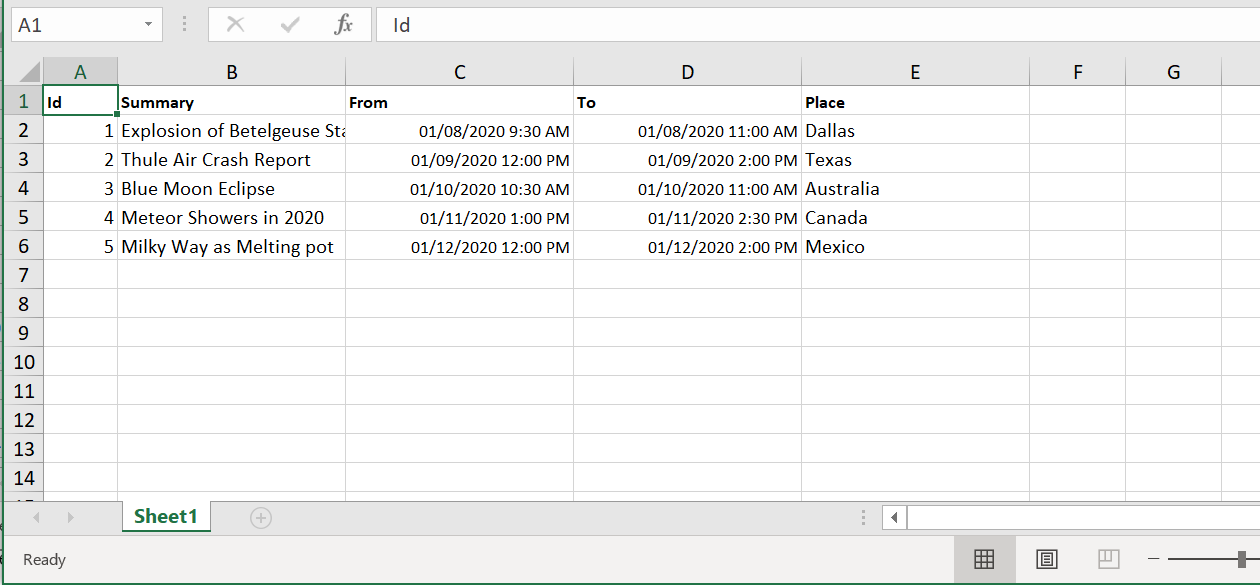
Export with custom file name
By default, the Scheduler downloads the exported Excel file with the name Schedule.xlsx. It also provides an option to export the Excel file with a custom file name by defining the desired fileName through the ExportOptions interface and passing it as an argument to the exportToExcel method.
import { NgModule } from '@angular/core'
import { BrowserModule } from '@angular/platform-browser'
import { ScheduleModule } from '@syncfusion/ej2-angular-schedule'
import { ButtonModule } from '@syncfusion/ej2-angular-buttons'
import { DayService, WeekService, WorkWeekService, MonthService, AgendaService, MonthAgendaService} from '@syncfusion/ej2-angular-schedule'


import { Component, ViewChild, ViewEncapsulation } from '@angular/core';
import { ScheduleComponent, EventSettingsModel,View, ActionEventArgs, ToolbarActionArgs, ExportOptions, ExcelExportService  } from '@syncfusion/ej2-angular-schedule';
import { ItemModel } from '@syncfusion/ej2-angular-navigations';
import { scheduleData } from './datasource';

@Component({
imports: [

        ScheduleModule,
        ButtonModule
    ],

providers: [DayService,
                WeekService,
                WorkWeekService,
                MonthService,
                AgendaService,
                MonthAgendaService,
                ExcelExportService],
standalone: true,
  selector: 'app-root',
  // specifies the template string for the Schedule component
  template: `<ejs-schedule #scheduleObj width='100%' height='550px' [views]="scheduleViews" cssClass='schedule-excel-export' [selectedDate]="selectedDate" [eventSettings]="eventSettings" [currentView]="currentView" (actionBegin)="onActionBegin($event)">
  <e-views><e-view option='Week' ></e-view></e-views></ejs-schedule>`,
  styleUrls: ['./index.css'],
  encapsulation: ViewEncapsulation.None
})
export class AppComponent {
  @ViewChild('scheduleObj')
  public scheduleObj?: ScheduleComponent;
  public selectedDate: Date = new Date(2019, 0, 10);
  public scheduleViews: View[] = ['Week'];
  public currentView: View = 'Week';
  public eventSettings: EventSettingsModel = { dataSource: scheduleData };
  public onActionBegin(args: ActionEventArgs & ToolbarActionArgs): void {
    if (args.requestType === 'toolbarItemRendering') {
      const exportItem: ItemModel = {
        align: 'Right', showTextOn: 'Both', prefixIcon: 'e-icon-schedule-excel-export',
        text: 'Excel Export', cssClass: 'e-excel-export', click: this.onExportClick.bind(this)
      };
      args.items?.push(exportItem);
    }
  }

  public onExportClick(): void {
    const exportValues: ExportOptions = { fileName: "SchedulerData" };
    this.scheduleObj?.exportToExcel(exportValues);
  }
 }
import { bootstrapApplication } from '@angular/platform-browser';
import { AppComponent } from './app.component';
import 'zone.js';
bootstrapApplication(AppComponent).catch((err) => console.error(err));Excel file formats
By default, the Scheduler exports event data to an Excel file in the .xlsx format. You can also export the Scheduler data in either .xlsx or csv format by defining the exportType option as either csv or xlsx through the ExportOptions interface. By default, the exportType is set to xlsx.
import { NgModule } from '@angular/core'
import { BrowserModule } from '@angular/platform-browser'
import { ScheduleModule } from '@syncfusion/ej2-angular-schedule'
import { ButtonModule } from '@syncfusion/ej2-angular-buttons'
import { DayService, WeekService, WorkWeekService, MonthService, AgendaService, MonthAgendaService} from '@syncfusion/ej2-angular-schedule'


import { Component, ViewChild, ViewEncapsulation } from '@angular/core';
import { ScheduleComponent, EventSettingsModel, View, ActionEventArgs, ToolbarActionArgs, ExportOptions, ExcelExportService  } from '@syncfusion/ej2-angular-schedule';
import { ItemModel } from '@syncfusion/ej2-angular-navigations';
import { scheduleData } from './datasource';

@Component({
imports: [

        ScheduleModule,
        ButtonModule
    ],

providers: [DayService,
                WeekService,
                WorkWeekService,
                MonthService,
                AgendaService,
                MonthAgendaService,
                ExcelExportService],
standalone: true,
  selector: 'app-root',
  // specifies the template string for the Schedule component
  template: `<ejs-schedule #scheduleObj width='100%' height='550px' [views]="scheduleViews" cssClass='schedule-excel-export' [selectedDate]="selectedDate" [eventSettings]="eventSettings" [currentView]="currentView" (actionBegin)="onActionBegin($event)">
  <e-views><e-view option='Week' ></e-view></e-views></ejs-schedule>`,
  styleUrls: ['./index.css'],
  encapsulation: ViewEncapsulation.None
})
export class AppComponent {
  @ViewChild('scheduleObj')
  public scheduleObj?: ScheduleComponent;
  public selectedDate: Date = new Date(2019, 0, 10);
  public scheduleViews: View[] = ['Week'];
  public currentView: View = 'Week';
  public eventSettings: EventSettingsModel = { dataSource: scheduleData };
  public onActionBegin(args: ActionEventArgs & ToolbarActionArgs): void {
    if (args.requestType === 'toolbarItemRendering') {
      const exportItem: ItemModel = {
        align: 'Right', showTextOn: 'Both', prefixIcon: 'e-icon-schedule-excel-export',
        text: 'Excel Export', cssClass: 'e-excel-export', click: this.onExportClick.bind(this)
      };
      args.items?.push(exportItem);
    }
  }

  public onExportClick(): void {
    const exportValues: ExportOptions = { exportType: "csv" };
    this.scheduleObj?.exportToExcel(exportValues);
  }
 }
import { bootstrapApplication } from '@angular/platform-browser';
import { AppComponent } from './app.component';
import 'zone.js';
bootstrapApplication(AppComponent).catch((err) => console.error(err));Custom separator in CSV
The Scheduler exports the event data to CSV format with , as the separator. You can change the separator by setting the separator property in ExportOptions.
import { NgModule } from '@angular/core'
import { BrowserModule } from '@angular/platform-browser'
import { ScheduleModule } from '@syncfusion/ej2-angular-schedule'
import { ButtonModule } from '@syncfusion/ej2-angular-buttons'
import { DayService, WeekService, WorkWeekService, MonthService, AgendaService, MonthAgendaService} from '@syncfusion/ej2-angular-schedule'


import { Component, ViewChild, ViewEncapsulation } from '@angular/core';
import { ScheduleComponent, EventSettingsModel, View, ActionEventArgs, ToolbarActionArgs, ExportOptions, ExcelExportService  } from '@syncfusion/ej2-angular-schedule';
import { ItemModel } from '@syncfusion/ej2-angular-navigations';
import { scheduleData } from './datasource';

@Component({
imports: [

        ScheduleModule,
        ButtonModule
    ],

providers: [DayService,
                WeekService,
                WorkWeekService,
                MonthService,
                AgendaService,
                MonthAgendaService,
                ExcelExportService],
standalone: true,
  selector: 'app-root',
  // specifies the template string for the Schedule component
  template: `<ejs-schedule #scheduleObj width='100%' height='550px' [views]="scheduleViews" cssClass='schedule-excel-export' [selectedDate]="selectedDate" [eventSettings]="eventSettings" [currentView]="currentView" (actionBegin)="onActionBegin($event)">
  <e-views><e-view option='Week' ></e-view></e-views></ejs-schedule>`,
  styleUrls: ['./index.css'],
  encapsulation: ViewEncapsulation.None
})
export class AppComponent {
  @ViewChild('scheduleObj')
  public scheduleObj?: ScheduleComponent;
  public selectedDate: Date = new Date(2019, 0, 10);
  public scheduleViews: View[] = ['Week'];
  public currentView: View = 'Week';
  public eventSettings: EventSettingsModel = { dataSource: scheduleData };
  public onActionBegin(args: ActionEventArgs & ToolbarActionArgs): void {
    if (args.requestType === 'toolbarItemRendering') {
      const exportItem: ItemModel = {
        align: 'Right', showTextOn: 'Both', prefixIcon: 'e-icon-schedule-excel-export',
        text: 'CSV-Export', cssClass: 'e-excel-export', click: this.onExportClick.bind(this)
      };
      args.items?.push(exportItem);
    }
  }

 public onExportClick(): void {
  const exportValues: ExportOptions = { exportType: 'csv', separator: ';' };
  this.scheduleObj?.exportToExcel(exportValues);
  }
 }
import { bootstrapApplication } from '@angular/platform-browser';
import { AppComponent } from './app.component';
import 'zone.js';
bootstrapApplication(AppComponent).catch((err) => console.error(err));How to customize the excel sheet on before exporting
Customizing an Excel sheet before export is easy with the excelExport event. This event gives you flexibility to tailor the exported data, format it according to specific needs, and include additional elements for enhanced presentation.
With the excelExport event, you can:
-
Adjust the formatting: Apply specific styles such as font type, size, color, and cell formatting to make the output visually appealing and consistent with your requirements.
-
Customize headers and footers: Personalize the Excel sheet by modifying the header and footer content, offering more control over the exported document.
-
Cancel the export: The event supports cancellation of the export process by setting the
cancelproperty totrue. This feature ensures you can prevent export based on specific conditions, offering you full control over the Excel export workflow.
Here is an example of how you can add a custom header and footer to an Excel sheet before exporting using the excelExport event.
import { NgModule } from '@angular/core';
import { BrowserModule } from '@angular/platform-browser';
import {
  ExcelExportEventArgs,
  ScheduleModule,
} from '@syncfusion/ej2-angular-schedule';
import { ButtonModule } from '@syncfusion/ej2-angular-buttons';
import {
  DayService,
  WeekService,
  WorkWeekService,
  MonthService,
  AgendaService,
  MonthAgendaService,
} from '@syncfusion/ej2-angular-schedule';

import { Component, ViewChild, ViewEncapsulation } from '@angular/core';
import {
  ScheduleComponent,
  EventSettingsModel,
  View,
  ActionEventArgs,
  ToolbarActionArgs,
  ExportOptions,
  ExcelExportService,
} from '@syncfusion/ej2-angular-schedule';
import { ItemModel } from '@syncfusion/ej2-angular-navigations';
import { scheduleData } from './datasource';

@Component({
  imports: [ScheduleModule, ButtonModule],

  providers: [
    DayService,
    WeekService,
    WorkWeekService,
    MonthService,
    AgendaService,
    MonthAgendaService,
    ExcelExportService,
  ],
  standalone: true,
  selector: 'app-root',
  // specifies the template string for the Schedule component
  template: `<ejs-schedule #scheduleObj width='100%' height='550px' [views]="scheduleViews" cssClass='schedule-excel-export' [selectedDate]="selectedDate" [eventSettings]="eventSettings" [currentView]="currentView" (actionBegin)="onActionBegin($event)" (excelExport)="onExcelExport($event)">
  <e-views><e-view option='Week' ></e-view></e-views></ejs-schedule>`,
  styleUrls: ['./index.css'],
  encapsulation: ViewEncapsulation.None,
})
export class AppComponent {
  @ViewChild('scheduleObj')
  public scheduleObj?: ScheduleComponent;
  public selectedDate: Date = new Date(2025, 0, 10);
  public scheduleViews: View[] = ['Week', 'Month'];
  public currentView: View = 'Week';
  public eventSettings: EventSettingsModel = { dataSource: scheduleData };
  public onActionBegin(args: ActionEventArgs & ToolbarActionArgs): void {
    if (args.requestType === 'toolbarItemRendering') {
      const exportItem: ItemModel = {
        align: 'Right',
        showTextOn: 'Both',
        prefixIcon: 'e-icon-schedule-excel-export',
        text: 'CSV-Export',
        cssClass: 'e-excel-export',
        click: this.onExportClick.bind(this),
      };
      args.items?.push(exportItem);
    }
  }
  public onExcelExport(args: ExcelExportEventArgs): void {
    const worksheet = args.worksheets[0];
    worksheet.rows.unshift({
      index: 1,
      cells: [
        {
          index: 1,
          value: 'Sales Report',
          colSpan: worksheet.columns.length,
          style: {
            bold: true,
            fontSize: 18,
            hAlign: 'Center',
            fill: { color: '#1E90FF' },
            color: '#FFFFFF',
          },
        },
      ],
    });
    worksheet.rows.unshift({
      index: 2,
      cells: [
        {
          index: 1,
          value: 'Generated on: ' + new Date().toLocaleDateString(),
          colSpan: worksheet.columns.length,
          style: {
            italic: true,
            fontSize: 12,
            hAlign: 'Left',
            fill: { color: '#D3D3D3' },
          },
        },
      ],
    });
    worksheet.rows.forEach((row: any, idx: number) => {
      row.index = idx + 1;
    });
    worksheet.rows.push({
      index: worksheet.rows.length + 1,
      cells: [
        {
          index: 1,
          value: 'End of Report',
          colSpan: worksheet.columns.length,
          style: {
            bold: true,
            fontSize: 14,
            hAlign: 'Center',
            fill: { color: '#FFD700' },
          },
        },
      ],
    });
  }
  public onExportClick(): void {
    const exportFields = [
      { name: 'Id', text: 'Id' },
      { name: 'Subject', text: 'Summary' },
      { name: 'StartTime', text: 'Start Date' },
      { name: 'EndTime', text: 'End Date' },
      { name: 'Location', text: 'Place' },
    ];
    const exportValues: ExportOptions = { fieldsInfo: exportFields };
    this.scheduleObj?.exportToExcel(exportValues);
  }
}
import { bootstrapApplication } from '@angular/platform-browser';
import { AppComponent } from './app.component';
import 'zone.js';
bootstrapApplication(AppComponent).catch((err) => console.error(err));Exporting calendar events as ICS file
You can export the Scheduler events to a calendar (.ics) file format and open it in default calendars such as Google Calendar or Outlook. To export the Scheduler events to an ICS file, first import the ICalendarExport module from the @syncfusion/ej2-schedule package and then inject it using the Schedule.Inject(ICalendarExport) method.
The following code example shows how the Scheduler events are exported to a calendar (.ics) file by making use of the exportToICalendar public method.
import { NgModule } from '@angular/core'
import { BrowserModule } from '@angular/platform-browser'
import { ScheduleModule } from '@syncfusion/ej2-angular-schedule'
import { ButtonModule } from '@syncfusion/ej2-angular-buttons'
import { UploaderModule } from '@syncfusion/ej2-angular-inputs'


import { Component, ViewChild } from '@angular/core';
import { ScheduleComponent, EventSettingsModel, View, DayService, DragAndDropService,
  WeekService, WorkWeekService, MonthService, AgendaService, ICalendarExportService, ICalendarImportService, ResizeService, MonthAgendaService } from '@syncfusion/ej2-angular-schedule';
import { scheduleData } from './datasource';

@Component({
imports: [

        ScheduleModule,
        ButtonModule,
        UploaderModule
    ],
standalone: true,
  selector: 'app-root',
  providers: [DayService, WeekService, WorkWeekService, MonthService, AgendaService, ResizeService,
    ICalendarExportService, ICalendarImportService, DragAndDropService, MonthAgendaService],
  // specifies the template string for the Schedule component
  template: `<button ejs-button id="ics-export" type="button" (click)="onExportClick()">Export</button>
<ejs-schedule #scheduleObj width='100%' height='550px' [views]="scheduleViews" [selectedDate]="selectedDate" [eventSettings]="eventSettings" [currentView]="currentView" >
  </ejs-schedule>`
})
export class AppComponent {
  @ViewChild('scheduleObj', { static: true })
  public scheduleObj?: ScheduleComponent;
  public selectedDate: Date = new Date(2018, 1, 15);
  public scheduleViews: View[] = ['Day', 'Week', 'WorkWeek', 'Month', 'Agenda'];
  public eventSettings: EventSettingsModel = { dataSource: scheduleData };
  public currentView: View = 'Week';

  public onExportClick(): void {
    this.scheduleObj?.exportToICalendar();
  }
 }
import { bootstrapApplication } from '@angular/platform-browser';
import { AppComponent } from './app.component';
import 'zone.js';
bootstrapApplication(AppComponent).catch((err) => console.error(err));Exporting calendar with custom file name
By default, the calendar is exported with the file name Calendar.ics. To change this file name on export, pass the custom string value as fileName to the method argument so that the file is downloaded with the provided name.
The following example downloads the iCal file with a name ScheduleEvents.ics.
import { NgModule } from '@angular/core'
import { BrowserModule } from '@angular/platform-browser'
import { ScheduleModule } from '@syncfusion/ej2-angular-schedule'
import { ButtonModule } from '@syncfusion/ej2-angular-buttons'
import { UploaderModule } from '@syncfusion/ej2-angular-inputs'
import { Component, ViewChild } from '@angular/core';
import { ScheduleComponent, EventSettingsModel, View, DayService, DragAndDropService,
  WeekService, WorkWeekService, MonthService, AgendaService, ICalendarExportService, ICalendarImportService, ResizeService, MonthAgendaService} from '@syncfusion/ej2-angular-schedule';
import { scheduleData } from './datasource';

@Component({
imports: [

        ScheduleModule,
        ButtonModule,
        UploaderModule
    ],
standalone: true,
  selector: 'app-root',
  providers: [DayService, WeekService, WorkWeekService, MonthService, AgendaService, ResizeService,
    ICalendarExportService, ICalendarImportService, DragAndDropService, MonthAgendaService],
  // specifies the template string for the Schedule component
  template: `<button ejs-button id="ics-export" type="button" (click)="onExportClick()">Export</button>
<ejs-schedule #scheduleObj width='100%' height='550px' [views]="scheduleViews" [selectedDate]="selectedDate" [eventSettings]="eventSettings" [currentView]="currentView" >
  <e-views><e-view option='Week' ></e-view></e-views></ejs-schedule>`
})
export class AppComponent {
  @ViewChild('scheduleObj')
  public scheduleObj?: ScheduleComponent;
  public selectedDate: Date = new Date(2018, 1, 15);
  public scheduleViews: View[] = ['Day', 'Week', 'WorkWeek', 'Month', 'Agenda'];
  public eventSettings: EventSettingsModel = { dataSource: scheduleData };
  public currentView: View = 'Week';

  public onExportClick=(): void =>{
    this.scheduleObj?.exportToICalendar('ScheduleEvents');
  }
 }
import { bootstrapApplication } from '@angular/platform-browser';
import { AppComponent } from './app.component';
import 'zone.js';
bootstrapApplication(AppComponent).catch((err) => console.error(err));Import events from other calendars
Events from external calendars (ICS files) can be imported into the Scheduler by using the importICalendar method. This method accepts the blob object of an .ics file as a mandatory argument.
To import an ICS file containing events into Scheduler, you need to first import the
ICalendarImportmodule from@syncfusion/ej2-schedulepackage and then inject it using theSchedule.Inject(ICalendarImport)method.
The following example shows how to import an ICS file into Scheduler, using the importICalendar method.
import { NgModule } from '@angular/core'
import { BrowserModule } from '@angular/platform-browser'
import { ScheduleModule } from '@syncfusion/ej2-angular-schedule'
import { ButtonModule } from '@syncfusion/ej2-angular-buttons'
import { UploaderModule } from '@syncfusion/ej2-angular-inputs'
import { Component, ViewChild } from '@angular/core';
import { ScheduleComponent, EventSettingsModel, View, DayService, DragAndDropService,
  WeekService, WorkWeekService, MonthService, AgendaService, ICalendarExportService, ICalendarImportService, ResizeService, MonthAgendaService } from '@syncfusion/ej2-angular-schedule';
import { scheduleData } from './datasource';
import { SelectedEventArgs } from '@syncfusion/ej2-inputs';

@Component({
imports: [

        ScheduleModule,
        ButtonModule,
        UploaderModule
    ],
standalone: true,
  selector: 'app-root',
  providers: [DayService, WeekService, WorkWeekService, MonthService, AgendaService, ResizeService,
    ICalendarExportService, ICalendarImportService, DragAndDropService, MonthAgendaService],
  // specifies the template string for the Schedule component
  template: `<ejs-uploader id='ics-import' cssClass='calendar-import' [multiple]='multiple' [buttons]='buttons'
    [showFileList]='showFileList' allowedExtensions='.ics' (selected)='onSelected($event)'></ejs-uploader>
<ejs-schedule #scheduleObj width='100%' height='550px' [views]="scheduleViews" [selectedDate]="selectedDate" [eventSettings]="eventSettings" [currentView]="currentView" >
  <e-views><e-view option='Week' ></e-view></e-views></ejs-schedule>`
})
export class AppComponent {
  @ViewChild('scheduleObj')
  public scheduleObj?: ScheduleComponent;
  public selectedDate: Date = new Date(2018, 1, 15);
  public scheduleViews: View[] = ['Day', 'Week', 'WorkWeek', 'Month', 'Agenda'];
  public eventSettings: EventSettingsModel = { dataSource: scheduleData };
  public currentView: View = 'Week';
  public showFileList: Boolean = false;
  public multiple: Boolean = false;
  public buttons: Object = { browse: 'Choose file' };

  public onSelected(args: SelectedEventArgs): void {
    this.scheduleObj?.importICalendar(((<HTMLInputElement>args.event.target) as any).files[0]);
  }
 }
import { bootstrapApplication } from '@angular/platform-browser';
import { AppComponent } from './app.component';
import 'zone.js';
bootstrapApplication(AppComponent).catch((err) => console.error(err));How to print the Scheduler element
The Scheduler allows you to print the Scheduler element by using the print client-side method. The print method works in two ways:
- Using the print method without options.
- Using the print method with options.
To print the Schedule, you need to import the
PrintServicemodule from the@syncfusion/ej2-angular-schedulepackage and then inject it usingproviders:[PrintService].
Using print method without options
You can print the Schedule element with the current view by using the print method without passing options. The following example shows how to print the Scheduler using the print method.
import { NgModule } from '@angular/core'
import { BrowserModule } from '@angular/platform-browser'
import { ScheduleModule } from '@syncfusion/ej2-angular-schedule'
import { ButtonModule } from '@syncfusion/ej2-angular-buttons'
import { UploaderModule } from '@syncfusion/ej2-angular-inputs'


import { ItemModel } from '@syncfusion/ej2-angular-navigations';
import { ScheduleComponent, EventSettingsModel, ActionEventArgs, ToolbarActionArgs, View, PrintService,
  DayService, WeekService, WorkWeekService, MonthService, AgendaService, MonthAgendaService } from '@syncfusion/ej2-angular-schedule';
import { Component, ViewChild, ViewEncapsulation } from '@angular/core';
import { scheduleData } from './datasource';

@Component({
imports: [

        ScheduleModule,
        ButtonModule,
        UploaderModule
    ],
standalone: true,
  selector: 'app-root',
  providers: [DayService, WeekService, WorkWeekService, MonthService, AgendaService, PrintService, MonthAgendaService],
  // specifies the template string for the Schedule component
  template: `<ejs-schedule #scheduleObj id="schedule" cssClass='schedule-print' width='100%' height='550px' [selectedDate]="selectedDate" [eventSettings]="eventSettings" (actionBegin)="onActionBegin($event)"></ejs-schedule>`
})
export class AppComponent {
  @ViewChild('scheduleObj')
  public scheduleObj?: ScheduleComponent;
  public selectedDate: Date = new Date(2018, 1, 15);
  public eventSettings: EventSettingsModel = { dataSource: scheduleData };

  public onActionBegin(args: ActionEventArgs & ToolbarActionArgs): void {
    if (args.requestType === 'toolbarItemRendering') {
      const exportItem: ItemModel = {
        align: 'Right', showTextOn: 'Both', prefixIcon: 'e-icon-schedule-print',
        text: 'Print', cssClass: 'e-print', click: this.onPrintIconClick.bind(this)
      };
      args.items?.push(exportItem);
    }
  }

  public onPrintIconClick(): void {
    this.scheduleObj?.print();
  }
 }
import { bootstrapApplication } from '@angular/platform-browser';
import { AppComponent } from './app.component';
import 'zone.js';
bootstrapApplication(AppComponent).catch((err) => console.error(err));Using print method with options
You can print the Schedule element based on your needs by using the print method and passing the print options used in this example. The following example shows how to print the Scheduler using the print method with options.
import { NgModule } from '@angular/core'
import { BrowserModule } from '@angular/platform-browser'
import { ScheduleModule } from '@syncfusion/ej2-angular-schedule'
import { ButtonModule } from '@syncfusion/ej2-angular-buttons'
import { UploaderModule } from '@syncfusion/ej2-angular-inputs'


import { ItemModel } from '@syncfusion/ej2-angular-navigations';
import { ScheduleComponent, EventSettingsModel, ActionEventArgs, ToolbarActionArgs, View, PrintService,
  DayService, WeekService, WorkWeekService, MonthService, AgendaService, ScheduleModel, MonthAgendaService } from '@syncfusion/ej2-angular-schedule';
import { Component, ViewChild, ViewEncapsulation } from '@angular/core';
import { scheduleData } from './datasource';

@Component({
imports: [

        ScheduleModule,
        ButtonModule,
        UploaderModule
    ],
standalone: true,
  selector: 'app-root',
  providers: [DayService, WeekService, WorkWeekService, MonthService, AgendaService, PrintService, MonthAgendaService],
  // specifies the template string for the Schedule component
  template: `<ejs-schedule #scheduleObj id="schedule" cssClass='schedule-print' width='100%' height='550px' [selectedDate]="selectedDate" [eventSettings]="eventSettings" (actionBegin)="onActionBegin($event)"></ejs-schedule>`
})
export class AppComponent {
  @ViewChild('scheduleObj')
  public scheduleObj?: ScheduleComponent;
  public selectedDate: Date = new Date(2018, 1, 15);
  public eventSettings: EventSettingsModel = { dataSource: scheduleData };

  public onActionBegin(args: ActionEventArgs & ToolbarActionArgs): void {
    if (args.requestType === 'toolbarItemRendering') {
      const exportItem: ItemModel = {
        align: 'Right', showTextOn: 'Both', prefixIcon: 'e-icon-schedule-print',
        text: 'Print', cssClass: 'e-print', click: this.onPrintIconClick.bind(this)
      };
      args.items!.push(exportItem);
    }
  }

  public onPrintIconClick(): void {
    let printModel: ScheduleModel = {
      agendaDaysCount: 14,
      cssClass: 'e-print-schedule',
      currentView: this.scheduleObj?.currentView,
      dateFormat: 'dd-MMM-yyyy',
      enableRtl: false,
      endHour: '18:00',
      firstDayOfWeek: 1,
      firstMonthOfYear: 0,
      group: {},
      height: 'auto',
      locale: this.scheduleObj?.locale,
      maxDate: this.scheduleObj?.selectedDate,
      minDate: this.scheduleObj?.getCurrentViewDates()[0],
      readonly: true,
      resources: [],
      rowAutoHeight: false,
      selectedDate: new Date(),
      showHeaderBar: false,
      showTimeIndicator: false,
      showWeekNumber: false,
      showWeekend: false,
      startHour: '06:00',
      timeFormat: 'HH',
      timeScale: { enable: true },
      width: 'auto',
      workDays: [1, 2, 3, 4, 5],
      workHours: { highlight: true, start: '10:00', end: '20:00' }
    };
    this.scheduleObj?.print(printModel);
  }
 }
import { bootstrapApplication } from '@angular/platform-browser';
import { AppComponent } from './app.component';
import 'zone.js';
bootstrapApplication(AppComponent).catch((err) => console.error(err));Customizing the print layout
The beforePrint event enables you to customize the print layout of the Scheduler control without altering the actual schedule layout or data. This event returns the HTML element used for printing, which can be tailored to specific requirements before the print operation is triggered. You can also prevent the print action by setting the cancel property to true.
Key customization options include:
- Customizing the header and footer: Add custom header and footer content to the print layout to include additional information.
- Controlling print output: Fine-tune the layout to ensure that only the necessary details are printed.
Here is an example of how you can add a custom header and footer to the print layout using the beforePrint event.
import { Component, ViewChild } from '@angular/core';
import {
  ScheduleComponent,
  EventSettingsModel,
  ActionEventArgs,
  ToolbarActionArgs,
  BeforePrintEventArgs,
  DayService,
  WeekService,
  WorkWeekService,
  MonthService,
  AgendaService,
  ScheduleModule,
  PrintService
} from '@syncfusion/ej2-angular-schedule';
import { ItemModel } from '@syncfusion/ej2-angular-navigations';
import { scheduleData } from './datasource';

@Component({
  selector: 'app-root',
  imports: [ScheduleModule],
  standalone: true,
  template: `
    <ejs-schedule #scheduleObj id="schedule" width="100%" height="550px"
      [selectedDate]="selectedDate" [eventSettings]="eventSettings"
      [views]="scheduleViews" (actionBegin)="onActionBegin($event)"
      (beforePrint)="onBeforePrint($event)">
    </ejs-schedule>
  `,
  providers: [DayService, WeekService, WorkWeekService, MonthService, AgendaService, PrintService]
})
export class AppComponent {
  @ViewChild('scheduleObj') public scheduleObj!: ScheduleComponent;
  public selectedDate: Date = new Date(2025, 1, 15);
  public scheduleViews = ['Day', 'Week', 'WorkWeek', 'Month'];

  private currentUser = this.getCurrentUserInfo();
  public eventSettings: EventSettingsModel = {
    dataSource: scheduleData
  };

  public onActionBegin(args: ActionEventArgs & ToolbarActionArgs): void {
    if (args.requestType === 'toolbarItemRendering') {
      const printItem: ItemModel = {
        align: 'Right',
        showTextOn: 'Both',
        prefixIcon: 'e-icon-schedule-print',
        text: 'Print',
        cssClass: 'e-schedule-print',
        click: this.onPrintIconClick.bind(this)
      };
      args.items?.push(printItem);
    }
  }

  public onPrintIconClick(): void {
    this.scheduleObj.print();
  }

  public onBeforePrint(args: BeforePrintEventArgs): void {
    const headerElement = document.createElement('div');
    headerElement.innerHTML = `
      <h1>${this.currentUser.department} Department Schedule</h1>
      <p>Printed by: ${this.currentUser.userRole}</p>
      <p>Date: ${new Date().toLocaleString()}</p>
    `;
    headerElement.style.backgroundColor = this.getDepartmentColor(this.currentUser.department);
    headerElement.style.color = 'white';
    headerElement.style.padding = '10px';
    args.printElement?.insertBefore(headerElement, args.printElement.firstChild);

    const highPriorityEvents = args.printElement?.querySelectorAll('.e-appointment.high-priority');
    highPriorityEvents?.forEach(event => {
      (event as HTMLElement).style.border = '2px solid red';
    });

    const events = this.scheduleObj.getEvents();
    const summaryElement = document.createElement('div');
    summaryElement.innerHTML = `
      <p>Total Events: ${events.length}</p>
      <p>High Priority Events: ${events.filter(e => e['priority'] === 'high').length}</p>
    `;
    args.printElement?.appendChild(summaryElement);

    if (this.currentUser.userRole === 'Manager') {
      const managerNote = document.createElement('div');
      managerNote.textContent = 'Confidential - For managerial use only';
      managerNote.style.color = 'red';
      args.printElement?.appendChild(managerNote);
    }
  }

  private getDepartmentColor(dept: string): string {
    const colors: Record<string, string> = {
      'Sales': '#4CAF50',
      'Marketing': '#2196F3',
      'Engineering': '#FF9800',
      'HR': '#9C27B0'
    };
    return colors[dept] || '#607D8B';
  }

  private getCurrentUserInfo() {
    return { department: 'Sales', userRole: 'Manager' };
  }
}
import { bootstrapApplication } from '@angular/platform-browser';
import { AppComponent } from './app.component';
import 'zone.js';
bootstrapApplication(AppComponent).catch((err) => console.error(err));You can refer to our Angular Scheduler feature tour page for feature highlights. You can also explore our Angular Scheduler example to see how to present and manipulate data.