Insert Audios in Blazor Rich Text Editor
The Blazor Rich Text Editor allows inserting audio files from online sources and the local computer where you want to insert the audio in your content. For inserting audio into the Rich Text Editor, the following list of options has been provided in the RichTextEditorAudioSettings.
| Options | Description |
|---|---|
| AllowedTypes | Specifies the extensions of the audio types allowed to insert on browsing and passing the extensions with comma separators. For example, pass allowedTypes as .mp3, .wav, .m4a, and .wma.
|
| LayoutOption | Sets the default display for audio when it is inserted into the Rich Text Editor. Possible options are Inline and Break.
|
| SaveFormat | Sets the default save format of the audio element when inserted. Possible options are Blob and Base64.
|
| SaveUrl | Provides URL to map the action result method to save the audio. |
| RemoveUrl | Provides the URL to map the action result method used to remove the audio file from the server. |
| Path | Specifies the location to store the audio. |
Configure audio tool in the toolbar
To include the audio tool in the Rich Text Editor, you can add the toolbar item Audio to the RichTextEditorToolbarSettings.Items property.
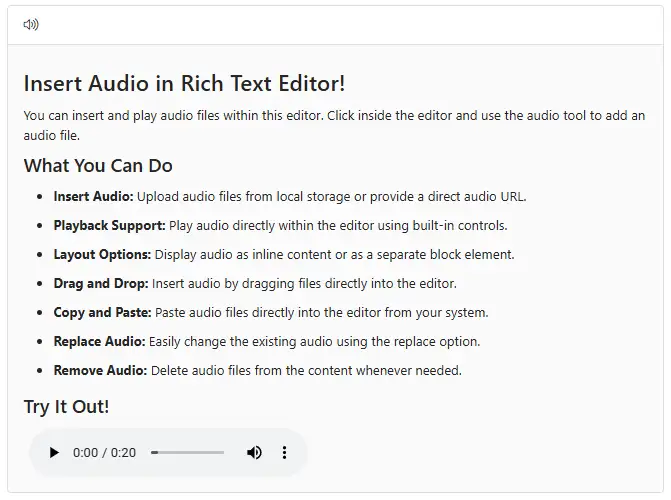
To configure Audio toolbar item, refer to the below code.
@using Syncfusion.Blazor.RichTextEditor

<SfRichTextEditor>
    <RichTextEditorToolbarSettings Items="@Items" />
    <h4>Insert Audio in Rich Text Editor!</h4>
    <p>You can insert and play audio files within this editor. Click inside the editor and use the audio tool to add an audio file.</p>
    <h5>What You Can Do</h5>
    <ul>
        <li><strong>Insert Audio:</strong> Upload audio files from local storage or provide a direct audio URL.</li>
        <li><strong>Playback Support:</strong> Play audio directly within the editor using built-in controls.</li>
        <li><strong>Layout Options:</strong> Display audio as inline content or as a separate block element.</li>
        <li><strong>Drag and Drop:</strong> Insert audio by dragging files directly into the editor.</li>
        <li><strong>Copy and Paste:</strong> Paste audio files directly into the editor from your system.</li>
        <li><strong>Replace Audio:</strong> Easily change the existing audio using the replace option.</li>
        <li><strong>Remove Audio:</strong> Delete audio files from the content whenever needed.</li>
    </ul>
    <h5>Try It Out!</h5>
    <audio controls>
        <source src="https://cdn.syncfusion.com/ej2/richtexteditor-resources/RTE-Audio.wav" type="audio/mp3" />
    </audio>
</SfRichTextEditor>

@code {
    private List<ToolbarItemModel> Items = new List<ToolbarItemModel>()
    {
        new ToolbarItemModel() { Command = ToolbarCommand.Audio }
    };
}
Insert audio from web
To insert audio from the hosted link or local machine, you should enable the audio tool in the editor’s toolbar.
Insert audio from web URL
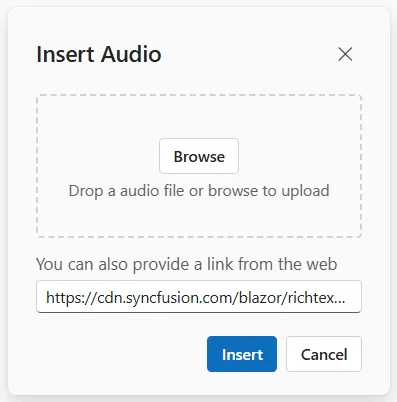
By default, the audio tool opens the audio dialog, allowing you to insert audio from an online source. Inserting the URL will be added to the src attribute of the <source> tag.
Upload and insert audio
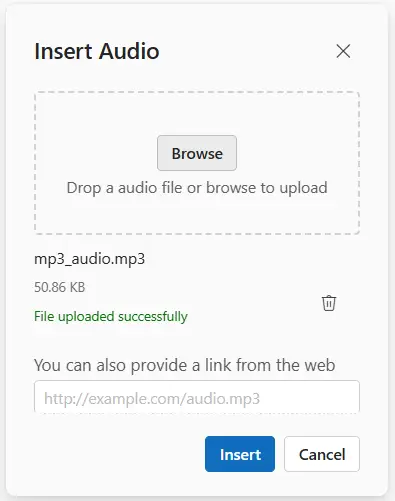
In the audio dialog, using the browse option, select the audio from the local machine and insert it into the Blazor Rich Text Editor content.
If the path field is not specified in the RichTextEditorAudioSettings, the audio will be converted into Blob url or Base64 and inserted inside the Rich Text Editor.
Server-side action
The selected audio can be uploaded to or removed from the required destination using the controller action below. Map the respective method names into RichTextEditorMediaSettings.SaveUrl and RichTextEditorMediaSettings.RemoveUrl properties. Also, specify the required destination path using the RichTextEditorMediaSettings.Path property.
If you want to insert lower-sized audio files in the editor and don’t want a specific physical location for saving audio, you can opt to save the format as
Base64.
@using Syncfusion.Blazor.RichTextEditor

<SfRichTextEditor>
    <RichTextEditorToolbarSettings Items="@Items" />
    <RichTextEditorAudioSettings SaveUrl="api/Audio/Save" RemoveUrl="api/Audio/Delete" Path="./Audio/"></RichTextEditorAudioSettings>
</SfRichTextEditor>
@code {
    private List<ToolbarItemModel> Items = new List<ToolbarItemModel>()
    {
        new ToolbarItemModel() { Command = ToolbarCommand.Audio }
    };
}using System;
using System.IO;
using System.Net.Http.Headers;
using Microsoft.AspNetCore.Mvc;
using Microsoft.AspNetCore.Http;
using System.Collections.Generic;
using Microsoft.AspNetCore.Hosting;
using Microsoft.AspNetCore.Http.Features;
namespace AudioUpload.Controllers
{
[ApiController]
public class AudioController : ControllerBase
{
private readonly IWebHostEnvironment hostingEnv;
public AudioController(IWebHostEnvironment env)
{
this.hostingEnv = env;
}
[HttpPost("[action]")]
[Route("api/Audio/Save")]
public void Save(IList<IFormFile> UploadFiles)
{
try
{
foreach (var file in UploadFiles)
{
if (UploadFiles != null)
{
string targetPath = hostingEnv.ContentRootPath + "\\wwwroot\\Audio";
string filename = ContentDispositionHeaderValue.Parse(file.ContentDisposition).FileName.Trim('"');
// Create a new directory if it does not exist
if (!Directory.Exists(targetPath))
{
Directory.CreateDirectory(targetPath);
}
// Name which is used to save the audio
filename = targetPath + $@"\{filename}";
if (!System.IO.File.Exists(filename))
{
// Upload an audio, if the same file name does not exist in the directory
using (FileStream fs = System.IO.File.Create(filename))
{
file.CopyTo(fs);
fs.Flush();
}
Response.StatusCode = 200;
}
else
{
Response.StatusCode = 204;
}
}
}
}
catch (Exception e)
{
Response.Clear();
Response.ContentType = "application/json; charset=utf-8";
Response.HttpContext.Features.Get<IHttpResponseFeature>().ReasonPhrase = e.Message;
}
}
[HttpPost("[action]")]
[Route("api/Audio/Delete")]
public IActionResult Delete(IList<IFormFile> UploadFiles)
{
try
{
foreach (IFormFile uploadFile in UploadFiles)
{
string? fileName = ContentDispositionHeaderValue.Parse(uploadFile.ContentDisposition).FileName?.Trim('"');
string filePath = Path.Combine(hostingEnv.WebRootPath, "Audio/", fileName!);
if (System.IO.File.Exists(filePath))
{
System.IO.File.Delete(filePath);
return Ok($"File '{fileName}' has been deleted.");
}
else
{
// Return 404 status if file not found
return NotFound($"File '{fileName}' not found.");
}
}
}
catch (Exception ex)
{
return StatusCode(500, $"An error occurred: {ex.Message}");
}
return StatusCode(500, $"No file processed.");
}
}
}Audio save format
The audio files can be saved as Blob or Base64 url by using the RichTextEditorAudioSettings.SaveFormat property, which is of enum type and the generated url will be set to the src attribute of the <source> tag.
By default, the files are saved in the
Blobformat.
The example below shows how audio is saved in Blob and Base64 formats.
<audio>
    <source src="blob:https://ej2.syncfusion.com/3ab56a6e-ec0d-490f-85a5-f0aeb0ad8879" type="audio/mp3" />
</audio>

<audio>
    <source src="data:audio/mp3;base64,iVBORw0KGgoAAAANSUhEUgAAADAAAAAwCAYAAABXAvmHA" type="audio/mp3" />
</audio>
Maximum file size restriction
By using the Rich Text Editor’s RichTextEditorAudioSettings.MaxFileSize property, you can restrict the audio to upload when the given audio size is greater than the allowed fileSize.
In the following example, the audio size has been validated before uploading, and it is determined whether the audio has been uploaded or not.
@using Syncfusion.Blazor.RichTextEditor

<SfRichTextEditor>
    <RichTextEditorToolbarSettings Items="@Items" />
    <RichTextEditorAudioSettings MaxFileSize="30000000"></RichTextEditorAudioSettings>
    <h5>Maximum File Size Restriction</h5>
    <p>You can control the size of audio files uploaded to the editor to ensure optimal performance and prevent large file uploads.</p>
    <ul>
        <li>The MaxFileSize property allows you to restrict audio uploads by defining the maximum allowed file size. By default, the maximum size is set to 30,000,000 bytes (approximately 30 MB). </li>
        <li>Audio files exceeding this limit are blocked from being uploaded to ensure better control and performance.</li>
    </ul>
</SfRichTextEditor>
@code {
    private List<ToolbarItemModel> Items = new List<ToolbarItemModel>()
    {
        new ToolbarItemModel() { Command = ToolbarCommand.Audio }
    };
}
Replacing audio
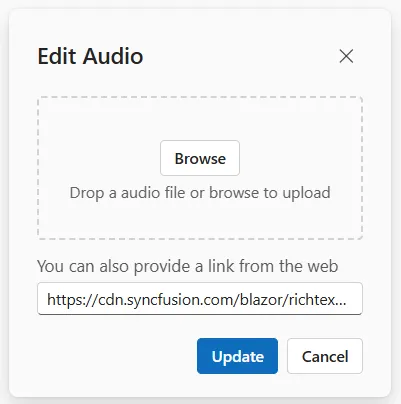
Once an audio file has been inserted, you can change it using the Blazor Rich Text Editor RichTextEditorQuickToolbarSettings Replace option. You can also replace the audio file using the web URL or the browse option in the audio dialog.
Delete audio
To remove audio from the Blazor Rich Text Editor content, select audio and click the Remove tool from the quick toolbar. It will delete the audio from the Blazor Rich Text Editor content.
Once you select the audio from the local machine, the URL for the audio will be generated. You can remove the audio from the service location by clicking the delete icon.
Display Position
Sets the default display for an audio file when it is inserted in the Blazor Rich Text Editor using the RichTextEditorMediaSettings.layoutOption property. The possible options are Inline and Break. It also updates the audio element’s layout position when updating the display positions.
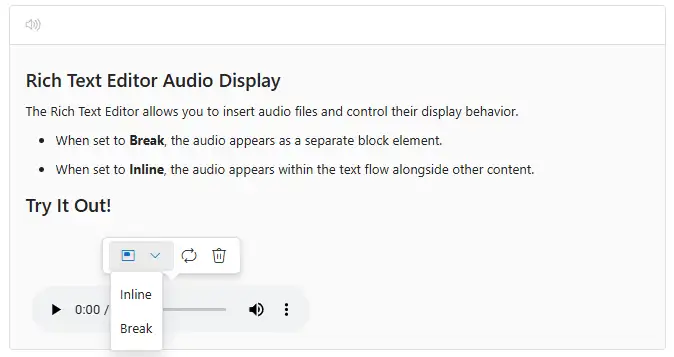
The default
layoutOptionproperty is set toInline.
@using Syncfusion.Blazor.RichTextEditor

<SfRichTextEditor>
    <RichTextEditorToolbarSettings Items="@Items" />
    <RichTextEditorAudioSettings LayoutOption="DisplayLayoutOptions.Break"></RichTextEditorAudioSettings>
    <h5>Rich Text Editor Audio Display</h5>
    <p>The Rich Text Editor allows you to insert audio files and control their display behavior.</p>
    <ul>
        <li>When set to <b>Break</b>, the audio appears as a separate block element.</li>
        <li>When set to <b>Inline</b>, the audio appears within the text flow alongside other content.</li>
    </ul>
    <h5>Try It Out!</h5>
    <audio controls>
        <source src="https://cdn.syncfusion.com/ej2/richtexteditor-resources/RTE-Audio.wav" type="audio/mp3" />
    </audio>
</SfRichTextEditor>
@code {
    private List<ToolbarItemModel> Items = new List<ToolbarItemModel>()
    {
        new ToolbarItemModel() { Command = ToolbarCommand.Audio }
    };
}
Drag and drop audio insertion
Default upload: Insert audio directly from your local file system (e.g., File Explorer, Finder) into the editor.
Server upload: Use the SaveUrl property to upload audio files to your server before inserting them into the editor.
@using Syncfusion.Blazor.RichTextEditor

<SfRichTextEditor>
    <RichTextEditorToolbarSettings Items="@Items" />
    <RichTextEditorAudioSettings SaveUrl="@saveUrl" Path="@path"></RichTextEditorAudioSettings>
    <p>
        The Rich Text Editor supports seamless audio insertion through drag-and-drop functionality. Users can quickly insert audio files into their content with a simple drag-and-drop action.
    </p>
    <p><b>Key features:</b></p>
    <ul>
        <li>Supports local upload: Drag audio files from your local system (e.g., File Explorer, Finder) and drop them
            directly into the editor.</li>
        <li>Supports server upload: Configure the <code>SaveUrl</code> property to upload audio files to your server
            before inserting them into the editor.</li>
        <li>Supports common audio formats such as MP3, WAV, and M4A ,WMA</li>
        <li>Fully customizable upload settings, including size limits and validation.</li>
    </ul>
</SfRichTextEditor>
@code {
    private string saveUrl = "https://blazor.syncfusion.com/services/production/api/RichTextEditor/SaveFile";
    private string path = "https://blazor.syncfusion.com/services/production/RichTextEditor/";
    private List<ToolbarItemModel> Items = new List<ToolbarItemModel>()
    {
        new ToolbarItemModel() { Command = ToolbarCommand.Audio }
    };
}
Disabling audio drag and drop
You can prevent drag-and-drop action by setting the OnMediaDrop argument’s Cancel property to true. The following code shows how to prevent the drag-and-drop.
@using Syncfusion.Blazor.RichTextEditor

<SfRichTextEditor>
    <RichTextEditorEvents OnMediaDrop="@OnMediaDrop"></RichTextEditorEvents>
</SfRichTextEditor>
@code{
    private void OnMediaDrop(MediaDropEventArgs args)
    {
        if (args.MediaType == "Audio") {
            args.Cancel = true;
        }
    }
}
Rename audio before inserting
Using the RichTextEditorAudioSettings property, specify the server handler to upload the selected audio. Then, by binding the FileUploadSuccess event, you will receive the modified file name from the server and update it in the Rich Text Editor’s insert audio dialog.
Refer RenameController.cs controller file for configure the server-side.
@using Syncfusion.Blazor.RichTextEditor

<SfRichTextEditor>
    <RichTextEditorToolbarSettings Items="@Items" />
    <RichTextEditorEvents FileUploadSuccess="@OnFileUploadSuccess"></RichTextEditorEvents>
    <RichTextEditorAudioSettings SaveUrl="api/Audio/Rename" Path="./Audio/"></RichTextEditorAudioSettings>
</SfRichTextEditor>
@code {

    public string[] header { get; set; }
    private List<ToolbarItemModel> Items = new List<ToolbarItemModel>()
    {
        new ToolbarItemModel() { Command = ToolbarCommand.Audio }
    };
    private void OnFileUploadSuccess(FileUploadSuccessEventArgs args)
    {
        var headers = args.Response.Headers.ToString();
        header = headers.Split("name: ");
        header = header[1].Split("\r");
        // Update the modified audio name to display a audio in the editor.
        args.File.Name = header[0];
    }
}using System;
using System.IO;
using System.Net.Http.Headers;
using Microsoft.AspNetCore.Mvc;
using Microsoft.AspNetCore.Http;
using System.Collections.Generic;
using Microsoft.AspNetCore.Hosting;
using Microsoft.AspNetCore.Http.Features;
namespace RenameAudio.Controllers
{
[ApiController]
public class AudioController : ControllerBase
{
private double x;
private string audiofileName;
private readonly IWebHostEnvironment hostingEnv;
public AudioController(IWebHostEnvironment env)
{
this.hostingEnv = env;
}
[HttpPost("[action]")]
[Route("api/Audio/Rename")]
public void Rename(IList<IFormFile> UploadFiles)
{
try
{
foreach (IFormFile file in UploadFiles)
{
if (UploadFiles != null)
{
string targetPath = hostingEnv.ContentRootPath + "\\wwwroot\\Audio";
string filename = ContentDispositionHeaderValue.Parse(file.ContentDisposition).FileName.Trim('"');
// Create a new directory if it does not exist
if (!Directory.Exists(targetPath))
{
Directory.CreateDirectory(targetPath);
}
audiofileName = filename;
string path = hostingEnv.WebRootPath + "\\Audio" + $@"\{filename}";
// Rename a uploaded audio file name
while (System.IO.File.Exists(path))
{
audiofileName = "rteAudio" + x + "-" + filename;
path = hostingEnv.WebRootPath + "\\Audio" + $@"\rteAudio{x}-{filename}";
x++;
}
if (!System.IO.File.Exists(path))
{
using (FileStream fs = System.IO.File.Create(path))
{
file.CopyTo(fs);
fs.Flush();
fs.Close();
}
// Modified file name shared through response header by adding custom header
Response.Headers.Add("name", audiofileName);
Response.StatusCode = 200;
Response.ContentType = "application/json; charset=utf-8";
}
}
}
}
catch (Exception e)
{
Response.Clear();
Response.ContentType = "application/json; charset=utf-8";
Response.HttpContext.Features.Get<IHttpResponseFeature>().ReasonPhrase = e.Message;
}
}
}
}Upload audio with authentication
The Blazor Rich Text Editor control allows you to add additional data with the File Upload, which can be received on the server side. By using the FileUploading event and its CustomFormData argument, you can pass parameters to the controller action. On the server side, you can fetch the custom headers by accessing the form collection from the current request, which retrieves the values sent using the POST method.
By default, it doesn’t support the
UseDefaultCredentialsproperty; you need to manually append the default credentials to the upload request.
@using Syncfusion.Blazor.RichTextEditor

<SfRichTextEditor>
    <RichTextEditorToolbarSettings Items="@Items" />
    <RichTextEditorEvents FileUploading="@OnFileUploading"></RichTextEditorEvents>
    <RichTextEditorAudioSettings SaveUrl="api/Audio/Save" Path="./Audio/"></RichTextEditorAudioSettings>
</SfRichTextEditor>
@code {
    private List<ToolbarItemModel> Items = new List<ToolbarItemModel>()
    {
        new ToolbarItemModel() { Command = ToolbarCommand.Audio }
    };
    private void OnFileUploading(FileUploadingEventArgs args)
    {
        var accessToken = "Authorization_token";
        // adding custom Form Data
        args.CustomFormData = new List<object> { new { Authorization = accessToken } };
    }
}using System;
using System.IO;
using System.Net.Http.Headers;
using Microsoft.AspNetCore.Mvc;
using Microsoft.AspNetCore.Http;
using System.Collections.Generic;
using Microsoft.AspNetCore.Hosting;
using Microsoft.AspNetCore.Http.Features;
namespace AudioUpload.Controllers
{
[ApiController]
public class AudioController : ControllerBase
{
private readonly IWebHostEnvironment hostingEnv;
public AudioController(IWebHostEnvironment env)
{
this.hostingEnv = env;
}
[HttpPost("[action]")]
[Route("api/Audio/Save")]
public void Save(IList<IFormFile> UploadFiles)
{
string currentPath = Request.Form["Authorization"].ToString();
try
{
foreach (var file in UploadFiles)
{
if (UploadFiles != null)
{
string targetPath = hostingEnv.ContentRootPath + "\\wwwroot\\Audio";
string filename = ContentDispositionHeaderValue.Parse(file.ContentDisposition).FileName.Trim('"');
// Create a new directory if it does not exist
if (!Directory.Exists(targetPath))
{
Directory.CreateDirectory(targetPath);
}
// Name which is used to save the audio
filename = targetPath + $@"\{filename}";
if (!System.IO.File.Exists(filename))
{
// Upload an audio, if the same file name does not exist in the directory
using (FileStream fs = System.IO.File.Create(filename))
{
file.CopyTo(fs);
fs.Flush();
}
Response.StatusCode = 200;
}
else
{
Response.StatusCode = 204;
}
}
}
}
catch (Exception e)
{
Response.Clear();
Response.ContentType = "application/json; charset=utf-8";
Response.HttpContext.Features.Get<IHttpResponseFeature>().ReasonPhrase = e.Message;
}
}
}
}Paste audio into the editor
The Blazor Rich Text Editor supports pasting audio files directly into the editor content. You can paste single or multiple audio files from your file system directly into the editor.