How can I help you?
Getting Started with ReactJS AutoComplete
Using the following steps, you can create a React AutoComplete component. The basic rendering of React AutoComplete is achieved with default functionality.
Create an AutoComplete
You can create a React application and add necessary scripts and styles with the help of the given React Getting Started Documentation.
Create a JSX file for rendering AutoComplete component using <EJ.Autocomplete> syntax. Add required properties to it in <EJ.Autocomplete> tag element
"use strict";
ReactDOM.render(
<EJ.Autocomplete id="default">
</EJ.Autocomplete>,
document.getElementById('autocomplete-default')
);
Define an HTML element for adding AutoComplete in the application and refer the JSX file.
<div id="autocomplete-default"></div>
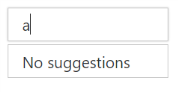
<script type="text/babel" src="autocomplete.jsx"></script>This will render an Autocomplete with no suggestion on executing.
Data Binding
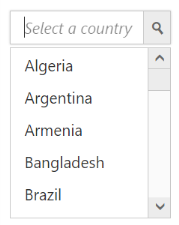
The data for AutoComplete suggestion list which can be populated using the dataSource property.
"use strict";
var autocomplete_data = [
{ text: "Algeria", sprite: "flag-dz" }, { text: "Argentina", sprite: "flag-ar" },
    { text: "Armenia", sprite: "flag-am" }, { text: "Brazil", sprite: "flag-br" },
    { text: "Bangladesh", sprite: "flag-bd" }, { text: "Canada", sprite: "flag-ca" },
    { text: "Cuba", sprite: "flag-cu" }, { text: "China", sprite: "flag-cn" },
    { text: "Denmark", sprite: "flag-dk" }, { text: "Estonia", sprite: "flag-ee" },
    { text: "Egypt", sprite: "flag-eg" }, { text: "France", sprite: "flag-fr" },
    { text: "Finland", sprite: "flag-fi" }, { text: "Greenland", sprite: "flag-gl" },
    { text: "India", sprite: "flag-in" }, { text: "Indonesia", sprite: "flag-id" },
    { text: "Malaysia", sprite: "flag-my" }, { text: "Mexico", sprite: "flag-mx" },
    { text: "New Zealand", sprite: "flag-nz" }, { text: "Netherlands", sprite: "flag-nl" },
    { text: "Norway", sprite: "flag-no" }, { text: "Portugal", sprite: "flag-pt" },
    { text: "Poland", sprite: "flag-pl" }, { text: "Qatar", sprite: "flag-qa" },
    { text: "Romania", sprite: "flag-ro" }, { text: "Spain", sprite: "flag-es" },
    { text: "Singapore", sprite: "flag-sg" }, { text: "Saudi Arabia", sprite: "flag-sa" },
    { text: "Thailand", sprite: "flag-th" }, { text: "Turkey", sprite: "flag-tr" },
    { text: "Ukraine", sprite: "flag-ua" }, { text: "United States", sprite: "flag-us" },
    { text: "Uruguay", sprite: "flag-uy" }, { text: "Viet Nam", sprite: "flag-vn" },
    { text: "Yemen", sprite: "flag-ye" }
];

var fields={"text":"text","key":"sprite"}
ReactDOM.render(
<EJ.Autocomplete id="default" dataSource = {autocomplete_data} fields={fields} watermarkText="Select a country">
</EJ.Autocomplete>,
document.getElementById('autocomplete-default')
);
Enable Popup Button
You can enable the popup button of AutoComplete by using showPopupButton property which helps you to show all the available suggestions on clicking it.
"use strict";
var autocomplete_data = [
{ text: "Algeria", sprite: "flag-dz" }, { text: "Argentina", sprite: "flag-ar" },
    { text: "Armenia", sprite: "flag-am" }, { text: "Brazil", sprite: "flag-br" },
    { text: "Bangladesh", sprite: "flag-bd" }, { text: "Canada", sprite: "flag-ca" },
    { text: "Cuba", sprite: "flag-cu" }, { text: "China", sprite: "flag-cn" },
    { text: "Denmark", sprite: "flag-dk" }, { text: "Estonia", sprite: "flag-ee" },
    { text: "Egypt", sprite: "flag-eg" }, { text: "France", sprite: "flag-fr" },
    { text: "Finland", sprite: "flag-fi" }, { text: "Greenland", sprite: "flag-gl" },
    { text: "India", sprite: "flag-in" }, { text: "Indonesia", sprite: "flag-id" },
    { text: "Malaysia", sprite: "flag-my" }, { text: "Mexico", sprite: "flag-mx" },
    { text: "New Zealand", sprite: "flag-nz" }, { text: "Netherlands", sprite: "flag-nl" },
    { text: "Norway", sprite: "flag-no" }, { text: "Portugal", sprite: "flag-pt" },
    { text: "Poland", sprite: "flag-pl" }, { text: "Qatar", sprite: "flag-qa" },
    { text: "Romania", sprite: "flag-ro" }, { text: "Spain", sprite: "flag-es" },
    { text: "Singapore", sprite: "flag-sg" }, { text: "Saudi Arabia", sprite: "flag-sa" },
    { text: "Thailand", sprite: "flag-th" }, { text: "Turkey", sprite: "flag-tr" },
    { text: "Ukraine", sprite: "flag-ua" }, { text: "United States", sprite: "flag-us" },
    { text: "Uruguay", sprite: "flag-uy" }, { text: "Viet Nam", sprite: "flag-vn" },
    { text: "Yemen", sprite: "flag-ye" }
];

var fields={"text":"text","key":"sprite"}
ReactDOM.render(
<EJ.Autocomplete id="default" dataSource = {autocomplete_data} showPopupButton={true} fields={fields} watermarkText="Select a country">
</EJ.Autocomplete>,
document.getElementById('autocomplete-default')
);
NOTE
You can find the Rotator properties from the API reference document