AI-Driven Smart Location Search in .NET MAUI Maps
18 Nov 201824 minutes to read
This document provides a comprehensive guide to implementing advanced search functionality within the Syncfusion .NET MAUI Maps control. By integrating Azure OpenAI, this solution enables an intelligent, AI-powered location search experience.
Prerequisite: Ensure that the required NuGet packages are installed, the necessary namespaces are imported, and the .NET MAUI Maps control is properly configured in your application. For detailed setup and configuration instructions, refer to the .NET MAUI Maps Getting Started guide. Also, refer to the .NET MAUI Autocomplete Getting Started guide before proceeding with this documentation.
Integrating AI-powered smart location search in .NET MAUI Autocomplete
Before proceeding, ensure that Azure OpenAI is configured and integrated with your .NET MAUI application. Refer to the Azure OpenAI integration prerequisites and complete the required setup steps.
The GetResultsFromAI method sends the user’s prompt to the Azure OpenAI service and retrieves the AI-generated response. It processes the request asynchronously, supports cancellation, and includes exception handling to ensure reliable communication with the AI model.
public async Task<string> GetResultsFromAI(string userPrompt)
{
    if (IsCredentialValid && Client != null)
    {
        ChatHistory = string.Empty;
        // Add the system message and user message to the options
        ChatHistory = ChatHistory + "You are a predictive analytics assistant.";
        ChatHistory = ChatHistory + userPrompt;
        try
        {
            var response = await Client.CompleteAsync(ChatHistory);
            return response.ToString();
        }
        catch
        {
            return string.Empty;
        }
    }

    return string.Empty;
}
To design the AI-powered smart location search UI using the .NET MAUI Autocomplete control, and then map the selected location into the .NET MAUI Maps control. Before proceeding, please refer to the getting started documentation for both the Syncfusion .NET MAUI Maps and Autocomplete controls.
Step 1: Create a custom marker model
Create a custom marker model to define geographic location information for .NET MAUI Maps tile layer markers. The model can also include a name, details, address, and image to provide additional information for the marker tooltip. The Image property holds the AI-generated image URI, and ImageName is reserved for an alternative local image name if needed.
public class CustomMarker : MapMarker
{
    public string? Name { get; set; }

    public string? Details { get; set; }

    public Uri? Image { get; set; }

    public string? Address { get; set; }

    public string? ImageName { get; set; }
}
Step 2: Add Maps tile layer in .NET MAUI Maps
Add a tile layer in the .NET MAUI Maps that can be used to search for and locate landmarks based on user input. The EnableCenterAnimation property animates the map center change, CanCacheTiles enables local tile caching for faster reloads, and ZoomLevel sets the initial magnification.
The OpenStreetMap tile URL used here is subject to the OSM Tile Usage Policy. Use a suitable tile provider for production and respect the provider’s usage limits.
<maps:SfMaps x:Name="maps">
    <maps:SfMaps.Layer>
        <maps:MapTileLayer x:Name="mapTileLayer"
                           UrlTemplate="https://tile.openstreetmap.org/{z}/{x}/{y}.png"
                           CanCacheTiles="True"
                           EnableCenterAnimation="True"
                           ShowMarkerTooltip="True">
            <maps:MapTileLayer.Center>
                <maps:MapLatLng x:Name="mapLatLng"
                                Latitude="37.0902"
                                Longitude="-95.7129">
                </maps:MapLatLng>
            </maps:MapTileLayer.Center>

            <maps:MapTileLayer.ZoomPanBehavior>
                <maps:MapZoomPanBehavior x:Name="zoomPanBehavior"
                                         ZoomLevel="4"
                                         MinZoomLevel="4"
                                         MaxZoomLevel="18"
                                         EnableDoubleTapZooming="True" />
            </maps:MapTileLayer.ZoomPanBehavior>
        </maps:MapTileLayer>
    </maps:SfMaps.Layer>
</maps:SfMaps>
Step 3: Customize the .NET MAUI Maps marker and tooltips
Customize the .NET MAUI Maps markers and tooltips to display relevant information, improving the overall user experience on the map. The MarkerTemplate defines the marker icon, while MarkerTooltipTemplate selects the tooltip layout via a DataTemplateSelector. The MarkerTooltipSettings configure the tooltip appearance (for example, a transparent background) so that the custom tooltip DataTemplate controls the visuals.
<Grid.Resources>
<ResourceDictionary>
<DataTemplate x:Key="MarkerTemplate">
<StackLayout IsClippedToBounds="false"
HorizontalOptions="Start"
VerticalOptions="Start"
HeightRequest="30">
<Image Source="map_pin.png"
Scale="1"
Aspect="AspectFit"
HorizontalOptions="Start"
VerticalOptions="Start"
HeightRequest="30"
WidthRequest="30" />
</StackLayout>
</DataTemplate>
<DataTemplate x:Key="DetailTemplate">
<Frame HasShadow="True" Margin="0" Padding="0" CornerRadius="10" WidthRequest="250">
<StackLayout BackgroundColor="Transparent" Orientation="Vertical">
<Image Source="{Binding DataItem.Image}" HeightRequest="120" Margin="0" WidthRequest="250" Aspect="AspectFill"/>
<Label Grid.Row="1" Text="{Binding DataItem.Name}" FontAttributes="Bold" FontSize="12" LineBreakMode="WordWrap" Padding="10,5,0,0"/>
<Label Grid.Row="2" Text="{Binding DataItem.Details}" LineBreakMode="WordWrap" FontSize="10" Padding="10,0,0,0"/>
<Label Grid.Row="3" Padding="10,0,0,5">
<Label.FormattedText>
<FormattedString>
<Span Text="" FontSize="8" FontFamily="MauiSampleFontIcon"/>
<Span Text="{Binding DataItem.Address}" FontSize="10"/>
</FormattedString>
</Label.FormattedText>
</Label>
</StackLayout>
</Frame>
</DataTemplate>
<DataTemplate x:Key="NormalTemplate">
<Frame HasShadow="True" Margin="0" Padding="0" CornerRadius="10" WidthRequest="250">
<StackLayout BackgroundColor="Transparent" Orientation="Vertical">
<Image Source="{Binding DataItem.Image}" HeightRequest="120" Margin="0" WidthRequest="250" Aspect="AspectFill"/>
<Label Grid.Row="1" Text="{Binding DataItem.Name}" FontAttributes="Bold" FontSize="12" LineBreakMode="WordWrap" Padding="10,5,0,0"/>
<Label Grid.Row="2" Text="{Binding DataItem.Details}" LineBreakMode="WordWrap" FontSize="10" Padding="10,0,0,5"/>
</StackLayout>
</Frame>
</DataTemplate>
<local:MarkerTemplateSelector x:Key="MarkerTemplateSelector"
DetailTemplate="{StaticResource DetailTemplate}"
NormalTemplate="{StaticResource NormalTemplate}"/>
</ResourceDictionary>
</Grid.Resources>
<maps:SfMaps x:Name="maps">
<maps:SfMaps.Layer>
<!-- code omitted for brevity -->
<maps:MapTileLayer x:Name="mapTileLayer"
UrlTemplate="https://tile.openstreetmap.org/{z}/{x}/{y}.png"
CanCacheTiles="True"
EnableCenterAnimation="True"
ShowMarkerTooltip="True"
MarkerTooltipTemplate="{StaticResource MarkerTemplateSelector}"
MarkerTemplate="{StaticResource MarkerTemplate}">
<maps:MapTileLayer.MarkerTooltipSettings>
<maps:MapTooltipSettings Background="Transparent"/>
</maps:MapTileLayer.MarkerTooltipSettings>
</maps:MapTileLayer>
</maps:SfMaps.Layer>
</maps:SfMaps>Refer to the following code example to select the marker tooltip data template.
public class MarkerTemplateSelector : DataTemplateSelector
{
    public DataTemplate? NormalTemplate { get; set; }
    public DataTemplate? DetailTemplate { get; set; }

    protected override DataTemplate? OnSelectTemplate(object item, BindableObject container)
    {
        var customMarker = (CustomMarker)item;
        return customMarker.Address == null ? NormalTemplate : DetailTemplate;
    }
}
Step 4: Integrate .NET MAUI Autocomplete in the searching UI
Add the .NET MAUI Autocomplete control to collect the user input, which can then be passed to an AI service to retrieve geometric details.
The tooltip uses a custom
MauiSampleFontIconfont family. Register custom fonts inMauiProgram.csby adding them to theConfigureFontspipeline (see the Fonts documentation).
Refer to the following code example to add the .NET MAUI Autocomplete control and design a search button. The button is wired to the OnSearchClicked handler (shown in Step 5) that calls GetRecommendationAsync.
<!-- code omitted for brevity -->
<HorizontalStackLayout VerticalOptions="Start" IsClippedToBounds="False" HorizontalOptions="Start" WidthRequest="{OnPlatform Default=350, Android=300}" Margin="10" IsVisible="True">
<!-- Get location inputs from users to find a location -->
<editors:SfAutocomplete x:Name="autoComplete"
IsClearButtonVisible="False"
HorizontalOptions="Start"
WidthRequest="{OnPlatform Default=350, Android=300}"
HeightRequest="50"
DropDownItemHeight="50"
Text="Hospitals in New York">
</editors:SfAutocomplete>
<!-- Location Search button -->
<Button x:Name="button"
Text=""
Margin="-55,0,0,0"
BackgroundColor="Transparent"
BorderColor="Transparent"
FontSize="20"
TextColor="Black"
FontFamily="MauiSampleFontIcon"
HeightRequest="50"
WidthRequest="50"
Clicked="OnSearchClicked"/>
</HorizontalStackLayout>Step 5: Enable AI-powered smart searching in .NET MAUI Maps
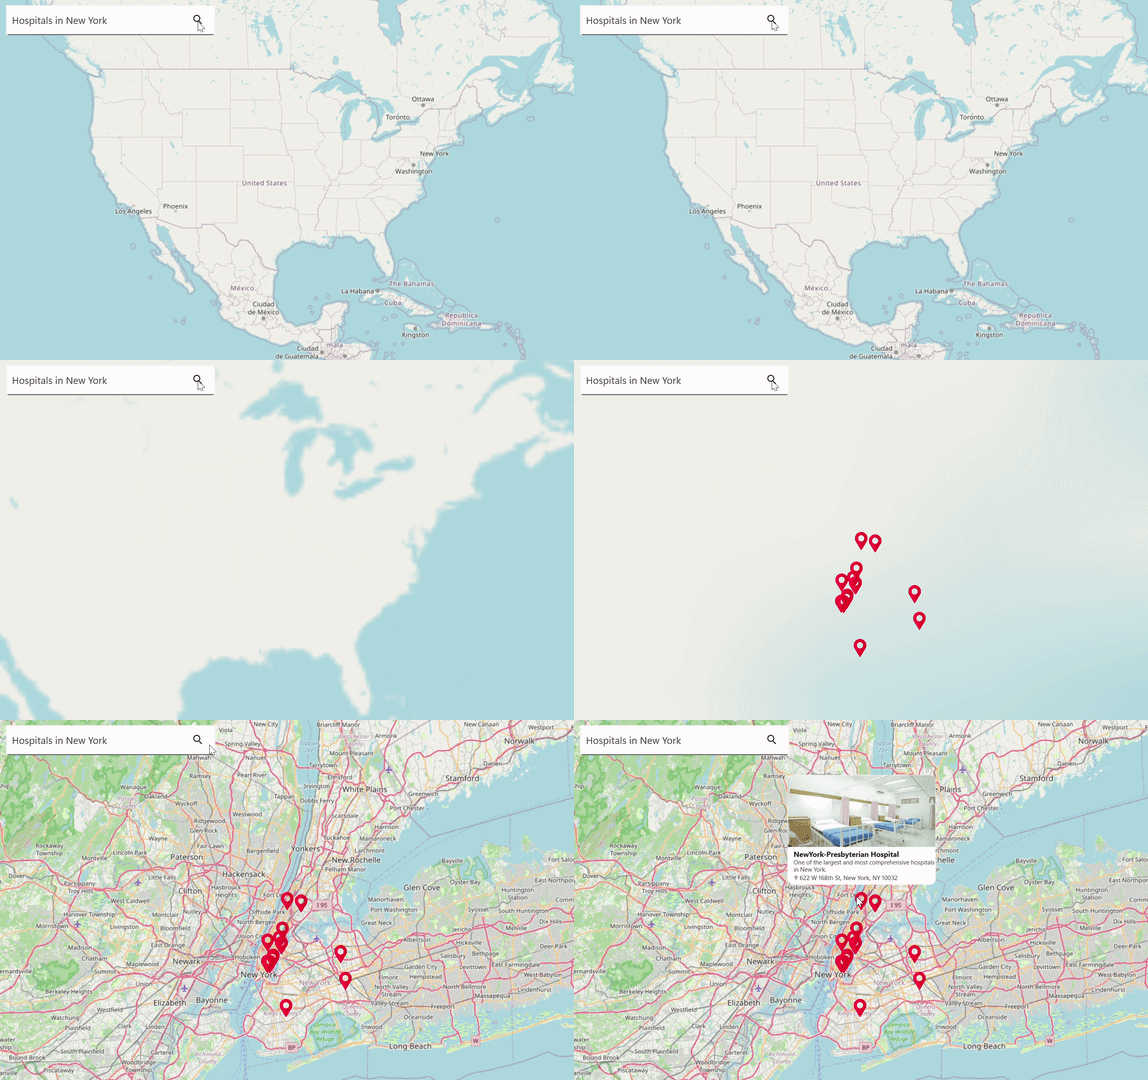
Add the prompt that asks the AI service to convert the user input into geographic locations in JSON format. The JSON data is then parsed into custom markers, which are added to the .NET MAUI Maps by using the Markers property of the MapTileLayer class. The expected JSON shape is shown below.
{
  "markercollections": [
    {
      "Name": "NYU Langone Hospital",
      "Details": "A leading academic medical center.",
      "Latitude": "40.7420",
      "Longitude": "-73.9740",
      "Address": "550 First Avenue, New York, NY 10016"
    }
  ]
}
The following code declares the page fields (azureAIHelper, customMarkers, busyIndicator), the OnSearchClicked button handler, the helper that converts string latitude/longitude values to double, and the GetRecommendationAsync method with error handling for malformed AI responses.
// code omitted for brevity
private AzureOpenAIService azureAIHelper;
private ObservableCollection<CustomMarker> customMarkers;
private SfBusyIndicator? busyIndicator;

private async void OnSearchClicked(object sender, EventArgs e)
{
    if (this.autoComplete != null)
    {
        await this.GetRecommendationAsync(this.autoComplete.Text);
    }
}

// Converts a string latitude/longitude value to a double using an invariant culture
// so that culture-specific decimal separators do not break parsing.
private static double StringToDoubleConverter(string? value)
{
    if (double.TryParse(value, System.Globalization.NumberStyles.Any,
        System.Globalization.CultureInfo.InvariantCulture, out double result))
    {
        return result;
    }
    return 0;
}

private async Task GetRecommendationAsync(string userQuery)
{
    if (this.autoComplete == null || this.mapTileLayer == null || this.zoomPanBehavior == null)
    {
        return;
    }

    if (string.IsNullOrWhiteSpace(this.autoComplete.Text))
    {
        return;
    }

    if (this.busyIndicator != null)
    {
        this.busyIndicator.IsVisible = true;
        this.busyIndicator.IsRunning = true;
    }

    // Prompt that asks the AI service to convert the user input into geographic locations.
    string prompt = $"Given location name: {userQuery}" +
       $"\nSome conditions need to follow:" +
       $"\nCheck the location name is just a state, city, capital or region, then retrieve the following fields: location name, detail, latitude, longitude, and set address value as null" +
       $"\nOtherwise, retrieve minimum 5 to 6 entries with following fields: location's name, details, latitude, longitude, address." +
       $"\nThe return format should be the following JSON format: markercollections[Name, Details, Latitude, Longitude, Address]" +
       $"\nRemove ```json and remove ``` if it is there in the code." +
       $"\nProvide JSON format details only, No need any explanation.";

    try
    {
        var returnMessage = await this.azureAIHelper.GetResultsFromAI(prompt);
        if (string.IsNullOrWhiteSpace(returnMessage))
        {
            this.busyIndicator.IsVisible = false;
            this.busyIndicator.IsRunning = false;
            return;
        }

        var jsonObj = JObject.Parse(returnMessage);
        var markerCollections = jsonObj["markercollections"];

        this.customMarkers?.Clear();
        if (markerCollections != null)
        {
            foreach (var marker in markerCollections)
            {
                CustomMarker customMarker = new CustomMarker();
                customMarker.Name = (string?)marker["Name"];
                customMarker.Details = (string?)marker["Details"];
                customMarker.Address = (string?)marker["Address"];
                customMarker.Latitude = StringToDoubleConverter((string?)marker["Latitude"]);
                customMarker.Longitude = StringToDoubleConverter((string?)marker["Longitude"]);
                if (this.azureAIHelper.Client != null)
                {
                    customMarker.Image = await this.azureAIHelper.GetImageFromAI(customMarker.Name);
                    customMarker.ImageName = string.Empty;
                }
                // JSON data is then parsed into custom markers to add in .NET MAUI Maps.
                this.customMarkers?.Add(customMarker);
            }
        }

        this.mapTileLayer.Markers = this.customMarkers;
        this.mapTileLayer.EnableCenterAnimation = true;
        if (this.customMarkers != null && this.customMarkers.Count > 0)
        {
            var firstMarker = this.customMarkers[0];
            this.mapTileLayer.Center = new MapLatLng
            {
                Latitude = firstMarker.Latitude,
                Longitude = firstMarker.Longitude,
            };

            if (this.azureAIHelper.Client != null)
            {
                this.zoomPanBehavior.ZoomLevel = 10;
            }
        }
    }
    catch (Exception)
    {
        // AI responses can be non-JSON or malformed; surface an empty result set.
        this.customMarkers?.Clear();
        this.mapTileLayer.Markers = this.customMarkers;
    }
    finally
    {
        if (this.busyIndicator != null)
        {
            this.busyIndicator.IsVisible = false;
            this.busyIndicator.IsRunning = false;
        }
    }
}
You can find the complete sample from this link.