Getting Started with .NET MAUI DockLayout (SfDockLayout)
22 Sep 202513 minutes to read
This guide details the initial setup and basic usage of the SfDockLayout control, offering insight into the layout’s capability to arrange views using different docking positions such as top, bottom, left, right, and none.
To get start quickly with our .NET MAUI DockLayout, you can check the below video.
Prerequisites
Ensure the following are installed before you begin:
- .NET 8 SDK or later.
- Visual Studio 2022 version 17.8 or later with the .NET MAUI workload.
Step 1: Create a new .NET MAUI project
- In Visual Studio, go to File > New > Project.
- Select the .NET MAUI App template and click Next.
- Enter a project name and location, then click Create.
Step 2: Install the Syncfusion® .NET MAUI Core Package
- Right-click on the project in Solution Explorer and choose Manage NuGet Packages.
- Search for Syncfusion.Maui.Core and install the latest version.
- Ensure all dependent packages are installed and the project builds successfully.
Step 3: Register the Syncfusion Core Handler
Syncfusion.Maui.Core nuget is a dependent package for all Syncfusion® controls of .NET MAUI. In the MauiProgram.cs file, register the handler for Syncfusion® core.
using Microsoft.Extensions.Logging;
using Syncfusion.Maui.Core.Hosting;

namespace DockLayoutGettingStarted
{
    public static class MauiProgram
    {
        public static MauiApp CreateMauiApp()
        {
            var builder = MauiApp.CreateBuilder();
            builder
                .UseMauiApp<App>()
                .ConfigureSyncfusionCore()
                .ConfigureFonts(fonts =>
                {
                    fonts.AddFont("OpenSans-Regular.ttf", "OpenSansRegular");
                });

            return builder.Build();
        }
    }
}
Step 4: Initialize the DockLayout Control
- To initialize the control, import the
Syncfusion.Maui.Corenamespace. - Initialize an SfDockLayout instance.
<ContentPage
    . . .
    xmlns:sf="clr-namespace:Syncfusion.Maui.Core;
    assembly=Syncfusion.Maui.Core">

     <sf:SfDockLayout/>

</ContentPage>
using Syncfusion.Maui.Core;
namespace DockLayoutGettingStarted
{
public partial class MainPage : ContentPage
{
public MainPage()
{
InitializeComponent();
SfDockLayout dockLayout = new SfDockLayout();
Content = dockLayout;
}
}
}Prerequisites
Make sure the following are installed:
- Install .NET 8 SDK or later is installed.
- Set up a .NET MAUI environment with Visual Studio Code.
- Ensure that the .NET MAUI extension is installed and configured as described here.
Step 1: Create a new .NET MAUI project
- Open the command palette by pressing
Ctrl+Shift+P, type .NET:New Project and press Enter. - Choose the .NET MAUI App template.
- Select the project location, type the project name, and press Enter.
- Then choose Create project.
Step 2: Install the Syncfusion® MAUI Core NuGet package
- Press Ctrl + ` (backtick) to open the integrated terminal in Visual Studio Code.
- Ensure you’re in the project root directory where your .csproj file is located.
- Run the command
dotnet add package Syncfusion.Maui.Coreto install the Syncfusion® .NET MAUI Core package. - To ensure all dependencies are installed, run
dotnet restore.
Step 3: Register the handler
The Syncfusion.Maui.Core NuGet is a dependent package for all Syncfusion® controls of .NET MAUI. In the MauiProgram.cs file, register the handler for Syncfusion® core.
using Microsoft.Maui;
using Microsoft.Maui.Hosting;
using Microsoft.Maui.Controls.Compatibility;
using Microsoft.Maui.Controls.Hosting;
using Microsoft.Maui.Controls.Xaml;
using Syncfusion.Maui.Core.Hosting;

namespace DockLayoutSample
{
  public static class MauiProgram
  {
	public static MauiApp CreateMauiApp()
	{
		var builder = MauiApp.CreateBuilder();
		builder
		.UseMauiApp<App>()
		.ConfigureSyncfusionCore()
		.ConfigureFonts(fonts =>
		{
			fonts.AddFont("OpenSans-Regular.ttf", "OpenSansRegular");
		});

		return builder.Build();
	 }
  }
}
Step 4: Initialize the DockLayout Control
- To initialize the control, import the
Syncfusion.Maui.Corenamespace. - Initialize an SfDockLayout instance.
<ContentPage
    . . .
    xmlns:sf="clr-namespace:Syncfusion.Maui.Core;
    assembly=Syncfusion.Maui.Core">

     <sf:SfDockLayout/>

</ContentPage>
using Syncfusion.Maui.Core;
namespace DockLayoutGettingStarted
{
public partial class MainPage : ContentPage
{
public MainPage()
{
InitializeComponent();
SfDockLayout dockLayout = new SfDockLayout();
Content = dockLayout;
}
}
}Prerequisites
Before proceeding, ensure the following are set up:
- Ensure you have the latest version of JetBrains Rider.
- Install .NET 8 SDK or later is installed.
- Make sure the MAUI workloads are installed and configured as described here.
Step 1: Create a new .NET MAUI Project
- Go to File > New Solution, Select .NET (C#) and choose the .NET MAUI App template.
- Enter the Project Name, Solution Name, and Location.
- Select the .NET framework version and click Create.
Step 2: Install the Syncfusion® .NET MAUI Core Package
- In Solution Explorer, right-click the project and choose Manage NuGet Packages.
- Search for Syncfusion.Maui.Core and install the latest version.
- Ensure the necessary dependencies are installed correctly, and the project is restored. If not, Open the Terminal in Rider and manually run:
dotnet restore
Step 3: Register the handler
Syncfusion.Maui.Core nuget is a dependent package for all Syncfusion® controls of .NET MAUI. In the MauiProgram.cs file, register the handler for Syncfusion® core.
using Microsoft.Extensions.Logging;
using Syncfusion.Maui.Core.Hosting;

namespace DockLayoutGettingStarted
{
    public static class MauiProgram
    {
        public static MauiApp CreateMauiApp()
        {
            var builder = MauiApp.CreateBuilder();
            builder
                .UseMauiApp<App>()
                .ConfigureSyncfusionCore()
                .ConfigureFonts(fonts =>
                {
                    fonts.AddFont("OpenSans-Regular.ttf", "OpenSansRegular");
                });

            return builder.Build();
        }
    }
}
Step 4: Initialize the DockLayout Control
- To initialize the control, import the
Syncfusion.Maui.Corenamespace. - Initialize an SfDockLayout instance.
<ContentPage
    . . .
    xmlns:sf="clr-namespace:Syncfusion.Maui.Core;
    assembly=Syncfusion.Maui.Core">

     <sf:SfDockLayout/>

</ContentPage>
using Syncfusion.Maui.Core;
namespace DockLayoutGettingStarted
{
public partial class MainPage : ContentPage
{
public MainPage()
{
InitializeComponent();
SfDockLayout dockLayout = new SfDockLayout();
Content = dockLayout;
}
}
}Set Dock Position for Child Views
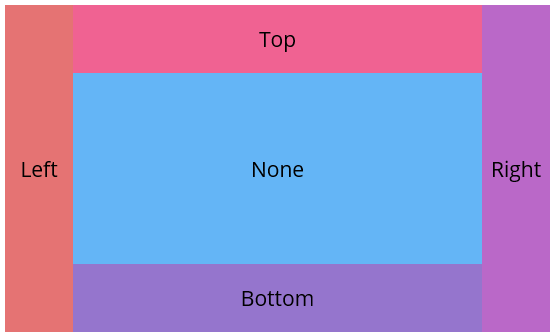
Inside the SfDockLayout control, child views can be arranged using the Dock attached property. This property allows to dock elements to specific edges— Top, Bottom, Left, Right, or set to None to remain non-docked and fill the remaining space.
<ContentPage xmlns="http://schemas.microsoft.com/dotnet/2021/maui"
             xmlns:x="http://schemas.microsoft.com/winfx/2009/xaml"
             xmlns:sf="clr-namespace:Syncfusion.Maui.Core;assembly=Syncfusion.Maui.Core"
             x:Class="DockLayoutGettingStarted.MainPage">

   <ContentPage.Content>
        <sf:SfDockLayout >
            <Label Text="Left" WidthRequest="80" sf:SfDockLayout.Dock="Left" Background="#E57373" />
            <Label Text="Right" WidthRequest="80" sf:SfDockLayout.Dock="Right" Background="#BA68C8" />
            <Label Text="Top" HeightRequest="80" sf:SfDockLayout.Dock="Top" Background="#F06292" />
            <Label Text="Bottom" HeightRequest="80"  sf:SfDockLayout.Dock="Bottom" Background="#9575CD"/>
            <Label Text="None" BackgroundColor="#64B5F6" />
        </sf:SfDockLayout>
    </ContentPage.Content>

</ContentPage>
using Syncfusion.Maui.Core;
namespace DockLayoutGettingStarted
{
public partial class MainPage : ContentPage
{
public MainPage()
{
InitializeComponent();
SfDockLayout dockLayout = new SfDockLayout();
dockLayout.Children.Add(new Label() { Text = "Left", WidthRequest = 80, Background = Color.FromArgb("#E57373") }, Dock.Left);
dockLayout.Children.Add(new Label() { Text = "Right", WidthRequest = 80, Background = Color.FromArgb("#BA68C8") }, Dock.Right);
dockLayout.Children.Add(new Label() { Text = "Top", HeightRequest = 80, Background = Color.FromArgb("#F06292") }, Dock.Top);
dockLayout.Children.Add(new Label() { Text = "Bottom", HeightRequest = 80, Background = Color.FromArgb("#9575CD") }, Dock.Bottom);
dockLayout.Children.Add(new Label() { Text = "None", Background = Color.FromArgb("#64B5F6") });
Content = dockLayout;
}
}
}
You can access a complete getting started sample from this link.