How can I help you?
Getting Started with .NET MAUI CheckBox
23 Jul 202521 minutes to read
This section guides you through setting up and configuring a CheckBox in your .NET MAUI application. Follow the steps below to add a basic CheckBox to your project.
To quickly get started with the .NET MAUI CheckBox, watch this video.
Prerequisites
Before proceeding, ensure the following are set up:
- Install .NET 8 SDK or later.
- Set up a .NET MAUI environment with Visual Studio 2022 (v17.3 or later).
Step 1: Create a new .NET MAUI project
- Go to File > New > Project and choose the .NET MAUI App template.
- Name the project and choose a location. Then, click Next.
- Select the .NET framework version and click Create.
Step 2: Install the Syncfusion® MAUI Buttons NuGet package
- In Solution Explorer, right-click the project and choose Manage NuGet Packages.
- Search for Syncfusion.Maui.Buttons and install the latest version.
- Ensure the necessary dependencies are installed correctly, and the project is restored.
Step 3: Register the handler
Syncfusion.Maui.Core is a dependent package for all Syncfusion® controls of .NET MAUI. In the MauiProgram.cs file, register the handler for Syncfusion® core.
using Microsoft.Extensions.Logging;
using Syncfusion.Maui.Core.Hosting;

namespace CheckBoxGettingStarted
{
    public static class MauiProgram
    {
        public static MauiApp CreateMauiApp()
        {
            var builder = MauiApp.CreateBuilder();
            builder
            .UseMauiApp<App>()
            .ConfigureSyncfusionCore()
            .ConfigureFonts(fonts =>
            {
                fonts.AddFont("OpenSans-Regular.ttf", "OpenSansRegular");
            });

            return builder.Build();
        }
    }
}
Step 4: Add a basic SfCheckBox
- To initialize the control, import the Buttons namespace into your code.
- Initialize SfCheckBox.
<ContentPage
    . . .
    xmlns:buttons="clr-namespace:Syncfusion.Maui.Buttons;assembly=Syncfusion.Maui.Buttons">
   <buttons:SfCheckBox x:Name="checkBox"/>
</ContentPage>
using Syncfusion.Maui.Buttons;
namespace CheckBoxGettingStarted
{
public partial class MainPage : ContentPage
{
public MainPage()
{
InitializeComponent();
SfCheckBox checkBox = new SfCheckBox();
this.Content = checkBox;
}
}
}Prerequisites
Before proceeding, ensure the following are set up:
- Install .NET 8 SDK or later.
- Set up a .NET MAUI environment with Visual Studio Code.
- Ensure that the .NET MAUI extension is installed and configured as described here.
Step 1: Create a new .NET MAUI project
- Open the command palette by pressing
Ctrl+Shift+Pand type .NET:New Project and enter. - Choose the .NET MAUI App template.
- Select the project location, type the project name, and press Enter.
- Then choose Create project.
Step 2: Install the Syncfusion® MAUI Buttons NuGet package
- Press Ctrl + ` (backtick) to open the integrated terminal in Visual Studio Code.
- Ensure you’re in the project root directory where your .csproj file is located.
- Run the command
dotnet add package Syncfusion.Maui.Buttonsto install the Syncfusion® .NET MAUI Buttons package. - To ensure all dependencies are installed, run
dotnet restore.
Step 3: Register the handler
Syncfusion.Maui.Core is a dependent package for all Syncfusion® controls of .NET MAUI. In the MauiProgram.cs file, register the handler for Syncfusion® core.
using Microsoft.Extensions.Logging;
using Syncfusion.Maui.Core.Hosting;

namespace CheckBoxGettingStarted
{
    public static class MauiProgram
    {
        public static MauiApp CreateMauiApp()
        {
            var builder = MauiApp.CreateBuilder();
            builder
            .UseMauiApp<App>()
            .ConfigureSyncfusionCore()
            .ConfigureFonts(fonts =>
            {
                fonts.AddFont("OpenSans-Regular.ttf", "OpenSansRegular");
            });

            return builder.Build();
        }
    }
}
Step 4: Add a basic SfCheckBox
- To initialize the control, import the Buttons namespace into your code.
- Initialize SfCheckBox.
<ContentPage
    . . .
    xmlns:buttons="clr-namespace:Syncfusion.Maui.Buttons;assembly=Syncfusion.Maui.Buttons">
   <buttons:SfCheckBox x:Name="checkBox"/>
</ContentPage>
using Syncfusion.Maui.Buttons;
namespace CheckBoxGettingStarted
{
public partial class MainPage : ContentPage
{
public MainPage()
{
InitializeComponent();
SfCheckBox checkBox = new SfCheckBox();
this.Content = checkBox;
}
}
}Prerequisites
Before proceeding, ensure the following are set up:
- Ensure you have the latest version of JetBrains Rider.
- Install .NET 8 SDK or later.
- Make sure the MAUI workloads are installed and configured as described here.
Step 1: Create a new .NET MAUI project
- Go to File > New Solution, Select .NET (C#) and choose the .NET MAUI App template.
- Enter the Project Name, Solution Name, and Location.
- Select the .NET framework version and click Create.
Step 2: Install the Syncfusion® MAUI Buttons NuGet package
- In Solution Explorer, right-click the project and choose Manage NuGet Packages.
- Search for Syncfusion.Maui.Buttons and install the latest version.
- Ensure the necessary dependencies are installed correctly, and the project is restored. If not, open the terminal in Rider and manually run:
dotnet restore.
Step 3: Register the handler
Syncfusion.Maui.Core is a dependent package for all Syncfusion® controls of .NET MAUI. In the MauiProgram.cs file, register the handler for Syncfusion® core.
using Microsoft.Extensions.Logging;
using Syncfusion.Maui.Core.Hosting;

namespace CheckBoxGettingStarted
{
    public static class MauiProgram
    {
        public static MauiApp CreateMauiApp()
        {
            var builder = MauiApp.CreateBuilder();
            builder
            .UseMauiApp<App>()
            .ConfigureSyncfusionCore()
            .ConfigureFonts(fonts =>
            {
                fonts.AddFont("OpenSans-Regular.ttf", "OpenSansRegular");
            });

            return builder.Build();
        }
    }
}
Step 4: Add a basic SfCheckBox
- To initialize the control, import the Buttons namespace into your code.
- Initialize SfCheckBox.
<ContentPage
    . . .
    xmlns:buttons="clr-namespace:Syncfusion.Maui.Buttons;assembly=Syncfusion.Maui.Buttons">
   <buttons:SfCheckBox x:Name="checkBox"/>
</ContentPage>
using Syncfusion.Maui.Buttons;
namespace CheckBoxGettingStarted
{
public partial class MainPage : ContentPage
{
public MainPage()
{
InitializeComponent();
SfCheckBox checkBox = new SfCheckBox();
this.Content = checkBox;
}
}
}Set the CheckBox caption
You can set the caption of the CheckBox using the Text property. This caption typically describes the meaning of the CheckBox and is displayed next to it.
<buttons:SfCheckBox x:Name="checkBox" IsChecked="True" Text="CheckBox"/>SfCheckBox checkBox = new SfCheckBox();
checkBox.IsChecked = true;
checkBox.Text = "CheckBox";
this.Content = checkBox;
Change the CheckBox state
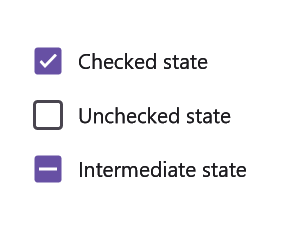
The three visual states of SfCheckBox are:
- Checked
- Unchecked
- Indeterminate

You can change the state of the CheckBox using the IsChecked property of the SfCheckBox. In the checked state, a tick mark is added to the visualization of the CheckBox.
| State | Property | Value |
| checked | IsChecked | true |
| unchecked | IsChecked | false |
| indeterminate | IsChecked | null |
NOTE
To report the indeterminate state for the CheckBox, set the
IsThreeStateproperty to true.
The CheckBox can be used as a single or as a group. A single CheckBox is mostly used for a binary yes/no choice, such as “Remember me?”, login scenario, or a terms of service agreement.
<buttons:SfCheckBox x:Name="checkBox" Text="I agree to the terms of services for this site" IsChecked="True"/>SfCheckBox checkBox = new SfCheckBox();
checkBox.Text = "I agree to the terms of services for this site";
checkBox.IsChecked = true;
this.Content = checkBox;
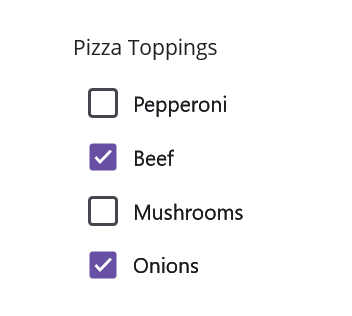
Multiple CheckBoxes can be used as a group for multi-select scenarios where a user selects one or more items from the choices that are not mutually exclusive.
<StackLayout Padding="20">
        <Label x:Name="label" Text="Pizza Toppings" Margin="0,10"/>
        <buttons:SfCheckBox x:Name="pepperoni" Text="Pepperoni"/>
        <buttons:SfCheckBox x:Name="beef" Text="Beef" IsChecked="True"/>
        <buttons:SfCheckBox x:Name="mushroom" Text="Mushrooms"/>
        <buttons:SfCheckBox x:Name="onion" Text="Onions" IsChecked="True"/>
    </StackLayout>
StackLayout stackLayout = new StackLayout() { Padding = 20 };
Label label = new Label();
label.Text = "Pizza Toppings";
label.Margin = new Thickness(0,10);
SfCheckBox pepperoni = new SfCheckBox();
pepperoni.Text = "Pepperoni";
SfCheckBox beef = new SfCheckBox();
beef.Text = "Beef";
beef.IsChecked = true;
SfCheckBox mushroom = new SfCheckBox();
mushroom.Text = "Mushrooms";
SfCheckBox onion = new SfCheckBox();
onion.Text = "Pepperoni";
onion.IsChecked = true;
stackLayout.Children.Add(label);
stackLayout.Children.Add(pepperoni);
stackLayout.Children.Add(beef);
stackLayout.Children.Add(mushroom);
stackLayout.Children.Add(onion);
this.Content = stackLayout;
Intermediate
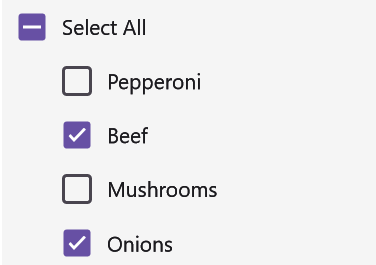
The SfCheckBox allows an Intermediate state in addition to the checked and unchecked state. The Intermediate state is enabled by setting the IsThreeState property of the control to True.
NOTE
When the IsThreeState property is set to
Falseand IsChecked property is set tonull, the CheckBox will be in unchecked state.
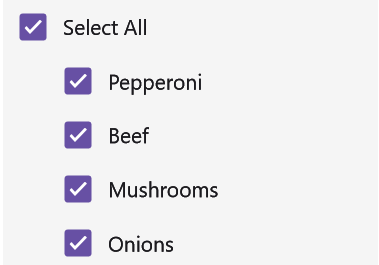
The Intermediate state is used when a group of sub-choices has both checked and unchecked states. In the following example, the “Select all” CheckBox has the IsThreeState property set to true. The “Select all” CheckBox is checked if all child elements are checked, unchecked if all the child elements are unchecked, and Intermediate otherwise.
<StackLayout Padding="20">
        <Label x:Name="label" Margin="10" Text="Pizza Toppings"/>
        <buttons:SfCheckBox x:Name="selectAll" Text="Select All" IsThreeState="True" IsChecked="{x:Null}" StateChanged="SelectAll_StateChanged"/>
        <buttons:SfCheckBox x:Name="pepperoni" Text="Pepperoni" StateChanged="CheckBox_StateChanged" Margin="30,0"/>
        <buttons:SfCheckBox x:Name="beef" Text="Beef" IsChecked="True" StateChanged="CheckBox_StateChanged" Margin="30,0"/>
        <buttons:SfCheckBox x:Name="mushroom" Text="Mushrooms" StateChanged="CheckBox_StateChanged" Margin="30,0"/>
        <buttons:SfCheckBox x:Name="onion" Text="Onions" IsChecked="True" StateChanged="CheckBox_StateChanged" Margin="30,0"/>
    </StackLayout>
SfCheckBox selectAll, pepperoni, beef, mushroom, onion;
public MainPage()
{
InitializeComponent();
StackLayout stackLayout = new StackLayout() { Padding = 20 };
Label label = new Label();
label.Text = "Pizza Toppings";
label.Margin = new Thickness(10);
selectAll = new SfCheckBox();
pepperoni = new SfCheckBox();
beef = new SfCheckBox();
onion = new SfCheckBox();
mushroom = new SfCheckBox();
pepperoni.StateChanged += CheckBox_StateChanged;
pepperoni.Text = "Pepperoni";
pepperoni.Margin = new Thickness(30, 0);
beef.StateChanged += CheckBox_StateChanged;
beef.Text = "Beef";
beef.IsChecked = true;
beef.Margin = new Thickness(30, 0);
mushroom.StateChanged += CheckBox_StateChanged;
mushroom.Text = "Mushrooms";
mushroom.Margin = new Thickness(30, 0);
onion.StateChanged += CheckBox_StateChanged;
onion.Text = "Onions";
onion.Margin = new Thickness(30, 0);
onion.IsChecked = true;
selectAll.StateChanged += SelectAll_StateChanged;
selectAll.Text = "Select All";
selectAll.IsThreeState = true;
selectAll.IsChecked = null;
stackLayout.Children.Add(label);
stackLayout.Children.Add(selectAll);
stackLayout.Children.Add(pepperoni);
stackLayout.Children.Add(beef);
stackLayout.Children.Add(mushroom);
stackLayout.Children.Add(onion);
this.Content = stackLayout;
}bool skip = false;
private void SelectAll_StateChanged(object sender, Syncfusion.Maui.Buttons.StateChangedEventArgs e)
{
if (!skip)
{
skip = true;
pepperoni.IsChecked = beef.IsChecked = mushroom.IsChecked = onion.IsChecked = e.IsChecked;
skip = false;
}
}
private void CheckBox_StateChanged(object sender, Syncfusion.Maui.Buttons.StateChangedEventArgs e)
{
if (!skip)
{
skip = true;
if (pepperoni.IsChecked.Value && beef.IsChecked.Value && mushroom.IsChecked.Value && onion.IsChecked.Value)
selectAll.IsChecked = true;
else if (!pepperoni.IsChecked.Value && !beef.IsChecked.Value && !mushroom.IsChecked.Value && !onion.IsChecked.Value)
selectAll.IsChecked = false;
else
selectAll.IsChecked = null;
skip = false;
}
}

You can download the getting started project of this demo from GitHub
See also
How to achieve intermediate state in .NET MAUI CheckBox using MVVM?