Getting Started
30 Sep 20198 minutes to read
This section helps to get started of the Splitter control in a JSP application.
Create a Splitter
The following steps guide you to add a Splitter control.
Create a new HTML file and include the below scripts and styles for rendering Essential JSP controls.
<head>
        <title>JSP Application</title>
        <link href="http://cdn.syncfusion.com/**28.1.33**/js/web/flat-azure/ej.web.all.min.css" rel="stylesheet" />
        <script src="https://code.jquery.com/jquery-3.0.0.min.js"></script>
        <script src="http://cdn.syncfusion.com/**28.1.33**/js/web/ej.web.all.min.js" type="text/javascript"></script>
    </head>
NOTE
Note: For further reference, refer the common JSP Getting Started Documentation to create an application and add necessary scripts and styles for rendering our control.
Create a simple Splitter by adding ej:splitter tag for initializing an empty Splitter control on the application.
<ej:splitter id="inner" height="250" width="400" >
        </ej:splitter>
Configure Splitter Panes
You need to add Splitter Panes by using ej:splitter-contentTemplate tag. Here we have added 2 panes with necessary elements.
<div class="cols-sample-area">
    <ej:splitter id="inner" height="250" width="400">
        <ej:splitter-contentTemplate>
            <div id="pane1">
                <div>
                    <div class="cont">
                        <h3 class="h3">JSP</h3>
                    </div>
                </div>
            </div>
            <div id="pane2" style="Height:100%; Width:100%">
                <div class="cont">
                    <div class="_content">
                        Select any product from the tree to show the description.
                    </div>
                    <div class="mobile spe" style="display:none;">
                        <h3>Mobile</h3>
                        <img src="content/images/Splitter/mobile.jpeg" />
                    </div>
                    <div class="harddisk spe" style="display:none;">
                        <h3>Harddisk</h3>
                        <img src="content/images/Splitter/harddisk.jpg" />
                    </div>
                    <div class="logo spe" style="display:none;">
                        <h3>Logo</h3>
                        <img src="content/images/Splitter/logo.png" />
                    </div>
                </div>
            </div>
        </ej:splitter-contentTemplate>
    </ej:splitter>
    </div>
Configure Tree View
We need to add TreeView to left pane. To configure Tree View control, you need to use ej:treeView tag element and add ul li elements in its contentTemplate.
Add the following code example in HTML file to configure Tree View.
<ej:treeview id="treeView" nodeselect="treeClicked">
        <ej:treeview-contentTemplate>
        <ul id="treeView" class="visibleHide">
            <li>
                Mobile
                <ul>
                    <li id="mobile" class="_child">Galaxy</li>
                </ul>
            </li>
            <li>
                Harddisk
                <ul>
                    <li id="harddisk" class="_child">Segate  </li>
                </ul>
            </li>
            <li>
                Logo
                <ul>
                    <li id="logo" class="_child">Amazon</li>
                </ul>
            </li>
        </ul>
        </ej:treeview-contentTemplate>
    </ej:treeview>
Set Actions
Add the following code example in script to set the action to view the image. We need to use nodeSelect event of TreeView to achieve action to view images.
function treeClicked(sender, args){
if (sender.currentElement.hasClass('_child')) {
var content = $('.' + sender.currentElement[0].id).html();
$('._content').html(content);
}
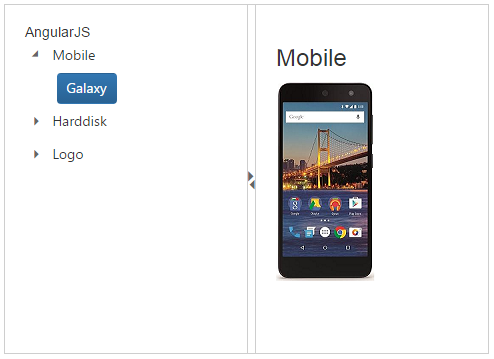
}The following screenshot is the output for the above code.
NOTE
Note: You can find the Splitter control properties from the API reference document