How can I help you?
Getting Started with JavaScript Radial Menu
The external script dependencies of the RadialMenu component are,
- jQuery 1.7.1 and later versions.
And the internal script dependencies of the RadialMenu widget are:
| File | Description / Usage |
|---|---|
| ej.core.min.js | Must be referred always before using all the JS controls. |
| ej.data.min.js | Used to handle data operation and should be used while binding data to JS controls. |
| ej.touch.min.js | For providing touch support |
| ej.radialmenu.min.js | This is main source file specific for rendering RadialMenu |
For getting started you can use the ‘ej.web.all.min.js’ file, which encapsulates all the ‘ej’ controls and frameworks in one single file.
For themes, you can use the ‘ej.web.all.min.css’ CDN link from the snippet given. To add the themes in your application, please refer this link.
Preparing HTML document
Create a new HTML file and add CDN links to the JavaScript and CSS dependencies to your project.
<!DOCTYPE html>

    <html>

    <head>

        <meta name="viewport" content="width=device-width, initial-scale=1.0" charset="utf-8" />

        <!-- style sheet for default theme(flat azure) -->

        <link href="http://cdn.syncfusion.com/33.1.44/js/web/flat-azure/ej.web.all.min.css"
              rel="stylesheet" />

        <!--scripts-->

        <script src="http://cdn.syncfusion.com/js/assets/external/jquery-1.11.3.min.js"></script>

        <script src="http://cdn.syncfusion.com/js/assets/external/jquery.easing.1.3.min.js"></script>

        <script src="http://cdn.syncfusion.com/33.1.44/js/web/ej.web.all.min.js"></script>

    </head>

    <body>

        <!--Place element to create RadialMenu-->

        <script>

            // Place your script code here to initialize RadialMenu

        </script>

    </body>

    </html>
NOTE
In production, we highly recommend you to use our custom script generator to create a custom script file with required controls and its dependencies only. Also to reduce the file size further please use GZip compression on your server.
Create your first Radial Menu control in JavaScript
RadialMenu can be rendered using ul li element or div element

Create a simple Radial Menu
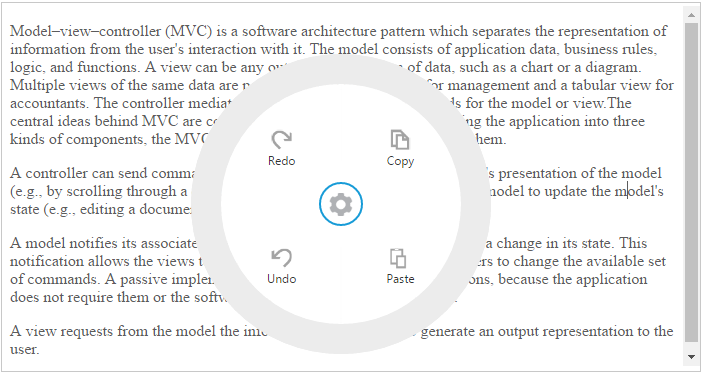
Create a div element that is a container for Radial Menu. You can set the images for each item by giving the image url with the data-ej-imageUrl attribute in the inner list element and text with data-ej-text attribute. Refer to the following code example.
<div id="radialmenu">
        <ul>
            <li data-ej-imageurl="http://js.syncfusion.com/ug/web/content/radial/copy.png"
                data-ej-text="Copy">
            </li>
            <li data-ej-imageurl="http://js.syncfusion.com/ug/web/content/radial/paste.png"
                data-ej-text="Paste">
            </li>
            <li data-ej-imageurl="http://js.syncfusion.com/ug/web/content/radial/redo.png"
                data-ej-text="Redo">
            </li>
            <li data-ej-imageurl="http://js.syncfusion.com/ug/web/content/radial/undo.png"
                data-ej-text="Undo">
            </li>
        </ul>
    </div>
Refer to the following code example to add target content to the Radial Menu.
<div id="radialTarget">
        <textarea id="textarea">
          <p>Model–view–controller (MVC) is a software architecture pattern which separates the representation of information from the user's interaction with it.
             The model consists of application data, business rules, logic, and functions. A view can be any output representation of data, such as a chart or a diagram.
             Multiple views of the same data are possible, such as a bar chart for management and a tabular view for accountants.
             The controller mediates input, converting it to commands for the model or view.The central ideas behind MVC are code reusable and in addition to dividing the application into three kinds of components, the MVC design defines the interactions between them.</p>
          <p>A controller can send commands to its associated view to change the view's presentation of the model (e.g., by scrolling through a document). It can also send commands to the model to update the model's state (e.g., editing a document).</p>

          <p>A model notifies its associated views and controllers when there has been a change in its state. This notification allows the views to produce updated output, and the controllers to change the available set of commands. A passive implementation of MVC omits these notifications because the application does not require them or the software platform does not support them.</p>

          <p>A view requests from the model the information that it needs to generate an output representation to the user.</p>
       </textarea>

    </div>
Add the following styles in your code.
<style type="text/css" class="cssStyles">
        #textarea {
            width: 100%;
            height: 270px;
        }
    </style>
Initialize Radial Menu control with the div element and set its target content in the script as follows.
$(function () {
            $('#radialmenu').ejRadialMenu({ targetElementId: "radialTarget" });
        });
You can display the Radial Menu by performing the desired action on the target content while selecting the text inside the target. Therefore, call the show method in the select action of the content. Refer to the following code example and add it to the script.
$(function () {
            $("#textarea").select(function (e) {
                $('#radialmenu').ejRadialMenu("show");
            });
        });
Run the above code and select any text inside the target. The settings icon is displayed. Click that icon to render the following output.