Getting Started with ASP.NET MVC Gantt Chart Control
This guide walks you through setting up and integrating the ASP.NET MVC Gantt control in your application using Visual Studio. You’ll learn how to configure the component, bind task data, map fields, and quickly visualize project timelines in just a few steps.
Ready to streamline your Syncfusion® ASP.NET MVC development? Discover the full potential of Syncfusion® ASP.NET MVC controls with Syncfusion® AI Coding Assistant. Effortlessly integrate, configure, and enhance your projects with intelligent, context-aware code suggestions, streamlined setups, and real-time insights—all seamlessly integrated into your preferred AI-powered IDEs like Visual Studio, Visual Studio Code, Cursor, Syncfusion® CodeStudio and more. Explore Syncfusion® AI Coding Assistant
Prerequisites
- System requirements for ASP.NET MVC controls
- Visual Studio 2017 or later
- .NET Framework 4.5 or later with ASP.NET MVC 5
- A valid Syncfusion® license key. Trial users can obtain a free community license from your Syncfusion account and register it in
Global.asaxApplication_Startas shown in the Register Syncfusion® license key topic.
Create ASP.NET MVC application with HTML helper
Install ASP.NET MVC package in the application
To add ASP.NET MVC controls in the application, open the NuGet package manager in Visual Studio (Tools → NuGet Package Manager → Manage NuGet Packages for Solution), search for Syncfusion.EJ2.MVC5 (version 35.1.37 or later) and then install it. Alternatively, run the following command in the NuGet Package Manager Console.
Install-Package Syncfusion.EJ2.MVC5 -Version 35.1.37Syncfusion® ASP.NET MVC controls are available on nuget.org. Refer to the NuGet packages topic to learn more about installing NuGet packages in various OS environments. The Syncfusion.EJ2.MVC5 NuGet package has dependencies, Newtonsoft.Json for JSON serialization and Syncfusion.Licensing for validating the Syncfusion® license key.
Add namespace
Add the Syncfusion.EJ2 namespace reference to ~/Views/Web.config so that the Gantt Chart HTML helper is available in every Razor view without an explicit @using directive.
<system.web.webPages.razor>
    <host factoryType="System.Web.Mvc.MvcWebRazorHostFactory, System.Web.Mvc, Version=5.2.7.0, Culture=neutral, PublicKeyToken=31BF3856AD364E35" />
    <pages pageBaseType="System.Web.Mvc.WebViewPage">
        <namespaces>
            <add namespace="System.Web.Mvc" />
            <add namespace="System.Web.Mvc.Ajax" />
            <add namespace="System.Web.Mvc.Html" />
            <add namespace="System.Web.Routing" />
            <add namespace="Syncfusion.EJ2"/>
        </namespaces>
    </pages>
</system.web.webPages.razor>
Update packages.config (optional)
Skip this step if your project was created with a recent Visual Studio ASP.NET Web Application template, which already references a compatible set of MVC 5.2.x and Razor 3.2.x assemblies. Run this step only if you see a build error such as
Could not load file or assembly Microsoft.AspNet.Mvc, Version=….
Update-Package Microsoft.AspNet.Mvc -Version 5.2.7 -Source nuget.org
Update-Package Microsoft.AspNet.Razor -Version 3.2.7 -Source nuget.org
If you encounter any issues after updating, you may need to update the corresponding
Web.configfiles in your project to reference the new assembly versions. Also, ensure that your project’s target framework (.NET Framework 4.6.2 or later) is compatible with the updated package versions.
Add stylesheet and script resources
The theme styles and client-side scripts are referenced using a CDN inside the <head> of ~/Views/Shared/_Layout.cshtml, as follows.
<head>
    ...
    <!-- Syncfusion ASP.NET MVC controls styles -->
    <link rel="stylesheet" href="https://cdn.syncfusion.com/ej2/35.1.37/fluent.css" />
    <!-- Syncfusion ASP.NET MVC controls scripts -->
    <script src="https://cdn.syncfusion.com/ej2/35.1.37/dist/ej2.min.js"></script>
</head>
Check out the Themes topic to learn different ways (CDN, NPM package, and CRG) to refer to styles in an ASP.NET MVC application, and to achieve the expected appearance for Syncfusion® ASP.NET MVC controls. Check out the Adding Script Reference topic to learn different approaches for adding script references in your ASP.NET MVC application.
Register Syncfusion® Script Manager
Register the script manager EJS().ScriptManager() at the end of the <body> in ~/Views/Shared/_Layout.cshtml as follows.
<body>
    ...
    <!-- Syncfusion ASP.NET MVC Script Manager -->
    @Html.EJS().ScriptManager()
</body>
Create sample data
Define a simple task list with hierarchical relationships. Each task must have a StartDate and at least one of Duration or EndDate to render properly. Add the following class to ~/Models/GanttDataSource.cs so that the model is in its own file (C# requires one public type per file in MVC 5 projects).
using System;

namespace WebApplication1.Models
{
    public class GanttDataSource
    {
        public int TaskId { get; set; }
        public string TaskName { get; set; }
        public DateTime StartDate { get; set; }
        public DateTime? EndDate { get; set; }
        public int? Duration { get; set; }
        public int? Progress { get; set; }
        public int? ParentID { get; set; }
    }
}
Define the data collection in the HomeController:
List<GanttDataSource> GanttDataSourceCollection = new List<GanttDataSource>()
{
    new GanttDataSource() { TaskId = 1, TaskName = "Project initiation", StartDate = new DateTime(2019, 04, 02), EndDate = new DateTime(2019, 04, 21) },
    new GanttDataSource() { TaskId = 2, TaskName = "Identify site location", StartDate = new DateTime(2019, 04, 02), Duration = 4, Progress = 70, ParentID = 1 },
    new GanttDataSource() { TaskId = 3, TaskName = "Perform soil test", StartDate = new DateTime(2019, 04, 02), Duration = 4, Progress = 50, ParentID = 1 },
    new GanttDataSource() { TaskId = 4, TaskName = "Soil test approval", StartDate = new DateTime(2019, 04, 02), Duration = 4, Progress = 50, ParentID = 1 },
    new GanttDataSource() { TaskId = 5, TaskName = "Project estimation", StartDate = new DateTime(2019, 04, 02), EndDate = new DateTime(2019, 04, 21) },
    new GanttDataSource() { TaskId = 6, TaskName = "Develop floor plan for estimation", StartDate = new DateTime(2019, 04, 04), Duration = 3, Progress = 70, ParentID = 5 },
    new GanttDataSource() { TaskId = 7, TaskName = "List materials", StartDate = new DateTime(2019, 04, 04), Duration = 3, Progress = 50, ParentID = 5 }
};
Add ASP.NET MVC Gantt Chart Control
Add the Syncfusion® ASP.NET MVC Gantt Chart control to ~/Views/Home/Index.cshtml and configure ~/Controllers/HomeController.cs to supply the data. The following code snippet initializes a basic Gantt Chart control with default settings.
Bind data to the Gantt Chart control by using the DataSource property. It accepts an array of JavaScript objects or a DataManager instance. The data source fields that are required to render tasks are mapped to the Gantt Chart control by using the TaskFields property.
Configure the controller
Replace the contents of ~/Controllers/HomeController.cs with the following code. The action returns the data list as the model so the Razor view can render it with a strongly-typed @model directive.
using System;
using System.Collections.Generic;
using System.Web.Mvc;
using WebApplication1.Models;

namespace WebApplication1.Controllers
{
public class HomeController : Controller
{
public ActionResult Index()
{
return View(GanttData());
}

        public static List<GanttDataSource> GanttData()
        {
            List<GanttDataSource> GanttDataSourceCollection = new List<GanttDataSource>()
            {
                new GanttDataSource() { TaskId = 1, TaskName = "Project initiation", StartDate = new DateTime(2019, 04, 02), EndDate = new DateTime(2019, 04, 21) },
                new GanttDataSource() { TaskId = 2, TaskName = "Identify site location", StartDate = new DateTime(2019, 04, 02), Duration = 4, Progress = 70, ParentID = 1 },
                new GanttDataSource() { TaskId = 3, TaskName = "Perform soil test", StartDate = new DateTime(2019, 04, 02), Duration = 4, Progress = 50, ParentID = 1 },
                new GanttDataSource() { TaskId = 4, TaskName = "Soil test approval", StartDate = new DateTime(2019, 04, 02), Duration = 4, Progress = 50, ParentID = 1 },
                new GanttDataSource() { TaskId = 5, TaskName = "Project estimation", StartDate = new DateTime(2019, 04, 02), EndDate = new DateTime(2019, 04, 21) },
                new GanttDataSource() { TaskId = 6, TaskName = "Develop floor plan for estimation", StartDate = new DateTime(2019, 04, 04), Duration = 3, Progress = 70, ParentID = 5 },
                new GanttDataSource() { TaskId = 7, TaskName = "List materials", StartDate = new DateTime(2019, 04, 04), Duration = 3, Progress = 50, ParentID = 5 }
            };

            return GanttDataSourceCollection;
        }
    }

}
Add the Gantt Chart to the view
Open ~/Views/Home/Index.cshtml and replace its contents with the following. The @model directive binds the controller’s list as the strongly-typed view model. If your application uses a different project namespace than WebApplication1, update the namespace in the model, controller, and view snippets consistently.
@model List<WebApplication1.Models.GanttDataSource>

@{
ViewBag.Title = "Gantt Chart Overview";
}

@Html.EJS().Gantt("gantt").DataSource(Model).TaskFields(ts => ts.Id("TaskId")
.Name("TaskName")
.StartDate("StartDate")
.EndDate("EndDate")
.Duration("Duration")
.Progress("Progress")
.ParentID("ParentID")).Render()
Configure task fields (reference)
The TaskFields fluent builder maps each data field to a Gantt Chart property. The most common options are listed below.
| Property | Description | Required | Maps to sample field |
|---|---|---|---|
Id |
Unique task identifier | Yes | TaskId |
Name |
Task display name | Yes | TaskName |
StartDate |
Task start date | Yes | StartDate |
EndDate |
Task end date (used when Duration is null) |
No | EndDate |
Duration |
Task duration in days (used when EndDate is null) |
No | Duration |
Progress |
Task completion percentage (0–100) | No | Progress |
ParentID |
Parent task ID for hierarchy | No (required for hierarchical data) | ParentID |
Child |
Mapping for self-referential child collection | No | – |
Dependency |
Predecessor field name | No | – |
ResourceInfo |
Resource mapping field name | No | – |
BaselineStartDate / BaselineEndDate
|
Baseline date fields | No | – |
Notes |
Task notes | No | – |
Use either
EndDateorDurationfor each task. If both are supplied,EndDatetakes precedence.
Run the application
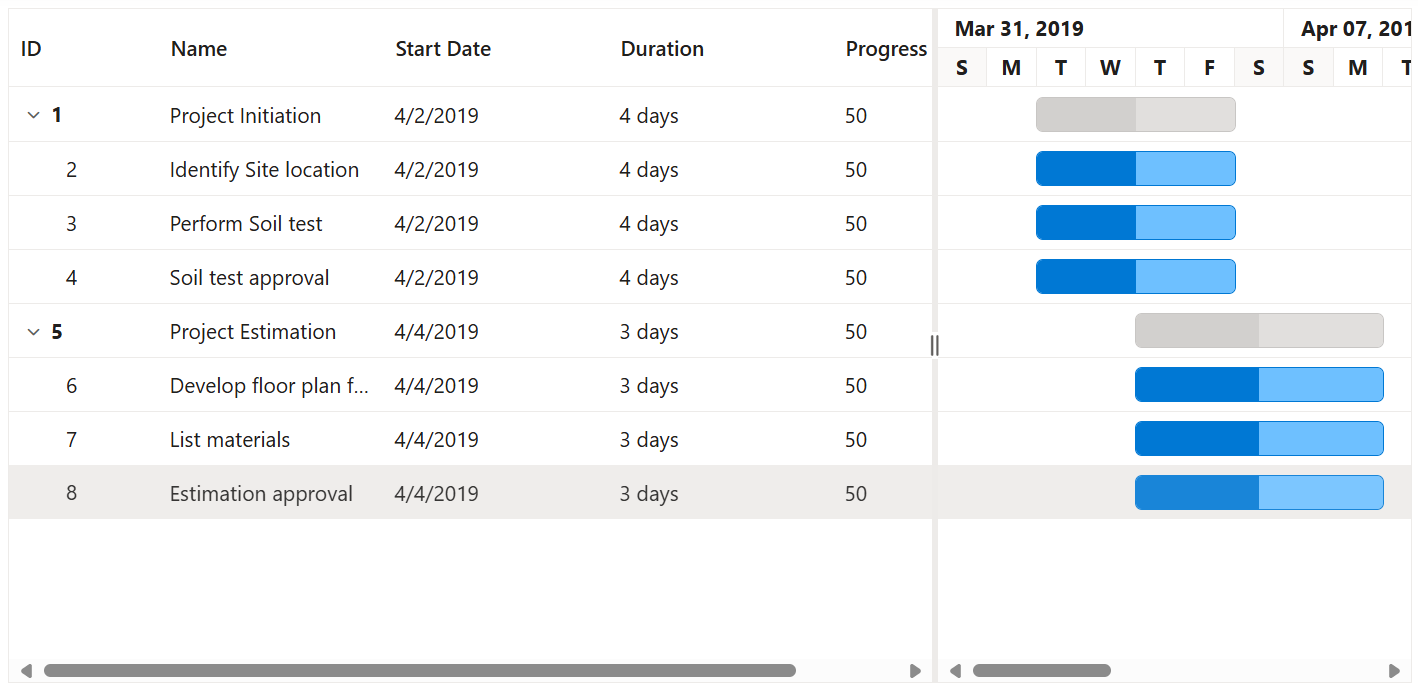
Press Ctrl+F5 (Windows) or ⌘+F5 (macOS) to run the app, then navigate to /Home/Index in the default browser. The Syncfusion® ASP.NET MVC Gantt Chart control will be rendered with a default height of 450 px and a day/week timeline by default.
Troubleshooting
| Issue | Likely cause | Fix |
|---|---|---|
| Blank chart, console shows a license warning | License key not registered | Register the key in Application_Start (see Prerequisites). |
CS0246: The type or namespace name 'Syncfusion' could not be found |
Syncfusion.EJ2 namespace not registered |
Add the namespace to ~/Views/Web.config (see Add namespace). |
CS1061: 'HtmlHelper<...>' does not contain a definition for 'Gantt' |
Helper assembly not referenced | Reinstall the Syncfusion.EJ2.MVC5 NuGet package and rebuild. |
| Chart renders without rows |
DataSource is null in the view |
Verify that the HomeController.Index action returns the data list and that the @model directive matches the list type. |
Resource 404 for fluent.css / ej2.min.js
|
Network blocked, CDN unreachable, or 35.1.37 not resolved |
Refer to the styles and scripts via NPM or CRG instead. |
Output
You will see a Gantt Chart with:
- A task tree showing the parent–child hierarchy (
Project initiation→Identify site location,Perform soil test,Soil test approval). - Timeline view showing task bars.
- Progress indicators on each task.
- End dates automatically calculated from
StartDate+Durationfor child tasks.
See also
- Key Elements – Learn about UI components and interactions
- Data Binding – Bind to local, remote, and adaptor-based data sources
- Columns – Configure the tree column and task columns
- Task Scheduling – Configure working time, dependencies, and constraints
- Overview – Explore all available features