Polygons in Flutter Maps (SfMaps)
28 Jul 202524 minutes to read
Polygon layer is a sublayer that renders a group of MapPolygon on MapShapeLayer and MapTileLayer. This section helps you learn how to add polygons and customize them.
Adding polygons
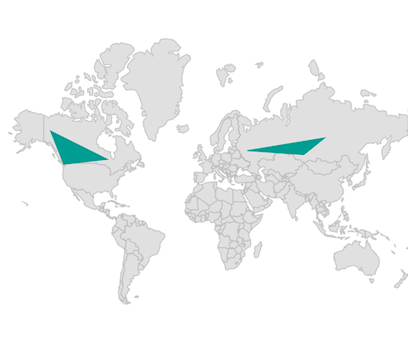
The polygons is a collection of MapPolygon. Every single MapPolygon connects multiple coordinates through a points property.
NOTE
It is applicable for both the tile layer and shape layer.
In the shape layer
late List<PolygonModel> polygons;
late List<MapLatLng> polygon1;
late List<MapLatLng> polygon2;
late MapShapeSource dataSource;

@override
void initState() {
    polygon1 = <MapLatLng>[
      MapLatLng(55.7558, 37.6173),
      MapLatLng(53.7596, 87.1216),
      MapLatLng(61.5240, 105.3188),
    ];

    polygon2 = <MapLatLng>[
      MapLatLng(64.2823, -135.0000),
      MapLatLng(51.2538, -85.3232),
      MapLatLng(48.4284, -123.3656),
    ];

    polygons = <PolygonModel>[
      PolygonModel(polygon1),
      PolygonModel(polygon2),
    ];
    dataSource = MapShapeSource.asset(
      'assets/world_map.json',
      shapeDataField: 'continent',
    );
    super.initState();
}

@override
Widget build(BuildContext context) {
  return Scaffold(
    body: SfMaps(
      layers: [
        MapShapeLayer(
          source: dataSource,
          sublayers: [
            MapPolygonLayer(
              polygons: List<MapPolygon>.generate(
                polygons.length,
                (int index) {
                  return MapPolygon(
                    points: polygons[index].points,
                  );
                },
              ).toSet(),
            ),
          ],
        ),
      ],
    ),
  );
}

class PolygonModel {
  PolygonModel(this.points);
  final List<MapLatLng> points;
}
In the tile layer
late List<PolygonModel> polygons;
late List<MapLatLng> polygon1;
late List<MapLatLng> polygon2;

@override
void initState() {
    polygon1 = <MapLatLng>[
       MapLatLng(55.7558, 37.6173),
       MapLatLng(53.7596, 87.1216),
       MapLatLng(61.5240, 105.3188),
    ];

    polygon2 = <MapLatLng>[
      MapLatLng(64.2823, -135.0000),
      MapLatLng(51.2538, -85.3232),
      MapLatLng(48.4284, -123.3656),
    ];

    polygons = <PolygonModel>[
      PolygonModel(polygon1),
      PolygonModel(polygon2),
    ];
    super.initState();
}

@override
Widget build(BuildContext context) {
  return Scaffold(
    body: SfMaps(
      layers: [
        MapTileLayer(
          urlTemplate: 'https://tile.openstreetmap.org/{z}/{x}/{y}.png',
          sublayers: [
            MapPolygonLayer(
              polygons: List<MapPolygon>.generate(
                polygons.length,
                (int index) {
                  return MapPolygon(
                    points: polygons[index].points,
                  );
                },
              ).toSet(),
            ),
          ],
        ),
      ],
    ),
  );
}

class PolygonModel {
  PolygonModel(this.points);
  final List<MapLatLng> points;
}
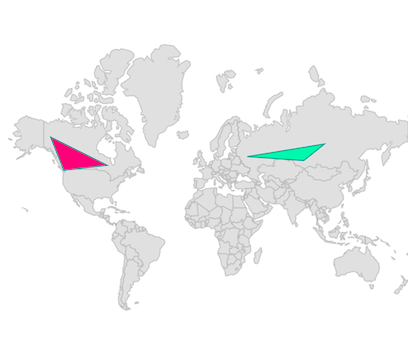
Fill color
You can apply the same color for all MapPolygon in the polygons collection using the MapPolygonLayer.color property. Alternatively, you can apply different colors to each MapPolygon in the polygons collection using the individual MapPolygon.color property.
late List<PolygonModel> polygons;
late List<MapLatLng> polygon1;
late List<MapLatLng> polygon2;
late MapShapeSource dataSource;

@override
void initState() {
    polygon1 = <MapLatLng>[
      MapLatLng(55.7558, 37.6173),
      MapLatLng(53.7596, 87.1216),
      MapLatLng(61.5240, 105.3188),
    ];

    polygon2 = <MapLatLng>[
      MapLatLng(64.2823, -135.0000),
      MapLatLng(51.2538, -85.3232),
      MapLatLng(48.4284, -123.3656),
    ];

    polygons = <PolygonModel>[
       PolygonModel(polygon1, Colors.greenAccent),
       PolygonModel(polygon2, Colors.pinkAccent),
    ];

    dataSource = MapShapeSource.asset(
      'assets/world_map.json',
      shapeDataField: 'continent',
    );
    super.initState();
}

@override
Widget build(BuildContext context) {
  return Scaffold(
    body: SfMaps(
      layers: [
        MapShapeLayer(
          source: dataSource,
          sublayers: [
            MapPolygonLayer(
              polygons: List<MapPolygon>.generate(
                polygons.length,
                (int index) {
                  return MapPolygon(
                    points: polygons[index].points,
                    color: polygons[index].color,
                  );
                },
              ).toSet(),
            ),
          ],
        ),
      ],
    ),
  );
}

class PolygonModel {
  PolygonModel(this.points, this.color);
  final List<MapLatLng> points;
  final Color color;
}
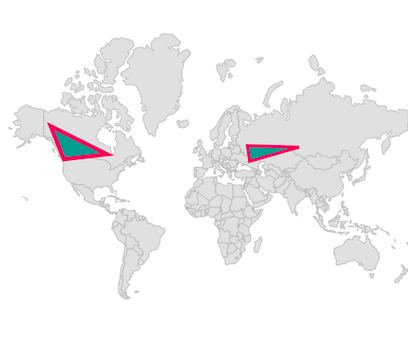
Stroke width and color
You can apply the same stroke width for all MapPolygon in the polygons collection using the MapPolygonLayer.strokeWidth property. Alternatively, you can apply different stroke width to each MapPolygon in the polygons collection using the individual MapPolygon.strokeWidth property. The default value of the MapPolygonLayer.strokeWidth property is 2.
You can apply the same stroke color for all MapPolygon in the polygons collection using the MapPolygonLayer.strokeColor property. Alternatively, you can apply different stroke color to each MapPolygon in the polygons collection using the individual MapPolygon.strokeColor property.
late List<PolygonModel> polygons;
late List<MapLatLng> polygon1;
late List<MapLatLng> polygon2;
late MapShapeSource dataSource;

@override
void initState() {
    polygon1 = <MapLatLng>[
       MapLatLng(55.7558, 37.6173),
       MapLatLng(53.7596, 87.1216),
       MapLatLng(61.5240, 105.3188),
    ];

    polygon2 = <MapLatLng>[
      MapLatLng(64.2823, -135.0000),
      MapLatLng(51.2538, -85.3232),
      MapLatLng(48.4284, -123.3656),
    ];

    polygons = <PolygonModel>[
       PolygonModel(polygon1, 3),
       PolygonModel(polygon2, 4),
    ];
    dataSource = MapShapeSource.asset(
      'assets/world_map.json',
      shapeDataField: 'continent',
    );
    super.initState();
}

@override
Widget build(BuildContext context) {
  return Scaffold(
    body: SfMaps(
      layers: [
        MapShapeLayer(
          source: dataSource,
          sublayers: [
            MapPolygonLayer(
              polygons: List<MapPolygon>.generate(
                polygons.length,
                (int index) {
                  return MapPolygon(
                    points: polygons[index].points,
                    strokeWidth: polygons[index].width,
                    strokeColor: Colors.pink,
                  );
                },
              ).toSet(),
            ),
          ],
        ),
      ],
    ),
  );
}

class PolygonModel {
  PolygonModel(this.points, this.width);
  final List<MapLatLng> points;
  final double width;
}
Tap
You can use the onTap callback to get a notification if the particular MapPolygon is tapped. You can also customize the tapped MapPolygon based on the index passed in the callback as shown in the below code snippet.
late List<PolygonModel> polygons;
late List<MapLatLng> polygon1;
late List<MapLatLng> polygon2;
late MapShapeSource dataSource;
late int selectedIndex;

@override
void initState() {
    polygon1 = <MapLatLng>[
       MapLatLng(55.7558, 37.6173),
       MapLatLng(53.7596, 87.1216),
       MapLatLng(61.5240, 105.3188),
    ];

    polygon2 = <MapLatLng>[
      MapLatLng(64.2823, -135.0000),
      MapLatLng(51.2538, -85.3232),
      MapLatLng(48.4284, -123.3656),
    ];

    polygons = <PolygonModel>[
      PolygonModel(polygon1),
      PolygonModel(polygon2),
    ];
    dataSource = MapShapeSource.asset(
      'assets/world_map.json',
      shapeDataField: 'continent',
    );

    selectedIndex = -1;
    super.initState();
}

@override
Widget build(BuildContext context) {
  return Scaffold(
    body: SfMaps(
      layers: [
        MapShapeLayer(
          source: dataSource,
          sublayers: [
            MapPolygonLayer(
              polygons: List<MapPolygon>.generate(
                polygons.length,
                (int index) {
                  return MapPolygon(
                    points: polygons[index].points,
                    color: selectedIndex == index ? Colors.pink : Colors.blue,
                    onTap: () {
                       setState(() {
                         selectedIndex = index;
                       });
                    }
                  );
                },
              ).toSet(),
            ),
          ],
        ),
      ],
    ),
  );
}

class PolygonModel {
  PolygonModel(this.points);
  final List<MapLatLng> points;
}
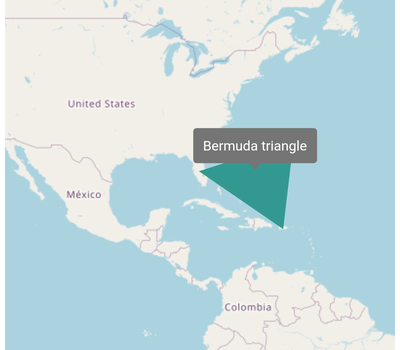
Tooltip
You can show additional information about the polygon drawn using the tooltipBuilder property.
late List<MapLatLng> polygon;

@override
void initState() {
   polygon = <MapLatLng>[
     MapLatLng(27.6648, -81.5158),
     MapLatLng(32.3078, -64.7505),
     MapLatLng(18.2208, -66.5901),
   ];
   super.initState();
}

@override
Widget build(BuildContext context) {
  return Scaffold(
     body: Center(
        child: Container(
          height: 400,
          width: 400,
          child: SfMaps(
            layers: [
              MapTileLayer(
                urlTemplate: 'https://tile.openstreetmap.org/{z}/{x}/{y}.png',
                initialFocalLatLng: MapLatLng(27.6648, -81.5158),
                initialZoomLevel: 3,
                sublayers: [
                  MapPolygonLayer(
                    polygons: List<MapPolygon>.generate(
                      1,
                      (int index) {
                        return MapPolygon(
                          points: polygon,
                        );
                      },
                    ).toSet(),
                    tooltipBuilder: (BuildContext context, int index) {
                      return Padding(
                        padding: EdgeInsets.all(10),
                        child: Text('Bermuda triangle',
                            style: TextStyle(color: Colors.white)),
                      );
                    },
                  ),
                ],
              ),
            ],
          ),
        ),
      ),
   );
}
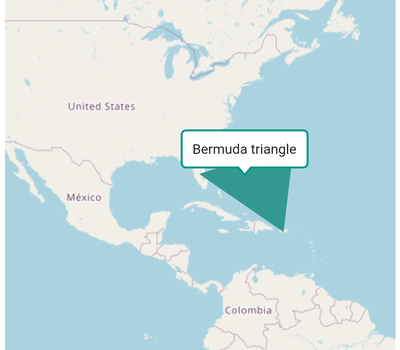
Tooltip customization
You can customize the appearance of the tooltip:
-
Background color - Change the background color of the tooltip in the maps using the
MapTooltipSettings.colorproperty. -
Stroke color - Change the stroke color of the tooltip in the maps using the
MapTooltipSettings.strokeColorproperty. -
Stroke width - Change the stroke width of the tooltip in the maps using the
MapTooltipSettings.strokeWidthproperty.
late List<MapLatLng> polygon;

@override
void initState() {
   polygon = <MapLatLng>[
      MapLatLng(27.6648, -81.5158),
      MapLatLng(32.3078, -64.7505),
      MapLatLng(18.2208, -66.5901),
   ];
   super.initState();
}

@override
Widget build(BuildContext context) {
  return Scaffold(
     body: Center(
        child: Container(
          height: 400,
          width: 400,
          child: SfMaps(
            layers: [
              MapTileLayer(
                urlTemplate: 'https://tile.openstreetmap.org/{z}/{x}/{y}.png',
                initialFocalLatLng: MapLatLng(27.6648, -81.5158),
                initialZoomLevel: 3,
                tooltipSettings: const MapTooltipSettings(
                  color: Colors.white,
                  strokeColor: Colors.teal,
                  strokeWidth: 2,
                ),
                sublayers: [
                  MapPolygonLayer(
                    polygons: List<MapPolygon>.generate(
                      1,
                      (int index) {
                        return MapPolygon(
                          points: polygon,
                        );
                      },
                    ).toSet(),
                    tooltipBuilder: (BuildContext context, int index) {
                      return Padding(
                        padding: EdgeInsets.all(10),
                        child: Text('Bermuda triangle'),
                      );
                    },
                  ),
                ],
              ),
            ],
          ),
        ),
      ),
   );
}
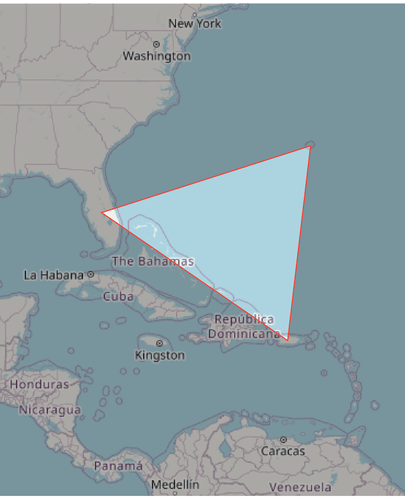
Inverted polygon
You can apply color to the inverted polygon by initializing the MapPolygonLayer.inverted constructor. The inner polygon color is transparent and the outer portion of the polygon covered by an overlay color.
You can customize the inverted polygon using the following properties:
-
Stroke color - Change the stroke color of the polygon using the
strokeColorproperty. -
Stroke width - Change the stroke width of the polygon using the
strokeWidthproperty. The default value of thestrokeWidthproperty is1. -
Overlay color - Change the outer portion color of the polygon using the
colorproperty. -
Tooltip - You can enable tooltip for the inverted polygon using the
tooltipBuilderproperty.
NOTE
It is applicable for both the tile layer and shape layer.
IMPORTANT
The individual polygon customization like
MapPolygon.color,MapPolygon.strokeColorandMapPolygon.strokeWidthare not supported for the inverted polygon.
late MapZoomPanBehavior zoomPanBehavior;
late List<MapLatLng> _polygon;

@override
void initState() {
   _polygon = <MapLatLng>[
      MapLatLng(27.6648, -81.5158),
      MapLatLng(32.3078, -64.7505),
      MapLatLng(18.2208, -66.5901),
   ];

   zoomPanBehavior = MapZoomPanBehavior(zoomLevel: 4);
   super.initState();
}

@override
Widget build(BuildContext context) {
  return Scaffold(
     body: SfMaps(
        layers: [
          MapTileLayer(
            urlTemplate: 'https://tile.openstreetmap.org/{z}/{x}/{y}.png',
            initialFocalLatLng: MapLatLng(25.0119, -73.4842),
            sublayers: [
              MapPolygonLayer.inverted(
                polygons: List<MapPolygon>.generate(
                  1,
                  (int index) {
                    return MapPolygon(
                      points: _polygon,
                    );
                  },
                ).toSet(),
                color: Colors.black.withOpacity(0.3),
                strokeColor: Colors.red,
                strokeWidth: 1,
              ),
            ],
            zoomPanBehavior: zoomPanBehavior,
          ),
        ],
      ),
   );
}
NOTE
Refer to the
tooltipsection for adding and customizing tooltip to the inverted polygon.