How can I help you?
Right To Left (RTL) in Flutter AIAssistView (SfAIAssistView)
19 May 202517 minutes to read
AIAssistView supports the right to left rendering for all the elements in the AIAssistView widget.
RTL rendering ways
Right to left rendering can be switched in the following ways:
Wrapping the SfAIAssistView with Directionality widget
To change the rendering direction from right to left, you can wrap the SfAIAssistView widget inside the Directionality widget and set the textDirection property as TextDirection.rtl.
@override
    Widget build(BuildContext context) {
      return Scaffold(
        body: Directionality(
          textDirection: TextDirection.rtl,
          child: SfAIAssistView(
              //...
          ),
        ),
      );
    }
RTL supported AIAssistView elements
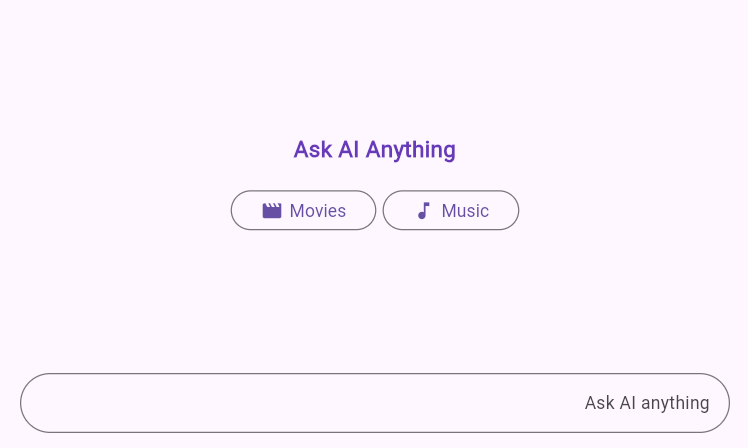
Placeholder
Right to left (RTL) rendering is supported for the placeholderBuilder in the AIAssistView. The widget added in the placeholderBuilder will be rendered from right to left direction. But, the text widget or text entered in the widget will render from left to right direction.
@override
      Widget build(BuildContext context) {
        return Scaffold(
          body: Directionality(
            textDirection: TextDirection.rtl,
            child: Padding(
              padding: const EdgeInsets.all(20.0),
              child: SfAIAssistView(
                messages: _messages,
                placeholderBuilder: (context) {
                  return Column(
                    mainAxisAlignment: MainAxisAlignment.center,
                    children: [
                      const Text(
                        'Ask AI Anything',
                        style: TextStyle(
                          color: Colors.deepPurple,
                          fontSize: 18,
                          fontWeight: FontWeight.bold,
                        ),
                      ),
                      const SizedBox(height: 20),
                      Row(
                        mainAxisAlignment: MainAxisAlignment.center,
                        children: [
                          OutlinedButton(
                            onPressed: () {},
                            child: const Row(
                              mainAxisSize: MainAxisSize.min,
                              children: [
                                Text('Music'),
                                SizedBox(width: 5),
                                Icon(Icons.music_note)
                              ],
                            ),
                          ),
                          const SizedBox(width: 5),
                          OutlinedButton(
                            onPressed: () {},
                            child: const Row(
                              mainAxisSize: MainAxisSize.min,
                              children: [
                                Text('Movies'),
                                SizedBox(width: 5),
                                Icon(Icons.movie_creation_rounded)
                              ],
                            ),
                          ),
                        ],
                      ),
                    ],
                  );
                },
              ),
            ),
          ),
        );
      }
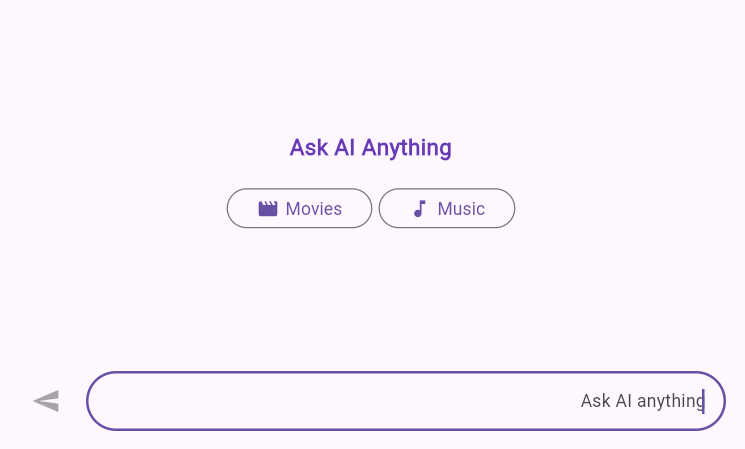
Composer
Right to left (RTL) rendering is supported for the composer in the AIAssistView. Composer will be rendered from right to left direction. But, the text entered in the composer will render from the left to right in the composer.
@override
      Widget build(BuildContext context) {
        return Scaffold(
          body: Directionality(
            textDirection: TextDirection.rtl,
            child: SfAIAssistView(
              messages: _messages,
              composer: const AssistComposer(
                decoration: InputDecoration(
                  hintText: 'Ask AI anything',
                ),
              ),
            ),
          ),
        );
      }
Action Button
Right to left (RTL) rendering is supported for the actionButton in the AIAssistView. Action button will be rendered from right to left direction.
@override
      Widget build(BuildContext context) {
        return Scaffold(
          body: Directionality(
            textDirection: TextDirection.rtl,
            child: SfAIAssistView(
              messages: _messages,
              actionButton: AssistActionButton(
                onPressed: (String value) {
                  // Handle the send button click action here.
                },
              ),
            ),
          ),
        );
      }
Conversation Area
Right to left (RTL) rendering is supported for both request and response Messages in the AIAssistView conversation area. In RTL mode, request and response message, header and suggestions will render the widget in right to left direction.
final List<AssistMessage> _messages = <AssistMessage>[];

      void _generativeResponse(String data) async {
        final String response = await _getAIResponse(data);
        setState(() {
          _messages.add(
            AssistMessage.response(
              data: response,
              time: DateTime.now(),
              suggestions: [
                const AssistMessageSuggestion(data: 'Provier'),
                const AssistMessageSuggestion(data: 'Riverpoad'),
                const AssistMessageSuggestion(data: 'Bloc'),
                const AssistMessageSuggestion(data: 'GetX'),
              ],
            ),
          );
        });
      }

      Future<String> _getAIResponse(String data) async {
        String response = '';
        // Connect with your preferred AI to generate a response to the request.
        return response;
      }

      @override
      Widget build(BuildContext context) {
        return Scaffold(
          body: Directionality(
            textDirection: TextDirection.rtl,
            child: SfAIAssistView(
              messages: _messages,
              actionButton: AssistActionButton(
                onPressed: (String data) {
                  if (data.trim().isNotEmpty) {
                    setState(() {
                      _messages.add(
                        AssistMessage.request(
                          data: data,
                          time: DateTime.now(),
                          author: const AssistMessageAuthor(
                              id: 'User ID', name: 'User name'),
                        ),
                      );
                      _generativeResponse(data);
                    });
                  }
                },
              ),
            ),
          ),
        );
      }
You can refer to our Flutter AI AssistView feature tour page for its groundbreaking feature representations. You can also explore our Flutter AI AssistView example which demonstrates interaction between users and AI services in a fully customizable layout and shows how to easily configure the AI AssistView with built-in support for creating stunning visual effects.