Getting Started with .NET PDF Library in Xamarin
13 Aug 20268 minutes to read
Note: Xamarin reached end-of-life in May 2024 and is no longer supported by Microsoft. For new projects, use the .NET MAUI equivalent of this guide.
The Xamarin PDF library is used to create, read, and edit PDF documents. This library also offers functionality to merge, split, stamp, work with forms, and secure PDF files.
To include the Syncfusion® Xamarin PDF library into your Xamarin application, please refer to the NuGet Package Required or Assemblies Required documentation.
Prerequisites
- Visual Studio 2019 (or later) with the Mobile development with .NET workload installed
- Xamarin SDK installed through the Visual Studio Installer
- An active Syncfusion® license key (a free 30-day trial is available)
Steps to create PDF document in Xamarin
Step 1: Create a new C# Xamarin.Forms application project.
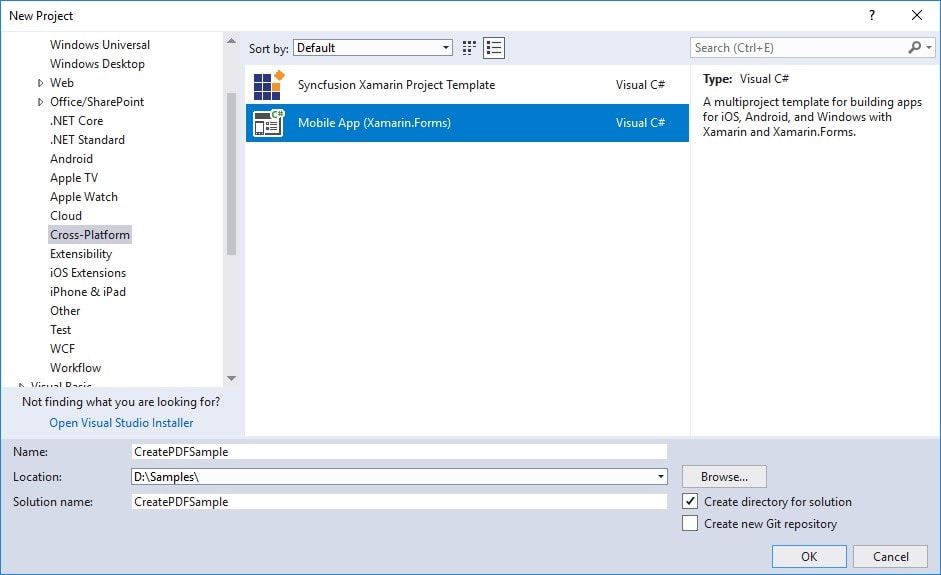
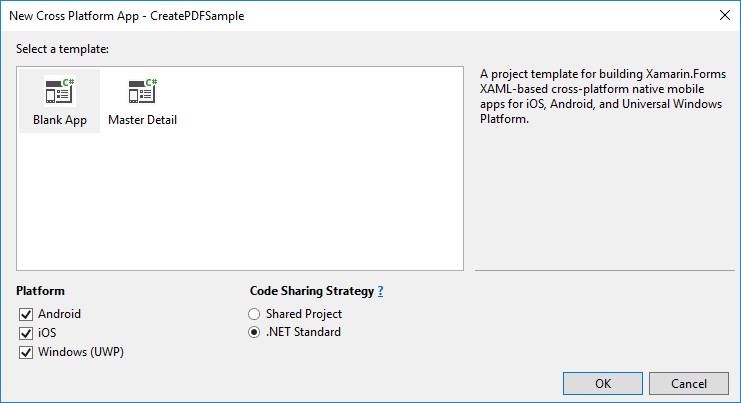
Step 2: Select a project template and required platforms to deploy the application. In this application, the portable assemblies to be shared across multiple platforms, so the .NET Standard code sharing strategy has been selected. For more details about code sharing, refer here.
If .NET Standard is not available in the code sharing strategy, the Portable Class Library (PCL) can be selected.
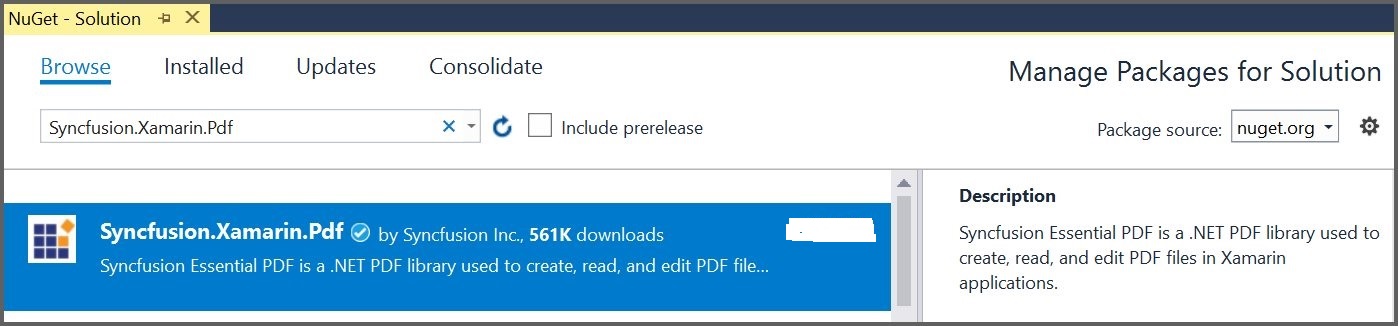
Step 3: Install the Syncfusion.Xamarin.PDF NuGet package as a reference to your Xamarin.Forms applications from NuGet.org.
Starting with v16.2.0.x, if you reference Syncfusion® assemblies from trial setup or from the NuGet feed, you also have to add the
Syncfusion.Licensingassembly reference and include a license key in your projects. Please refer to this link to learn about registering the Syncfusion license key in your application to use our components.
Step 4: Register the Syncfusion® license key. An evaluation watermark is added to every page of the generated PDF until a valid key is registered. Include the license key in the App.xaml.cs constructor (or any startup class) before creating a PdfDocument instance. Refer to the Syncfusion License documentation to learn about registering the Syncfusion® license key in your application.
using Syncfusion.Licensing;

public App()
{
    // Register the Syncfusion license
    Syncfusion.Licensing.SyncfusionLicenseProvider.RegisterLicense("YOUR LICENSE KEY");
    //The root page of your application.
    MainPage = new MainXamlPage();
}
Step 5: Add a new Forms XAML page in the portable project if no XAML page is defined in the App class. Otherwise, proceed to the next step.
a. To add the new XAML page, right-click the project and select Add > New Item and add a Forms XAML Page from the list. Name it as MainXamlPage.
b. In App class of portable project (App.cs), replace the existing constructor of App class with the following code example, which invokes the MainXamlPage.
public App()
{
  //The root page of your application.
  MainPage = new MainXamlPage();
}
Step 6: In the MainXamlPage.xaml, add new button as follows.
<ContentPage xmlns="http://xamarin.com/schemas/2014/forms"
             xmlns:x="http://schemas.microsoft.com/winfx/2009/xaml"
             x:Class="GettingStarted.MainXamlPage">
  <StackLayout VerticalOptions="Center">
    <Button Text="Generate Document" Clicked="OnButtonClicked" HorizontalOptions="Center"/>
  </StackLayout>
</ContentPage>
Step 7: Include the following namespace in the MainXamlPage.xaml.cs file.
using Syncfusion.Pdf;
using Syncfusion.Pdf.Parsing;
using Syncfusion.Pdf.Graphics;
using Syncfusion.Pdf.Grid;
Step 8: Include the following code example in the click event of the button in MainXamlPage.xaml.cs, to create a PDF document and save it in a stream.
private void Button_Clicked(object sender, EventArgs e)
{
  //Create a new PDF document.
  PdfDocument document = new PdfDocument();
  //Add a page to the document.
  PdfPage page = document.Pages.Add();
  //Create PDF graphics for the page.
  PdfGraphics graphics = page.Graphics;
  //Set the standard font.
  PdfFont font = new PdfStandardFont(PdfFontFamily.Helvetica, 20);
  //Draw the text.
  graphics.DrawString("Hello World!!!", font, PdfBrushes.Black, new PointF(0, 0));
  //Save the document to the stream.
  MemoryStream stream = new MemoryStream();
  document.Save(stream);
  //Close the document.
  document.Close(true);
  //Save the stream as a file in the device and invoke it for viewing.
  Xamarin.Forms.DependencyService.Get<ISave>().SaveAndView("Output.pdf", "application/pdf", stream);
}
Step 9: Download the helper files from this link and add them into the mentioned project. These helper files allow you to save the stream as a physical file and open the file for viewing.
| Project | File Name | Summary |
|---|---|---|
| portable project | ISave.cs | Represents the base interface for the save operation |
| iOS Project | SaveIOS.cs | Save implementation for iOS device |
| PreviewControllerDS.cs | Helper class for viewing the PDF file in iOS device | |
| Android project | SaveAndroid.cs | Save implementation for Android device |
| WinPhone project | SaveWinPhone.cs | Save implementation for Windows Phone device |
| UWP project | SaveWindows.cs | Save implementation for UWP device. |
| Windows(8.1) project | SaveWindows81.cs | Save implementation for WinRT device. |
Step 10: Configure the Android file provider so that the generated PDF document can be saved and viewed on devices running Android SDK 23 and above. Android introduced a new runtime permission model from SDK version 23 onwards.
a. Create a new XML file named provider_paths.xml under the Android project Resources folder and add the following code in it.
Eg: Resources/xml/provider_paths.xml
<?xml version="1.0" encoding="UTF-8"?>
<paths xmlns:android="http://schemas.android.com/apk/res/android">
    <external-path
        name="external_files"
        path="." />
</paths>
b. Add the following code to the AndroidManifest.xml file located under Properties/AndroidManifest.xml.
<?xml version="1.0" encoding="utf-8"?>
<manifest xmlns:android="http://schemas.android.com/apk/res/android"
          android:versionCode="1"
          android:versionName="1.0"
          package="com.companyname.GettingStarted">
    <uses-sdk
        android:minSdkVersion="19"
        android:targetSdkVersion="27" />
    <application
        android:label=" GettingStarted.Android"
        android:requestLegacyExternalStorage="true">
        <provider
            android:name="android.support.v4.content.FileProvider"
            android:authorities="${applicationId}.provider"
            android:exported="false"
            android:grantUriPermissions="true">
            <meta-data
                android:name="android.support.FILE_PROVIDER_PATHS"
                android:resource="@xml/provider_paths" />
        </provider>
    </application>
</manifest>
Include the following changes when deploying the application on Android 11 and later:
- Add the user permission for reading and writing external storage to the
AndroidManifest.xmlfile. Theandroid:requestLegacyExternalStorageattribute can be enabled on the<application>element when required, as shown below.
<uses-permission android:name="android.permission.WRITE_EXTERNAL_STORAGE" />
<uses-permission android:name="android.permission.READ_EXTERNAL_STORAGE" />

<application android:label="GettingStarted.Android" android:requestLegacyExternalStorage="true">
Step 11: Compile and execute the application. This will create a simple PDF document.
You can download a complete working sample from GitHub.
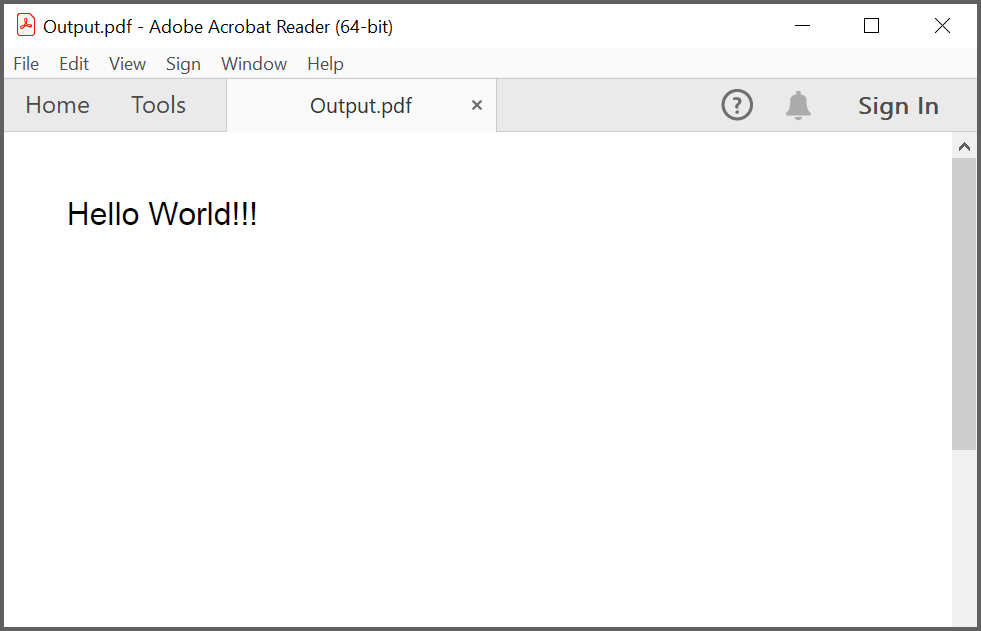
By executing the program, you will get the PDF document as follows.
Click here to explore the rich set of Syncfusion® PDF library features.
An online sample link to create PDF document.
Next steps
- Create a PDF in .NET MAUI (the recommended modern alternative to Xamarin)
- Create a PDF in WPF
- Create a PDF in Windows Forms
- Create a PDF in ASP.NET Core
- Open and read an existing PDF document
- Save the generated PDF to a file or stream