Create or Generate PDF file in ASP.NET Core
24 Jul 202613 minutes to read
The .NET PDF library is a powerful and versatile solution for creating, reading, and editing PDF documents in .NET applications. It also provides advanced features such as merging and splitting PDFs, adding stamps, working with form fields, and securing PDF files with encryption and permissions.
To integrate the .NET PDF library into your ASP.NET Core application, refer to the official documentation sections on NuGet Package Required or Assemblies Required for step-by-step guidance.
Steps to create PDF document in ASP.NET Core
Prerequisites:
- Visual Studio 2019 or later with the ASP.NET and web development workload installed.
- Install .NET 8.0 SDK or later from the .NET Downloads page.
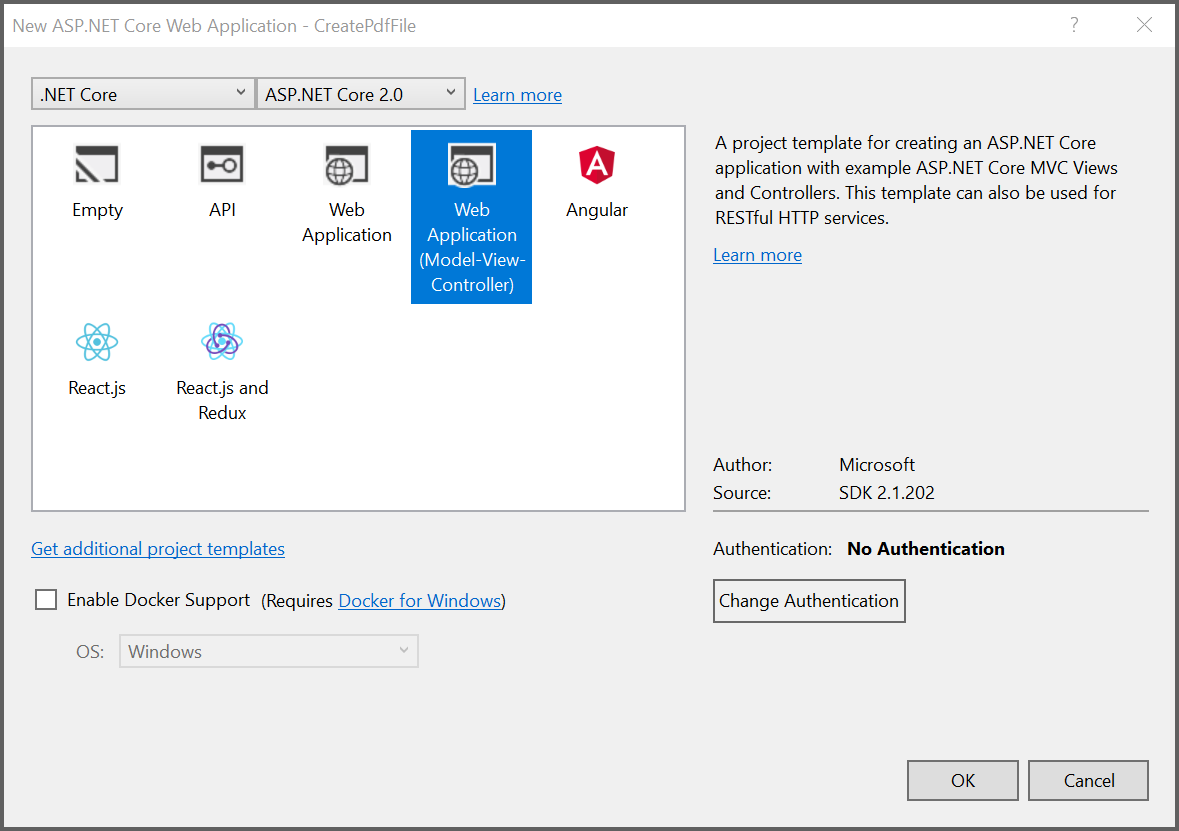
Step 1: Create a new C# ASP.NET Core Web Application project. Select ASP.NET Core Web App (Model-View-Controller) from the template list.
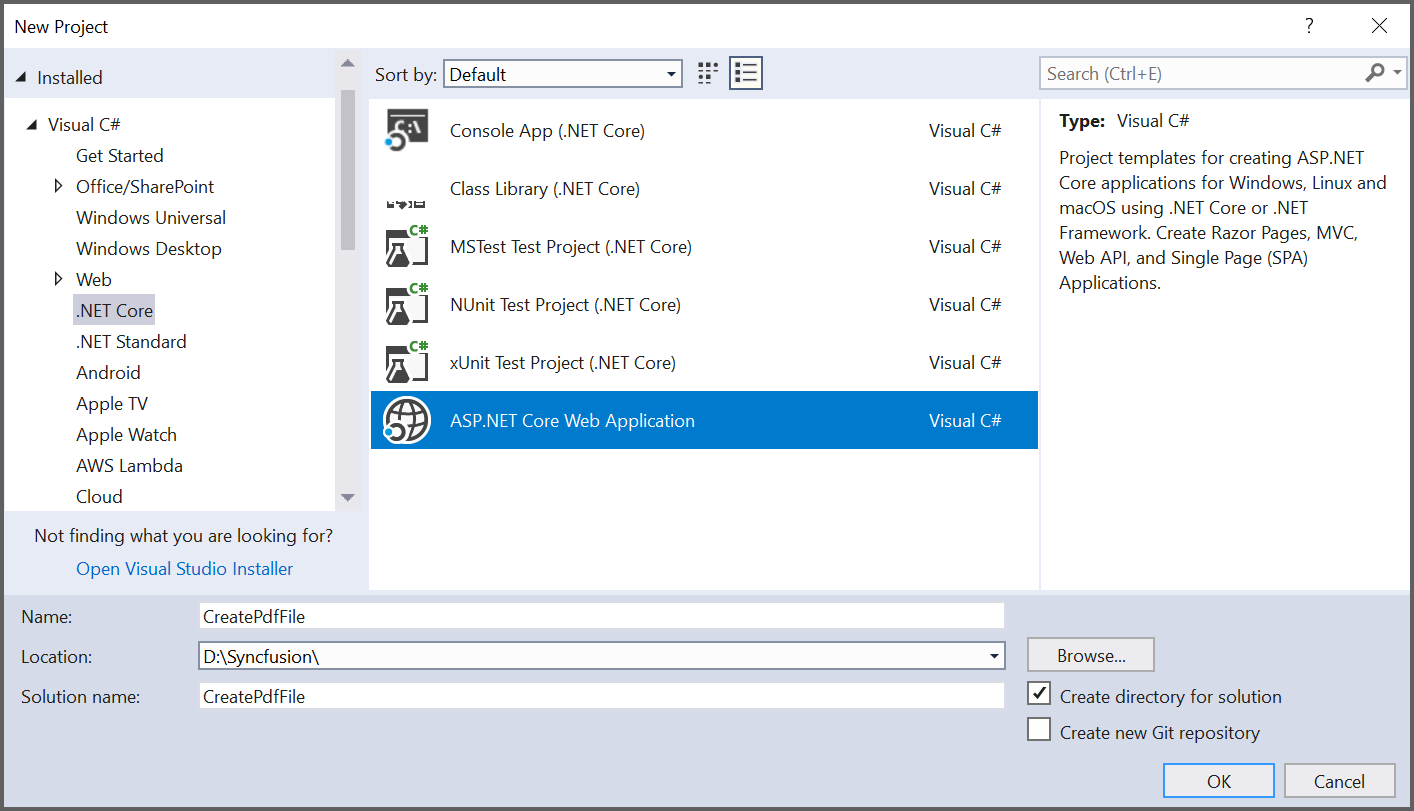
Step 2: Name your project and click Next. In the Additional information window, select the target framework (for example, .NET 8.0) and click Create.
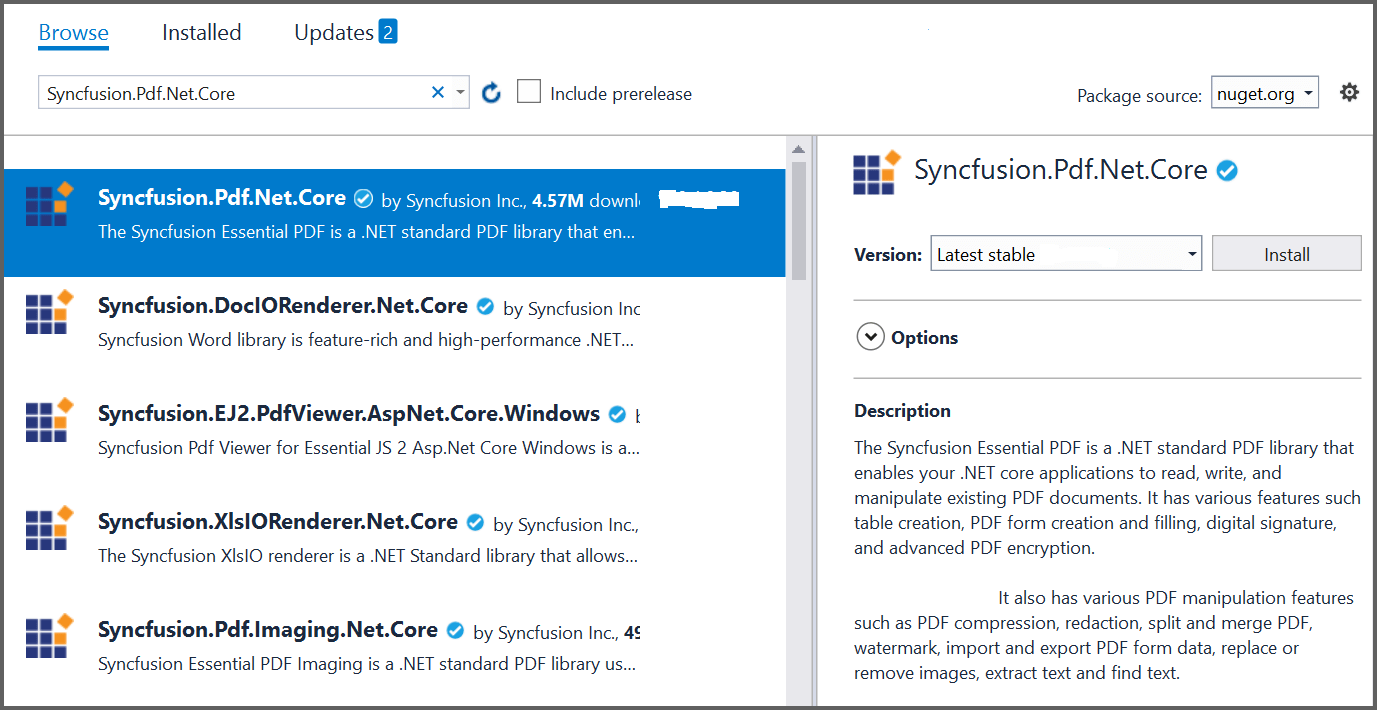
Step 3: Install the Syncfusion.Pdf.Net.Core NuGet package from NuGet.org.
Step 4: Register the Syncfusion® license key. A trial watermark is added to every page of the generated PDF until a valid key is registered. Include the license key in Program.cs before initializing any Syncfusion® component:
using Syncfusion.Licensing;

var builder = WebApplication.CreateBuilder(args);
// Register the Syncfusion license
Syncfusion.Licensing.SyncfusionLicenseProvider.RegisterLicense("YOUR LICENSE KEY");

// Add services to the container.
builder.Services.AddControllersWithViews();

var app = builder.Build();
Replace "YOUR LICENSE KEY" with the license key associated with your Syncfusion® account. If you do not have a license key, you can request a free 30-day trial or apply for a Community License from the Syncfusion® website. For more information about registering a license key in your application, refer to the Syncfusion® Licensing Documentation.
Step 5: A default controller named HomeController.cs is added on creation of an ASP.NET Core MVC project. Include the following namespaces in that HomeController.cs file.
using Syncfusion.Pdf;
using Syncfusion.Pdf.Graphics;
using Syncfusion.Drawing;
using System.IO;
using Microsoft.AspNetCore.Mvc;
Step 6: A default action method named Index is present in HomeController.cs. Right-click the Index method and select Go To View to open Index.cshtml, then add a new button as shown below.
@{Html.BeginForm("CreateDocument", "Home", FormMethod.Get);
      {
         <div>
            <input type="submit" value="Create PDF Document" style="width:200px;height:27px" />
         </div>
      }
      Html.EndForm();
}
Step 7: Add a new action method named CreateDocument in HomeController.cs and include the following code to generate a PDF document using the PdfDocument class. Then use the DrawString method of the PdfGraphics object to draw the text on the PDF page.
public IActionResult CreateDocument()
{
   //Create a new PDF document.
   PdfDocument document = new PdfDocument();
   //Add a page to the document.
   PdfPage page = document.Pages.Add();
   //Create PDF graphics for the page.
   PdfGraphics graphics = page.Graphics;
   //Set the standard font.
   PdfFont font = new PdfStandardFont(PdfFontFamily.Helvetica, 20);
   //Draw the text.
   graphics.DrawString("Hello World!!!", font, PdfBrushes.Black, new PointF(0, 0));
   //Save the PDF to the MemoryStream.
   MemoryStream stream = new MemoryStream();
   document.Save(stream);
   //Close the document. Pass true to dispose internal resources.
   document.Close(true);
   //Set the position to '0'.
   stream.Position = 0;
   //Download the PDF document in the browser.
   FileStreamResult fileStreamResult = new FileStreamResult(stream, "application/pdf");
   fileStreamResult.FileDownloadName = "Sample.pdf";
   return fileStreamResult;
}
Step 8: Build the project by clicking Build > Build Solution or pressing Ctrl+Shift+B.
Step 9: Run the project by clicking the Start button (green arrow) or pressing F5.
Step 10: Open the app in a browser, then click the Create PDF Document button on the home page. The browser downloads Sample.pdf containing the text “Hello World!!!”.
Prerequisites:
- .NET SDK (version 8.0 or later) — Download.
- Visual Studio Code — Download.
- C# extension for VS Code installed from the Extensions view (Ctrl+Shift+X).
Step 1: Open the terminal (Ctrl+`) and run the following command to create a C# ASP.NET Core Web Application project targeting .NET 8.0.
dotnet new mvc -n CreatePdfASPNETCoreAPP -f net8.0
Step 2: Navigate to the project directory and open it in VS Code.
cd CreatePdfASPNETCoreAPP
Step 3: Add the Syncfusion.Pdf.Net.Core NuGet package to your project.
dotnet add package Syncfusion.Pdf.Net.Core
Step 4: Register the Syncfusion® license key. A trial watermark is added to every page of the generated PDF until a valid key is registered. Include the license key in Program.cs before initializing any Syncfusion® component:
using Syncfusion.Licensing;

var builder = WebApplication.CreateBuilder(args);
// Register the Syncfusion license
Syncfusion.Licensing.SyncfusionLicenseProvider.RegisterLicense("YOUR LICENSE KEY");

// Add services to the container.
builder.Services.AddControllersWithViews();

var app = builder.Build();
Replace "YOUR LICENSE KEY" with the license key associated with your Syncfusion® account. If you do not have a license key, you can request a free 30-day trial or apply for a Community License from the Syncfusion® website. For more information about registering a license key in your application, refer to the Syncfusion® Licensing Documentation.
Step 5: A default controller named HomeController.cs is added on creation of the ASP.NET Core project. Include the following namespaces in that file.
using Syncfusion.Pdf;
using Syncfusion.Pdf.Graphics;
using Syncfusion.Drawing;
using System.IO;
using Microsoft.AspNetCore.Mvc;
Step 6: A default action method named Index is present in HomeController.cs. Open Views/Home/Index.cshtml and add a new button as shown below.
@{Html.BeginForm("CreateDocument", "Home", FormMethod.Get);
    {
        <div>
            <input type="submit" value="Create PDF Document" style="width:200px;height:27px" />
        </div>
    }
    Html.EndForm();
}
Step 7: Add a new action method named CreateDocument in HomeController.cs and include the following code to generate a PDF document using the PdfDocument class. Then use the DrawString method of the PdfGraphics object to draw the text on the PDF page.
public IActionResult CreateDocument()
{
    //Create a new PDF document.
    PdfDocument document = new PdfDocument();
    //Add a page to the document.
    PdfPage page = document.Pages.Add();
    //Create PDF graphics for the page.
    PdfGraphics graphics = page.Graphics;
    //Set the standard font.
    PdfFont font = new PdfStandardFont(PdfFontFamily.Helvetica, 20);
    //Draw the text.
    graphics.DrawString("Hello World!!!", font, PdfBrushes.Black, new PointF(0, 0));
    //Save the PDF to the MemoryStream.
    MemoryStream stream = new MemoryStream();
    document.Save(stream);
    //Close the document. Pass true to dispose internal resources.
    document.Close(true);
    //Set the position to '0'.
    stream.Position = 0;
    //Download the PDF document in the browser.
    FileStreamResult fileStreamResult = new FileStreamResult(stream, "application/pdf");
    fileStreamResult.FileDownloadName = "Sample.pdf";
    return fileStreamResult;
}
Step 8: Build the project by running the following command:
dotnet build
Step 9: Run the project:
dotnet run
Step 10: Open a browser, navigate to the URL shown in the terminal output (typically https://localhost:7xxx), and click Create PDF Document to download Sample.pdf.
Prerequisites:
- JetBrains Rider (latest stable version).
- .NET 8.0 SDK or later — Download.
Step 1: On the Rider welcome screen, click New Solution.

Step 2: Select Project Type as Web, choose the target framework (for example, .NET 8.0), and select the Web App (Model-View-Controller) template. Enter a project name and location, then click Create.

Step 3: Install the Syncfusion.Pdf.Net.Core NuGet package. Click the NuGet icon in the Rider toolbar, search for Syncfusion.Pdf.Net.Core, select the latest stable version, click + (Add), and then Install.

Step 4: Register the Syncfusion® license key. A trial watermark is added to every page of the generated PDF until a valid key is registered. Include the license key in Program.cs before initializing any Syncfusion® component:
using Syncfusion.Licensing;

var builder = WebApplication.CreateBuilder(args);
// Register the Syncfusion license
Syncfusion.Licensing.SyncfusionLicenseProvider.RegisterLicense("YOUR LICENSE KEY");

// Add services to the container.
builder.Services.AddControllersWithViews();

var app = builder.Build();
Replace "YOUR LICENSE KEY" with the license key associated with your Syncfusion® account. If you do not have a license key, you can request a free 30-day trial or apply for a Community License from the Syncfusion® website. For more information about registering a license key in your application, refer to the Syncfusion® Licensing Documentation.
Step 5: A default controller named HomeController.cs is added on creation of the ASP.NET Core project. Include the following namespaces in that file.
using Syncfusion.Pdf;
using Syncfusion.Pdf.Graphics;
using Syncfusion.Drawing;
using System.IO;
using Microsoft.AspNetCore.Mvc;
Step 6: A default action method named Index is present in HomeController.cs. Right-click the Index method and select Go To View to open Index.cshtml, then add a new button as shown below.
@{
    Html.BeginForm("CreateDocument", "Home", FormMethod.Get);
    {
        <div>
            <input type="submit" value="Create PDF Document" style="width:200px;height:27px" />
        </div>
    }
    Html.EndForm();
}
Step 7: Add a new action method named CreateDocument in HomeController.cs and include the following code to generate a PDF document using the PdfDocument class. Then use the DrawString method of the PdfGraphics object to draw the text on the PDF page.
public IActionResult CreateDocument()
{
    //Create a new PDF document.
    PdfDocument document = new PdfDocument();
    //Add a page to the document.
    PdfPage page = document.Pages.Add();
    //Create PDF graphics for the page.
    PdfGraphics graphics = page.Graphics;
    //Set the standard font.
    PdfFont font = new PdfStandardFont(PdfFontFamily.Helvetica, 20);
    //Draw the text.
    graphics.DrawString("Hello World!!!", font, PdfBrushes.Black, new PointF(0, 0));
    //Save the PDF to the MemoryStream.
    MemoryStream stream = new MemoryStream();
    document.Save(stream);
    //Close the document. Pass true to dispose internal resources.
    document.Close(true);
    //Set the position to '0'.
    stream.Position = 0;
    //Download the PDF document in the browser.
    FileStreamResult fileStreamResult = new FileStreamResult(stream, "application/pdf");
    fileStreamResult.FileDownloadName = "Sample.pdf";
    return fileStreamResult;
}
Step 8: Build the project by clicking the Build button in the toolbar or pressing Ctrl+Shift+B.
Step 9: Run the project by clicking the Run button (green arrow) in the toolbar or pressing Shift+F10.
Step 10: Open the app in a browser, then click the Create PDF Document button on the home page. The browser downloads Sample.pdf containing the text “Hello World!!!”.
You can download a complete working sample from GitHub.
By executing the program, you will get the PDF document as follows.

Click here to explore the rich set of Syncfusion® PDF library features.
An online sample link to create PDF document in ASP.NET Core.