How can I help you?
Essential JS for Ember
System Requirements
To work with Ember, you need to install the followings on your machine.
-
Node.js 5.x.x+ version.
-
NPM 3.x.x+ version
-
Ember CLI 2.x.x+ version.
-
Any Text Editor
Create a simple Ember Application
Please follow the below steps to use Syncfusion Ember add-on in your Ember CLI application.
-
Create Ember CLI application using the command ember new ember-app.
-
Add syncfusion-ember in
package.jsonto add the Syncfusion Ember add-on into your applicationember-app. -
Add syncfusion-javascript package for source files (
scriptsandcss).
"devDependencies": {
        ...
        "syncfusion-ember":"*"; //To install the latest version
        "syncfusion-javascript": "*"; // To install source files
}- Disable
EXTEND_PROTOTYPESoption in theenvironment.jsfile underconfigfolder to preventonfunction prototype extension in our controls events.
EmberENV: {
		FEATURES: {
			// Here you can enable experimental features on an ember canary build
			// e.g. 'with-controller': true
		},
		EXTEND_PROTOTYPES: false
},-
Open the command prompt in the root folder and run the command
npm installto download the dependent files in node-modules. -
Copy the files
ej.web.all.minandjsrender.minfromweb/scriptsfolder which is in JavaScript build samples location(Click Explore Demos button from the Javascript Dashboard)or copyej.web.all.minfromnode_modules/syncfusion-javascript/Scripts/ej/weband downloadjsrender.minfile from CDN into thevendorfolder. Import the same into the application using below code inember-cli-build.js.
module.exports = function(defaults) {
        var app = new EmberApp(defaults, {
            // Add options here
        });
        app.import('vendor/ej.web.all.min.js');
        app.import('vendor/jsrender.min.js');
        return app.toTree();
};-
Create the folder
scriptsandcontentin public folder and copy JavaScript and CSS files fromweb/scriptsandweb/themesfolder which is in JavaScript build samples location(Click Explore Demos button from the Javascript Dashboard)or copy thethemesfiles fromnode_modules/syncfusion-javascript/Content/ej/webinto created folders. -
And include the necessary file references in Index page which is in
appfolder of the Ember application.
<head>
<link rel="stylesheet" href="{{rootURL}}
content/ejthemes/default-theme/ej.web.all.min.css">
</head>
<body>
<script src="{{rootURL}}scripts/scripts/jsondata.min.js" type="text/javascript"></script>
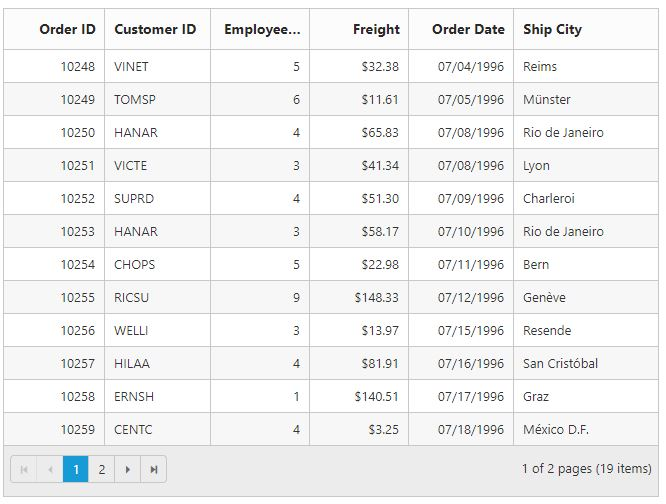
</body>Create Grid sample in the Ember CLI application
-
Open the command prompt in the folder
ember-app. -
Use the command ember generate route grid/default to create template
default.hbsfile in templates folder and routerdefault.jsfile in routes folder. It also add the routing content inrouter.js. -
Use below code in
default.hbsin templates folder to render the Grid.
<div class="e-control">

	{{ej-grid id="Grid" e-dataSource=model.data e-columns=model.cols e-allowPaging=true }}

</div>- Use the below code in
default.jsin routes folder to bind the model to the Grid.
export default Ember.Route.extend({
        model() {
            return {
                data: window.gridData,
                cols: [
                    { field: "OrderID", headerText: "Order ID", width: 75, textAlign: ej.TextAlign.Right },
                    { field: "CustomerID", headerText: "Customer ID", width: 80 },
                    { field: "EmployeeID", headerText: "Employee ID", width: 75, textAlign: ej.TextAlign.Right},
                    { field: "Freight", width: 75, format: "{0:C}", textAlign: ej.TextAlign.Right, priority: 3 },
                    { field: "OrderDate", headerText: "Order Date", format: "{0:MM/dd/yyyy}"},
                    { field: "ShipCity", headerText: "Ship City", width: 110, priority: 2 }
               ]
           }
        }
});- Use the below code in
.eslintrcfile to ignore the ESLint errors while usingejin samples as likeej.TextAlign.Right.
...
    rules: {
        ...
    },
    globals: {
	    ej: false
    }
    ...
Build or Run the Ember CLI application
-
To Build the Ember CLI application using the command
ember buildwhich builds the application and creates thedistfolder. Now you can host thedistfolder in IIS. -
To Run the Ember CLI application using the command
ember servewhich builds the application and creates thedistfolder. However it hosts the application in the urlhttp://localhost:4200. -
Open the browser and navigates to
http://localhost:4200.