Create Form Fields in JavaScript (ES6) PDF Viewer
13 Nov 202624 minutes to read
Form fields can be created visually using the Form Designer UI or dynamically using APIs.
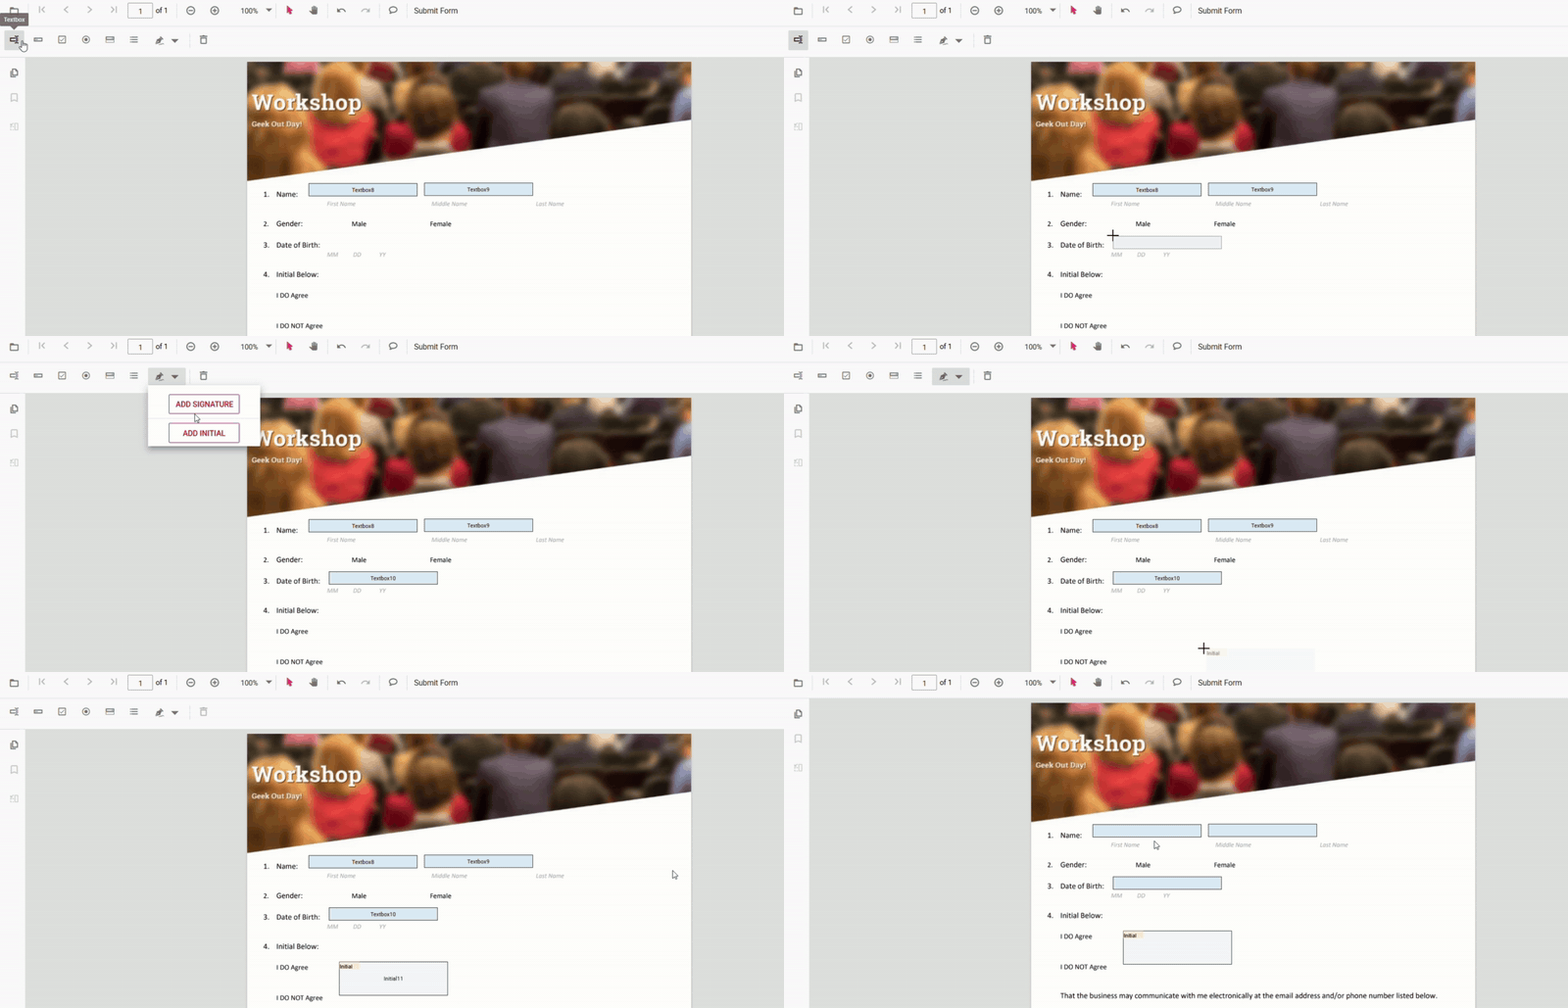
Create form fields using the Form Designer UI
Use this approach when designing forms manually without writing code.
Steps:
- Enable Form Designer mode in the PDF Viewer.
- Click a form field type (Textbox, Checkbox, Dropdown, etc.) from the toolbar.
- Click on the PDF page to place the form field.
- Move or resize the field as required.
- Configure field properties using the Properties panel.
Add form fields programmatically (API)
Use this approach to generate form fields dynamically based on data or application logic.
//Add Text Box using addFormField Method
pdfviewer.formDesignerModule.addFormField('Textbox', {
    name: 'First Name',
    bounds: { X: 146, Y: 229, Width: 150, Height: 24 },
    pageNumber: 1,
    isRequired: true,
    tooltip: 'Enter your first name'
  } as TextFieldSettings);
Use programmatic creation when:
- Building dynamic forms
- Pre-filling forms from databases
- Automating form creation workflows
PDF Form Field Types and How to Add Them
Each field can be added via the Form Designer or programmatically.
Textbox
Add via Toolbar (UI)
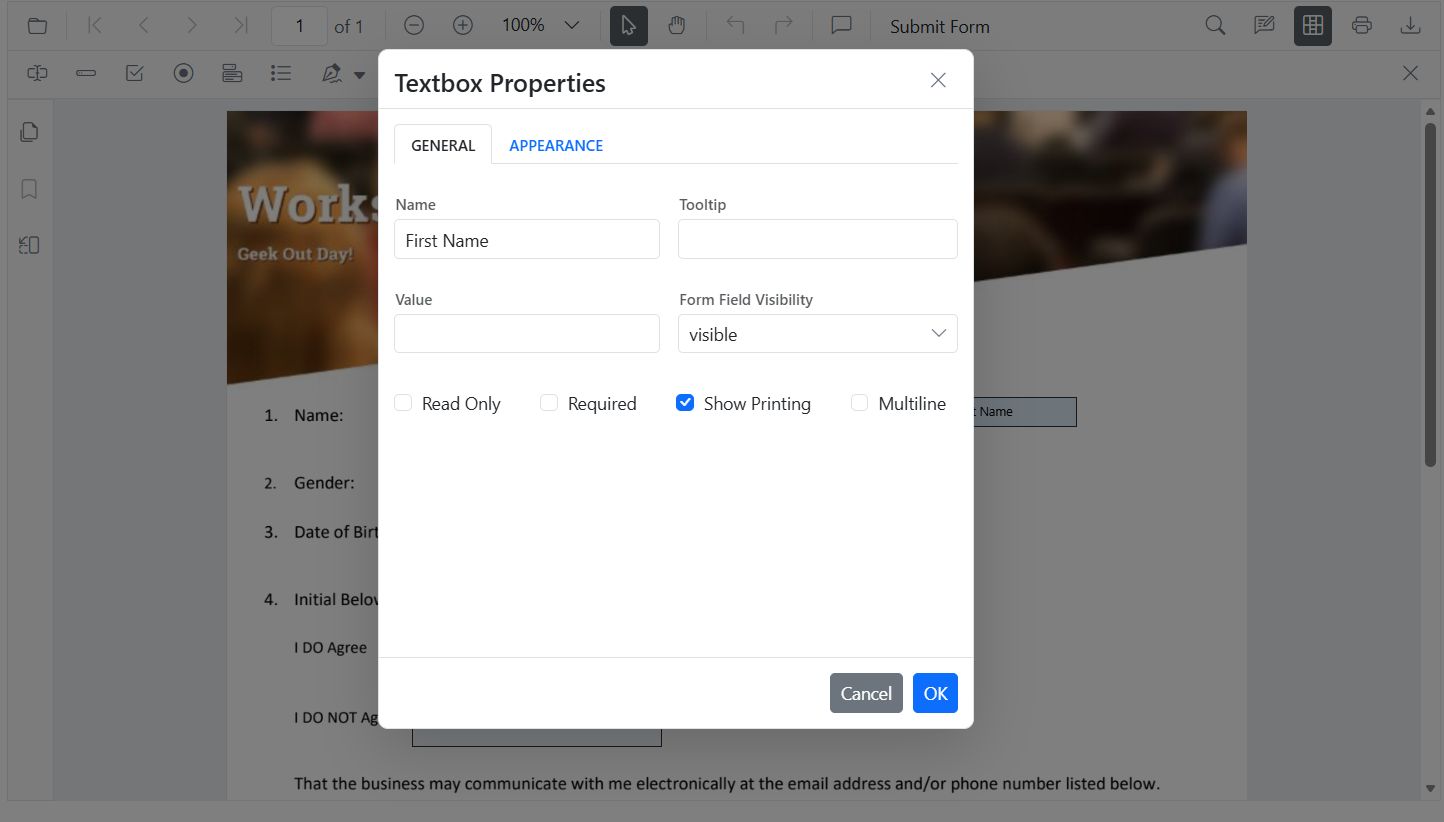
- Open Form Designer → select Textbox → click on the page → configure in Properties.
Add Programmatically (API)
//Add Text Box using addFormField Method
pdfviewer.formDesignerModule.addFormField('Textbox', {
    name: 'FirstName',
    pageNumber: 1,
    bounds: { X: 100, Y: 150, Width: 200, Height: 24 },
    isRequired: true,
    tooltip: 'Enter your first name',
    maxLength: 40
} as TextFieldSettings);
Password
Add via Toolbar (UI)
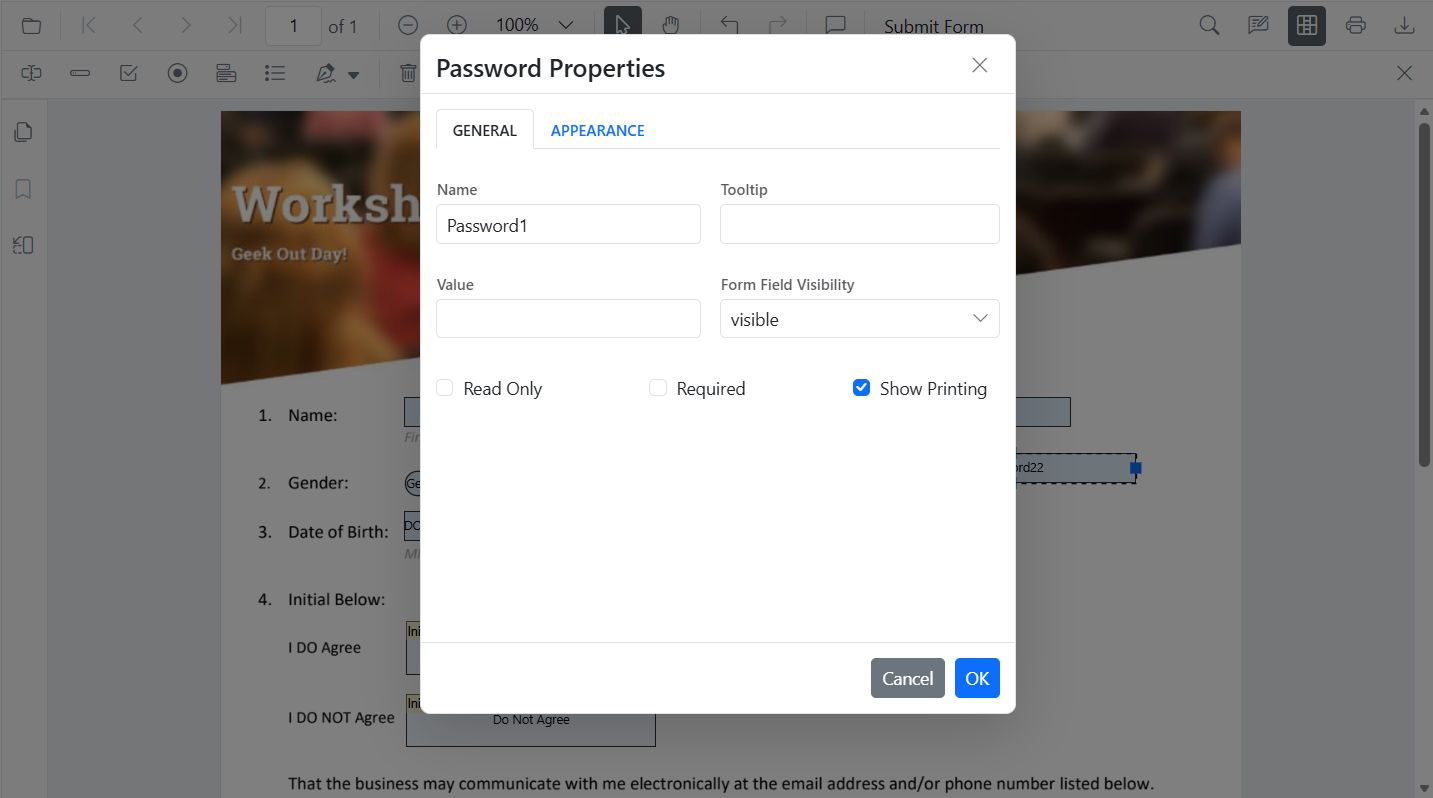
- Select Password → place it → configure tooltip, required, max length.
Add Programmatically (API)
//Add Password Field using addFormField Method
pdfviewer.formDesignerModule.addFormField('Password', {
    name: 'AccountPassword',
    pageNumber: 1,
    bounds: { X: 100, Y: 190, Width: 200, Height: 24 },
    isRequired: true,
    maxLength: 32,
    tooltip: 'Enter a secure password',
} as PasswordFieldSettings);
CheckBox
Add via Toolbar (UI)
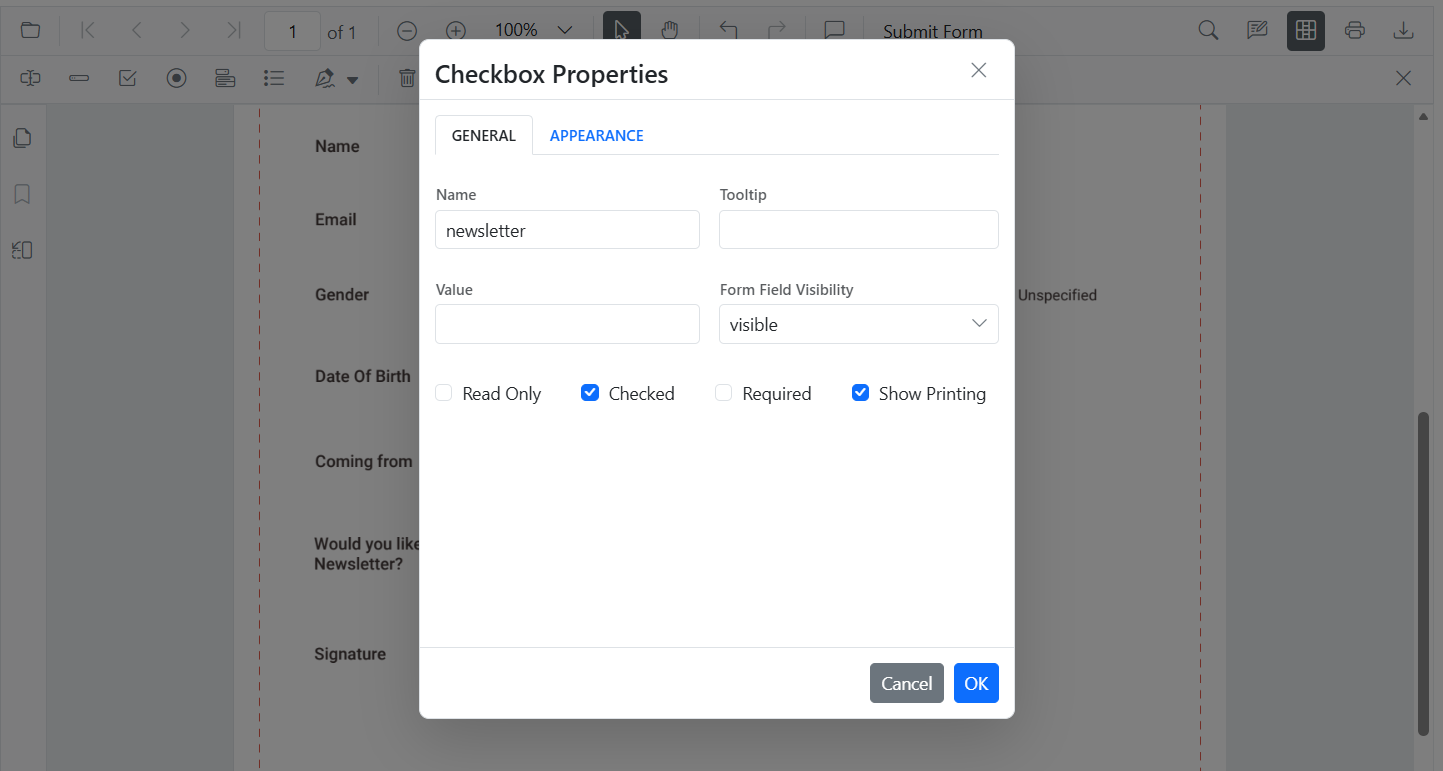
- Select CheckBox → click to place → duplicate for options → set isChecked, tooltip, appearance.
Add Programmatically (API)
//Add CheckBox Field using addFormField Method
  pdfviewer.formDesignerModule.addFormField('CheckBox', {
    name: 'AgreeTerms',
    pageNumber: 1,
    bounds: { X: 100, Y: 230, Width: 18, Height: 18 },
    isChecked: false,
    tooltip: 'I agree to the terms',
  } as CheckBoxFieldSettings);
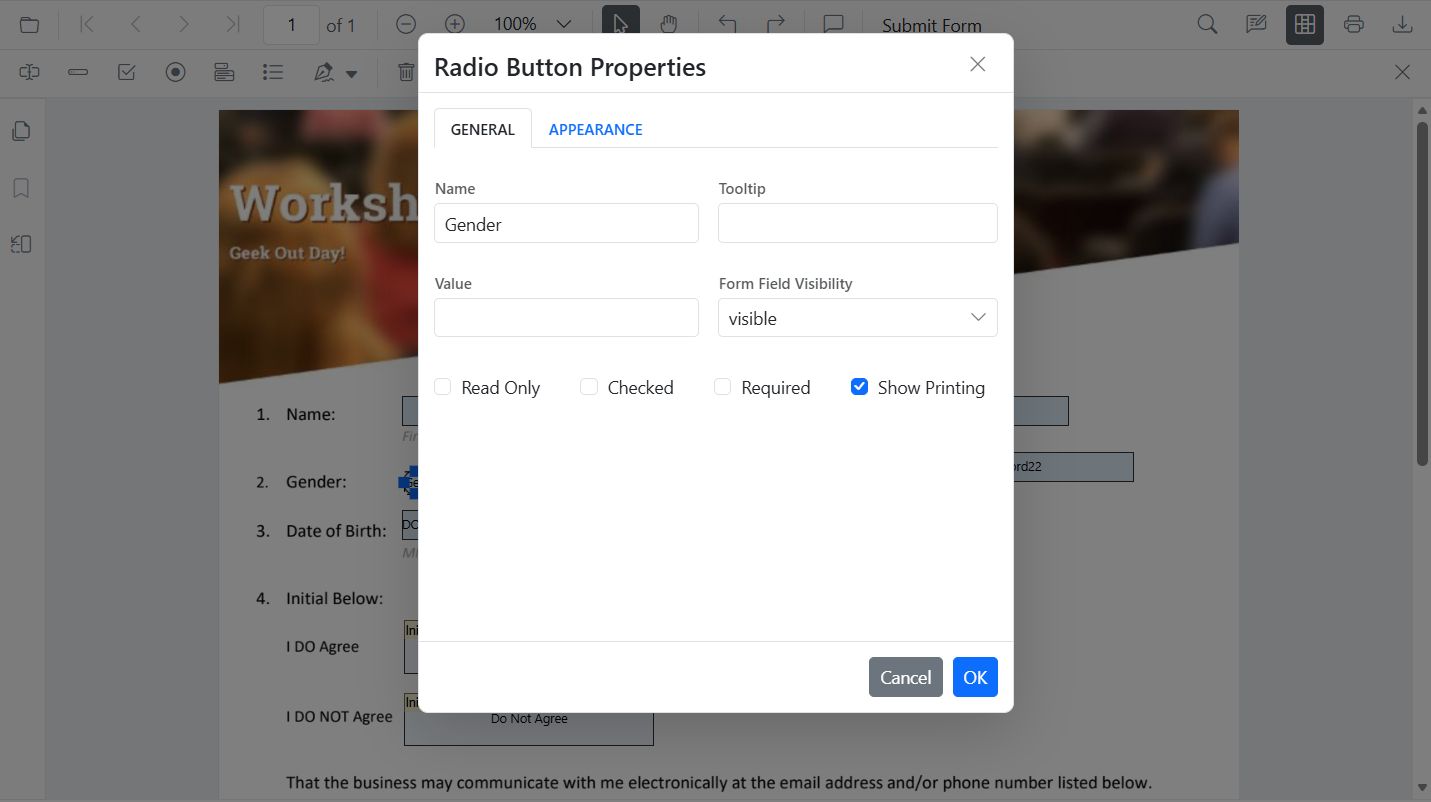
RadioButton
Add via Toolbar (UI)
- Select RadioButton → place buttons with the same Name to group → configure selection/colors.
Add Programmatically (API)
//Add RadioButtons using addFormField Method
  pdfviewer.formDesignerModule.addFormField('RadioButton', {
    name: 'Gender',
     value: 'Male',
     pageNumber: 1,
     bounds: { X: 100, Y: 270, Width: 16, Height: 16 }
  } as RadioButtonFieldSettings);
    pdfviewer.formDesignerModule.addFormField('RadioButton', {
    name: 'Gender',
     value: 'Female',
     pageNumber: 1,
     bounds: { X: 160, Y: 270, Width: 16, Height: 16 }
  } as RadioButtonFieldSettings);
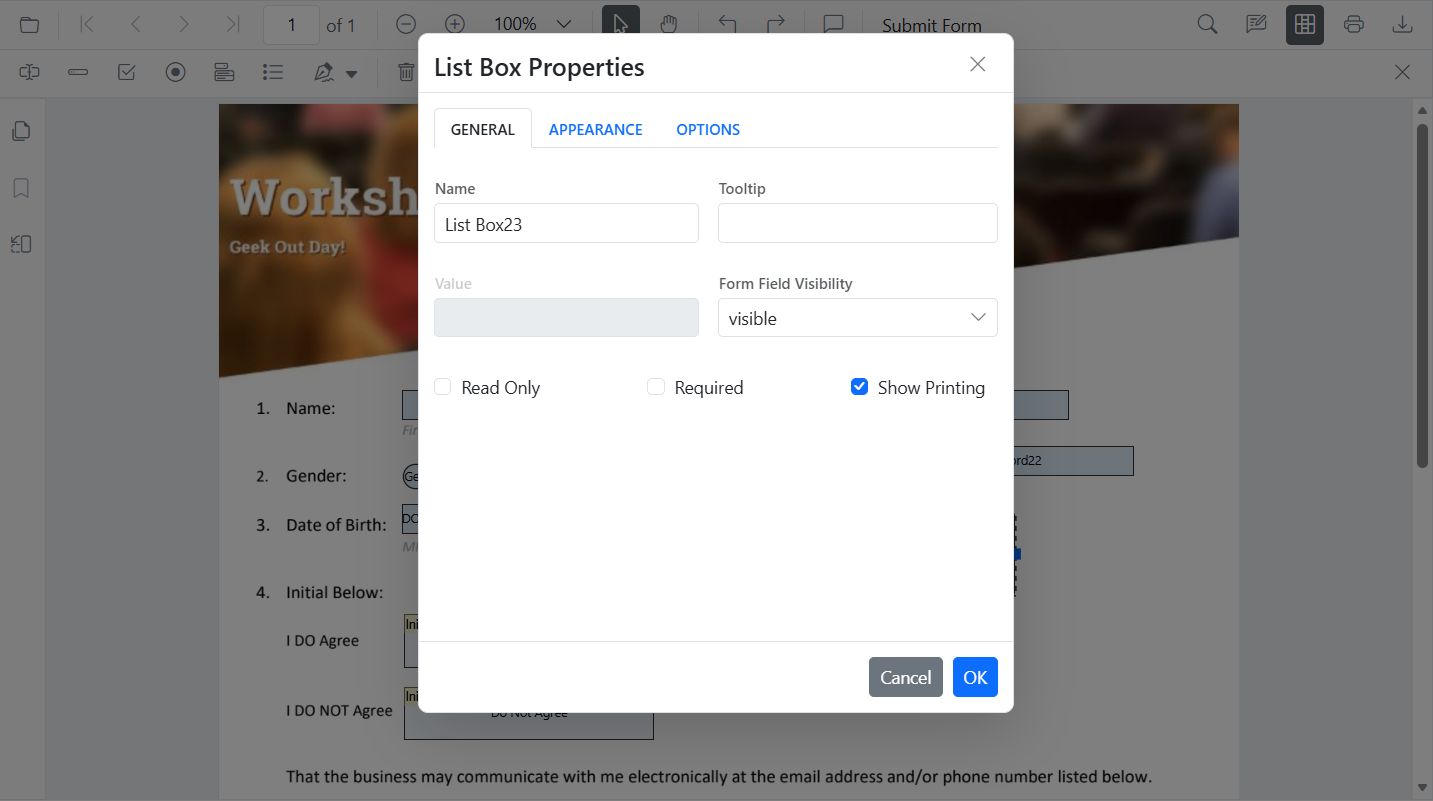
ListBox
Add via Toolbar (UI)
- Select ListBox → place → add items in Properties.
Add Programmatically (API)
//Add ListBox using addFormField Method
    const option = [
        { itemName: 'Item 1', itemValue: 'item1' },
        { itemName: 'Item 2', itemValue: 'item2' },
        { itemName: 'Item 3', itemValue: 'item3' }
      ];
    pdfviewer.formDesignerModule.addFormField('ListBox', {
    name: 'States',
    pageNumber: 1,
    bounds: { X: 100, Y: 310, Width: 220, Height: 70 },
    options: option,
  } as ListBoxFieldSettings);
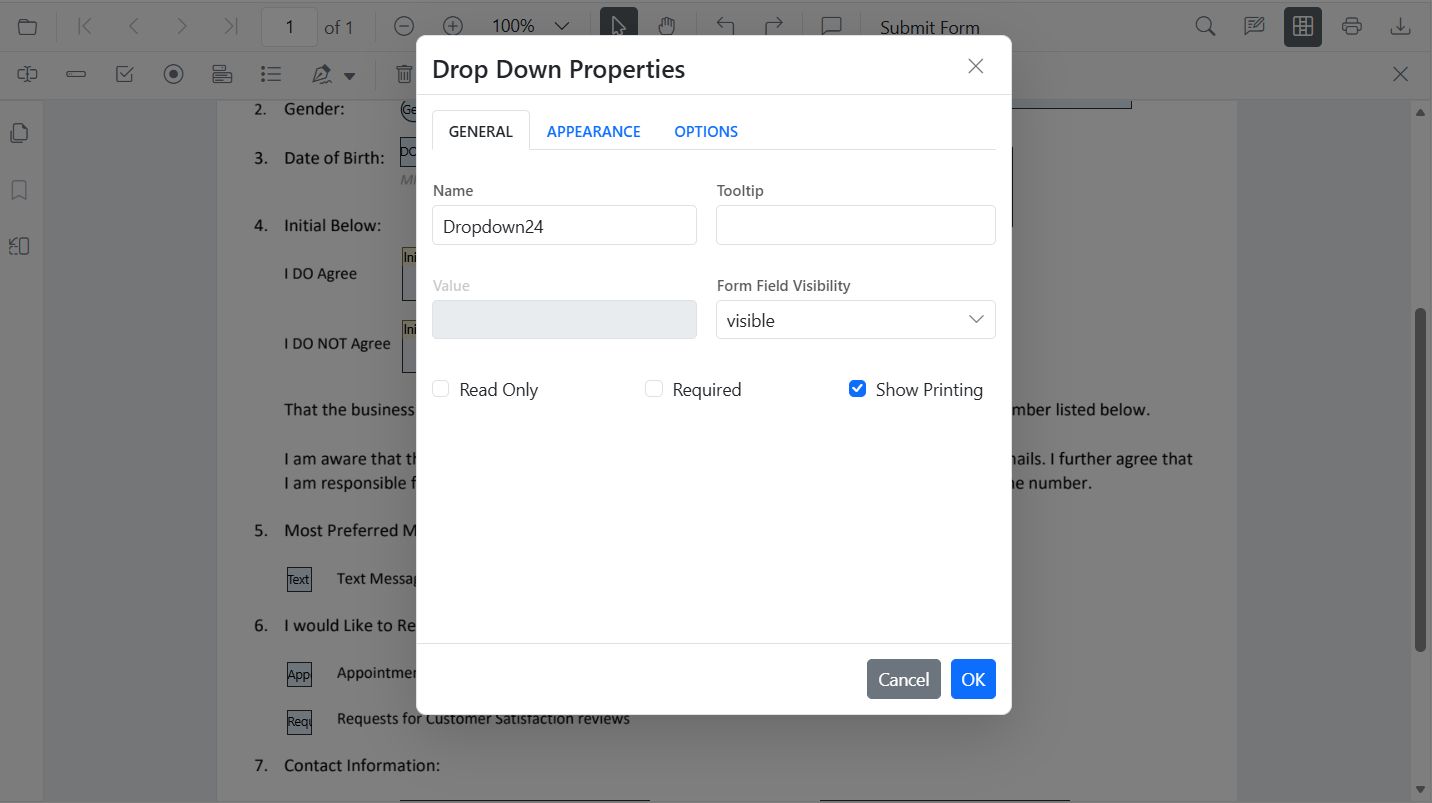
DropDown
Add via Toolbar (UI)
- Select DropDown → place → add items → set default value.
Add Programmatically (API)
//Add DropDown using addFormField Method
  const options = [
    { itemName: 'Item 1', itemValue: 'item1' },
    { itemName: 'Item 2', itemValue: 'item2' },
    { itemName: 'Item 3', itemValue: 'item3' },
  ];

  pdfviewer.formDesignerModule.addFormField('DropDown', {
    name: 'Country',
    options,
    pageNumber: 1,
    bounds: { X: 560, Y: 320, Width: 150, Height: 24 },
  } as DropdownFieldSettings);
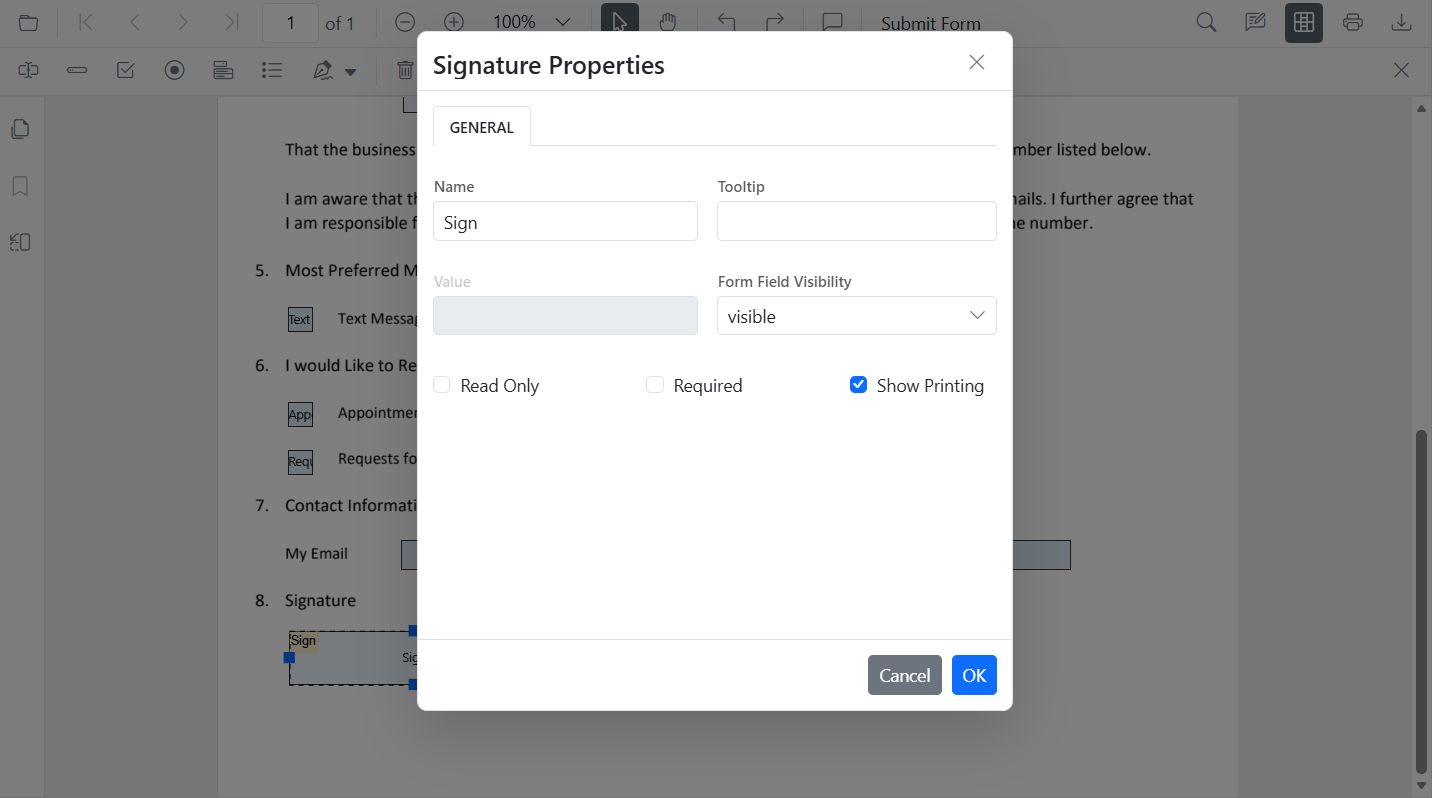
Signature Field
Add via Toolbar (UI)
- Select Signature Field → place where signing is required → configure indicator text, thickness, tooltip, required.
Add Programmatically (API)
//Add Signature Field using addFormField Method
  pdfviewer.formDesignerModule.addFormField('SignatureField', {
    name: 'Sign',
    pageNumber: 1,
    bounds: { X: 57, Y: 923, Width: 200, Height: 43 },
    tooltip: 'sign Here',
    isRequired: true,
  } as SignatureFieldSettings);
Initial Field
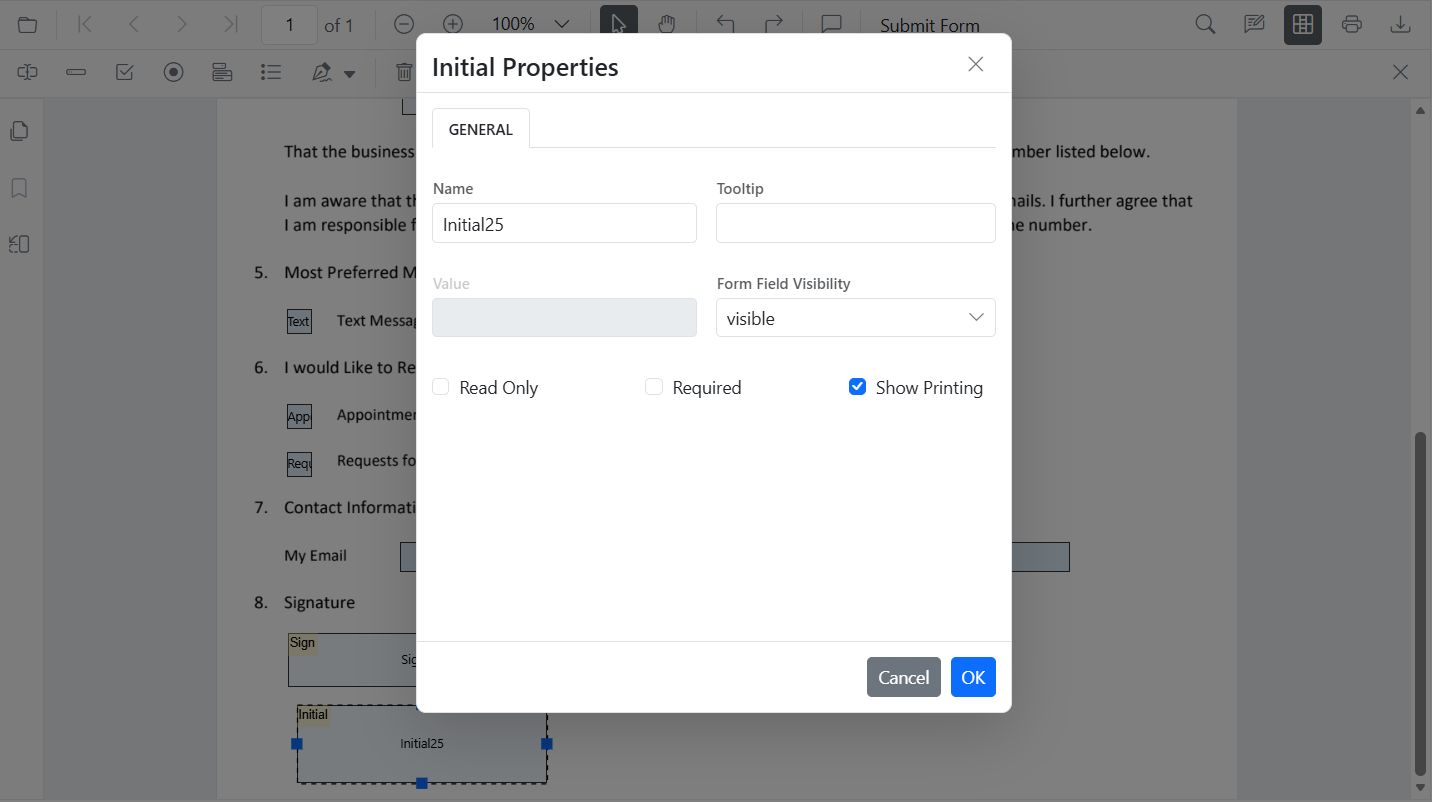
Add via Toolbar (UI)
- Select Initial Field → place where initials are needed → configure text and required state.
Add Programmatically (API)
//Add Initial Field using addFormField Method
  pdfviewer.formDesignerModule.addFormField('InitialField', {
    name: 'Initials',
    pageNumber: 1,
    bounds: { X: 57, Y: 923, Width: 200, Height: 43 },
    tooltip: 'sign Here',
    isRequired: true,
  } as InitialFieldSettings);
DateTime Picker
Add via Toolbar (UI)
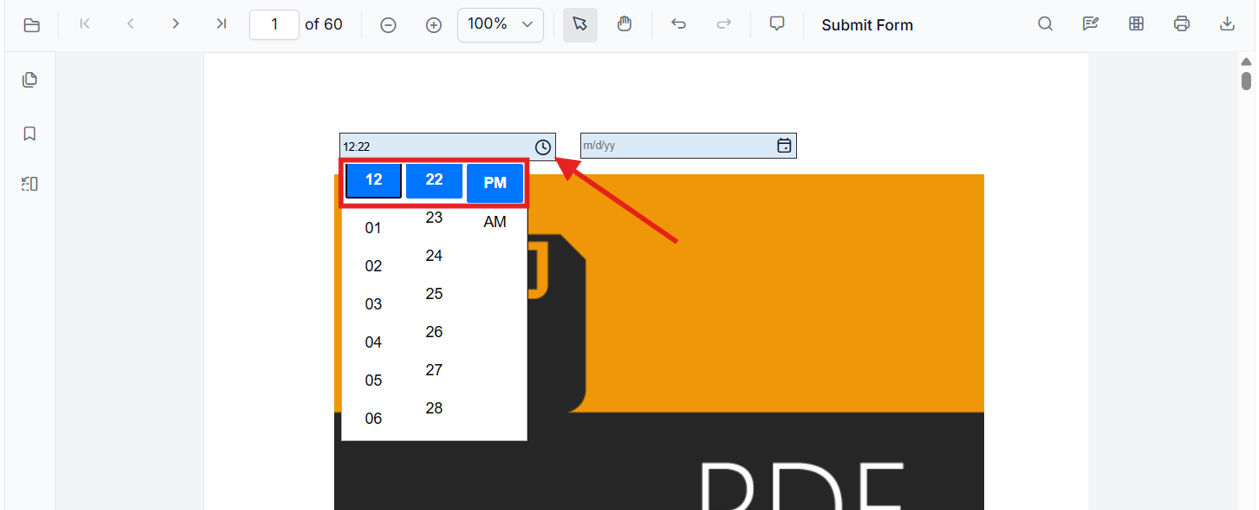
- Open the Form Designer toolbar, select DateTime Picker, and click on a PDF page to place the field. The DateTime Picker tool adds date and time fields in Form Designer mode.
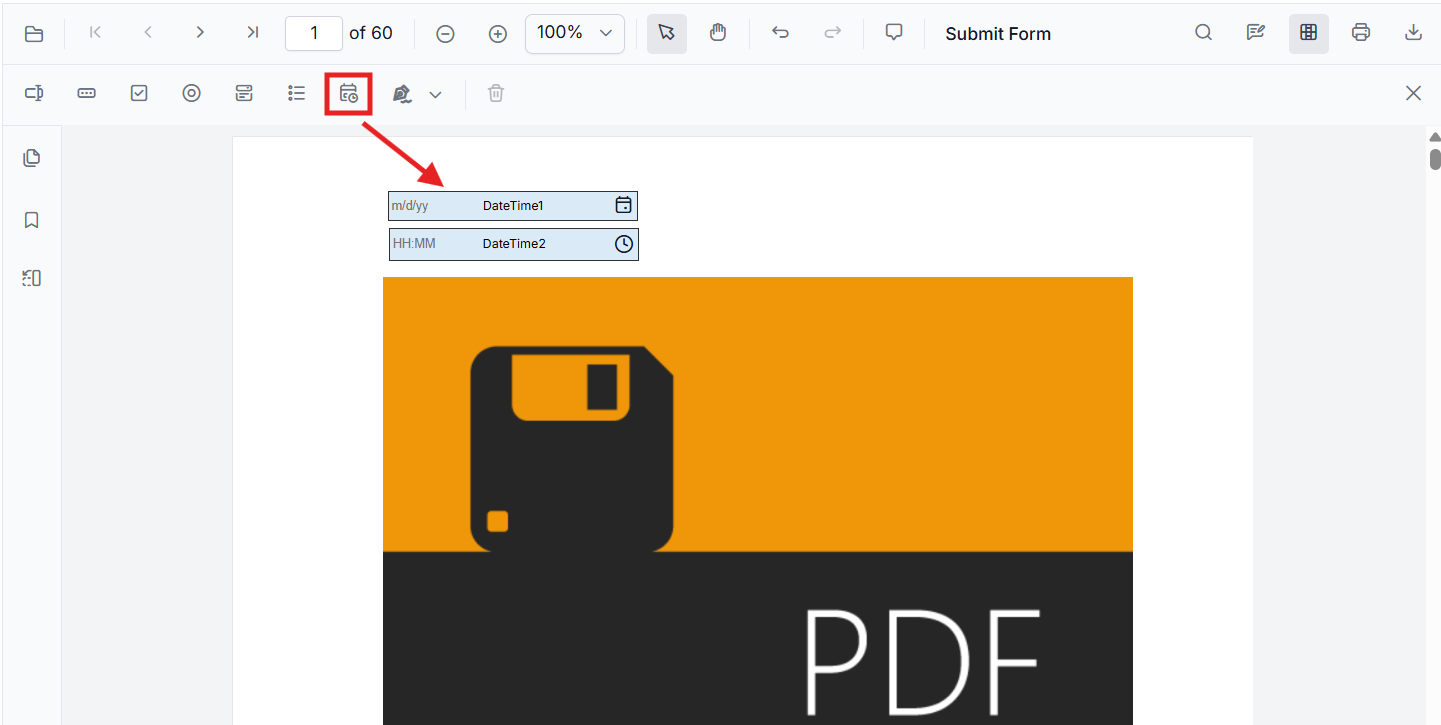
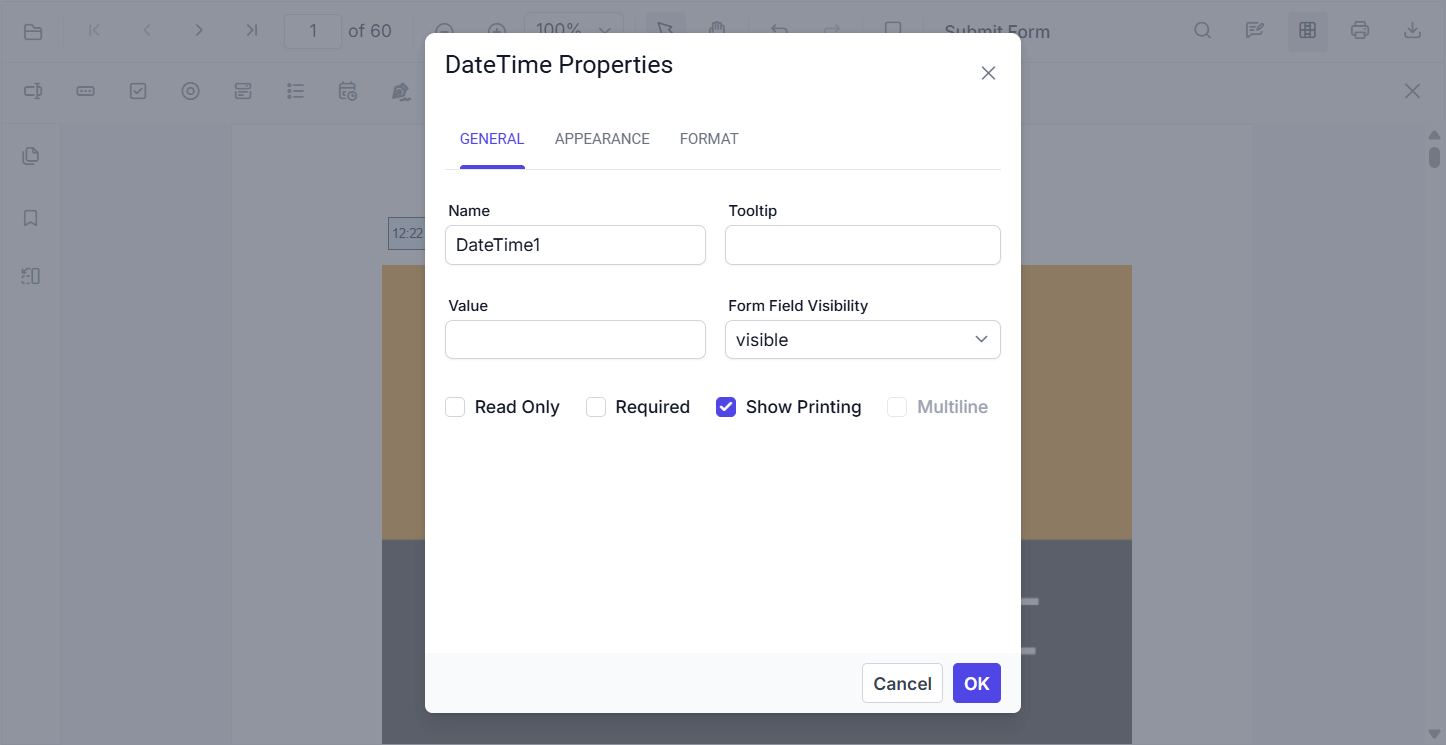
- Select the field to configure its general properties, such as its name, value, visibility, and whether it is read-only or required.
Manual Entry and Picker
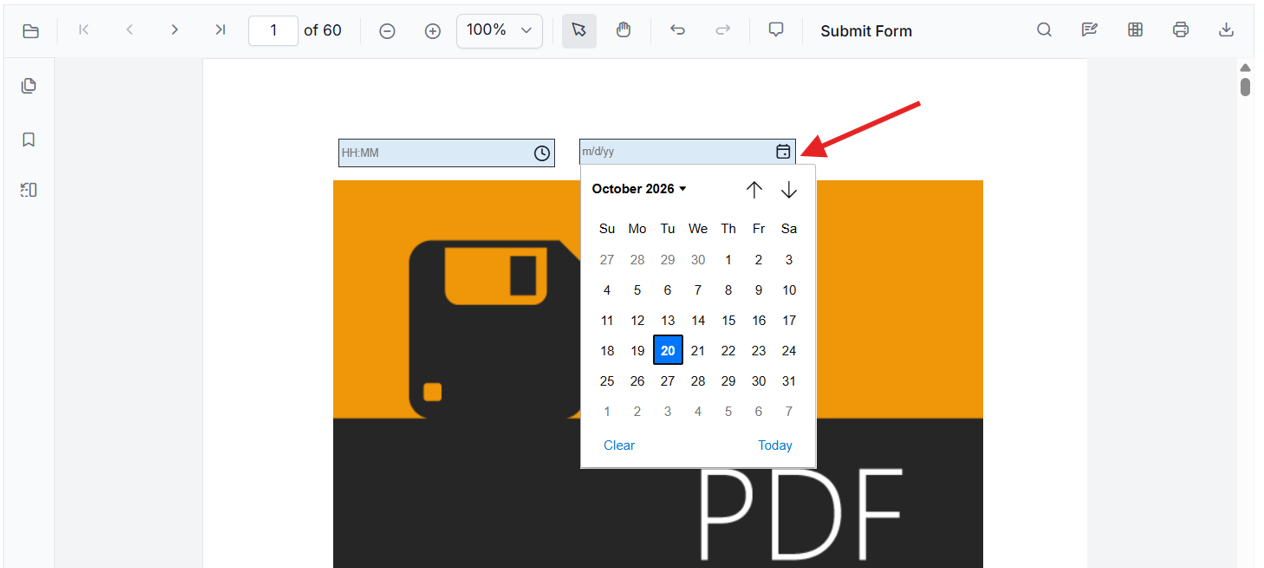
The field accepts values either by direct typing or through the integrated picker UI:
-
Date Field – Enter a date manually, or open the calendar dropdown to pick a date.
-
Time Field – Enter a time manually, or open the time dropdown to pick a time.
Strict Format Validation
Invalid values are rejected and a validation popup is displayed. The invalid value is not applied to the field.
For example, with the format m/d/yy:
| Input | Result |
|---|---|
10/19/2026 |
Accepted |
19/10/26 |
Rejected |
not-a-date |
Rejected |
Date / Time Toggle and Format Editing
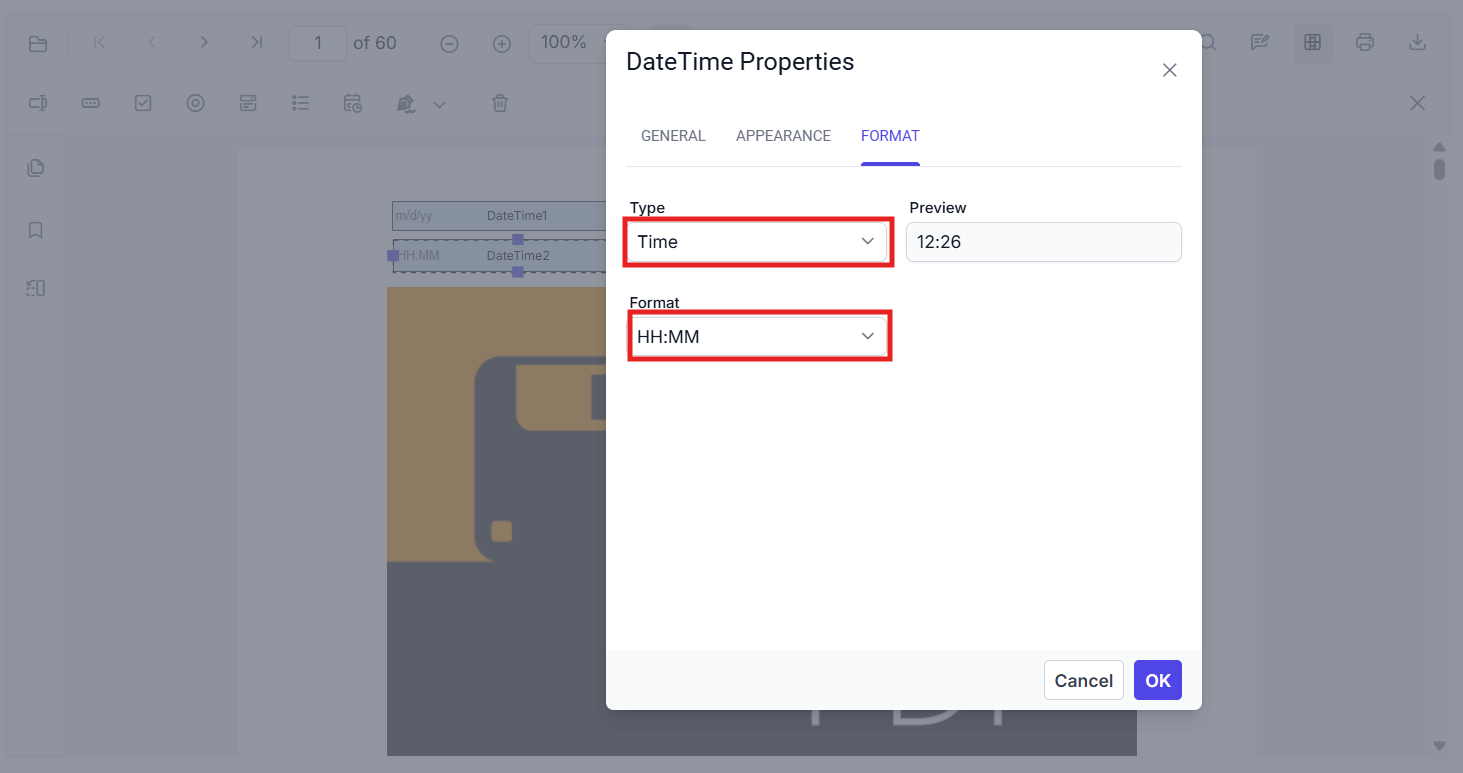
The Format tab in the Properties panel lets you:
- Switch between Date Picker and Time Picker modes.
- Edit the display format string.
- Preview formatting changes before saving.
Common Formats
| Format String | Example Output |
|---|---|
m/d/yy |
10/19/26 |
mm/dd/yyyy |
10/19/2026 |
HH:MM |
14:30 |
HH:MM:ss |
14:30:45 |
Form Designer Appearance
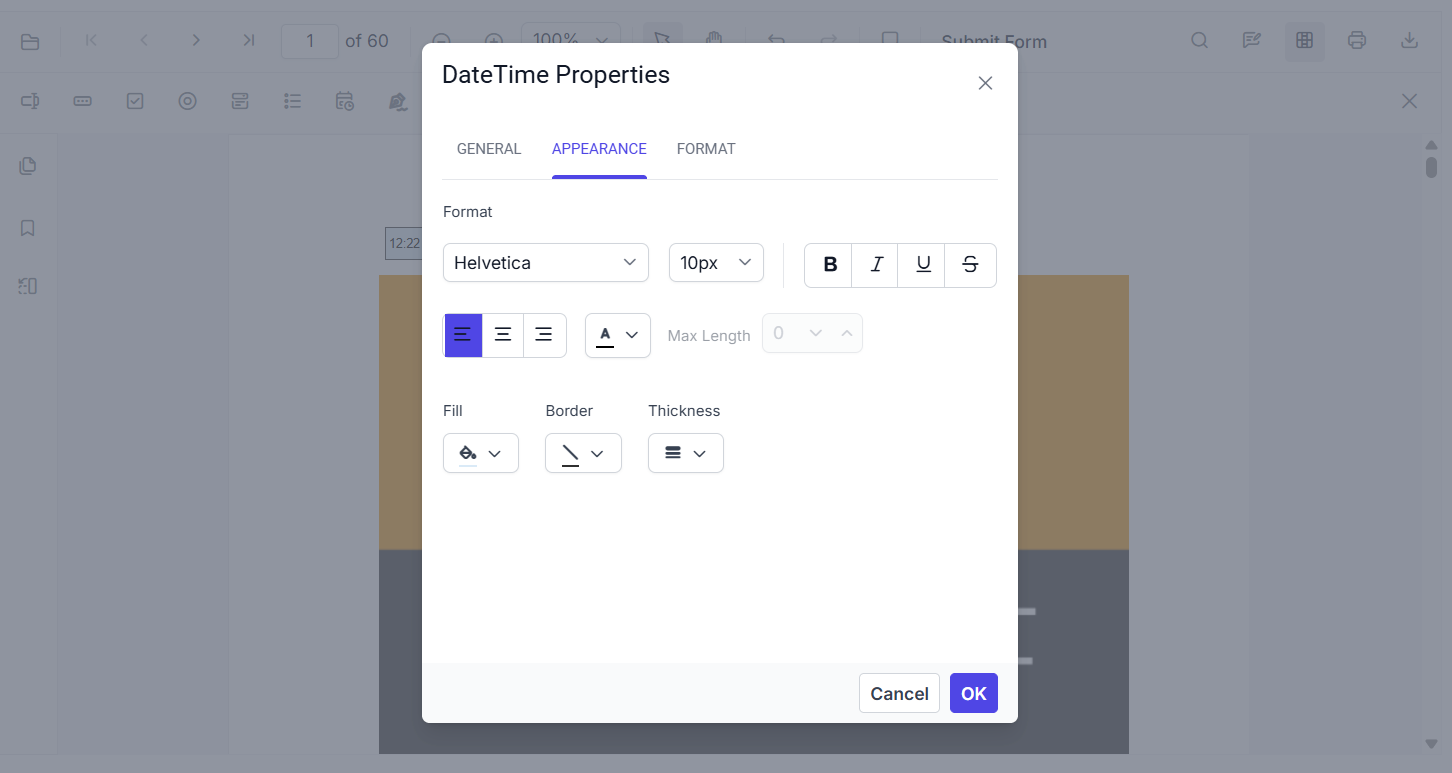
Placed DateTime pickers have a distinct visual appearance in Form Designer mode, including:
- Colored background
- Visible border
- Field-type indicator
Add Programmatically (API)
// Add Date field using addFormField Method
  pdfviewer.formDesignerModule.addFormField('Textbox', {
    name: 'DateField1',
    bounds: { X: 146, Y: 200, Width: 200, Height: 24 },
    pageNumber: 1,
    isDateField: true,
    fontSize: 10,
    color: 'black',
    fontFamily: 'Helvetica',
    backgroundColor: '#daeaf7ff',
    borderColor: '#303030',
    alignment: 'Left',
    isReadOnly: false,
    visibility: 'visible',
    isRequired: false,
    isPrint: true,
    tooltip: '',
    thickness: 1,
    actions: {
      format: { script: 'AFDate_FormatEx("m/d/yy")' }
    }
  } as TextFieldSettings);
  // Add Time field using addFormField Method
  pdfviewer.formDesignerModule.addFormField('Textbox', {
    name: 'TimeField1',
    bounds: { X: 146, Y: 250, Width: 200, Height: 24 },
    pageNumber: 1,
    isDateField: true,
    fontSize: 10,
    color: 'black',
    fontFamily: 'Helvetica',
    backgroundColor: '#daeaf7ff',
    borderColor: '#303030',
    alignment: 'Left',
    isReadOnly: false,
    visibility: 'visible',
    isRequired: false,
    isPrint: true,
    tooltip: '',
    thickness: 1,
    actions: {
      format: { script: 'AFTime_FormatEx("HH:MM")' }
    }
  } as TextFieldSettings);
Button
A button field is an interactive form field displayed on a PDF page that allows users to perform various actions, such as navigating to a specific page or location within the document. Users can configure actions to be triggered through mouse and keyboard interactions. Button fields can be added and edited using both the Form Designer UI and programmatically.
Button Text and Value
The text displayed on the button is defined using the text property, while the data value associated with the button field is defined using the value property. If the text property is not specified, the value property is used as the displayed button text.
Button Actions
An action can be associated with a button field, and the action is executed when the corresponding event occurs. The action is configured for the required event in the Actions tab of the Button Properties dialog.
| Action | Description |
|---|---|
mouseUp |
Executes the action when the mouse button is released over the button field. |
mouseDown |
Executes the action when the mouse button is pressed over the button field. |
mouseEnter |
Executes the action when the pointer enters the button field area. |
mouseLeave |
Executes the action when the pointer leaves the button field area. |
gotFocus |
Executes the action when the button field receives focus. |
lostFocus |
Executes the action when the button field loses focus. |
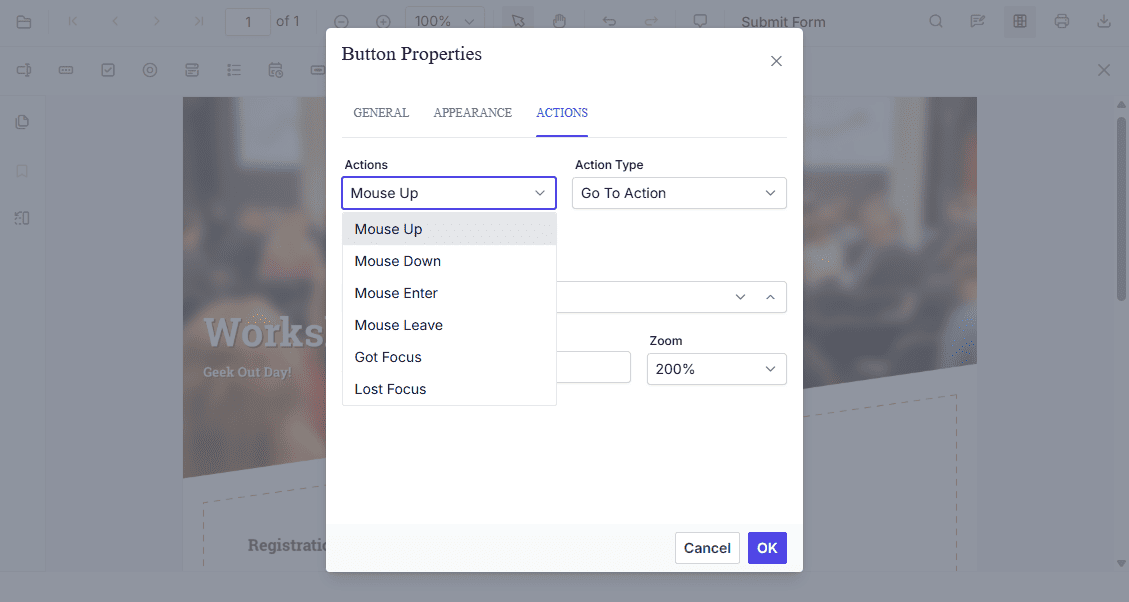
The Go To Action navigates the viewer to a specific page, position, and zoom level in the document when the action is triggered.
| Property | Description |
|---|---|
destinationPageNumber |
The page number to navigate to. |
destinationLocation |
The position (x and y) within the destination page. |
zoomValue |
The zoom level applied when navigating to the destination. A value of 0 retains the current zoom level. |
Add via Toolbar (UI)
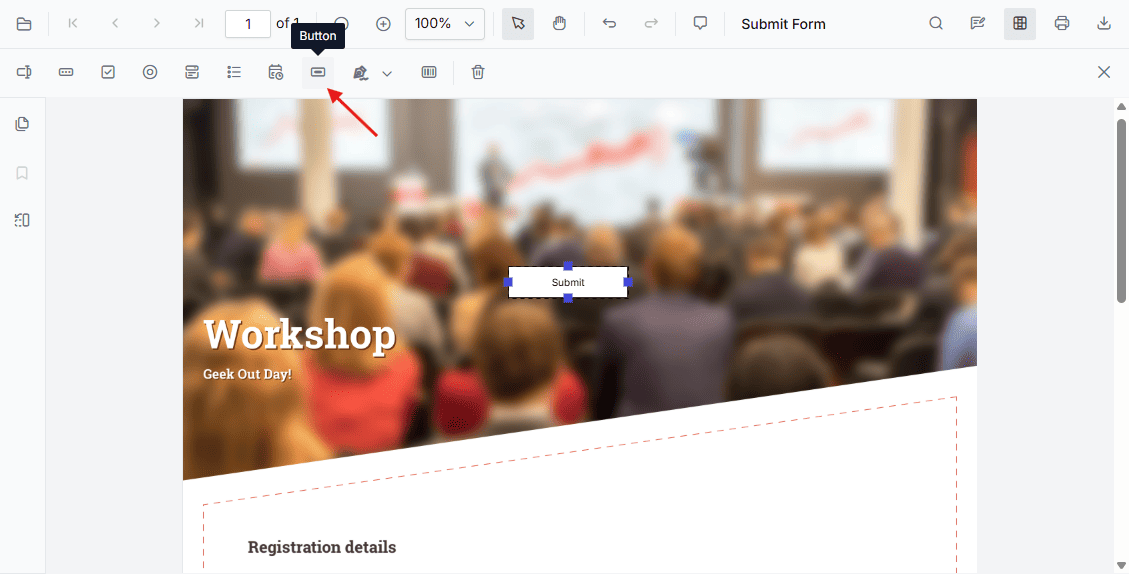
- Open Form Designer → select Button → click on the page → configure in Properties.
- Select the placed field to review or change its general properties, such as its name, value, tooltip, visibility, and whether it is read-only or required.
Add Programmatically (API)
// Add a button field that navigates to page 5 when it is clicked
pdfviewer.formDesignerModule.addFormField('ButtonField', {
    name: 'Submit1',
    pageNumber: 1,
    bounds: { X: 100, Y: 350, Width: 120, Height: 32 },
    value: 'Submit',
    text: 'Submit',
    tooltip: 'Click to submit',
    actions: {
        mouseUp: {
            action: ActionType.GoTo,
            destinationPageNumber: 5,
            destinationLocation: { x: 100, y: 100 },
            zoomValue: 2
        } as GoToActionModel
    }
});
Place a button field interactively
Use setFormFieldMode() to switch the form designer into the button placement mode, and then click on the PDF page to place the button field. The existing button fields can be removed using deleteFormField().
<button id="addButtonField">Add Button Field</button>
<button id="enableButtonMode">Enable Button Designer Mode</button>
<select id="buttonFields"></select>
<button id="editButtonField">Edit Button Field</button>
<button id="deleteButtonField">Delete Button Field</button>
// Refresh the button fields available in the document
function refreshButtonFields(): void {
const dropdown = document.getElementById('buttonFields') as HTMLSelectElement;
if (!dropdown) {
return;
}
dropdown.innerHTML = '';
const fields = Array.isArray(pdfviewer.formFieldCollections)
? pdfviewer.formFieldCollections
: [];
const buttonFields = fields.filter((field: any) => field.type === 'ButtonField');
if (buttonFields.length === 0) {
const emptyOption = document.createElement('option');
emptyOption.text = 'No Button Field';
emptyOption.value = '';
dropdown.appendChild(emptyOption);
return;
}
buttonFields.forEach((field: any) => {
const option = document.createElement('option');
option.value = field.id;
option.text = field.name || field.value || field.id;
dropdown.appendChild(option);
});
}
// Add a button field programmatically
(document.getElementById('addButtonField') as HTMLButtonElement)?.addEventListener('click', () => {
pdfviewer.formDesignerModule.addFormField('ButtonField', {
name: 'Submit' + (document.getElementById('buttonFields') as HTMLSelectElement).options.length + 1,
pageNumber: 1,
bounds: { X: 100, Y: 350, Width: 120, Height: 32 },
value: 'Submit',
text: 'Submit',
tooltip: 'Click to submit',
actions: {
mouseUp: {
action: ActionType.GoTo,
destinationPageNumber: 5,
destinationLocation: { x: 100, y: 100 },
zoomValue: 2
} as GoToActionModel
}
});
refreshButtonFields();
});
// Switch the form designer into the button placement mode
(document.getElementById('enableButtonMode') as HTMLButtonElement)?.addEventListener('click', () => {
pdfviewer.formDesignerModule.setFormFieldMode('ButtonField');
});
// Update the properties and actions of the selected button field
(document.getElementById('editButtonField') as HTMLButtonElement)?.addEventListener('click', () => {
const selectedId = (document.getElementById('buttonFields') as HTMLSelectElement).value;
const fields = Array.isArray(pdfviewer.formFieldCollections)
? pdfviewer.formFieldCollections
: [];
const field = fields.find((f: any) => f.id === selectedId);
if (field) {
pdfviewer.formDesignerModule.updateFormField(field, {
value: 'Submit Button',
text: 'Submit Button',
alignment: 'Left',
tooltip: 'Updated Submit Button',
actions: {
mouseUp: {
action: ActionType.GoTo,
destinationPageNumber: 7,
destinationLocation: { x: 100, y: 100 },
zoomValue: 1
} as GoToActionModel
}
});
}
refreshButtonFields();
});
// Delete the selected button field
(document.getElementById('deleteButtonField') as HTMLButtonElement)?.addEventListener('click', () => {
const selectedId = (document.getElementById('buttonFields') as HTMLSelectElement).value;
const fields = Array.isArray(pdfviewer.formFieldCollections)
? pdfviewer.formFieldCollections
: [];
const field = fields.find((f: any) => f.id === selectedId);
if (field) {
pdfviewer.formDesignerModule.deleteFormField(field);
}
refreshButtonFields();
});Barcode
A barcode field is a form field that displays the entered value as a barcode that can be scanned. Barcode fields can be added and edited both through the Form Designer UI and programmatically.
Barcode Symbology
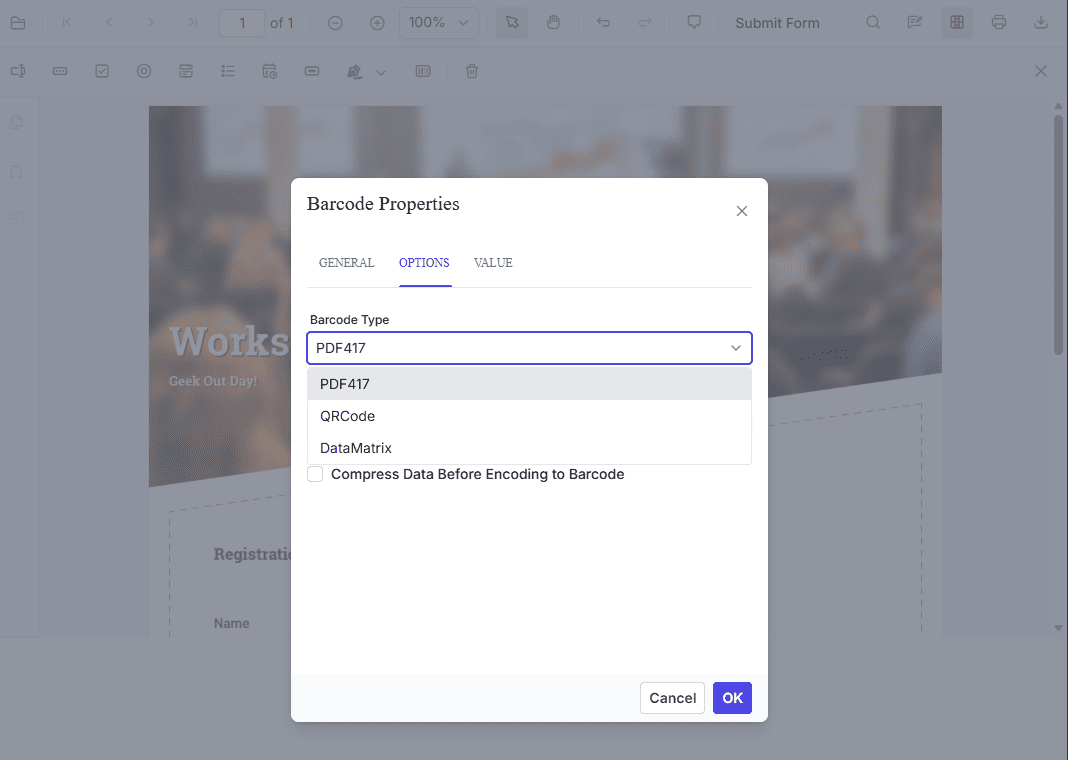
The barcode type is referred to as the symbology. The following symbologies are supported, and PDF417 is used by default.
| Symbology | Description |
|---|---|
PDF417 |
A stacked, linear barcode that supports alphanumeric data. This is the default symbology. |
QRCode |
A two-dimensional matrix barcode that supports numeric, alphanumeric, and binary data. |
DataMatrix |
A two-dimensional matrix barcode that is used to encode a small amount of data in a compact area. |
Barcode Value Format
The value that is encoded in the barcode can be supplied in three ways.
| Value format | Description |
|---|---|
TabDelimited |
Carries the values in the barcode separated by a tab character, so the values appear at a tab space distance from each other. |
XML |
Stores the values pairwise in an XML structure. |
CustomValue |
Stores the value as a string, and any string can be assigned to it. |
Complete support for executing custom scripts is not available. Instead, the PDF Viewer parses the final value assigned to the barcode field in the PDF document.
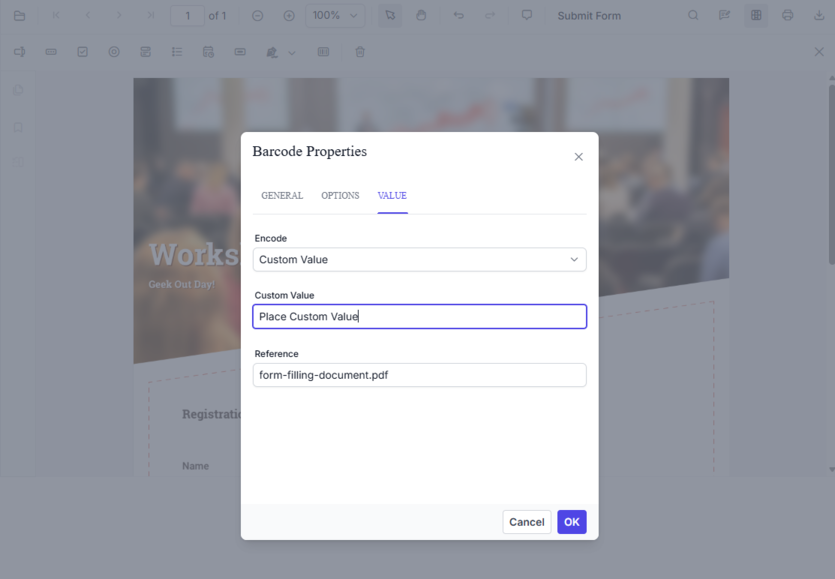
Static Barcode Value
The barcode value can be set to a fixed value from the Value tab of the Barcode Properties dialog.
Select Custom Value in the Encode dropdown, and then enter the text to be encoded in the Custom Value text box.
Dynamic Barcode Value
The barcode value can also be calculated from the other form fields that are present in the PDF document.
In the Form Designer, open the Value tab of the Barcode Properties dialog and use the Select Field for Calculation option to bind one or more fields to the barcode field.
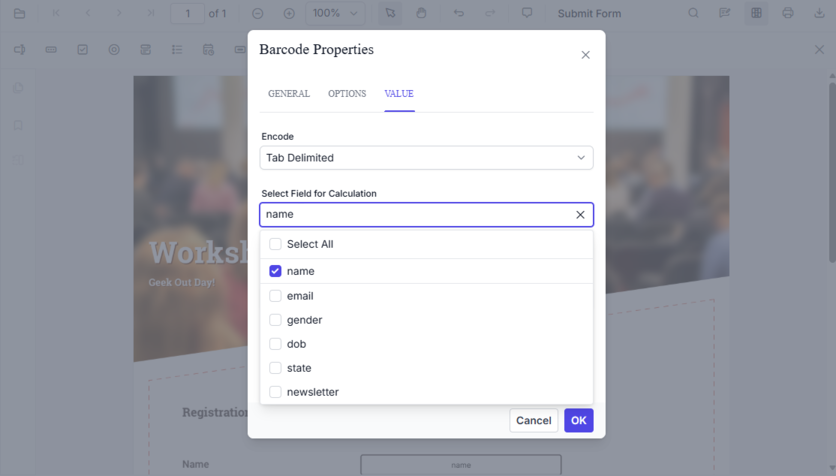
When a value is entered in a bound field, the barcode value is updated automatically.
By default, the barcode stores the field name along with its value. To store only the field values, clear the Include Field Names option. This option is available only for the
TabDelimitedformat and does not apply to theXMLformat, which always stores data as name-value pairs.
Barcode Caption
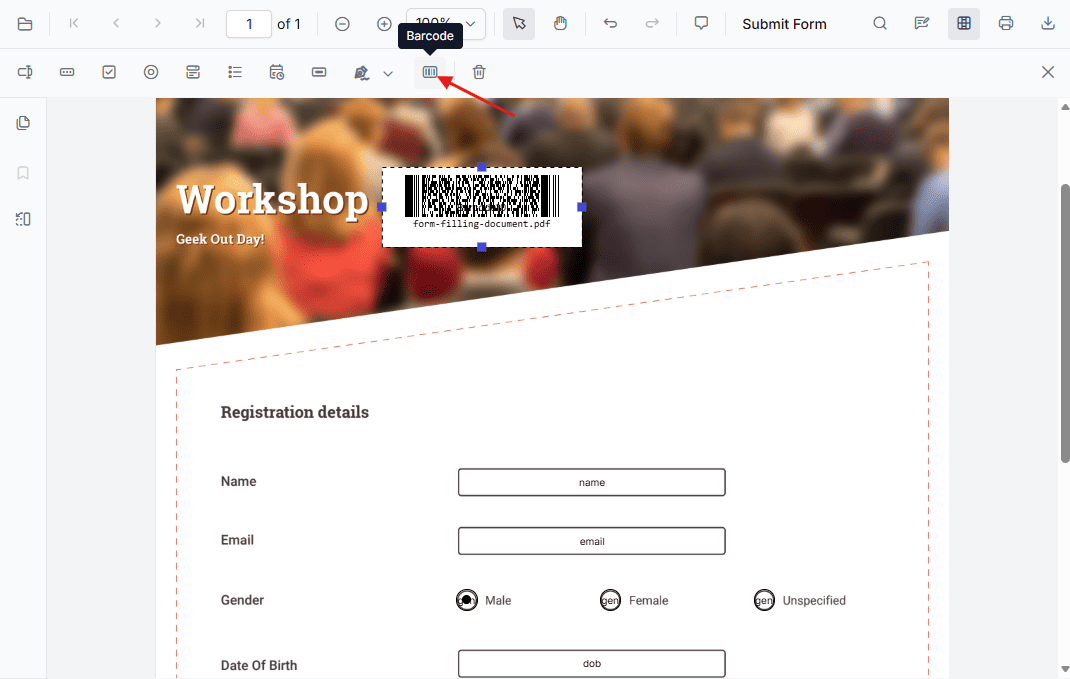
By default, the name of the loaded PDF document is displayed below the generated barcode field. Use the caption property to change this text, either from the UI or programmatically.
Barcode Error Correction Level
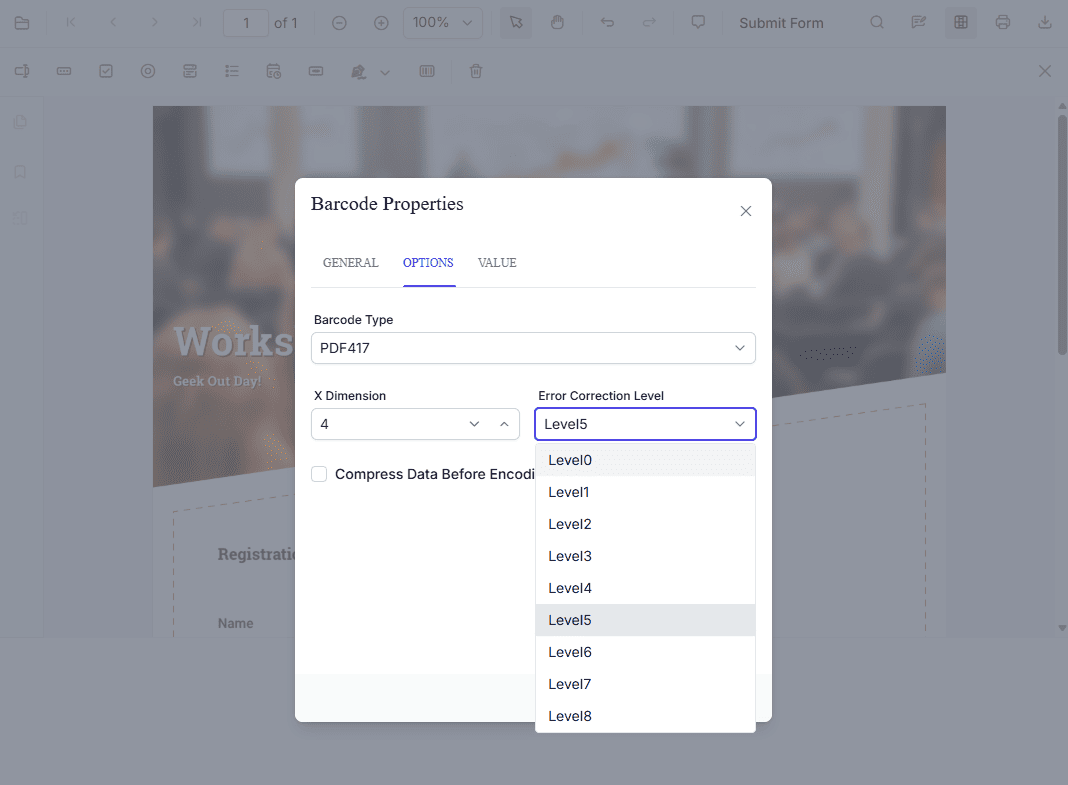
The error correction level determines how much damage the generated barcode can tolerate before it can no longer be read. The available levels depend on the selected symbology.
| Symbology | Supported values |
|---|---|
PDF417 |
Level0 to Level8
|
QRCode |
Low, Medium, Quartile, High
|
DataMatrix |
Not applicable, since Data Matrix does not use this setting. |
The default error correction level is Level5.
Add via UI: Open the Form Designer toolbar, select Barcode, and click on a PDF page to place the field. Select the placed field to review or change its general properties, such as its name, value, visibility, and whether it is read-only or required.
Add Programmatically (API)
// Add a barcode field with the default PDF417 symbology
pdfviewer.formDesignerModule.addFormField('Barcode', {
  bounds: { X: 146, Y: 300, Width: 180, Height: 100 },
  name: 'Barcode1',
  pageNumber: 1,
  tooltip: 'Scan to view the product details',
  symbology: BarcodeSymbology.PDF417,
  errorCorrectionLevel: Pdf417ErrorCorrectionLevel.Level6,
  valueFormat: BarcodeValueFormat.TabDelimited,
  caption: 'Product Barcode',
} as BarcodeFieldSettings);
Add a barcode field with a specific symbology and update an existing barcode field
// Add a barcode field with the QRCode symbology
pdfviewer.formDesignerModule.addFormField('Barcode', {
  name: 'Barcode1',
  bounds: { X: 100, Y: 150, Width: 200, Height: 80 },
  pageNumber: 1,
  symbology: 'QRCode'
} as BarcodeFieldSettings);

// Update the symbology of the barcode field
const fields = pdfviewer.formFieldCollections;
const barcode = fields.filter((field: any) => field.type === 'Barcode')[0];

if (barcode) {
  pdfviewer.formDesignerModule.updateFormField(barcode, {
    symbology: 'DataMatrix'
  } as BarcodeFieldSettings);
}
Add fields dynamically with setFormFieldMode
Use setFormFieldMode() to add fields on the fly based on user actions.
Edit Form Fields in TypeScript PDF Viewer
Form Fields can be edited using the UI or API.
Edit Using the UI
- Right-click a field → Properties to update settings.
- Drag to move; use handles to resize.
- Use the toolbar to toggle field mode or add new fields.
Edit Programmatically
<button id='editTextbox'>EditTextBox</button>
<button id='addPasswordField'>Add Form Field</button>
//Edit FormField on Button Click
(document.getElementById('editTextbox') as HTMLButtonElement)?.addEventListener('click', () => {
// Retrieve form fields collection
const fields = pdfviewer.retrieveFormFields();
// Find the textbox field by name (Here field name is First Name)
const field = fields.find((f: any) => f.name === 'First Name') || fields[0]; //Update Name accordingly
if (field) {
// Update textbox field styling and value
pdfviewer.formDesignerModule.updateFormField(field, {
value: 'John',
fontFamily: 'Courier',
fontSize: 12,
fontStyle: FontStyle.None,
color: 'black',
backgroundColor: 'white',
borderColor: 'black',
thickness: 2,
alignment: 'Left',
maxLength: 50
} as TextFieldSettings);
}
});
//Add Form Fields using setFormFieldmode
document.getElementById('addPasswordField').addEventListener('click', function () {
pdfviewer.formDesignerModule.setFormFieldMode("Password");
//In setFormFieldMode-You can pass the required field to be added like Textbox, Checkbox etc.,
});