Getting Started with .NET PDF Library in Console Application
13 Aug 202613 minutes to read
The .NET PDF library is used to create, read, and edit PDF documents. This library also offers functionality to merge, split, stamp, work with forms, and secure PDF files.
To include the .NET PDF library into your Console application, refer to the NuGet Packages Required or Assemblies Required documentation.
To quickly get started with the .NET PDF library, watch this video:
Steps to Create a PDF Document in a .NET (Core) Console App
Prerequisites:
- .NET SDK 8.0 (or later)
- Visual Studio with the .NET desktop development workload
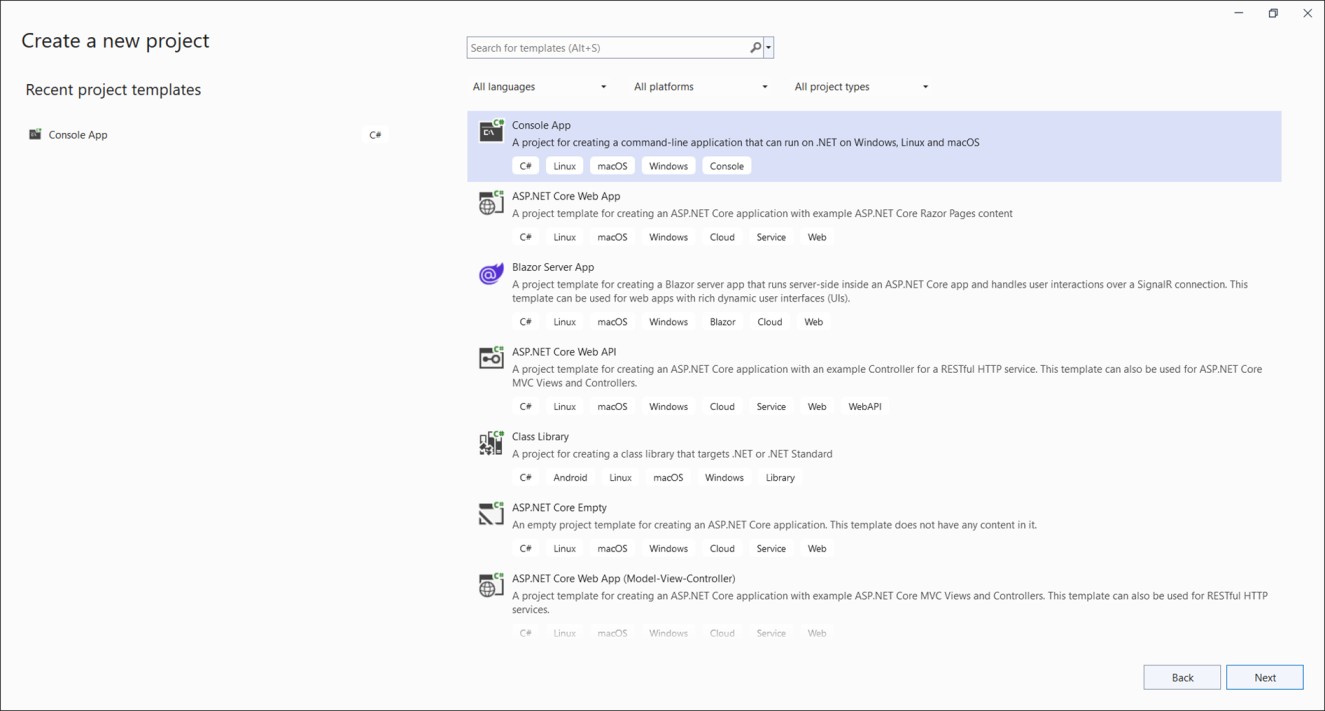
Step 1: Create a new C# Console Application project.
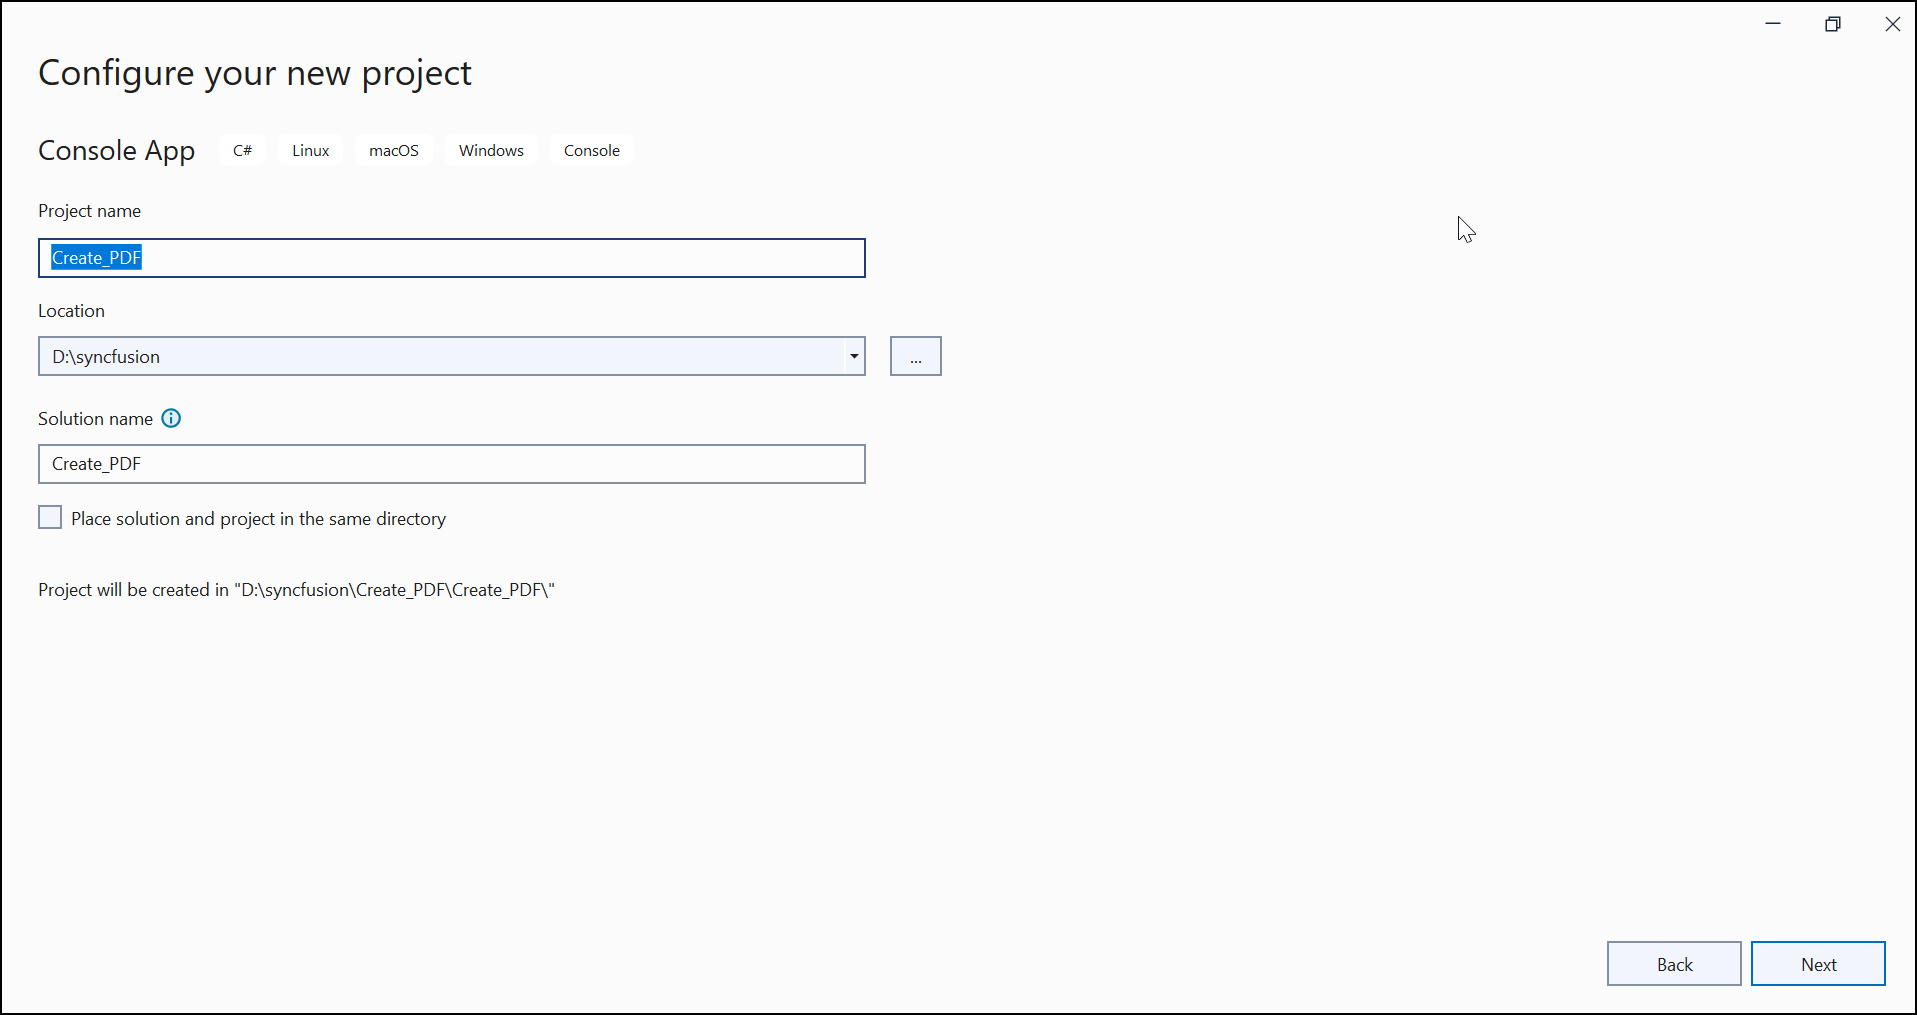
Step 2: Name the project and choose a location.
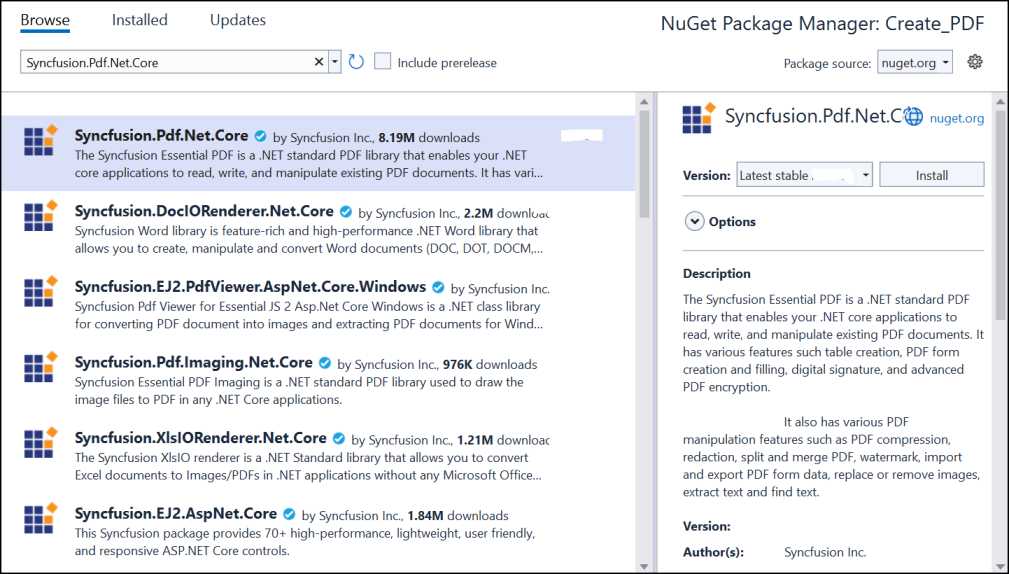
Step 3: Install the Syncfusion.Pdf.Net.Core NuGet package as reference to your .NET Standard applications from NuGet.org.
Step 4: Register the Syncfusion® license key. An evaluation watermark is added to every page of the generated PDF until a valid key is registered. Include the license key at the very top of Program.cs before creating a PdfDocument instance. Refer to the Syncfusion License documentation to learn about registering the Syncfusion® license key in your application.
using Syncfusion.Licensing;

// Register the Syncfusion license
Syncfusion.Licensing.SyncfusionLicenseProvider.RegisterLicense("YOUR LICENSE KEY");
Replace "YOUR LICENSE KEY" with the license key associated with your Syncfusion® account. If you do not have a license key, you can request a free 30-day trial or apply for a Community License from the Syncfusion® website. For more information about registering a license key in your application, refer to the Syncfusion® Licensing Documentation.
Step 5: Include the following namespaces in the Program.cs file.
using System.IO;
using Syncfusion.Pdf.Graphics;
using Syncfusion.Pdf;
using Syncfusion.Drawing;
Step 6: Include the below code snippet in Program.cs to create a PDF file using the PdfDocument class. The DrawString method of the PdfGraphics object draws text on the PDF page, and the document is saved to disk through a FileStream.
//Create a new PDF document.
PdfDocument document = new PdfDocument();
//Add a page to the document.
PdfPage page = document.Pages.Add();
//Create PDF graphics for the page.
PdfGraphics graphics = page.Graphics;
//Set the standard font.
PdfFont font = new PdfStandardFont(PdfFontFamily.Helvetica, 20);
//Draw the text.
graphics.DrawString("Hello World!!!", font, PdfBrushes.Black, new PointF(0, 0));
//Create a fileStream.
FileStream fileStream = new FileStream("Output.pdf", FileMode.CreateNew, FileAccess.ReadWrite);
//Save and close the PDF document.
document.Save(fileStream);
document.Close(true);
Step 7: Build the project.
Click the Build button in the toolbar or press Ctrl+Shift+B to build the project.
Step 8: Run the project.
Click the Run button (green arrow) in the toolbar or press Ctrl+F5 to run the app. The generated Output.pdf will appear in the project’s output directory.
Prerequisites:
- .NET SDK 8.0 (or later)
- Visual Studio Code
-
C# extension for Visual Studio Code (search for
C#in the Extensions view and install the official Microsoft extension) - An active Syncfusion® license key (a free 30-day trial is available)
Step 1: Open a new terminal in VS Code by pressing Ctrl+` and run the following command to create a new .NET console application project. Replace CreatePdfConsoleApp with your desired project name.
dotnet new console -n CreatePdfConsoleApp
Use
dotnet new console -f net8.0 -n CreatePdfConsoleAppto explicitly target a specific .NET version (for example, .NET 8.0).
Step 2: Navigate to the newly created project directory.
cd CreatePdfConsoleApp
Step 3: Use the following command in the terminal to add the Syncfusion.Pdf.Net.Core package as a reference to your project.
dotnet add package Syncfusion.Pdf.Net.Core
Step 4: Register the Syncfusion® license key. An evaluation watermark is added to every page of the generated PDF until a valid key is registered. Include the license key at the top of Program.cs before creating a PdfDocument instance. Refer to the Syncfusion License documentation to learn about registering the Syncfusion® license key in your application.
using Syncfusion.Licensing;

// Register the Syncfusion license
Syncfusion.Licensing.SyncfusionLicenseProvider.RegisterLicense("YOUR LICENSE KEY");
Replace "YOUR LICENSE KEY" with the license key associated with your Syncfusion® account. If you do not have a license key, you can request a free 30-day trial or apply for a Community License from the Syncfusion® website. For more information about registering a license key in your application, refer to the Syncfusion® Licensing Documentation.
Step 5: Include the following namespaces in the Program.cs file.
using System.IO;
using Syncfusion.Pdf.Graphics;
using Syncfusion.Pdf;
using Syncfusion.Drawing;
Step 6: Replace the contents of Program.cs with the code below to create a PDF file using the PdfDocument class. The DrawString method of the PdfGraphics object is used to draw text on the PDF page, and the Save method persists the document to the specified file path before Close finalizes it.
//Create a new PDF document.
PdfDocument document = new PdfDocument();
//Add a page to the document.
PdfPage page = document.Pages.Add();
//Create PDF graphics for the page.
PdfGraphics graphics = page.Graphics;
//Set the standard font.
PdfFont font = new PdfStandardFont(PdfFontFamily.Helvetica, 20);
//Draw the text.
graphics.DrawString("Hello World!!!", font, PdfBrushes.Black, new PointF(0, 0));
//Save and close the PDF document.
document.Save("Output.pdf");
document.Close(true);
Step 7: Build the project.
Run the following command in the integrated terminal:
dotnet build
Confirm that the build succeeds with no errors before continuing to the next step.
Step 8: Run the project.
Run the following command in the integrated terminal to build and launch the application:
dotnet run
Prerequisites:
- JetBrains Rider
- .NET SDK 8.0 (or later)
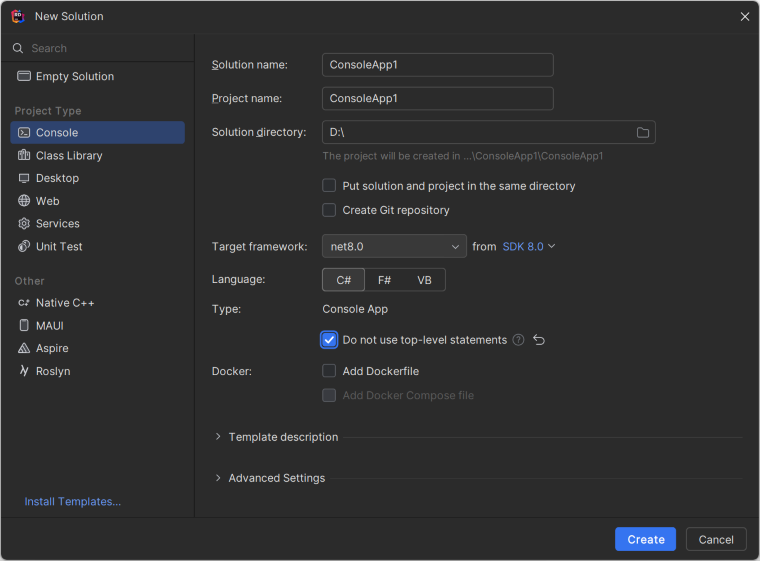
Step 1. Open JetBrains Rider and create a new .NET Core console application project.
- Launch JetBrains Rider.
- Click New Solution on the welcome screen.
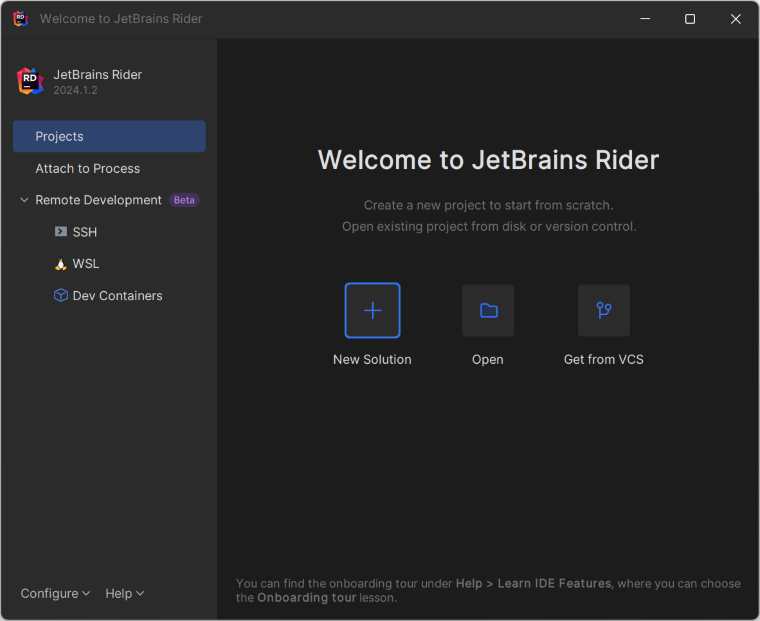
- In the new Solution dialog, select Project Type as Console.
- Enter a project name and specify the location.
- Select the target framework (e.g., .NET 8.0, .NET 9.0).
- Click Create.
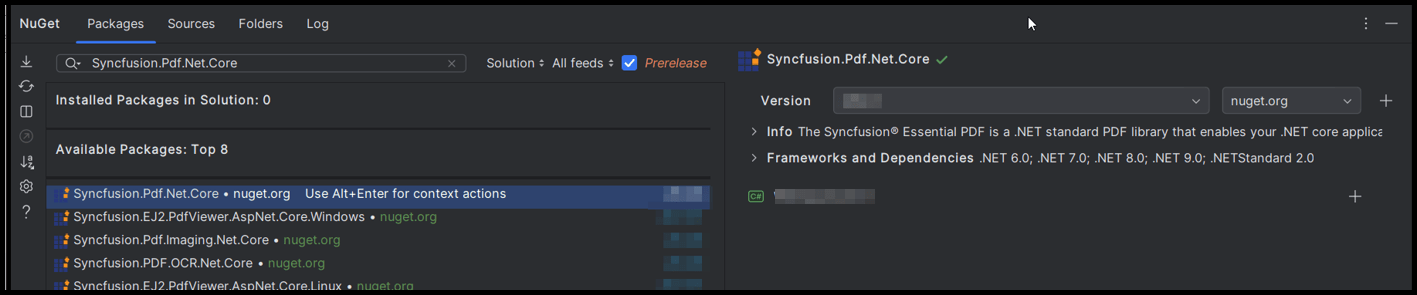
Step 2: Install the NuGet package from NuGet.org.
- Click the NuGet icon in the Rider toolbar and type Syncfusion.Pdf.Net.Core in the search bar.
- Ensure that “nuget.org” is selected as the package source.
- Select the latest Syncfusion.Pdf.Net.Core NuGet package from the list.
- Click the + (Add) button to add the package.
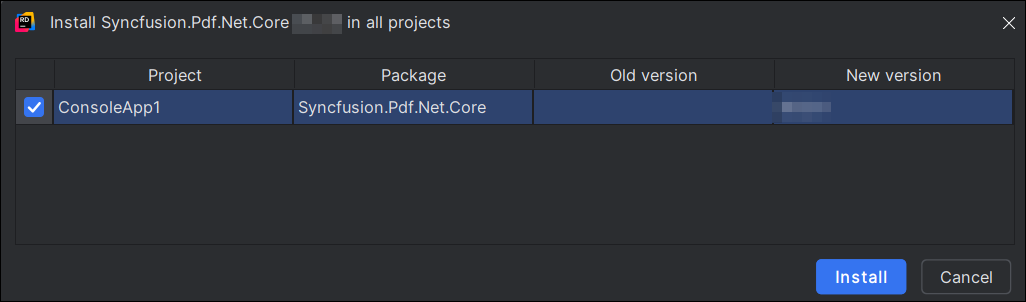
- Click the Install button to complete the installation.
Step 3: Register the Syncfusion license key. A trial watermark is added to every page of the generated PDF until a valid key is registered. Include the license key at the start of Program.cs before initializing any Syncfusion component:
using Syncfusion.Licensing;

// Register the Syncfusion license
Syncfusion.Licensing.SyncfusionLicenseProvider.RegisterLicense("YOUR LICENSE KEY");
Replace "YOUR LICENSE KEY" with the license key associated with your Syncfusion® account. If you do not have a license key, you can request a free 30-day trial or apply for a Community License from the Syncfusion® website. For more information about registering a license key in your application, refer to the Syncfusion® Licensing Documentation.
Step 4: Include the following namespaces in the Program.cs file.
using System.IO;
using Syncfusion.Pdf.Graphics;
using Syncfusion.Pdf;
using Syncfusion.Drawing;
Step 5: Include the below code snippet in Program.cs to create a PDF file.
//Create a new PDF document.
PdfDocument document = new PdfDocument();
//Add a page to the document.
PdfPage page = document.Pages.Add();
//Create PDF graphics for the page.
PdfGraphics graphics = page.Graphics;
//Set the standard font.
PdfFont font = new PdfStandardFont(PdfFontFamily.Helvetica, 20);
//Draw the text.
graphics.DrawString("Hello World!!!", font, PdfBrushes.Black, new PointF(0, 0));
//Create a fileStream.
FileStream fileStream = new FileStream("Output.pdf", FileMode.CreateNew, FileAccess.ReadWrite);
//Save and close the PDF document.
document.Save(fileStream);
document.Close(true);
Step 5: Build the project.
Click the Build button in the toolbar or press Ctrl+Shift+B to build the project.
Step 6: Run the project.
Click the Run button (green arrow) in the toolbar or press F5 to run the app.
You can download a complete working sample from GitHub.
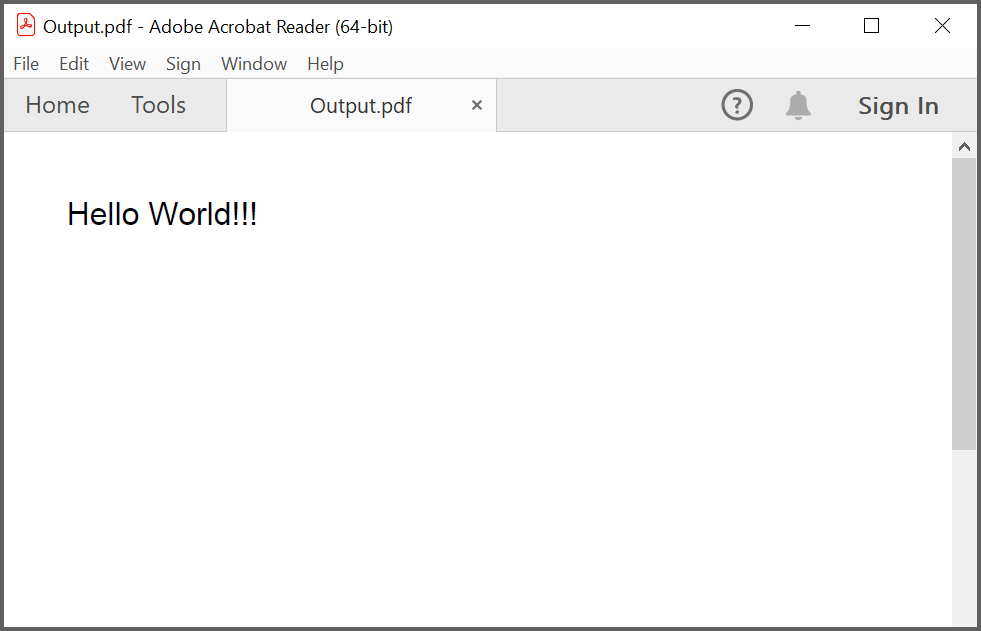
By executing the program, you will get the PDF document as follows.
Steps to Create a PDF Document in a .NET Framework Console App
The following steps illustrate creating a simple Hello World PDF document in a console application using .NET Framework.
Prerequisites:
- Visual Studio 2017 or later with the .NET desktop development workload.
- .NET Framework 4.6.2 or later installed on the development machine.
- An active Syncfusion® license. If you do not have one, request a free 30-day trial at https://www.syncfusion.com/sales/communitylicense.
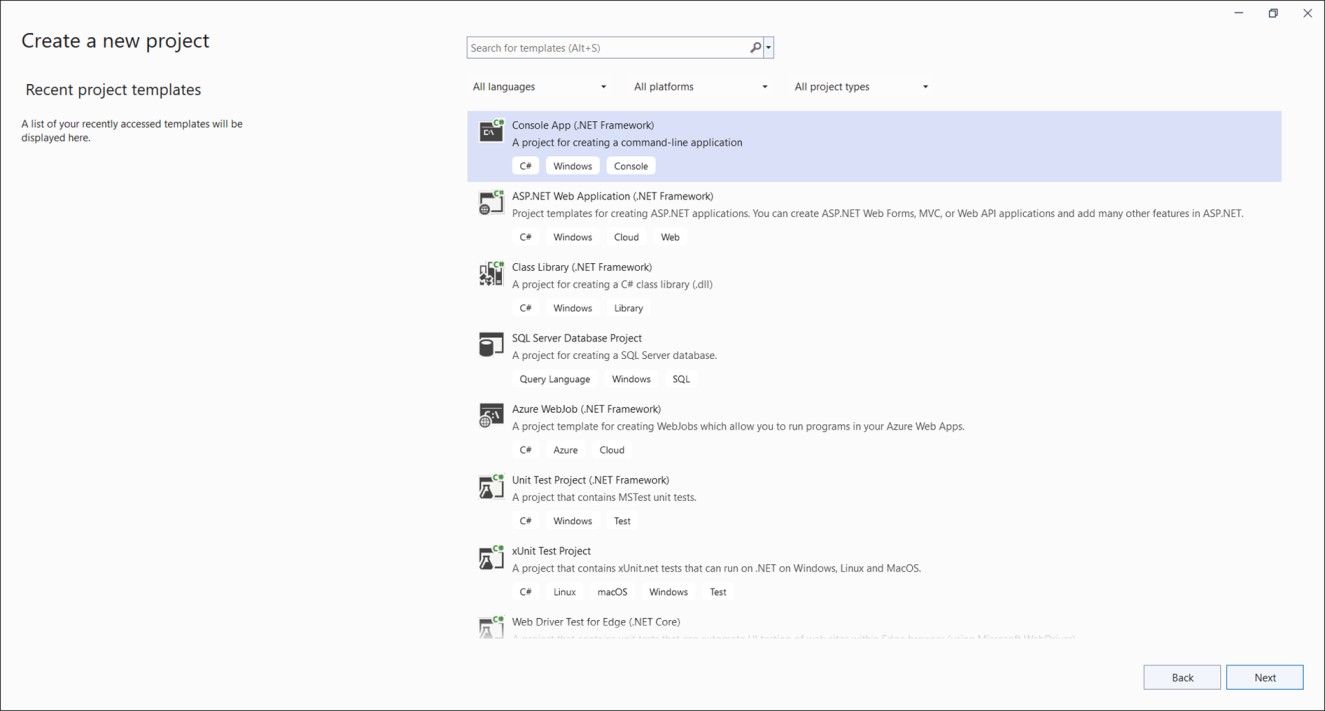
Step 1: Create a new C# Console Application (.NET Framework) project in Visual Studio.
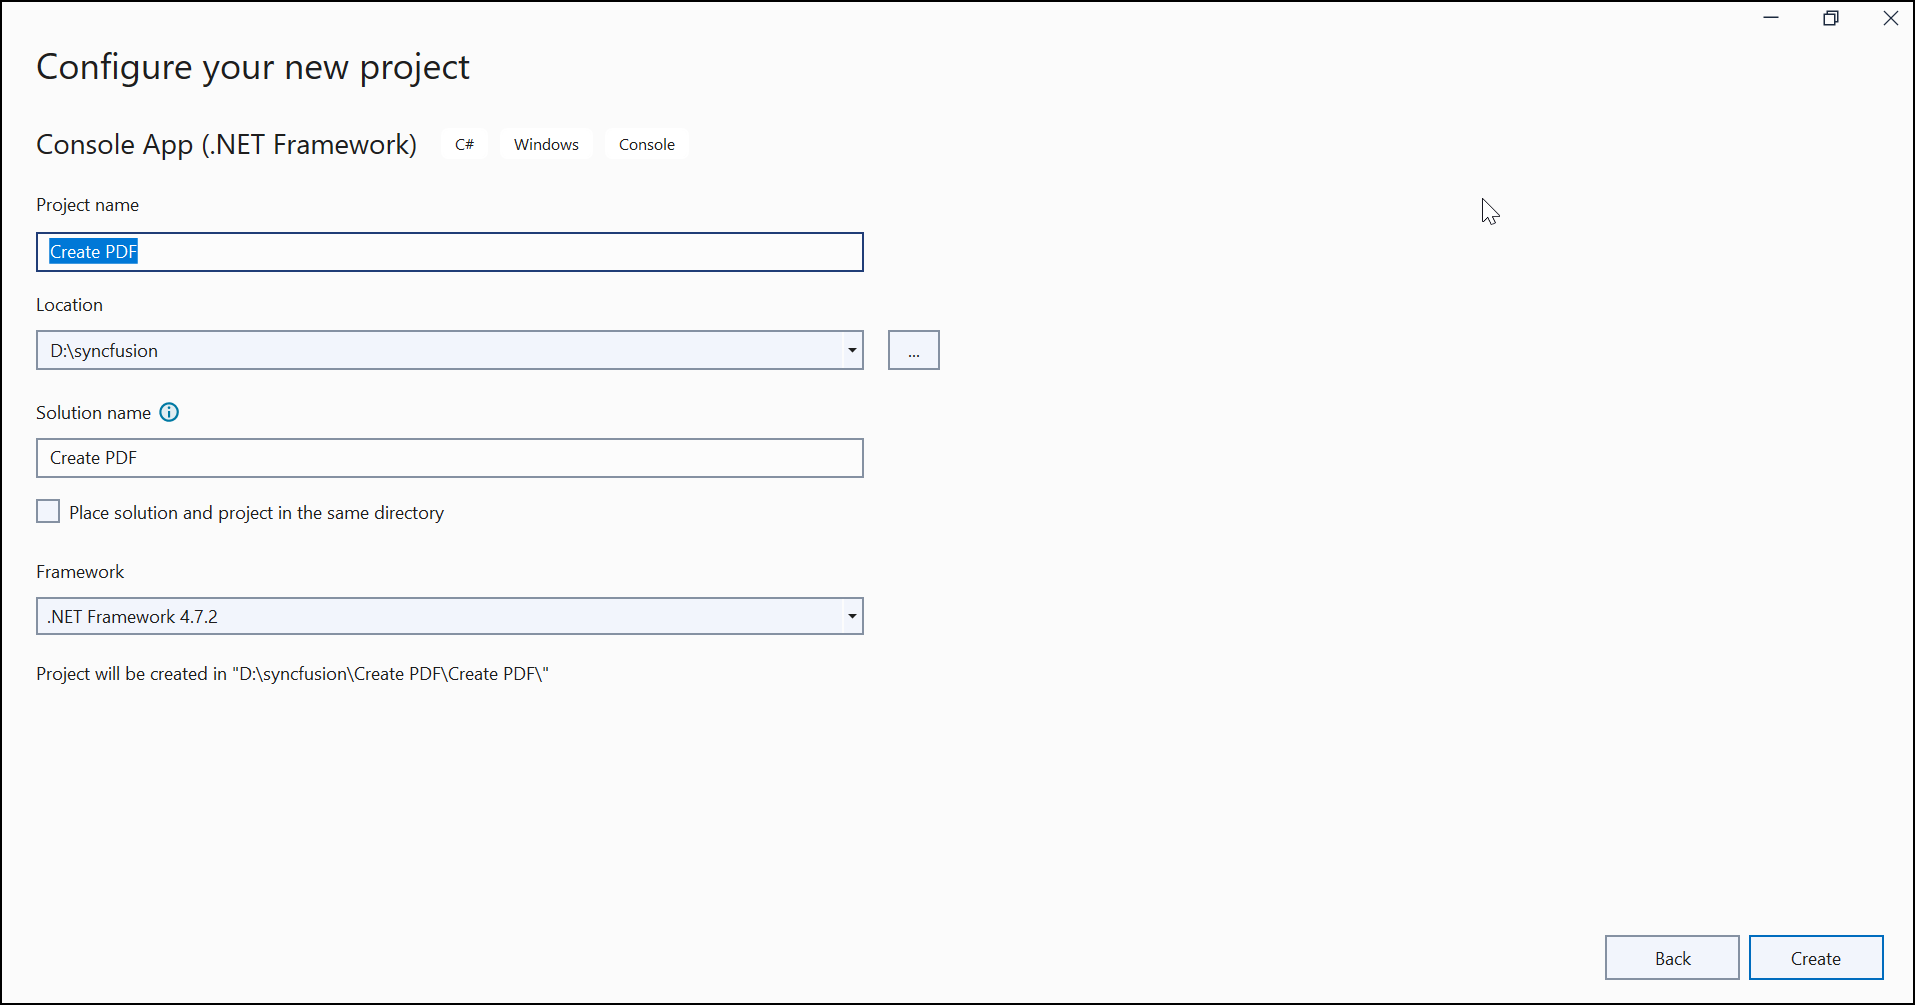
Step 2: Name the project and click Create.
Step 3: Install the Syncfusion.Pdf.WinForms NuGet package as a reference to your .NET Framework applications from NuGet.org. You can install it either through the NuGet Package Manager (right-click the project → Manage NuGet Packages… → search for Syncfusion.Pdf.WinForms → Install) or by running the following command in the Package Manager Console:
Install-Package Syncfusion.Pdf.WinForms
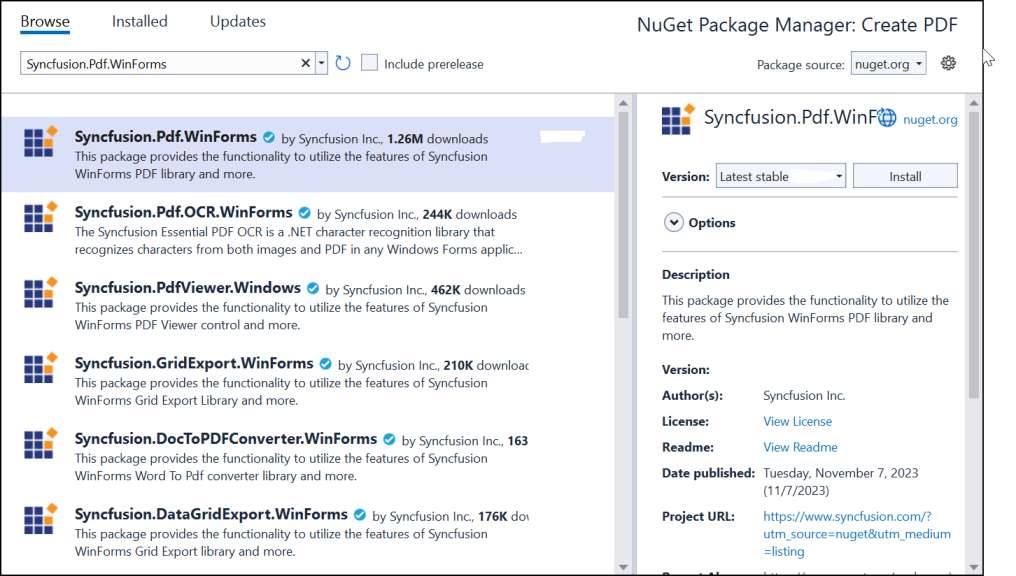
The Syncfusion.Pdf.WinForms NuGet package is a dependent package for Syncfusion® Windows Forms GUI controls, so named with suffix “WinForms”. It has platform-independent .NET Framework (4.0, 4.5, 4.5.1, 4.6) assemblies of the PDF library and doesn’t contain any Windows Forms-related references or code. Hence, we recommend this package for the .NET Framework Console application.
Step 4: Register the Syncfusion® license key. An evaluation watermark is added to every page of the generated PDF until a valid key is registered. Include the license key at the start of Program.cs before creating a PdfDocument instance. Refer to the Syncfusion License documentation to learn about registering the Syncfusion® license key in your application.
using Syncfusion.Licensing;

// Register the Syncfusion license
Syncfusion.Licensing.SyncfusionLicenseProvider.RegisterLicense("YOUR LICENSE KEY");
RReplace "YOUR LICENSE KEY" with the license key associated with your Syncfusion® account. If you do not have a license key, you can request a free 30-day trial or apply for a Community License from the Syncfusion® website. For more information about registering a license key in your application, refer to the Syncfusion® Licensing Documentation.
Step 5: Include the following namespaces in the Program.cs file.
using Syncfusion.Pdf.Graphics;
using Syncfusion.Pdf;
using System.Drawing;
Step 6: Include the following code sample in Program.cs to create a PDF file using the PdfDocument class. The DrawString method of the PdfGraphics object is used to draw text on the PDF page and save the output to disk.
//Create a new PDF document.
using (PdfDocument document = new PdfDocument())
{
    //Add a page to the document.
    PdfPage page = document.Pages.Add();
    //Create PDF graphics for a page.
    PdfGraphics graphics = page.Graphics;
    //Set the standard font.
    PdfFont font = new PdfStandardFont(PdfFontFamily.Helvetica, 20);
    //Draw the text.
    graphics.DrawString("Hello World!!!", font, PdfBrushes.Black, new PointF(0, 0));
    //Save the document.
    document.Save("Output.pdf");
}
Step 7: Build the project.
Right-click the project in Solution Explorer and choose Build, or press Ctrl+Shift+B to build the entire solution.
Step 8: Run the project.
Click the Start button (green arrow) or press F5 to run the app with debugging, or press Ctrl+F5 to run without debugging. The generated Output.pdf will appear in the project’s output directory (typically bin\Debug\).
The
Output.pdfis written to the current working directory of the application. When running from Visual Studio, this is typicallybin\Debug\. You can pass an absolute path (for example,Path.Combine(Environment.GetFolderPath(Environment.SpecialFolder.Desktop), "Output.pdf")) to save the PDF to a known location.
You can download a complete working sample from GitHub.
By executing the program, you will get the PDF document as follows.
Click here to explore the rich set of Syncfusion® PDF library features.
An online sample link to create PDF document.