# Create or Generate PDF file in Blazor
The Syncfusion® [Blazor PDF library](https://www.syncfusion.com/document-processing/pdf-framework/blazor/pdf-library) is used to create, read, and edit PDF documents. This library also offers functionality to merge, split, stamp, forms, and secure PDF files.
To include the Syncfusion® Blazor PDF library into your Blazor application, please refer to the [NuGet Package Required](https://help.syncfusion.com/document-processing/pdf/pdf-library/net/nuget-packages-required) or [Assemblies Required](https://help.syncfusion.com/document-processing/pdf/pdf-library/net/assemblies-required) documentation.
To quickly get started with creating a PDF document in Blazor, check this video:
{% youtube "https://www.youtube.com/watch?v=B5BOBwus0Jc&t=2s" %}
## Steps to create PDF document in Blazor Server application
{% tabcontents %}
{% tabcontent Visual Studio %}
**Prerequisites**:
* Install .NET SDK: Ensure that you have the .NET SDK installed on your system. You can download it from the [.NET Downloads page](https://dotnet.microsoft.com/en-us/download).
* Install Visual Studio: Download and install Visual Studio Code from the [official website](https://code.visualstudio.com/download).
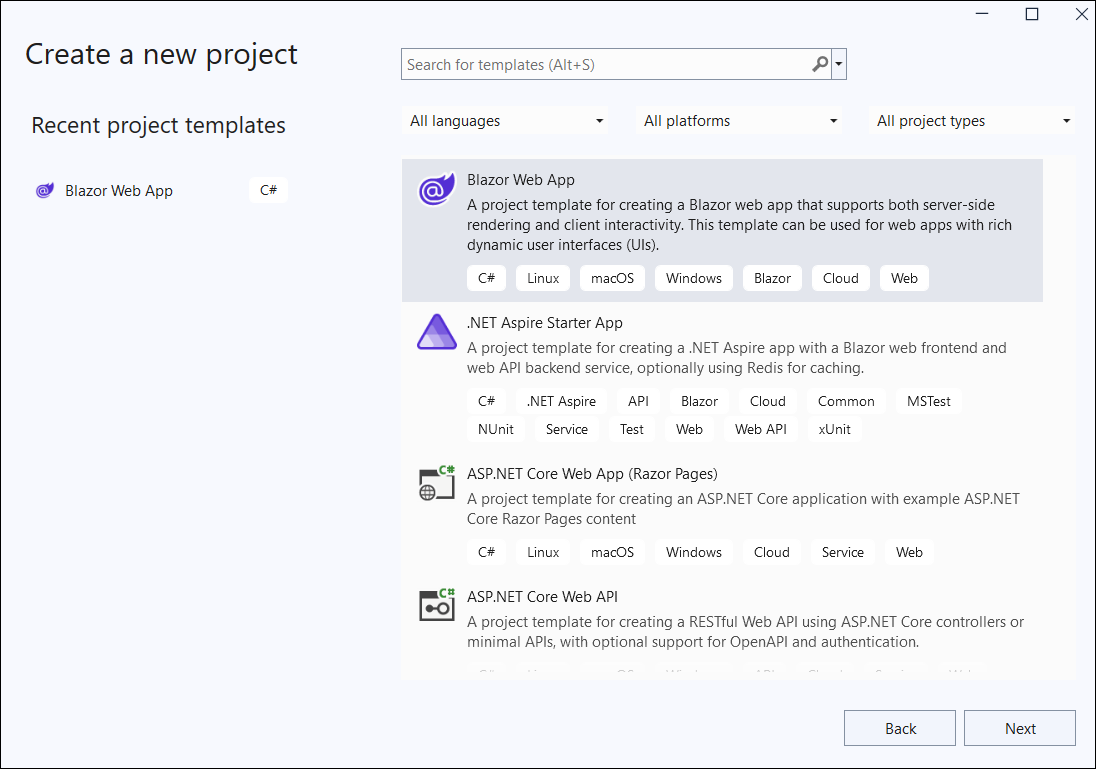
Step 1: Create a new C# Blazor server-side application project. Select **Blazor Web App** from the template and click the Next button.
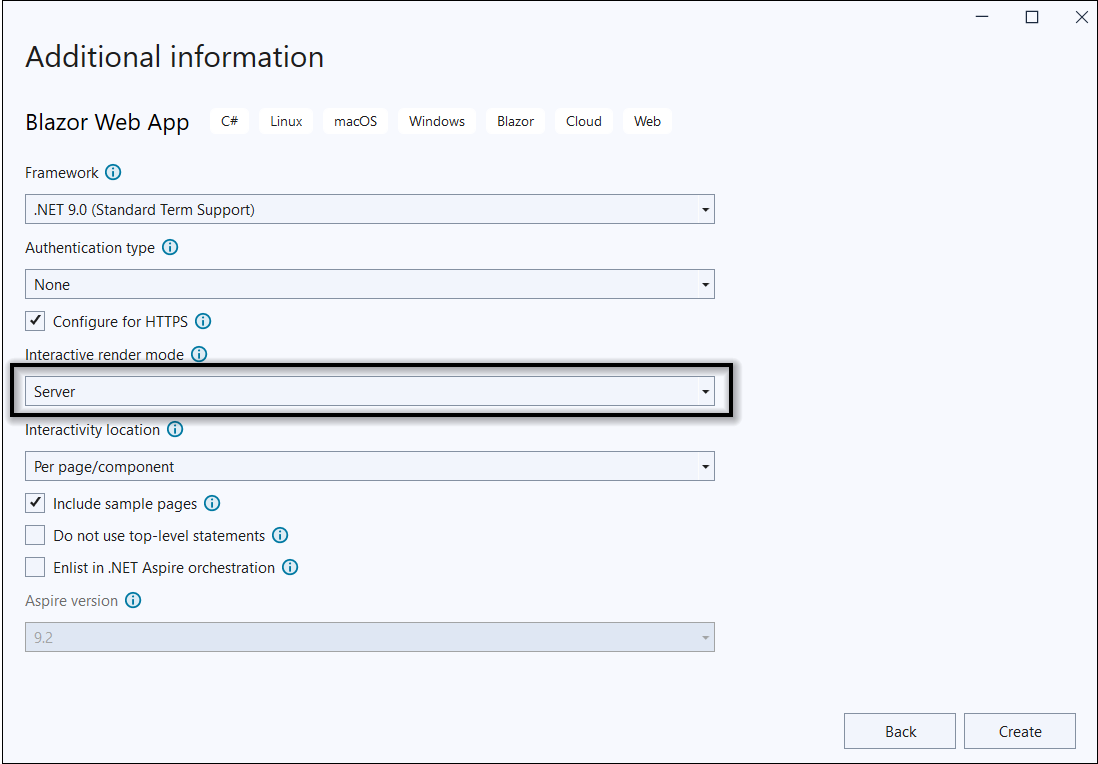
Step 2: In the **Interactive Render Mode section**, choose `Server` as the render mode. Then, click the `Create` button to generate a new Blazor Server-Side Application.
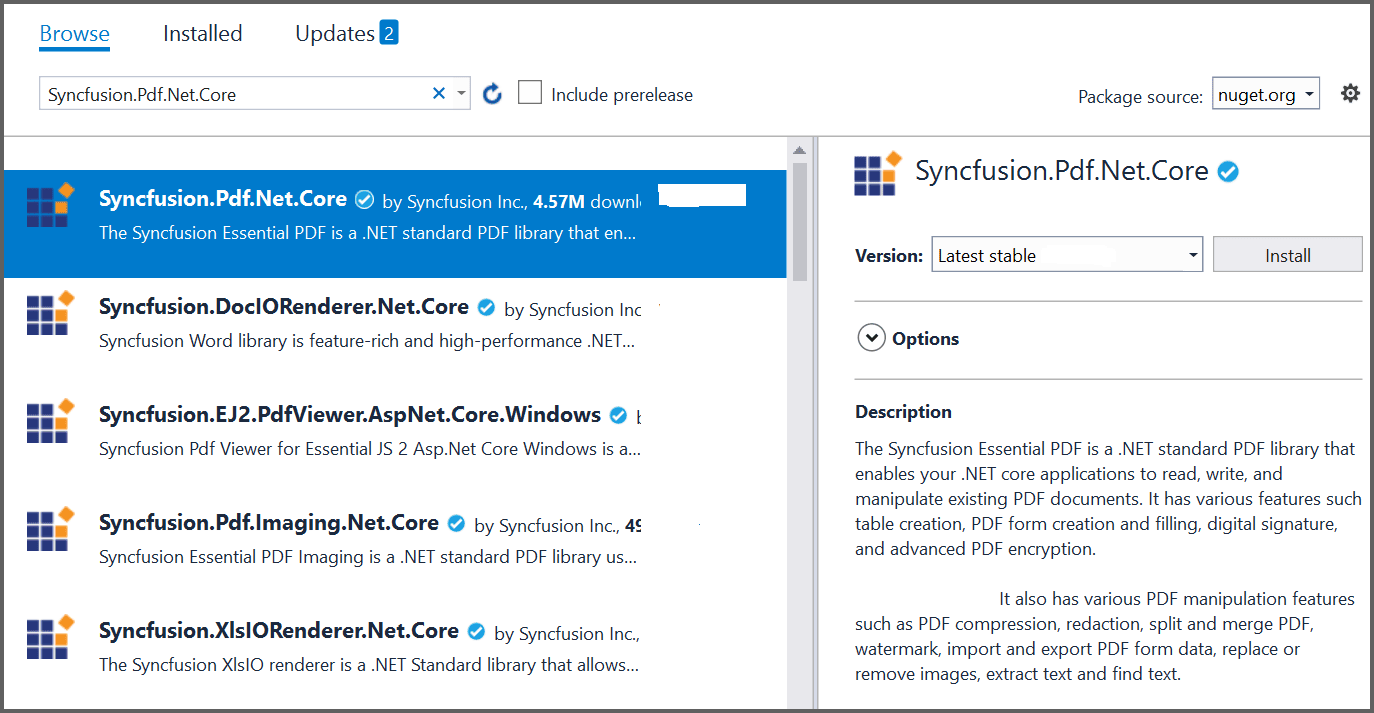
Step 3: To create a PDF document in a Blazor Server app, install the [Syncfusion.PDF.Net.Core](https://www.nuget.org/packages/Syncfusion.pdf.Net.Core) package into your Blazor project.
Step 4: Create a new cs file named **ExportService.cs** under **Data** folder and include the following namespaces in the file.
{% tabs %}
{% highlight c# tabtitle="C#" %}
using Syncfusion.Pdf;
using Syncfusion.Pdf.Graphics;
using Syncfusion.Pdf.Grid;
using Syncfusion.Drawing;
{% endhighlight %}
{% endtabs %}
Step 5: The [PdfDocument](https://help.syncfusion.com/cr/document-processing/Syncfusion.Pdf.PdfDocument.html) object represents an entire PDF document that is being created. The [PdfTextElement](https://help.syncfusion.com/cr/document-processing/Syncfusion.Pdf.Graphics.PdfTextElement.html) is used to add text in a PDF document and which provides the layout result of the added text by using the location of the next element that decides to prevent content overlapping. The [PdfGrid](https://help.syncfusion.com/cr/document-processing/Syncfusion.Pdf.Grid.PdfGrid.html) allows you to create table by entering data manually or from an external data sources.
Add the following code sample in ``ExportService`` class which illustrates how to create a simple PDF document using ``PdfTextElement`` and ``PdfGrid``.
{% tabs %}
{% highlight c# tabtitle="C#" %}
//Export weather data to PDF document.
public static MemoryStream CreatePdf(WeatherForecast[] forecasts)
{
if (forecasts == null)
{
throw new ArgumentNullException("Forecast cannot be null");
}
//Create a new PDF document.
using (PdfDocument pdfDocument = new PdfDocument())
{
int paragraphAfterSpacing = 8;
int cellMargin = 8;
//Add page to the PDF document.
PdfPage page = pdfDocument.Pages.Add();
//Create a new font.
PdfStandardFont font = new PdfStandardFont(PdfFontFamily.TimesRoman, 16);
//Create a text element to draw a text in PDF page.
PdfTextElement title = new PdfTextElement("Weather Forecast", font, PdfBrushes.Black);
PdfLayoutResult result = title.Draw(page, new PointF(0, 0));
PdfStandardFont contentFont = new PdfStandardFont(PdfFontFamily.TimesRoman, 12);
PdfTextElement content = new PdfTextElement("This component demonstrates fetching data from a service and Exporting the data to PDF document using Syncfusion .NET PDF library.", contentFont, PdfBrushes.Black);
PdfLayoutFormat format = new PdfLayoutFormat();
format.Layout = PdfLayoutType.Paginate;
//Draw a text to the PDF document.
result = content.Draw(page, new RectangleF(0, result.Bounds.Bottom + paragraphAfterSpacing, page.GetClientSize().Width, page.GetClientSize().Height), format);
//Create a PdfGrid.
PdfGrid pdfGrid = new PdfGrid();
pdfGrid.Style.CellPadding.Left = cellMargin;
pdfGrid.Style.CellPadding.Right = cellMargin;
//Applying built-in style to the PDF grid.
pdfGrid.ApplyBuiltinStyle(PdfGridBuiltinStyle.GridTable4Accent1);
//Assign data source.
pdfGrid.DataSource = forecasts
pdfGrid.Style.Font = contentFont;
//Draw PDF grid into the PDF page.
pdfGrid.Draw(page, new Syncfusion.Drawing.PointF(0, result.Bounds.Bottom + paragraphAfterSpacing));
using (MemoryStream stream = new MemoryStream())
{
//Saving the PDF document into the stream.
pdfDocument.Save(stream);
//Closing the PDF document.
pdfDocument.Close(true);
return stream;
}
}
}
{% endhighlight %}
{% endtabs %}
Step 6: Register your service in the ``Program.cs`` class as follows.
{% tabs %}
{% highlight c# tabtitle="C#" %}
services.AddRazorPages();
services.AddServerSideBlazor();
services.AddSingleton();
services.AddSingleton();
{% endhighlight %}
{% endtabs %}
Step 7: Inject ``ExportService`` in-to ``Weather.razor`` using the following code.
{% tabs %}
{% highlight CSHTML %}
@inject ExportToFileService exportService
@inject Microsoft.JSInterop.IJSRuntime JS
@using System.IO;
{% endhighlight %}
{% endtabs %}
Create a button in the ``Weather.razor`` using the following code.
{% tabs %}
{% highlight CSHTML %}
Export to PDF
{% endhighlight %}
{% endtabs %}
Add the ``ExportToPdf`` method in ``Weather.razor`` page to call the export service.
{% tabs %}
{% highlight c# tabtitle="C#" %}
@functions
{
protected async Task ExportToPdf()
{
using (MemoryStream excelStream = ExportService.CreatePdf(forecasts))
{
await JS.SaveAs("Sample.pdf", excelStream.ToArray());
}
}
}
{% endhighlight %}
{% endtabs %}
Step 8: Include the ``FileUtil`` class within the ``ExportService.cs`` file to enable file-related operations as part of the export functionality.
{% tabs %}
{% highlight c# tabtitle="C#" %}
public static class FileUtil
{
public static ValueTask SaveAs(this IJSRuntime js, string filename, byte[] data)
=> js.InvokeAsync(
"saveAsFile",
filename,
Convert.ToBase64String(data));
}
{% endhighlight %}
{% endtabs %}
Step 9: Add the following JavaScript function in the ``App.razor`` available under the ``Components`` folder.
{% tabs %}
{% highlight HTML %}
{% endhighlight %}
{% endtabs %}
Step 10: Build the project.
Click on Build > Build Solution or press Ctrl + Shift + B to build the project.
Step 11: Run the project.
Click the Start button (green arrow) or press F5 to run the app.
{% endtabcontent %}
{% tabcontent Visual Studio Code %}
**Prerequisites**:
* Install .NET SDK: Ensure that you have the .NET SDK installed on your system. You can download it from the [.NET Downloads page](https://dotnet.microsoft.com/en-us/download).
* Install Visual Studio Code: Download and install Visual Studio Code from the [official website](https://code.visualstudio.com/download).
* Install C# Extension for VS Code: Open Visual Studio Code, go to the Extensions view (Ctrl+Shift+X), and search for 'C#'. Install the official [C# extension provided by Microsoft](https://marketplace.visualstudio.com/items?itemName=ms-dotnettools.csharp).
Step 1: Open the terminal (Ctrl+` ) and run the following command to create a new Blazor Server application
```
dotnet new blazorserver -n CreatePdfBlazorServerApp
```
Step 2: Replace ****CreatePdfBlazorServerApp** with your desired project name.
Step 3: Navigate to the project directory using the following command
```
cd CreatePdfBlazorServerApp
```
Step 4: Use the following command in the terminal to add the [Syncfusion.Pdf.Net.Core](https://www.nuget.org/packages/Syncfusion.pdf.Net.Core) package to your project.
```
dotnet add package Syncfusion.Pdf.Net.Core
```
Step 5: Create a new cs file named **ExportService.cs** under **Data** folder and include the following namespaces in the file.
{% tabs %}
{% highlight c# tabtitle="C#" %}
using Syncfusion.Pdf;
using Syncfusion.Pdf.Graphics;
using Syncfusion.Pdf.Grid;
using Syncfusion.Drawing;
{% endhighlight %}
{% endtabs %}
Step 6: The [PdfDocument](https://help.syncfusion.com/cr/document-processing/Syncfusion.Pdf.PdfDocument.html) object represents an entire PDF document that is being created. The [PdfTextElement](https://help.syncfusion.com/cr/document-processing/Syncfusion.Pdf.Graphics.PdfTextElement.html) is used to add text in a PDF document and which provides the layout result of the added text by using the location of the next element that decides to prevent content overlapping. The [PdfGrid](https://help.syncfusion.com/cr/document-processing/Syncfusion.Pdf.Grid.PdfGrid.html) allows you to create table by entering data manually or from an external data sources.
Add the following code sample in ``ExportService`` class which illustrates how to create a simple PDF document using ``PdfTextElement`` and ``PdfGrid``.
{% tabs %}
{% highlight c# tabtitle="C#" %}
//Export weather data to PDF document.
public static MemoryStream CreatePdf(WeatherForecast[] forecasts)
{
if (forecasts == null)
{
throw new ArgumentNullException("Forecast cannot be null");
}
//Create a new PDF document.
using (PdfDocument pdfDocument = new PdfDocument())
{
int paragraphAfterSpacing = 8;
int cellMargin = 8;
//Add page to the PDF document.
PdfPage page = pdfDocument.Pages.Add();
//Create a new font.
PdfStandardFont font = new PdfStandardFont(PdfFontFamily.TimesRoman, 16);
//Create a text element to draw a text in PDF page.
PdfTextElement title = new PdfTextElement("Weather Forecast", font, PdfBrushes.Black);
PdfLayoutResult result = title.Draw(page, new PointF(0, 0));
PdfStandardFont contentFont = new PdfStandardFont(PdfFontFamily.TimesRoman, 12);
PdfTextElement content = new PdfTextElement("This component demonstrates fetching data from a service and Exporting the data to PDF document using Syncfusion .NET PDF library.", contentFont, PdfBrushes.Black);
PdfLayoutFormat format = new PdfLayoutFormat();
format.Layout = PdfLayoutType.Paginate;
//Draw a text to the PDF document.
result = content.Draw(page, new RectangleF(0, result.Bounds.Bottom + paragraphAfterSpacing, page.GetClientSize().Width, page.GetClientSize().Height), format);
//Create a PdfGrid.
PdfGrid pdfGrid = new PdfGrid();
pdfGrid.Style.CellPadding.Left = cellMargin;
pdfGrid.Style.CellPadding.Right = cellMargin;
//Applying built-in style to the PDF grid.
pdfGrid.ApplyBuiltinStyle(PdfGridBuiltinStyle.GridTable4Accent1);
//Assign data source.
pdfGrid.DataSource = forecasts
pdfGrid.Style.Font = contentFont;
//Draw PDF grid into the PDF page.
pdfGrid.Draw(page, new Syncfusion.Drawing.PointF(0, result.Bounds.Bottom + paragraphAfterSpacing));
using (MemoryStream stream = new MemoryStream())
{
//Saving the PDF document into the stream.
pdfDocument.Save(stream);
//Closing the PDF document.
pdfDocument.Close(true);
return stream;
}
}
}
{% endhighlight %}
{% endtabs %}
Register your service in the ``ConfigureServices`` method available in the ``Startup.cs`` class as follows.
{% tabs %}
{% highlight c# tabtitle="C#" %}
public void ConfigureServices(IServiceCollection services)
{
services.AddRazorPages();
services.AddServerSideBlazor();
services.AddSingleton();
services.AddSingleton();
}
{% endhighlight %}
{% endtabs %}
Step 7: Inject ``ExportService`` in-to ``FetchData.razor`` using the following code.
{% tabs %}
{% highlight CSHTML %}
@inject ExportToFileService exportService
@inject Microsoft.JSInterop.IJSRuntime JS
@using System.IO;
{% endhighlight %}
{% endtabs %}
Create a button in the ``FetchData.razor`` using the following code.
{% tabs %}
{% highlight CSHTML %}
Export to PDF
{% endhighlight %}
{% endtabs %}
Add the ``ExportToPdf`` method in ``FetchData.razor`` page to call the export service.
{% tabs %}
{% highlight c# tabtitle="C#" %}
@functions
{
protected async Task ExportToPdf()
{
using (MemoryStream excelStream = ExportService.CreatePdf(forecasts))
{
await JS.SaveAs("Sample.pdf", excelStream.ToArray());
}
}
}
{% endhighlight %}
{% endtabs %}
Step 8: Create a class file with ``FileUtil`` name and add the following code to invoke the JavaScript action to download the file in the browser.
{% tabs %}
{% highlight c# tabtitle="C#" %}
public static class FileUtil
{
public static ValueTask SaveAs(this IJSRuntime js, string filename, byte[] data)
=> js.InvokeAsync(
"saveAsFile",
filename,
Convert.ToBase64String(data));
}
{% endhighlight %}
{% endtabs %}
Step 9: Add the following JavaScript function in the ``_Host.cshtml`` available under the ``Pages`` folder.
{% tabs %}
{% highlight HTML %}
{% endhighlight %}
{% endtabs %}
Step 10: Build the project.
Run the following command in terminal to build the project.
```
dotnet build
```
Step 11: Run the project.
Run the following command in terminal to build the project.
```
dotnet run
```
{% endtabcontent %}
{% tabcontent JetBrains Rider %}
**Prerequisites:**
* JetBrains Rider.
* Install .NET 8 SDK or later.
Step 1. Open JetBrains Rider and create a new Blazor server-side app project.
* Launch JetBrains Rider.
* Click new solution on the welcome screen.
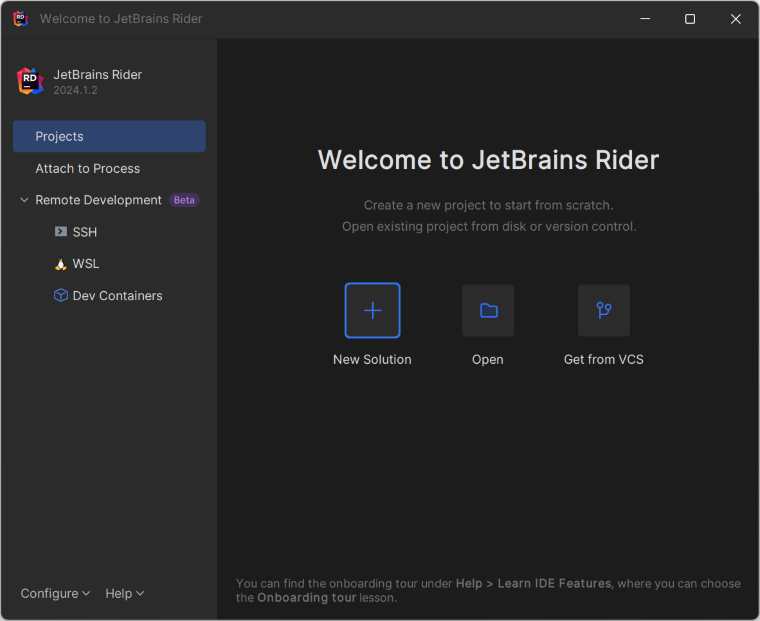
* In the new Solution dialog, select Project Type as Web.
* Enter a project name and specify the location.
* Choose template as **Blazor Server App**.
* Select the target framework (e.g., .NET 8.0, .NET 9.0).
* Click create.

Step 2: Install the NuGet package from [NuGet.org](https://www.nuget.org/).
* Click the NuGet icon in the Rider toolbar and type [Syncfusion.Pdf.Net.Core](https://www.nuget.org/packages/Syncfusion.Pdf.Net.Core) in the search bar.
* Ensure that "nuget.org" is selected as the package source.
* Select the latest Syncfusion.Pdf.Net.Core NuGet package from the list.
* Click the + (Add) button to add the package.
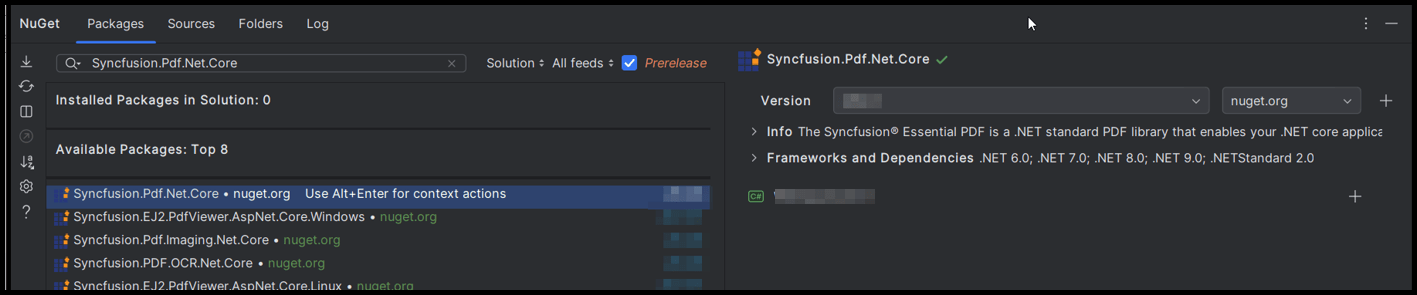
* Click the Install button to complete the installation.

Step 5: Create a new cs file named **ExportService.cs** under **Data** folder and include the following namespaces in the file.
{% tabs %}
{% highlight c# tabtitle="C#" %}
using Syncfusion.Pdf;
using Syncfusion.Pdf.Graphics;
using Syncfusion.Pdf.Grid;
using Syncfusion.Drawing;
{% endhighlight %}
{% endtabs %}
Step 6: The [PdfDocument](https://help.syncfusion.com/cr/document-processing/Syncfusion.Pdf.PdfDocument.html) object represents an entire PDF document that is being created. The [PdfTextElement](https://help.syncfusion.com/cr/document-processing/Syncfusion.Pdf.Graphics.PdfTextElement.html) is used to add text in a PDF document and which provides the layout result of the added text by using the location of the next element that decides to prevent content overlapping. The [PdfGrid](https://help.syncfusion.com/cr/document-processing/Syncfusion.Pdf.Grid.PdfGrid.html) allows you to create table by entering data manually or from an external data sources.
Add the following code sample in ``ExportService`` class which illustrates how to create a simple PDF document using ``PdfTextElement`` and ``PdfGrid``.
{% tabs %}
{% highlight c# tabtitle="C#" %}
//Export weather data to PDF document.
public static MemoryStream CreatePdf(WeatherForecast[] forecasts)
{
if (forecasts == null)
{
throw new ArgumentNullException("Forecast cannot be null");
}
//Create a new PDF document.
using (PdfDocument pdfDocument = new PdfDocument())
{
int paragraphAfterSpacing = 8;
int cellMargin = 8;
//Add page to the PDF document.
PdfPage page = pdfDocument.Pages.Add();
//Create a new font.
PdfStandardFont font = new PdfStandardFont(PdfFontFamily.TimesRoman, 16);
//Create a text element to draw a text in PDF page.
PdfTextElement title = new PdfTextElement("Weather Forecast", font, PdfBrushes.Black);
PdfLayoutResult result = title.Draw(page, new PointF(0, 0));
PdfStandardFont contentFont = new PdfStandardFont(PdfFontFamily.TimesRoman, 12);
PdfTextElement content = new PdfTextElement("This component demonstrates fetching data from a service and Exporting the data to PDF document using Syncfusion .NET PDF library.", contentFont, PdfBrushes.Black);
PdfLayoutFormat format = new PdfLayoutFormat();
format.Layout = PdfLayoutType.Paginate;
//Draw a text to the PDF document.
result = content.Draw(page, new RectangleF(0, result.Bounds.Bottom + paragraphAfterSpacing, page.GetClientSize().Width, page.GetClientSize().Height), format);
//Create a PdfGrid.
PdfGrid pdfGrid = new PdfGrid();
pdfGrid.Style.CellPadding.Left = cellMargin;
pdfGrid.Style.CellPadding.Right = cellMargin;
//Applying built-in style to the PDF grid.
pdfGrid.ApplyBuiltinStyle(PdfGridBuiltinStyle.GridTable4Accent1);
//Assign data source.
pdfGrid.DataSource = forecasts
pdfGrid.Style.Font = contentFont;
//Draw PDF grid into the PDF page.
pdfGrid.Draw(page, new Syncfusion.Drawing.PointF(0, result.Bounds.Bottom + paragraphAfterSpacing));
using (MemoryStream stream = new MemoryStream())
{
//Saving the PDF document into the stream.
pdfDocument.Save(stream);
//Closing the PDF document.
pdfDocument.Close(true);
return stream;
}
}
}
{% endhighlight %}
{% endtabs %}
Register your service in the ``ConfigureServices`` method available in the ``Startup.cs`` class as follows.
{% tabs %}
{% highlight c# tabtitle="C#" %}
public void ConfigureServices(IServiceCollection services)
{
services.AddRazorPages();
services.AddServerSideBlazor();
services.AddSingleton();
services.AddSingleton();
}
{% endhighlight %}
{% endtabs %}
Step 7: Inject ``ExportService`` in-to ``FetchData.razor`` using the following code.
{% tabs %}
{% highlight CSHTML %}
@inject ExportToFileService exportService
@inject Microsoft.JSInterop.IJSRuntime JS
@using System.IO;
{% endhighlight %}
{% endtabs %}
Create a button in the ``FetchData.razor`` using the following code.
{% tabs %}
{% highlight CSHTML %}
Export to PDF
{% endhighlight %}
{% endtabs %}
Add the ``ExportToPdf`` method in ``FetchData.razor`` page to call the export service.
{% tabs %}
{% highlight c# tabtitle="C#" %}
@functions
{
protected async Task ExportToPdf()
{
using (MemoryStream excelStream = ExportService.CreatePdf(forecasts))
{
await JS.SaveAs("Sample.pdf", excelStream.ToArray());
}
}
}
{% endhighlight %}
{% endtabs %}
Step 8: Create a class file with ``FileUtil`` name and add the following code to invoke the JavaScript action to download the file in the browser.
{% tabs %}
{% highlight c# tabtitle="C#" %}
public static class FileUtil
{
public static ValueTask SaveAs(this IJSRuntime js, string filename, byte[] data)
=> js.InvokeAsync(
"saveAsFile",
filename,
Convert.ToBase64String(data));
}
{% endhighlight %}
{% endtabs %}
Step 9: Add the following JavaScript function in the ``_Host.cshtml`` available under the ``Pages`` folder.
{% tabs %}
{% highlight HTML %}
{% endhighlight %}
{% endtabs %}
Step 10: Build the project.
Click the **Build** button in the toolbar or press Ctrl +Shift +B to build the project.
Step 11: Run the project.
Click the **Run** button (green arrow) in the toolbar or press F5 to run the app.
{% endtabcontent %}
{% endtabcontents %}
You can download a complete working sample from [GitHub](https://github.com/SyncfusionExamples/PDF-Examples/tree/master/Getting%20Started/Blazor/ServerSideApplication).
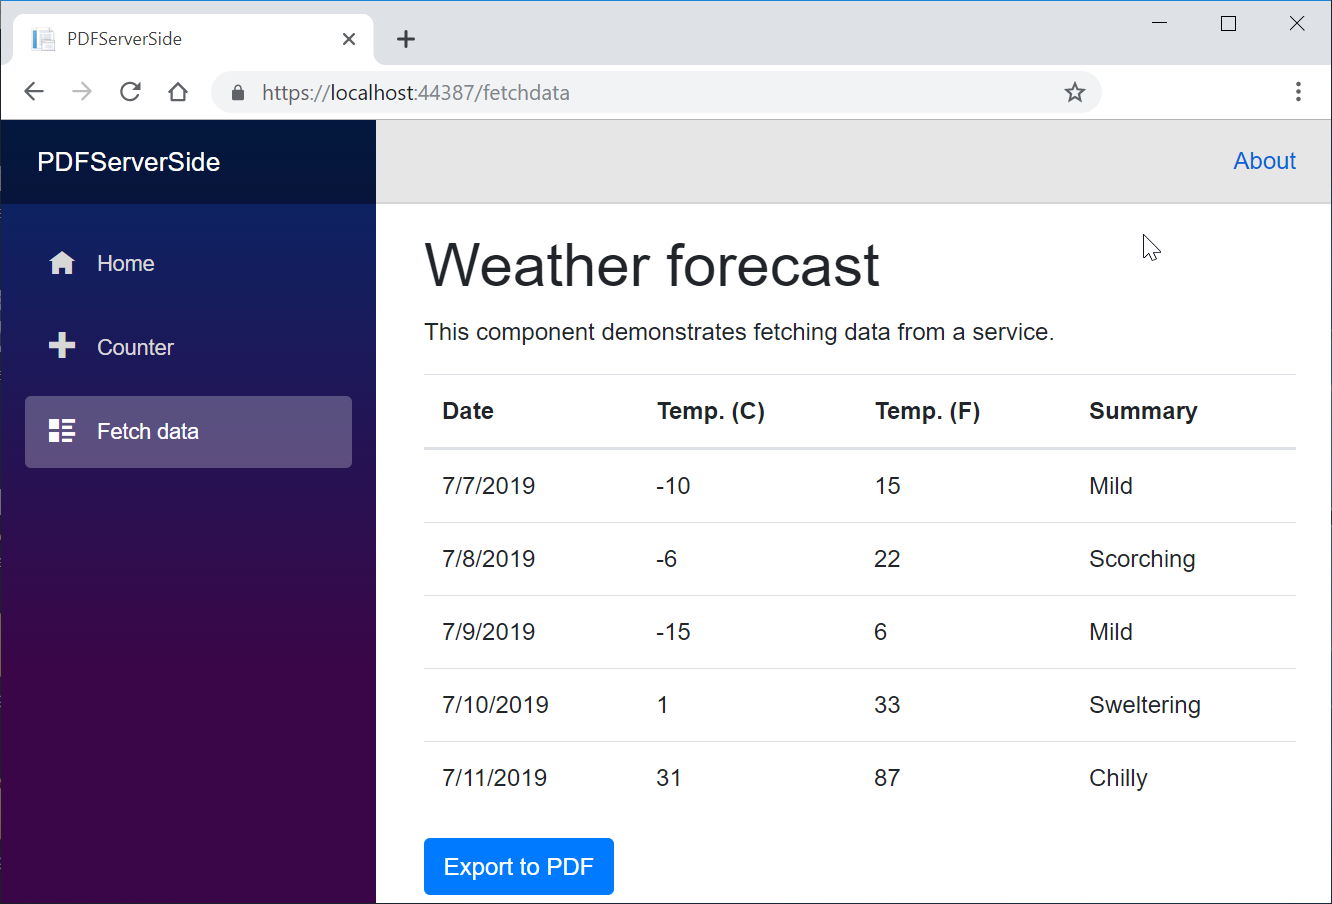
By executing the program, you will get the following output in the browser.
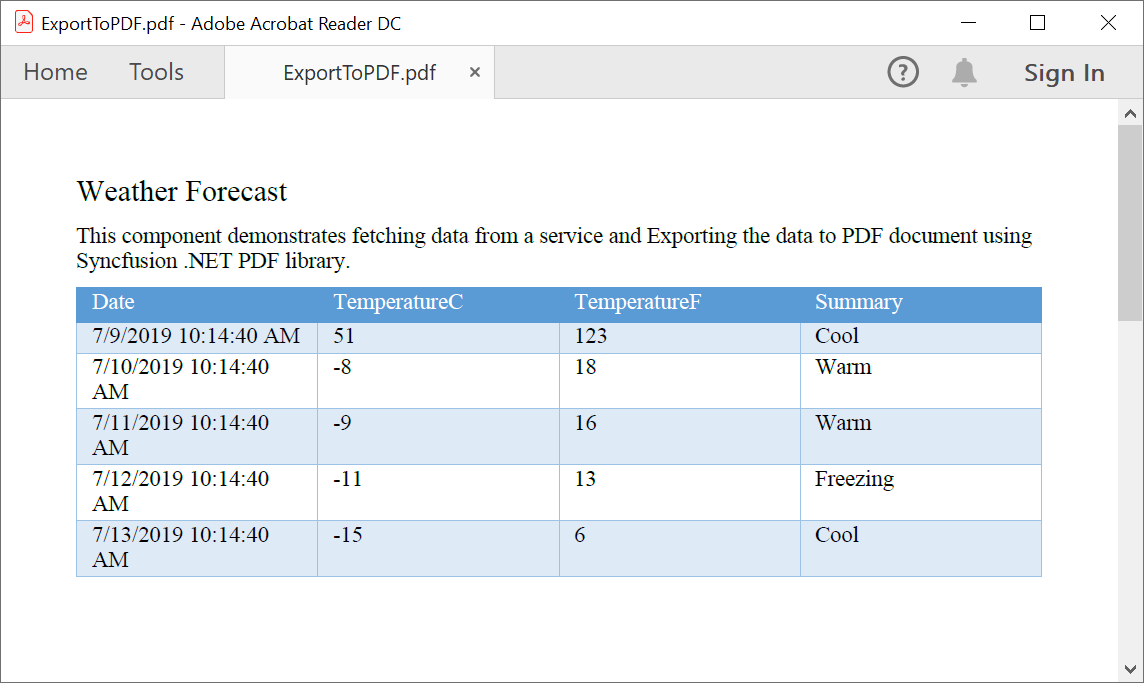
Click the Export to PDF button, and you will get the PDF document with the following output.
N> It is recommended to use Blazor Server-Side application to reduce the pay back load which is high in Blazor Client-Side.
Click [here](https://www.syncfusion.com/document-processing/pdf-framework/blazor) to explore the rich set of Syncfusion® PDF library features.
An online sample link to [create PDF document](https://blazor.syncfusion.com/demos/pdf/hello-world?theme=fluent) in Blazor.
## Steps to create PDF document in Blazor WASM application
{% tabcontents %}
{% tabcontent Visual Studio %}
**Prerequisites**:
* Install .NET SDK: Ensure that you have the .NET SDK installed on your system. You can download it from the [.NET Downloads page](https://dotnet.microsoft.com/en-us/download).
* Install Visual Studio: Download and install Visual Studio Code from the [official website](https://code.visualstudio.com/download).
Step 1: Create a new C# Blazor client-side application project. Select Blazor Web App from the template and click the Next button.

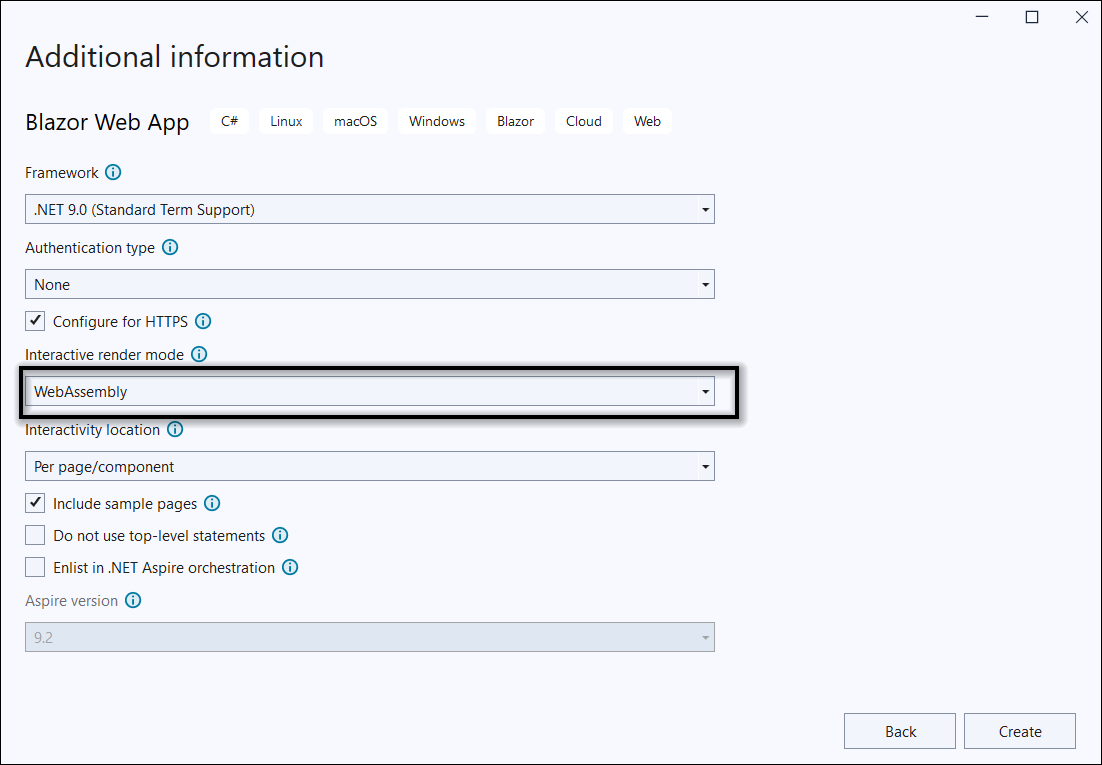
Step 2: In the **Interactive Render Mode section**, choose `WebAssembly` as the render mode. Then, click the `Create` button to generate a new Blazor client-Side Application.
Step 4: Install the [Syncfusion.PDF.Net.Core](https://www.nuget.org/packages/Syncfusion.pdf.Net.Core) NuGet package as a reference to your Blazor application from [NuGet.org](https://www.nuget.org).

N> Starting with v16.2.0.x, if you reference Syncfusion® assemblies from trial setup or from the NuGet feed, you also have to add "Syncfusion.Licensing" assembly reference and include a license key in your projects. Please refer to this [link](https://help.syncfusion.com/common/essential-studio/licensing/overview) to know about registering Syncfusion® license key in your application to use our components.
Step 5: Next, include the following namespaces in that ``FetchData.razor`` file.
{% tabs %}
{% highlight c# tabtitle="C#" %}
@using Syncfusion.Pdf
@using Syncfusion.Pdf.Grid;
@using Syncfusion.Drawing;
@using Syncfusion.Pdf.Graphics;
@inject Microsoft.JSInterop.IJSRuntime JS
@using System.IO;
{% endhighlight %}
{% endtabs %}
Step 6: Create a button in the ``FetchData.razor`` using the following code.
{% tabs %}
{% highlight CSHTML %}
Export to PDF
{% endhighlight %}
{% endtabs %}
Step 7: Define the ``@ExportToPdf`` click function on ``FetchData.razor`` file.
The [PdfDocument](https://help.syncfusion.com/cr/document-processing/Syncfusion.Pdf.PdfDocument.html) object represents an entire PDF document that is being created and add a [PdfPage](https://help.syncfusion.com/cr/document-processing/Syncfusion.Pdf.PdfPage.html) to it. The [PdfTextElement](https://help.syncfusion.com/cr/document-processing/Syncfusion.Pdf.Graphics.PdfTextElement.html) is used to add text in a PDF document and which provides the layout result of the added text by using the location of the next element that decides to prevent content overlapping. The [PdfGrid](https://help.syncfusion.com/cr/document-processing/Syncfusion.Pdf.Grid.PdfGrid.html) allows you to create table by entering data manually or from an external data sources.
{% tabs %}
{% highlight c# tabtitle="C#" %}
@functions {
void ExportToPdf()
{
int paragraphAfterSpacing = 8;
int cellMargin = 8;
//Create a new PDF document.
PdfDocument pdfDocument = new PdfDocument();
//Add Page to the PDF document.
PdfPage page = pdfDocument.Pages.Add();
//Create a new font.
PdfStandardFont font = new PdfStandardFont(PdfFontFamily.TimesRoman, 16);
//Create a text element to draw a text in PDF page.
PdfTextElement title = new PdfTextElement("Weather Forecast", font, PdfBrushes.Black);
PdfLayoutResult result = title.Draw(page, new PointF(0, 0));
PdfStandardFont contentFont = new PdfStandardFont(PdfFontFamily.TimesRoman, 12);
//Create text element.
PdfTextElement content = new PdfTextElement("This component demonstrates fetching data from a client side and Exporting the data to PDF document using Syncfusion .NET PDF library.", contentFont, PdfBrushes.Black);
PdfLayoutFormat format = new PdfLayoutFormat();
format.Layout = PdfLayoutType.Paginate;
//Draw a text to the PDF document.
result = content.Draw(page, new RectangleF(0, result.Bounds.Bottom + paragraphAfterSpacing, page.GetClientSize().Width, page.GetClientSize().Height), format);
//Create a PdfGrid.
PdfGrid pdfGrid = new PdfGrid();
pdfGrid.Style.CellPadding.Left = cellMargin;
pdfGrid.Style.CellPadding.Right = cellMargin;
//Applying built-in style to the PDF grid
pdfGrid.ApplyBuiltinStyle(PdfGridBuiltinStyle.GridTable4Accent1);
//Assign data source.
pdfGrid.DataSource = forecasts;
pdfGrid.Style.Font = contentFont;
//Draw PDF grid into the PDF page.
pdfGrid.Draw(page, new Syncfusion.Drawing.PointF(0, result.Bounds.Bottom + paragraphAfterSpacing));
//Create memory stream.
MemoryStream memoryStream = new MemoryStream();
//Save the PDF document.
pdfDocument.Save(memoryStream);
//Download the PDF document
JS.SaveAs("Sample.pdf", memoryStream.ToArray());
}
}
{% endhighlight %}
{% endtabs %}
Step 8: Create a class file with ``FileUtil`` name and add the following code to invoke the JavaScript action to download the file in the browser.
{% tabs %}
{% highlight c# tabtitle="C#" %}
public static class FileUtil
{
public static ValueTask SaveAs(this IJSRuntime js, string filename, byte[] data)
=> js.InvokeAsync(
"saveAsFile",
filename,
Convert.ToBase64String(data));
}
{% endhighlight %}
{% endtabs %}
Step 9: Add the following JavaScript function in the ``index.html`` available under the ``wwwroot`` folder.
{% tabs %}
{% highlight HTML %}
{% endhighlight %}
{% endtabs %}
Step 10: Build the project.
Click on Build > Build Solution or press Ctrl + Shift + B to build the project.
Step 11: Run the project.
Click the Start button (green arrow) or press F5 to run the app.
{% endtabcontent %}
{% tabcontent Visual Studio Code %}
**Prerequisites**:
* Install .NET SDK: Ensure that you have the .NET SDK installed on your system. You can download it from the [.NET Downloads page](https://dotnet.microsoft.com/en-us/download).
* Install Visual Studio Code: Download and install Visual Studio Code from the [official website](https://code.visualstudio.com/download).
* Install C# Extension for VS Code: Open Visual Studio Code, go to the Extensions view (Ctrl+Shift+X), and search for 'C#'. Install the official [C# extension provided by Microsoft](https://marketplace.visualstudio.com/items?itemName=ms-dotnettools.csharp).
Step 1: Open the terminal (Ctrl+` ) and run the following command to create a new Blazor Server application
```
dotnet new blazorwasm -o CreatePdfBlazorWASMApp
```
Step 2: Replace ****CreatePdfBlazorWASMApp** with your desired project name.
Step 3: Navigate to the project directory using the following command
```
cd CreatePdfBlazorWASMApp
```
Step 4: Use the following command in the terminal to add the [Syncfusion.Pdf.Net.Core](https://www.nuget.org/packages/Syncfusion.pdf.Net.Core) package to your project.
```
dotnet add package Syncfusion.Pdf.Net.Core
```
Step 5: Create a new cs file named **ExportService.cs** under **Data** folder and include the following namespaces in the file.
{% tabs %}
{% highlight c# tabtitle="C#" %}
using Syncfusion.Pdf;
using Syncfusion.Pdf.Graphics;
using Syncfusion.Pdf.Grid;
using Syncfusion.Drawing;
{% endhighlight %}
{% endtabs %}
Step 6: The [PdfDocument](https://help.syncfusion.com/cr/document-processing/Syncfusion.Pdf.PdfDocument.html) object represents an entire PDF document that is being created. The [PdfTextElement](https://help.syncfusion.com/cr/document-processing/Syncfusion.Pdf.Graphics.PdfTextElement.html) is used to add text in a PDF document and which provides the layout result of the added text by using the location of the next element that decides to prevent content overlapping. The [PdfGrid](https://help.syncfusion.com/cr/document-processing/Syncfusion.Pdf.Grid.PdfGrid.html) allows you to create table by entering data manually or from an external data sources.
Add the following code sample in ``ExportService`` class which illustrates how to create a simple PDF document using ``PdfTextElement`` and ``PdfGrid``.
{% tabs %}
{% highlight c# tabtitle="C#" %}
//Export weather data to PDF document.
public static MemoryStream CreatePdf(WeatherForecast[] forecasts)
{
if (forecasts == null)
{
throw new ArgumentNullException("Forecast cannot be null");
}
//Create a new PDF document.
using (PdfDocument pdfDocument = new PdfDocument())
{
int paragraphAfterSpacing = 8;
int cellMargin = 8;
//Add page to the PDF document.
PdfPage page = pdfDocument.Pages.Add();
//Create a new font.
PdfStandardFont font = new PdfStandardFont(PdfFontFamily.TimesRoman, 16);
//Create a text element to draw a text in PDF page.
PdfTextElement title = new PdfTextElement("Weather Forecast", font, PdfBrushes.Black);
PdfLayoutResult result = title.Draw(page, new PointF(0, 0));
PdfStandardFont contentFont = new PdfStandardFont(PdfFontFamily.TimesRoman, 12);
PdfTextElement content = new PdfTextElement("This component demonstrates fetching data from a service and Exporting the data to PDF document using Syncfusion .NET PDF library.", contentFont, PdfBrushes.Black);
PdfLayoutFormat format = new PdfLayoutFormat();
format.Layout = PdfLayoutType.Paginate;
//Draw a text to the PDF document.
result = content.Draw(page, new RectangleF(0, result.Bounds.Bottom + paragraphAfterSpacing, page.GetClientSize().Width, page.GetClientSize().Height), format);
//Create a PdfGrid.
PdfGrid pdfGrid = new PdfGrid();
pdfGrid.Style.CellPadding.Left = cellMargin;
pdfGrid.Style.CellPadding.Right = cellMargin;
//Applying built-in style to the PDF grid.
pdfGrid.ApplyBuiltinStyle(PdfGridBuiltinStyle.GridTable4Accent1);
//Assign data source.
pdfGrid.DataSource = forecasts
pdfGrid.Style.Font = contentFont;
//Draw PDF grid into the PDF page.
pdfGrid.Draw(page, new Syncfusion.Drawing.PointF(0, result.Bounds.Bottom + paragraphAfterSpacing));
using (MemoryStream stream = new MemoryStream())
{
//Saving the PDF document into the stream.
pdfDocument.Save(stream);
//Closing the PDF document.
pdfDocument.Close(true);
return stream;
}
}
}
{% endhighlight %}
{% endtabs %}
Register your service in the ``ConfigureServices`` method available in the ``Startup.cs`` class as follows.
{% tabs %}
{% highlight c# tabtitle="C#" %}
public void ConfigureServices(IServiceCollection services)
{
services.AddRazorPages();
services.AddServerSideBlazor();
services.AddSingleton();
services.AddSingleton();
}
{% endhighlight %}
{% endtabs %}
Step 7: Inject ``ExportService`` in-to ``FetchData.razor`` using the following code.
{% tabs %}
{% highlight CSHTML %}
@inject ExportToFileService exportService
@inject Microsoft.JSInterop.IJSRuntime JS
@using System.IO;
{% endhighlight %}
{% endtabs %}
Create a button in the ``FetchData.razor`` using the following code.
{% tabs %}
{% highlight CSHTML %}
Export to PDF
{% endhighlight %}
{% endtabs %}
Add the ``ExportToPdf`` method in ``FetchData.razor`` page to call the export service.
{% tabs %}
{% highlight c# tabtitle="C#" %}
@functions
{
protected async Task ExportToPdf()
{
using (MemoryStream excelStream = ExportService.CreatePdf(forecasts))
{
await JS.SaveAs("Sample.pdf", excelStream.ToArray());
}
}
}
{% endhighlight %}
{% endtabs %}
Step 8: Create a class file with ``FileUtil`` name and add the following code to invoke the JavaScript action to download the file in the browser.
{% tabs %}
{% highlight c# tabtitle="C#" %}
public static class FileUtil
{
public static ValueTask SaveAs(this IJSRuntime js, string filename, byte[] data)
=> js.InvokeAsync(
"saveAsFile",
filename,
Convert.ToBase64String(data));
}
{% endhighlight %}
{% endtabs %}
Step 9: Add the following JavaScript function in the ``_Host.cshtml`` available under the ``Pages`` folder.
{% tabs %}
{% highlight HTML %}
{% endhighlight %}
{% endtabs %}
Step 10: Build the project.
Run the following command in terminal to build the project.
```
dotnet build
```
12. Run the project:
Run the following command in terminal to run the project.
```
dotnet run
```
{% endtabcontent %}
{% tabcontent JetBrains Rider %}
**Prerequisites:**
* JetBrains Rider.
* Install .NET 8 SDK or later.
Step 1. Open JetBrains Rider and create a new Blazor WASM app project.
* Launch JetBrains Rider.
* Click new solution on the welcome screen.

* In the new Solution dialog, select Project Type as Web.
* Enter a project name and specify the location.
* Choose template as **Blazor WebAssembly Standalone App**.
* Select the target framework (e.g., .NET 8.0, .NET 9.0).
* Click create.

Step 2: Install the NuGet package from [NuGet.org](https://www.nuget.org/).
* Click the NuGet icon in the Rider toolbar and type [Syncfusion.Pdf.Net.Core](https://www.nuget.org/packages/Syncfusion.Pdf.Net.Core) in the search bar.
* Ensure that "nuget.org" is selected as the package source.
* Select the latest Syncfusion.Pdf.Net.Core NuGet package from the list.
* Click the + (Add) button to add the package.

* Click the Install button to complete the installation.

N> Starting with v16.2.0.x, if you reference Syncfusion® assemblies from trial setup or from the NuGet feed, you also have to add "Syncfusion.Licensing" assembly reference and include a license key in your projects. Please refer to this [link](https://help.syncfusion.com/common/essential-studio/licensing/overview) to know about registering Syncfusion® license key in your application to use our components.
Step 5: Next, include the following namespaces in that ``FetchData.razor`` file.
{% tabs %}
{% highlight c# tabtitle="C#" %}
@using Syncfusion.Pdf
@using Syncfusion.Pdf.Grid;
@using Syncfusion.Drawing;
@using Syncfusion.Pdf.Graphics;
@inject Microsoft.JSInterop.IJSRuntime JS
@using System.IO;
{% endhighlight %}
{% endtabs %}
Step 6: Create a button in the ``FetchData.razor`` using the following code.
{% tabs %}
{% highlight CSHTML %}
Export to PDF
{% endhighlight %}
{% endtabs %}
Step 7: Define the ``@ExportToPdf`` click function on ``FetchData.razor`` file.
The [PdfDocument](https://help.syncfusion.com/cr/document-processing/Syncfusion.Pdf.PdfDocument.html) object represents an entire PDF document that is being created and add a [PdfPage](https://help.syncfusion.com/cr/document-processing/Syncfusion.Pdf.PdfPage.html) to it. The [PdfTextElement](https://help.syncfusion.com/cr/document-processing/Syncfusion.Pdf.Graphics.PdfTextElement.html) is used to add text in a PDF document and which provides the layout result of the added text by using the location of the next element that decides to prevent content overlapping. The [PdfGrid](https://help.syncfusion.com/cr/document-processing/Syncfusion.Pdf.Grid.PdfGrid.html) allows you to create table by entering data manually or from an external data sources.
{% tabs %}
{% highlight c# tabtitle="C#" %}
@functions {
void ExportToPdf()
{
int paragraphAfterSpacing = 8;
int cellMargin = 8;
//Create a new PDF document.
PdfDocument pdfDocument = new PdfDocument();
//Add Page to the PDF document.
PdfPage page = pdfDocument.Pages.Add();
//Create a new font.
PdfStandardFont font = new PdfStandardFont(PdfFontFamily.TimesRoman, 16);
//Create a text element to draw a text in PDF page.
PdfTextElement title = new PdfTextElement("Weather Forecast", font, PdfBrushes.Black);
PdfLayoutResult result = title.Draw(page, new PointF(0, 0));
PdfStandardFont contentFont = new PdfStandardFont(PdfFontFamily.TimesRoman, 12);
//Create text element.
PdfTextElement content = new PdfTextElement("This component demonstrates fetching data from a client side and Exporting the data to PDF document using Syncfusion .NET PDF library.", contentFont, PdfBrushes.Black);
PdfLayoutFormat format = new PdfLayoutFormat();
format.Layout = PdfLayoutType.Paginate;
//Draw a text to the PDF document.
result = content.Draw(page, new RectangleF(0, result.Bounds.Bottom + paragraphAfterSpacing, page.GetClientSize().Width, page.GetClientSize().Height), format);
//Create a PdfGrid.
PdfGrid pdfGrid = new PdfGrid();
pdfGrid.Style.CellPadding.Left = cellMargin;
pdfGrid.Style.CellPadding.Right = cellMargin;
//Applying built-in style to the PDF grid
pdfGrid.ApplyBuiltinStyle(PdfGridBuiltinStyle.GridTable4Accent1);
//Assign data source.
pdfGrid.DataSource = forecasts;
pdfGrid.Style.Font = contentFont;
//Draw PDF grid into the PDF page.
pdfGrid.Draw(page, new Syncfusion.Drawing.PointF(0, result.Bounds.Bottom + paragraphAfterSpacing));
//Create memory stream.
MemoryStream memoryStream = new MemoryStream();
//Save the PDF document.
pdfDocument.Save(memoryStream);
//Download the PDF document
JS.SaveAs("Sample.pdf", memoryStream.ToArray());
}
}
{% endhighlight %}
{% endtabs %}
Step 8: Create a class file with ``FileUtil`` name and add the following code to invoke the JavaScript action to download the file in the browser.
{% tabs %}
{% highlight c# tabtitle="C#" %}
public static class FileUtil
{
public static ValueTask SaveAs(this IJSRuntime js, string filename, byte[] data)
=> js.InvokeAsync(
"saveAsFile",
filename,
Convert.ToBase64String(data));
}
{% endhighlight %}
{% endtabs %}
Step 9: Add the following JavaScript function in the ``index.html`` available under the ``wwwroot`` folder.
{% tabs %}
{% highlight HTML %}
{% endhighlight %}
{% endtabs %}
Step 10: Build the project.
Click the **Build** button in the toolbar or press Ctrl +Shift +B to build the project.
Step 11: Run the project.
Click the **Run** button (green arrow) in the toolbar or press F5 to run the app.
{% endtabcontent %}
{% endtabcontents %}
You can download a complete working sample from [GitHub](https://github.com/SyncfusionExamples/PDF-Examples/tree/master/Getting%20Started/Blazor/ClientSideApplication).
By executing the program, you will get the following output in the browser.
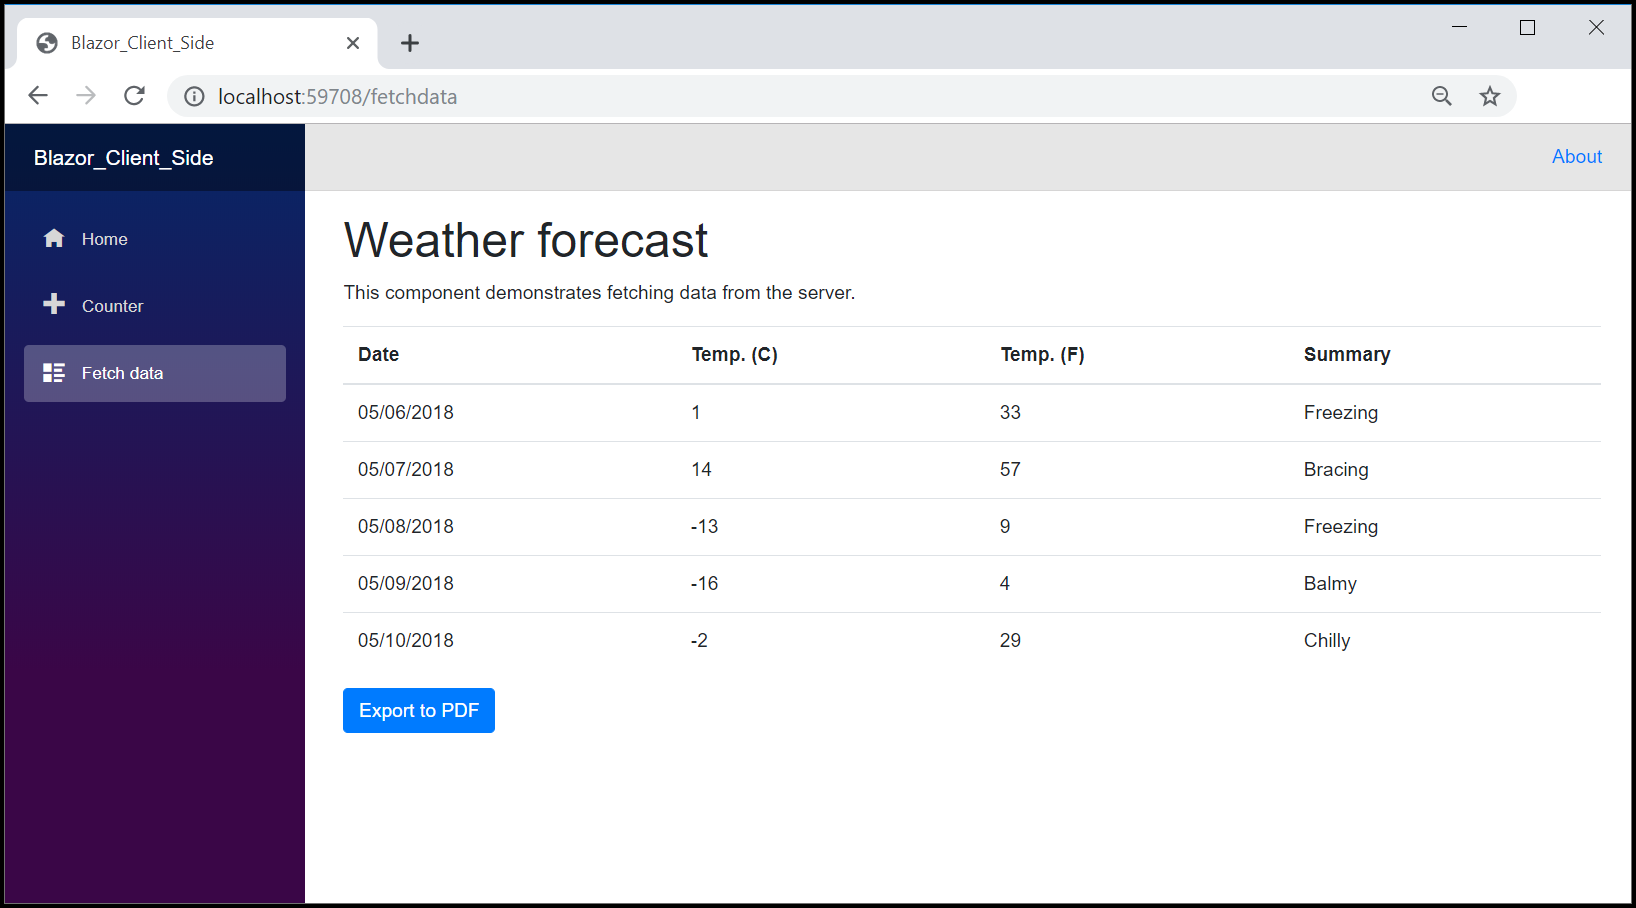
Click the Export to PDF button and you will get the PDF document with the following output.

Click [here](https://www.syncfusion.com/document-processing/pdf-framework/blazor) to explore the rich set of Syncfusion® PDF library features.
An online sample link to [create PDF document](https://blazor.syncfusion.com/demos/pdf/hello-world?theme=fluent) in Blazor.
## Steps to create PDF documents in .NET MAUI Blazor application
{% tabcontents %}
{% tabcontent Visual Studio %}
**Prerequisites**:
* Install .NET SDK: Ensure that you have the .NET SDK installed on your system. You can download it from the [.NET Downloads page](https://dotnet.microsoft.com/en-us/download).
* Install Visual Studio: Download and install Visual Studio Code from the [official website](https://code.visualstudio.com/download).
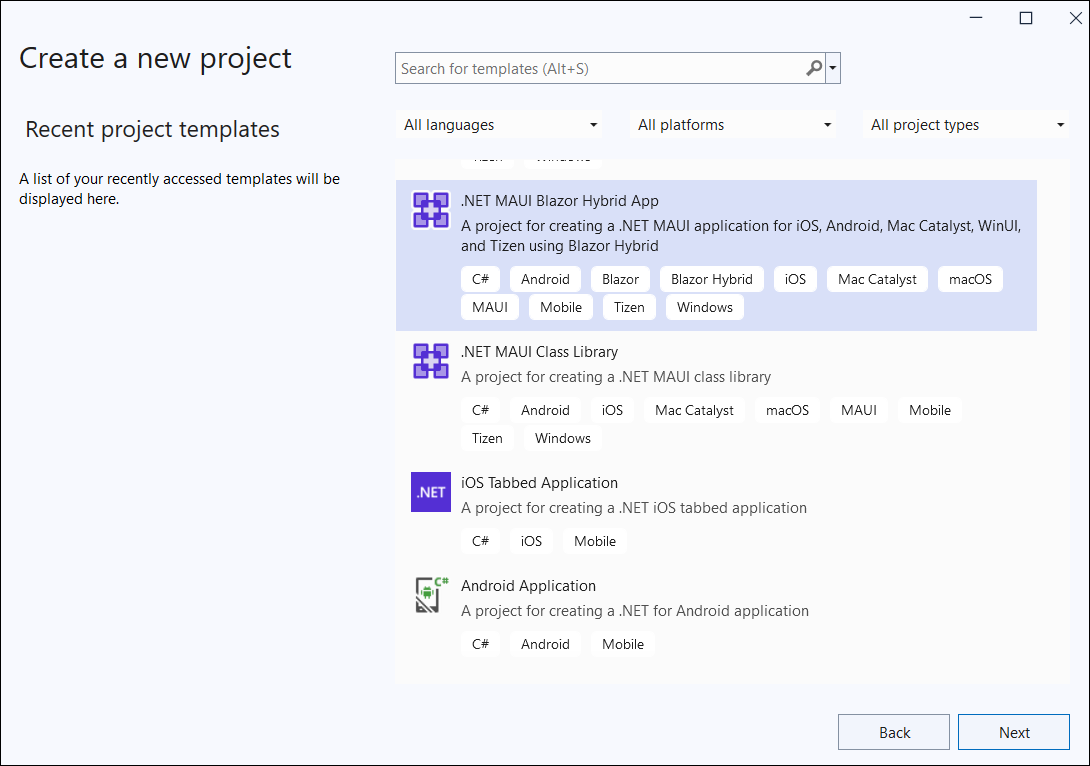
Step 1: Create a new project by choosing `.NET MAUI Blazor Hybrid and Web App` template in Visual Studio.
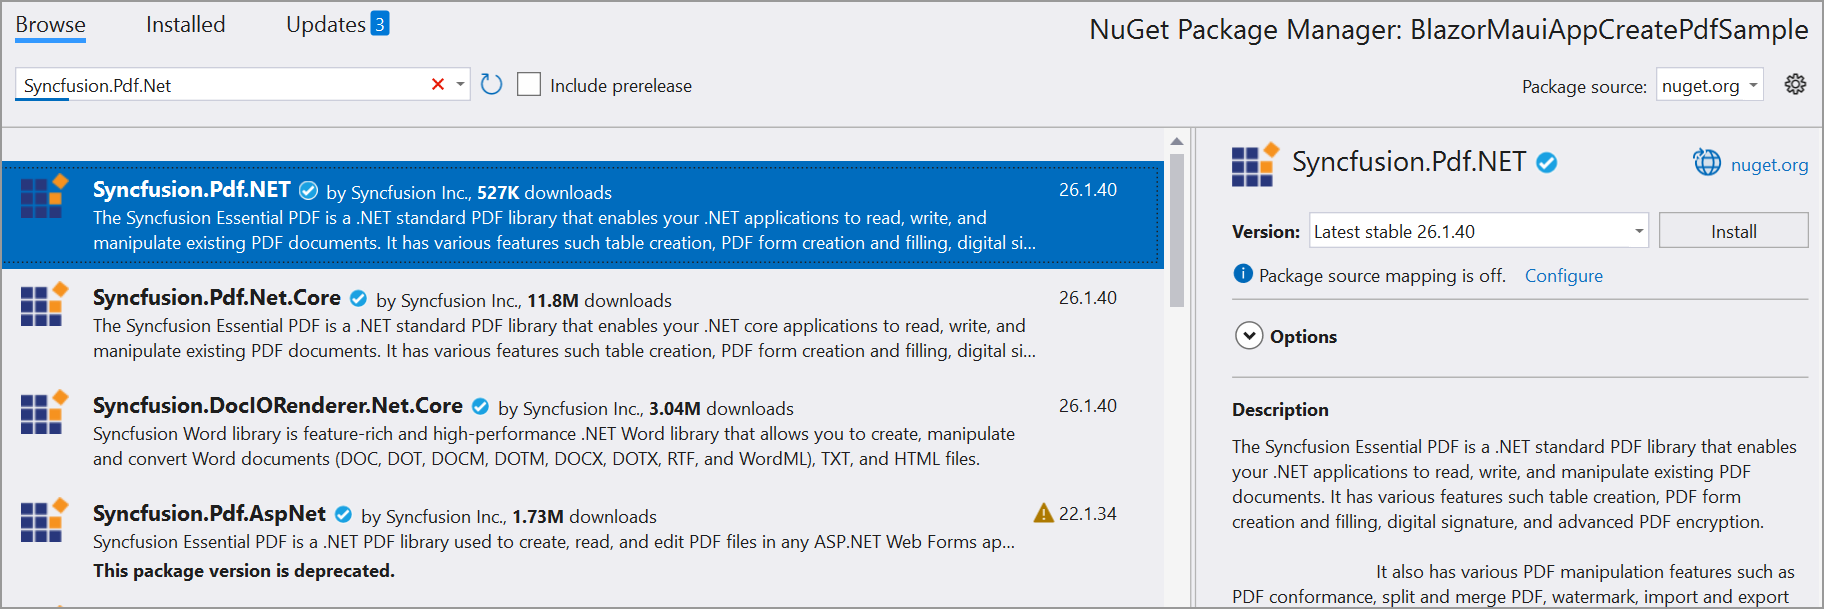
Step 2: Install the [Syncfusion.PDF.NET](https://www.nuget.org/packages/Syncfusion.pdf.Net) NuGet package as a reference to your Blazor application from [NuGet.org](https://www.nuget.org).
Step 3: Next, include the following namespaces in the ``_Imports.razor`` file.
{% tabs %}
{% highlight c# tabtitle="C#" %}
@using Syncfusion.Pdf;
@using Syncfusion.Pdf.Graphics;
@using Syncfusion.Pdf.Grid;
@using Syncfusion.Drawing;
@using BlazorMauiAppCreatePdfSample.Services
{% endhighlight %}
{% endtabs %}
Step 4: Create a button in the ``Weather.razor`` using the following code.
{% tabs %}
{% highlight CSHTML %}
Export to PDF
{% endhighlight %}
{% endtabs %}
Step 5: Define the ``@ExportToPdf`` click function on ``Weather.razor`` file.
The [PdfDocument](https://help.syncfusion.com/cr/file-formats/Syncfusion.Pdf.PdfDocument.html) object represents an entire PDF document that is being created and add a [PdfPage](https://help.syncfusion.com/cr/file-formats/Syncfusion.Pdf.PdfPage.html) to it. The [PdfTextElement](https://help.syncfusion.com/cr/file-formats/Syncfusion.Pdf.Graphics.PdfTextElement.html) is used to add text in a PDF document and which provides the layout result of the added text by using the location of the next element that decides to prevent content overlapping. The [PdfGrid](https://help.syncfusion.com/cr/file-formats/Syncfusion.Pdf.Grid.PdfGrid.html) allows you to create table by entering data manually or from an external data source.
{% tabs %}
{% highlight c# tabtitle="C#" %}
@functions {
void ExportToPdf()
{
int paragraphAfterSpacing = 8;
int cellMargin = 8;
//Create a new PDF document.
PdfDocument pdfDocument = new PdfDocument();
//Add Page to the PDF document.
PdfPage page = pdfDocument.Pages.Add();
//Create a new font.
PdfStandardFont font = new PdfStandardFont(PdfFontFamily.TimesRoman, 16);
//Create a text element to draw a text in PDF page.
PdfTextElement title = new PdfTextElement("Weather Forecast", font, PdfBrushes.Black);
PdfLayoutResult result = title.Draw(page, new PointF(0, 0));
PdfStandardFont contentFont = new PdfStandardFont(PdfFontFamily.TimesRoman, 12);
//Create text element.
PdfTextElement content = new PdfTextElement("This component demonstrates fetching data from a client side and Exporting the data to PDF document using Syncfusion .NET PDF library.", contentFont, PdfBrushes.Black);
PdfLayoutFormat format = new PdfLayoutFormat();
format.Layout = PdfLayoutType.Paginate;
//Draw a text to the PDF document.
result = content.Draw(page, new RectangleF(0, result.Bounds.Bottom + paragraphAfterSpacing, page.GetClientSize().Width, page.GetClientSize().Height), format);
//Create a PdfGrid.
PdfGrid pdfGrid = new PdfGrid();
pdfGrid.Style.CellPadding.Left = cellMargin;
pdfGrid.Style.CellPadding.Right = cellMargin;
//Applying built-in style to the PDF grid
pdfGrid.ApplyBuiltinStyle(PdfGridBuiltinStyle.GridTable4Accent1);
//Assign data source.
pdfGrid.DataSource = forecasts;
pdfGrid.Style.Font = contentFont;
//Draw PDF grid into the PDF page.
pdfGrid.Draw(page, new Syncfusion.Drawing.PointF(0, result.Bounds.Bottom + paragraphAfterSpacing));
using (MemoryStream ms = new MemoryStream())
{
// Save the PDF document to the memory stream
pdfDocument.Save(ms);
// Close the PDF document
pdfDocument.Close(true);
// Reset the memory stream position
ms.Position = 0;
// Create a SaveService instance
SaveService service = new SaveService();
// Save and view the PDF document
service.SaveAndView("Output.pdf", "application/pdf", ms);
}
}
{% endhighlight %}
{% endtabs %}
Step 6: Build the project.
Click on Build > Build Solution or press Ctrl + Shift + B to build the project.
Step 7: Run the project.
Click the Start button (green arrow) or press F5 to run the app.
{% endtabcontent %}
{% tabcontent Visual Studio Code %}
**Prerequisites**:
* Install .NET SDK: Ensure that you have the .NET SDK installed on your system. You can download it from the [.NET Downloads page](https://dotnet.microsoft.com/en-us/download).
* Install Visual Studio Code: Download and install Visual Studio Code from the [official website](https://code.visualstudio.com/download).
* Install C# Extension for VS Code: Open Visual Studio Code, go to the Extensions view (Ctrl+Shift+X), and search for 'C#'. Install the official [C# extension provided by Microsoft](https://marketplace.visualstudio.com/items?itemName=ms-dotnettools.csharp).
Step 1: Open the terminal (Ctrl+` ) and run the following command to create a new Blazor Server application
```
dotnet new maui-blazor -n CreatePdfBlazorMaUIApp
```
Step 2: Replace ****CreatePdfBlazorMaUIApp** with your desired project name.
Step 3: Navigate to the project directory using the following command
```
cd CreatePdfBlazorMaUIApp
```
Step 4: Use the following command in the terminal to add the [Syncfusion.PDF.NET](https://www.nuget.org/packages/Syncfusion.pdf.Net) package to your project.
```
dotnet add package Syncfusion.Pdf.Net
```
Step 5: Next, include the following namespaces in the ``_Imports.razor`` file.
{% tabs %}
{% highlight c# tabtitle="C#" %}
@using Syncfusion.Pdf;
@using Syncfusion.Pdf.Graphics;
@using Syncfusion.Pdf.Grid;
@using Syncfusion.Drawing;
@using BlazorMauiAppCreatePdfSample.Services
{% endhighlight %}
{% endtabs %}
Step 6: Create a button in the ``Weather.razor`` using the following code.
{% tabs %}
{% highlight CSHTML %}
Export to PDF
{% endhighlight %}
{% endtabs %}
Step 7: Define the ``@ExportToPdf`` click function on ``Weather.razor`` file.
The [PdfDocument](https://help.syncfusion.com/cr/file-formats/Syncfusion.Pdf.PdfDocument.html) object represents an entire PDF document that is being created and add a [PdfPage](https://help.syncfusion.com/cr/file-formats/Syncfusion.Pdf.PdfPage.html) to it. The [PdfTextElement](https://help.syncfusion.com/cr/file-formats/Syncfusion.Pdf.Graphics.PdfTextElement.html) is used to add text in a PDF document and which provides the layout result of the added text by using the location of the next element that decides to prevent content overlapping. The [PdfGrid](https://help.syncfusion.com/cr/file-formats/Syncfusion.Pdf.Grid.PdfGrid.html) allows you to create table by entering data manually or from an external data source.
{% tabs %}
{% highlight c# tabtitle="C#" %}
@functions {
void ExportToPdf()
{
int paragraphAfterSpacing = 8;
int cellMargin = 8;
//Create a new PDF document.
PdfDocument pdfDocument = new PdfDocument();
//Add Page to the PDF document.
PdfPage page = pdfDocument.Pages.Add();
//Create a new font.
PdfStandardFont font = new PdfStandardFont(PdfFontFamily.TimesRoman, 16);
//Create a text element to draw a text in PDF page.
PdfTextElement title = new PdfTextElement("Weather Forecast", font, PdfBrushes.Black);
PdfLayoutResult result = title.Draw(page, new PointF(0, 0));
PdfStandardFont contentFont = new PdfStandardFont(PdfFontFamily.TimesRoman, 12);
//Create text element.
PdfTextElement content = new PdfTextElement("This component demonstrates fetching data from a client side and Exporting the data to PDF document using Syncfusion .NET PDF library.", contentFont, PdfBrushes.Black);
PdfLayoutFormat format = new PdfLayoutFormat();
format.Layout = PdfLayoutType.Paginate;
//Draw a text to the PDF document.
result = content.Draw(page, new RectangleF(0, result.Bounds.Bottom + paragraphAfterSpacing, page.GetClientSize().Width, page.GetClientSize().Height), format);
//Create a PdfGrid.
PdfGrid pdfGrid = new PdfGrid();
pdfGrid.Style.CellPadding.Left = cellMargin;
pdfGrid.Style.CellPadding.Right = cellMargin;
//Applying built-in style to the PDF grid
pdfGrid.ApplyBuiltinStyle(PdfGridBuiltinStyle.GridTable4Accent1);
//Assign data source.
pdfGrid.DataSource = forecasts;
pdfGrid.Style.Font = contentFont;
//Draw PDF grid into the PDF page.
pdfGrid.Draw(page, new Syncfusion.Drawing.PointF(0, result.Bounds.Bottom + paragraphAfterSpacing));
using (MemoryStream ms = new MemoryStream())
{
// Save the PDF document to the memory stream
pdfDocument.Save(ms);
// Close the PDF document
pdfDocument.Close(true);
// Reset the memory stream position
ms.Position = 0;
// Create a SaveService instance
SaveService service = new SaveService();
// Save and view the PDF document
service.SaveAndView("Output.pdf", "application/pdf", ms);
}
}
{% endhighlight %}
{% endtabs %}
Step 8: Build the project.
Run the following command in terminal to build the project.
```
dotnet build
```
Step 9: Run the project.
Run the following command in terminal to build the project.
```
dotnet run
```
{% endtabcontent %}
{% tabcontent JetBrains Rider %}
**Prerequisites:**
* JetBrains Rider.
* Install .NET 8 SDK or later.
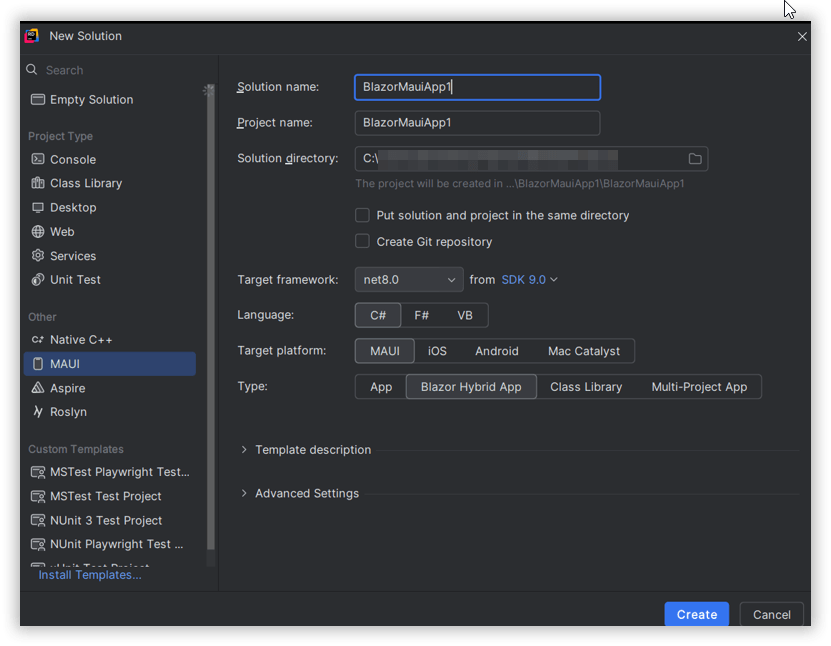
Step 1. Open JetBrains Rider and create a new .NET MAUI Blazor Hybrid App project.
* Launch JetBrains Rider.
* Click new solution on the welcome screen.

* In the new Solution dialog, select Project Type as Web.
* Enter a project name and specify the location.
* Choose template as **.NET MAUI Blazor Hybrid App**.
* Select the target framework (e.g., .NET 8.0, .NET 9.0).
* Click create.
Step 2: Install the NuGet package from [NuGet.org](https://www.nuget.org/).
* Click the NuGet icon in the Rider toolbar and type [Syncfusion.Pdf.NET](https://www.nuget.org/packages/Syncfusion.Pdf.Net) in the search bar.
* Ensure that "nuget.org" is selected as the package source.
* Select the latest Syncfusion.Pdf.NET NuGet package from the list.
* Click the + (Add) button to add the package.

* Click the Install button to complete the installation.
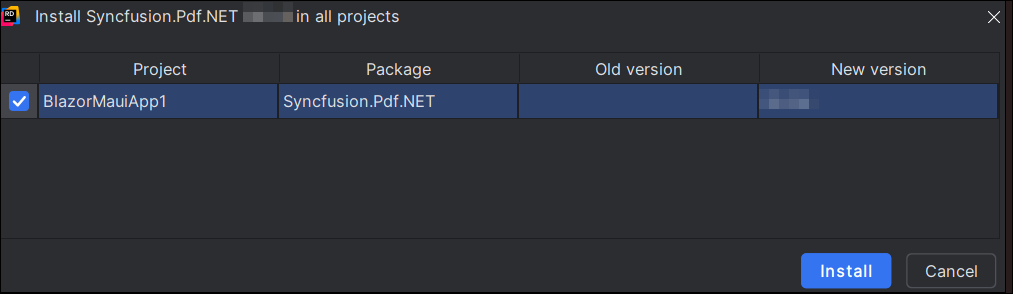
Step 4: Next, include the following namespaces in the ``_Imports.razor`` file.
{% tabs %}
{% highlight c# tabtitle="C#" %}
@using Syncfusion.Pdf;
@using Syncfusion.Pdf.Graphics;
@using Syncfusion.Pdf.Grid;
@using Syncfusion.Drawing;
@using BlazorMauiAppCreatePdfSample.Services
{% endhighlight %}
{% endtabs %}
Step 5: Create a button in the ``Weather.razor`` using the following code.
{% tabs %}
{% highlight CSHTML %}
Export to PDF
{% endhighlight %}
{% endtabs %}
Step 6: Define the ``@ExportToPdf`` click function on ``Weather.razor`` file.
The [PdfDocument](https://help.syncfusion.com/cr/file-formats/Syncfusion.Pdf.PdfDocument.html) object represents an entire PDF document that is being created and add a [PdfPage](https://help.syncfusion.com/cr/file-formats/Syncfusion.Pdf.PdfPage.html) to it. The [PdfTextElement](https://help.syncfusion.com/cr/file-formats/Syncfusion.Pdf.Graphics.PdfTextElement.html) is used to add text in a PDF document and which provides the layout result of the added text by using the location of the next element that decides to prevent content overlapping. The [PdfGrid](https://help.syncfusion.com/cr/file-formats/Syncfusion.Pdf.Grid.PdfGrid.html) allows you to create table by entering data manually or from an external data source.
{% tabs %}
{% highlight c# tabtitle="C#" %}
@functions {
void ExportToPdf()
{
int paragraphAfterSpacing = 8;
int cellMargin = 8;
//Create a new PDF document.
PdfDocument pdfDocument = new PdfDocument();
//Add Page to the PDF document.
PdfPage page = pdfDocument.Pages.Add();
//Create a new font.
PdfStandardFont font = new PdfStandardFont(PdfFontFamily.TimesRoman, 16);
//Create a text element to draw a text in PDF page.
PdfTextElement title = new PdfTextElement("Weather Forecast", font, PdfBrushes.Black);
PdfLayoutResult result = title.Draw(page, new PointF(0, 0));
PdfStandardFont contentFont = new PdfStandardFont(PdfFontFamily.TimesRoman, 12);
//Create text element.
PdfTextElement content = new PdfTextElement("This component demonstrates fetching data from a client side and Exporting the data to PDF document using Syncfusion .NET PDF library.", contentFont, PdfBrushes.Black);
PdfLayoutFormat format = new PdfLayoutFormat();
format.Layout = PdfLayoutType.Paginate;
//Draw a text to the PDF document.
result = content.Draw(page, new RectangleF(0, result.Bounds.Bottom + paragraphAfterSpacing, page.GetClientSize().Width, page.GetClientSize().Height), format);
//Create a PdfGrid.
PdfGrid pdfGrid = new PdfGrid();
pdfGrid.Style.CellPadding.Left = cellMargin;
pdfGrid.Style.CellPadding.Right = cellMargin;
//Applying built-in style to the PDF grid
pdfGrid.ApplyBuiltinStyle(PdfGridBuiltinStyle.GridTable4Accent1);
//Assign data source.
pdfGrid.DataSource = forecasts;
pdfGrid.Style.Font = contentFont;
//Draw PDF grid into the PDF page.
pdfGrid.Draw(page, new Syncfusion.Drawing.PointF(0, result.Bounds.Bottom + paragraphAfterSpacing));
using (MemoryStream ms = new MemoryStream())
{
// Save the PDF document to the memory stream
pdfDocument.Save(ms);
// Close the PDF document
pdfDocument.Close(true);
// Reset the memory stream position
ms.Position = 0;
// Create a SaveService instance
SaveService service = new SaveService();
// Save and view the PDF document
service.SaveAndView("Output.pdf", "application/pdf", ms);
}
}
{% endhighlight %}
{% endtabs %}
Step 7: Build the project.
Click the **Build** button in the toolbar or press Ctrl +Shift +B to build the project.
Step 8: Run the project.
Click the **Run** button (green arrow) in the toolbar or press F5 to run the app.
{% endtabcontent %}
{% endtabcontents %}
You can download a complete working sample from [GitHub](https://github.com/SyncfusionExamples/PDF-Examples/tree/master/Getting%20Started/Blazor/BlazorMauiAppCreatePdfSample).
By running the program, you will see the output in the browser when you click the "Whether" option in the left-side menu.
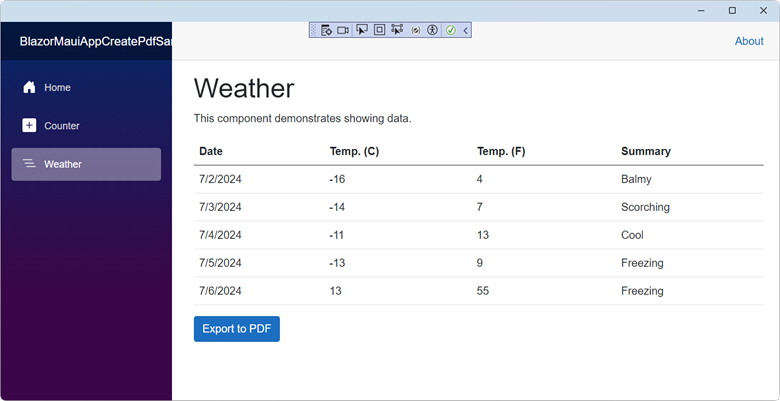
Click the `Export to PDF` button to get the PDF document with the following output.

### Save the PDF document on different platforms
Create a folder named `Services`, then add a class called `SaveService.cs` within this folder, and insert the following code into it.
{% tabs %}
{% highlight c# tabtitle="C#" %}
public partial class SaveService
{
//Method to save document as a file and view the saved document.
public partial void SaveAndView(string filename, string contentType, MemoryStream stream);
}
{% endhighlight %}
{% endtabs %}
Now, we need to implement platform-specific code to save the PDF document.
#### Andriod
Create a new class file named `SaveAndroid.cs` within the Android folder and add the following code to enable file saving on the Android platform.
{% tabs %}
{% highlight c# tabtitle="C#" %}
public partial void SaveAndView(string filename, string contentType, MemoryStream stream)
{
string exception = string.Empty;
string? root = null;
if (Android.OS.Environment.IsExternalStorageEmulated)
{
root = Android.App.Application.Context!.GetExternalFilesDir(Android.OS.Environment.DirectoryDownloads)!.AbsolutePath;
}
else
root = System.Environment.GetFolderPath(System.Environment.SpecialFolder.MyDocuments);
Java.IO.File myDir = new(root + "/Syncfusion");
myDir.Mkdir();
Java.IO.File file = new(myDir, filename);
if (file.Exists())
{
file.Delete();
}
try
{
FileOutputStream outs = new(file);
outs.Write(stream.ToArray());
outs.Flush();
outs.Close();
}
catch (Exception e)
{
exception = e.ToString();
}
if (file.Exists())
{
if (Build.VERSION.SdkInt >= Android.OS.BuildVersionCodes.N)
{
var fileUri = AndroidX.Core.Content.FileProvider.GetUriForFile(Android.App.Application.Context, Android.App.Application.Context.PackageName + ".provider", file);
var intent = new Intent(Intent.ActionView);
intent.SetData(fileUri);
intent.AddFlags(ActivityFlags.NewTask);
intent.AddFlags(ActivityFlags.GrantReadUriPermission);
Android.App.Application.Context.StartActivity(intent);
}
else
{
var fileUri = Android.Net.Uri.Parse(file.AbsolutePath);
var intent = new Intent(Intent.ActionView);
intent.SetDataAndType(fileUri, contentType);
intent = Intent.CreateChooser(intent, "Open File");
intent!.AddFlags(ActivityFlags.NewTask);
Android.App.Application.Context.StartActivity(intent);
}
}
}
{% endhighlight %}
{% endtabs %}
N> Introduced a new runtime permission model for the Android SDK version 23 and above. So, include the following code for enabling the Android file provider to save and view the generated PDF document.
1. Create a new XML file with the name of `file_paths.xml` under the Android project Resources/xml folder and add the following code in it.
{% tabs %}
{% highlight c# tabtitle="C#" %}
{% endhighlight %}
{% endtabs %}
2. Add the following code to the `AndroidManifest.xml` file located under Properties/AndroidManifest.xml.
{% tabs %}
{% highlight c# tabtitle="C#" %}
{% endhighlight %}
{% endtabs %}
#### IOS
Create a new class file named `SaveIOS.cs` within the iOS folder and include the following code to enable file saving on the iOS platform.
{% tabs %}
{% highlight c# tabtitle="C#" %}
public partial void SaveAndView(string filename, string contentType, MemoryStream stream)
{
string exception = string.Empty;
string path = Environment.GetFolderPath(Environment.SpecialFolder.Personal);
string filePath = Path.Combine(path, filename);
try
{
FileStream fileStream = File.Open(filePath, FileMode.Create);
stream.Position = 0;
stream.CopyTo(fileStream);
fileStream.Flush();
fileStream.Close();
}
catch (Exception e)
{
exception = e.ToString();
}
if (contentType != "application/html" || exception == string.Empty)
{
UIViewController? currentController = UIApplication.SharedApplication!.KeyWindow!.RootViewController;
while (currentController!.PresentedViewController != null)
currentController = currentController.PresentedViewController;
QLPreviewController qlPreview = new();
QLPreviewItem item = new QLPreviewItemBundle(filename, filePath);
qlPreview.DataSource = new PreviewControllerDS(item);
currentController.PresentViewController((UIViewController)qlPreview, true, null);
}
}
{% endhighlight %}
{% endtabs %}
#### MacOS
Create a new class file named `SaveMac.cs` within the MacCatalyst folder and include the following code to enable file saving on the MacOS platform.
{% tabs %}
{% highlight c# tabtitle="C#" %}
public partial void SaveAndView(string filename, string contentType, MemoryStream stream)
{
string path = Environment.GetFolderPath(Environment.SpecialFolder.MyDocuments);
string filePath = Path.Combine(path, filename);
stream.Position = 0;
//Saves the document
using FileStream fileStream = new(filePath, FileMode.Create, FileAccess.ReadWrite);
stream.CopyTo(fileStream);
fileStream.Flush();
fileStream.Dispose();
UIWindow? window = GetKeyWindow();
if (window != null && window.RootViewController != null)
{
UIViewController? uiViewController = window.RootViewController;
if (uiViewController != null)
{
QLPreviewController qlPreview = new();
QLPreviewItem item = new QLPreviewItemBundle(filename, filePath);
qlPreview.DataSource = new PreviewControllerDS(item);
uiViewController.PresentViewController((UIViewController)qlPreview, true, null);
}
}
}
public UIWindow? GetKeyWindow()
{
foreach (var scene in UIApplication.SharedApplication.ConnectedScenes)
{
if (scene is UIWindowScene windowScene)
{
foreach (var window in windowScene.Windows)
{
if (window.IsKeyWindow)
{
return window;
}
}
}
}
return null;
}
{% endhighlight %}
{% endtabs %}
#### Windows
Create a new class file named `SaveWindows.cs` within the Windows folder and include the following code to enable file saving on the Windows platform.
{% tabs %}
{% highlight c# tabtitle="C#" %}
public async partial void SaveAndView(string filename, string contentType, MemoryStream stream)
{
StorageFile stFile;
string extension = Path.GetExtension(filename);
//Gets process windows handle to open the dialog in application process.
IntPtr windowHandle = System.Diagnostics.Process.GetCurrentProcess().MainWindowHandle;
if (!Windows.Foundation.Metadata.ApiInformation.IsTypePresent("Windows.Phone.UI.Input.HardwareButtons"))
{
//Creates file save picker to save a file.
FileSavePicker savePicker = new();
if (extension == ".xlsx")
{
savePicker.DefaultFileExtension = ".xlsx";
savePicker.SuggestedFileName = filename;
//Saves the file as xlsx file.
savePicker.FileTypeChoices.Add("XLSX", new List() { ".xlsx" });
}
if (extension == ".docx")
{
savePicker.DefaultFileExtension = ".docx";
savePicker.SuggestedFileName = filename;
//Saves the file as Docx file.
savePicker.FileTypeChoices.Add("DOCX", new List() { ".docx" });
}
else if (extension == ".doc")
{
savePicker.DefaultFileExtension = ".doc";
savePicker.SuggestedFileName = filename;
//Saves the file as Doc file.
savePicker.FileTypeChoices.Add("DOC", new List() { ".doc" });
}
else if (extension == ".rtf")
{
savePicker.DefaultFileExtension = ".rtf";
savePicker.SuggestedFileName = filename;
//Saves the file as Rtf file.
savePicker.FileTypeChoices.Add("RTF", new List() { ".rtf" });
}
else if (extension == ".pdf")
{
savePicker.DefaultFileExtension = ".pdf";
savePicker.SuggestedFileName = filename;
//Saves the file as Pdf file.
savePicker.FileTypeChoices.Add("PDF", new List() { ".pdf" });
}
else if (extension == ".pptx")
{
savePicker.DefaultFileExtension = ".pptx";
savePicker.SuggestedFileName = filename;
//Saves the file as pptx file.
savePicker.FileTypeChoices.Add("PPTX", new List() { ".pptx" });
}
else if (extension == ".png")
{
savePicker.DefaultFileExtension = ".png";
savePicker.SuggestedFileName = filename;
//Saves the file as png file.
savePicker.FileTypeChoices.Add("PNG", new List() { ".png" });
}
WinRT.Interop.InitializeWithWindow.Initialize(savePicker, windowHandle);
stFile = await savePicker.PickSaveFileAsync();
}
else
{
StorageFolder local = ApplicationData.Current.LocalFolder;
stFile = await local.CreateFileAsync(filename, CreationCollisionOption.ReplaceExisting);
}
if (stFile != null)
{
using (IRandomAccessStream zipStream = await stFile.OpenAsync(FileAccessMode.ReadWrite))
{
//Writes compressed data from memory to file.
using Stream outstream = zipStream.AsStreamForWrite();
outstream.SetLength(0);
//Saves the stream as file.
byte[] buffer = stream.ToArray();
outstream.Write(buffer, 0, buffer.Length);
outstream.Flush();
}
//Create message dialog box.
MessageDialog msgDialog = new("Do you want to view the document?", "File has been created successfully");
UICommand yesCmd = new("Yes");
msgDialog.Commands.Add(yesCmd);
UICommand noCmd = new("No");
msgDialog.Commands.Add(noCmd);
WinRT.Interop.InitializeWithWindow.Initialize(msgDialog, windowHandle);
//Showing a dialog box.
IUICommand cmd = await msgDialog.ShowAsync();
if (cmd.Label == yesCmd.Label)
{
//Launch the saved file.
await Windows.System.Launcher.LaunchFileAsync(stFile);
}
}
}
{% endhighlight %}
{% endtabs %}
The helper files mentioned above are available on [this](https://help.syncfusion.com/document-processing/pdf/pdf-library/net/create-pdf-file-in-maui#helper-files-for-net-maui) page. You can refer to [this](https://help.syncfusion.com/document-processing/pdf/pdf-library/net/create-pdf-file-in-maui#helper-files-for-net-maui) page for more details.
Click [here](https://www.syncfusion.com/document-processing/pdf-framework/blazor) to explore the rich set of Syncfusion® PDF library features.