Loading Blazor Diagram from PostgreSQL Database
18 Nov 201824 minutes to read
This guide explains how to display an organizational chart using data stored in a PostgreSQL database and visualize it with the Blazor Diagram component.
It covers:
- Design and store organizational chart data in a database.
- Connect the application to the database using Entity Framework Core.
- Make the data available through a backend API.
- Display the organizational chart in Blazor Server and Blazor WebAssembly (WASM) applications.
Note: The REST API must return an array of JSON objects with id, parent_id, and role fields for correct data binding.
What is Entity Framework Core?
Entity Framework Core (EF Core) is a software tool that simplifies database operations in .NET applications. It acts as a bridge between C# code and databases such as PostgreSQL.
Key Benefits of Entity Framework Core
- Automatic SQL Generation: Entity Framework Core generates optimized SQL queries automatically, eliminating the need to write raw SQL code.
- Type Safety: Work with strongly typed C# objects instead of SQL strings, which helps reduce runtime errors.
- Built-in Security: Automatic query parameterization helps protect applications from SQL injection attacks.
- Database Versioning with Migrations: Database schema changes can be tracked, applied, and rolled back using migrations.
- Familiar Syntax: LINQ (Language Integrated Query) provides a readable and intuitive way to query data using C#.
What is Npgsql Entity Framework Core Provider?
The Npgsql.EntityFrameworkCore.PostgreSQL package is the official Entity Framework Core provider for PostgreSQL. It acts as a bridge between Entity Framework Core and PostgreSQL, allowing applications to read, write, update, and delete data in a PostgreSQL database.
Prerequisites
Ensure that the following software and packages are installed:
| Software / Package | Version | Purpose |
|---|---|---|
| Visual Studio / Code | Latest | Development IDE with .NET workloads |
| .NET SDK | 10.0 or later | Build & run projects |
| PostgreSQL Server | 12.x or later | Stores organizational chart data |
| pgAdmin 4 (optional) | Latest | DB management UI |
| Syncfusion.Blazor.Diagram | 34.1.29 | Diagram component |
| Syncfusion.Blazor.Themes | 34.1.29 | Styling for Blazor components |
| Microsoft.EntityFrameworkCore.Design | 10.x | EF Core design‑time tools |
| Microsoft.EntityFrameworkCore.Tools | 10.x | EF Core CLI tools |
| Npgsql.EntityFrameworkCore.PostgreSQL | 10.x | EF provider for PostgreSQL |
Installing PostgreSQL
Download PostgreSQL from the official website: https://www.postgresql.org/download/.
Installation Steps:
- Download the installer for the preferred version (12.x or higher recommended).
- Run the installer and follow the setup wizard.
- During installation:
- Set a password for PostgreSQL (for example, postgres123) and remember it.
- Keep the default port 5432.
- Next, the Select Components screen will open.
- By default, all options are selected, as shown in the image:
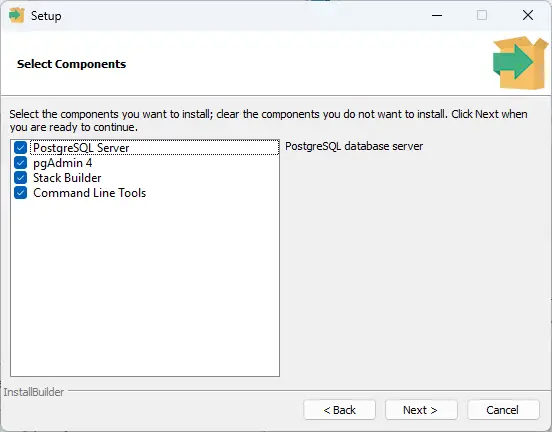
- Uncheck the Stack Builder option — it is not necessary for this setup.
- Ensure PostgreSQL Server, pgAdmin 4, and Command Line Tools are selected.
- Complete the installation.
PostgreSQL Database Setup
Two options are available to create a database:
- Manual (pgAdmin 4)
- Automated Database Setup Using EF Core Migrations.
Option A: Manual (pgAdmin 4)
Opening pgAdmin
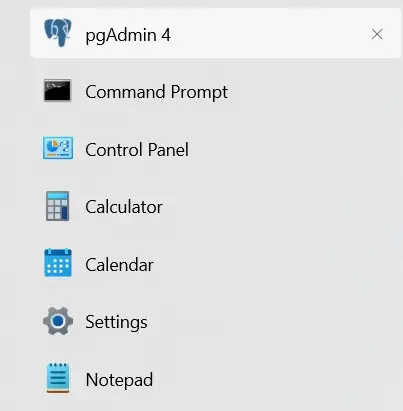
PostgreSQL includes pgAdmin 4, a graphical tool for database management. Open pgAdmin 4 from the Windows Start menu or application launcher.
Creating the Database
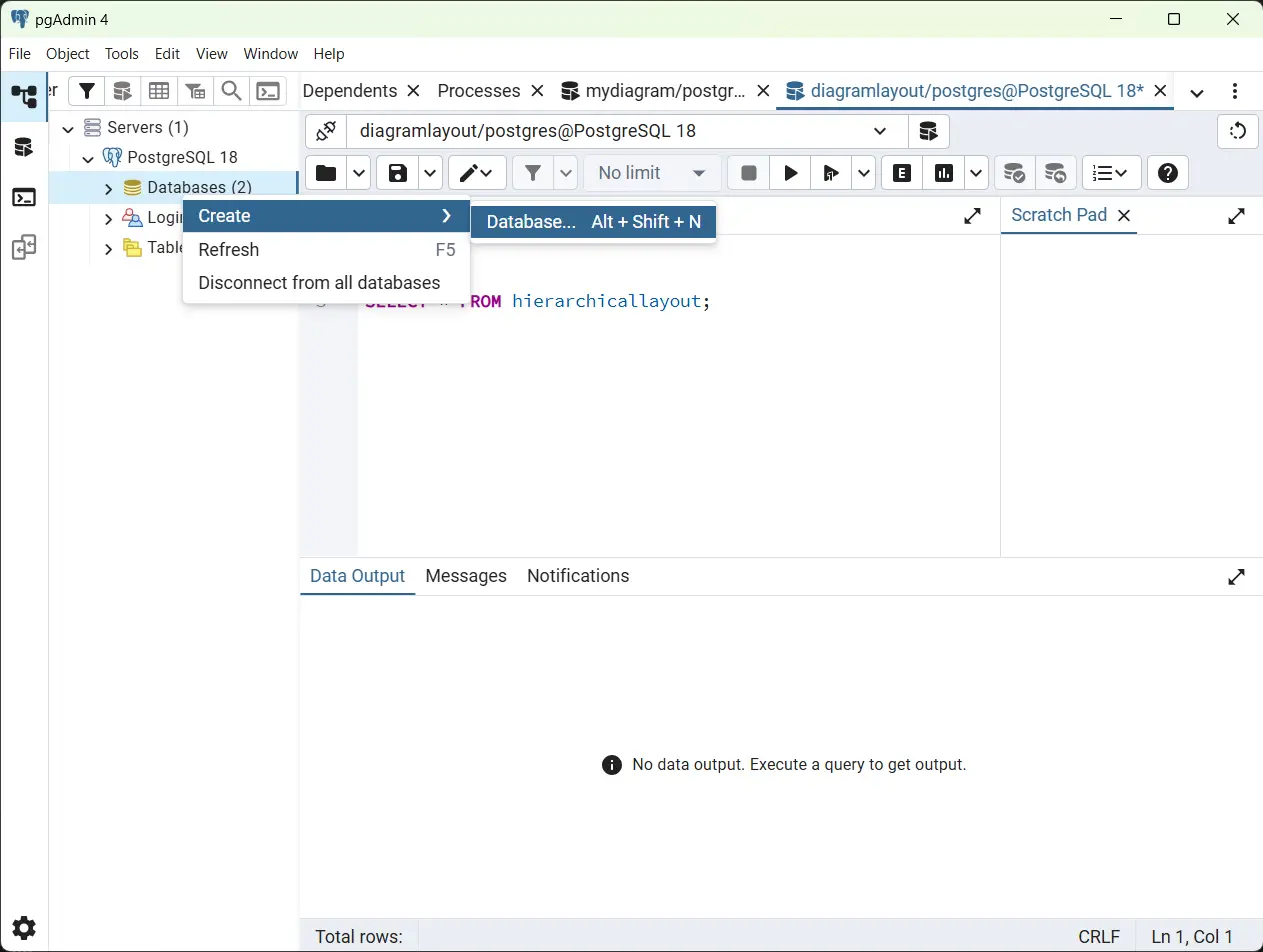
Right-click on the Databases option and select Create → Database.
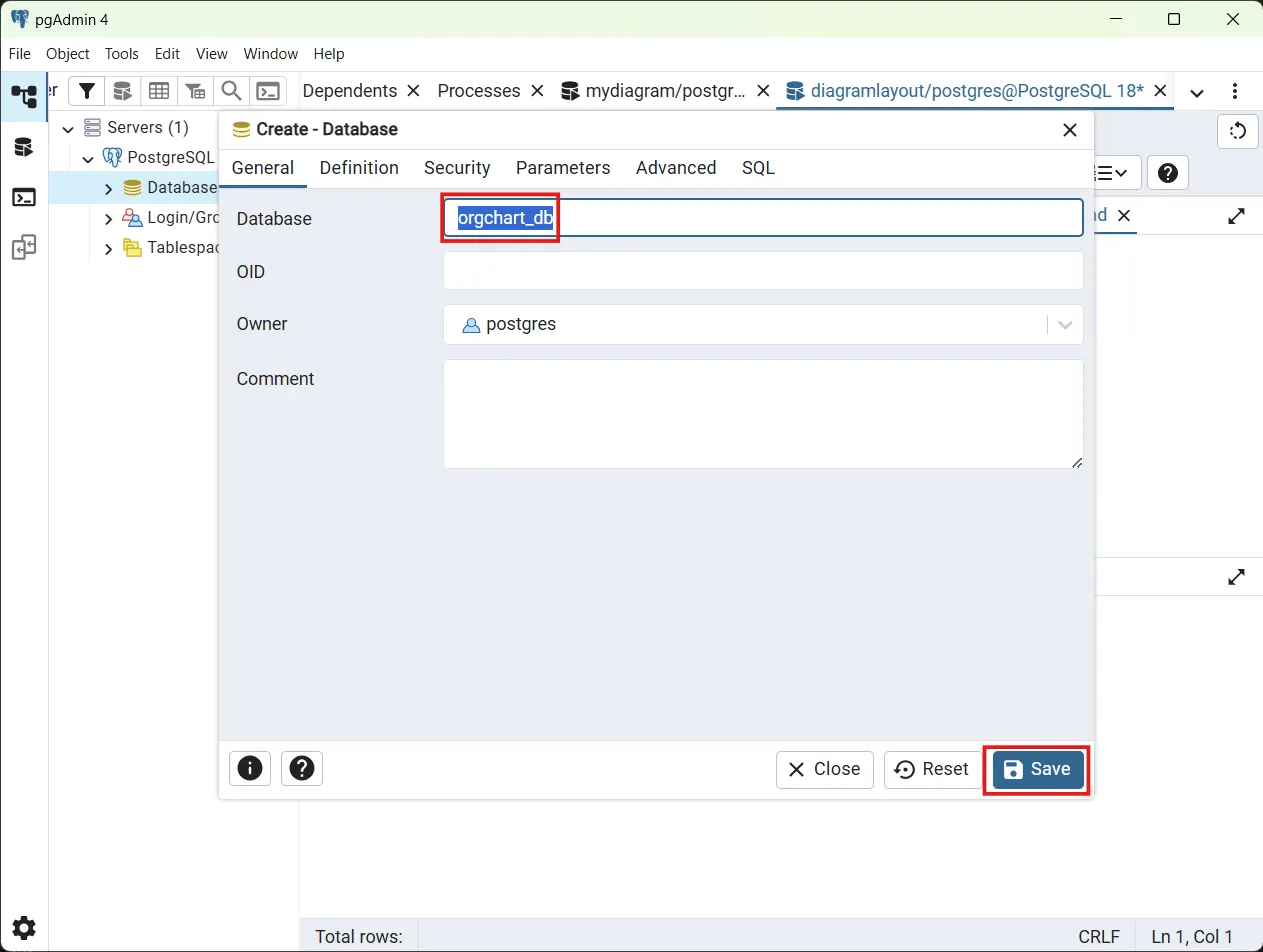
In the Create - Database dialog:
- Enter org_chart_db as the database name.
- Click Save to create the database.
After creating the database, right-click the org_chart_db database and choose Query Tool from the context menu.
Quick procedure before running SQL:
- Clear the editor (Ctrl+A → Delete) to remove any previous statements.
- Enter the SQL, then click Execute / Execute Query (or press F5) to run it.
- After execution, clear the editor again before entering the next statement.
Follow this simple sequence for every SQL in this guide.
Creating the Table
Run the following SQL to create the org_chart_layout table:
CREATE TABLE IF NOT EXISTS org_chart_layout (
  id text PRIMARY KEY,
  role text NOT NULL,
  parent_id text NULL
);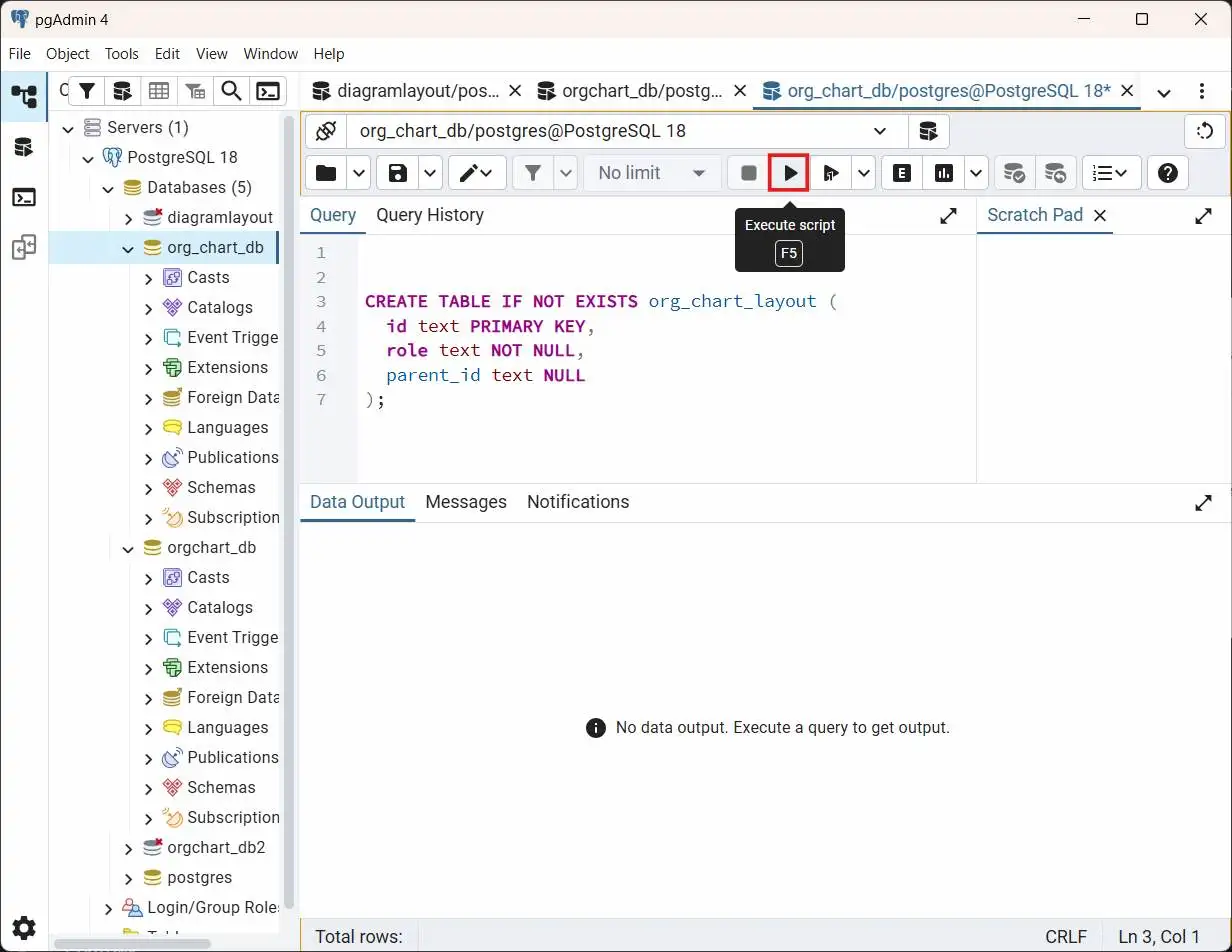
The table structure includes:
- id – Primary key for unique node identification.
- role – Display text for the node in the organizational chart layout.
- parent_id – Foreign key reference to the parent node (NULL for root).
Inserting Sample Data
Add organizational chart data using the SQL INSERT statement. The sample data shows a typical organizational structure with board, management, and department levels.
INSERT INTO org_chart_layout (id, role, parent_id) VALUES
('parent', 'Board', NULL),
('1', 'General Manager', 'parent'),
('2', 'Human Resource Manager', '1'),
('3', 'Trainers', '2'),
('4', 'Recruiting Team', '2'),
('5', 'Finance Asst. Manager', '2'),
('6', 'Design Manager', '1'),
('7', 'Design Supervisor', '6'),
('8', 'Development Supervisor', '6'),
('9', 'Drafting Supervisor', '6'),
('10', 'Operations Manager', '1'),
('11', 'Statistics Department', '10'),
('12', 'Logistics Department', '10'),
('16', 'Marketing Manager', '1'),
('17', 'Overseas Sales Manager', '16'),
('18', 'Petroleum Manager', '16'),
('20', 'Service Department Manager', '16'),
('21', 'Quality Control Department', '16')
ON CONFLICT (id) DO UPDATE
SET role = EXCLUDED.role,
    parent_id = EXCLUDED.parent_id;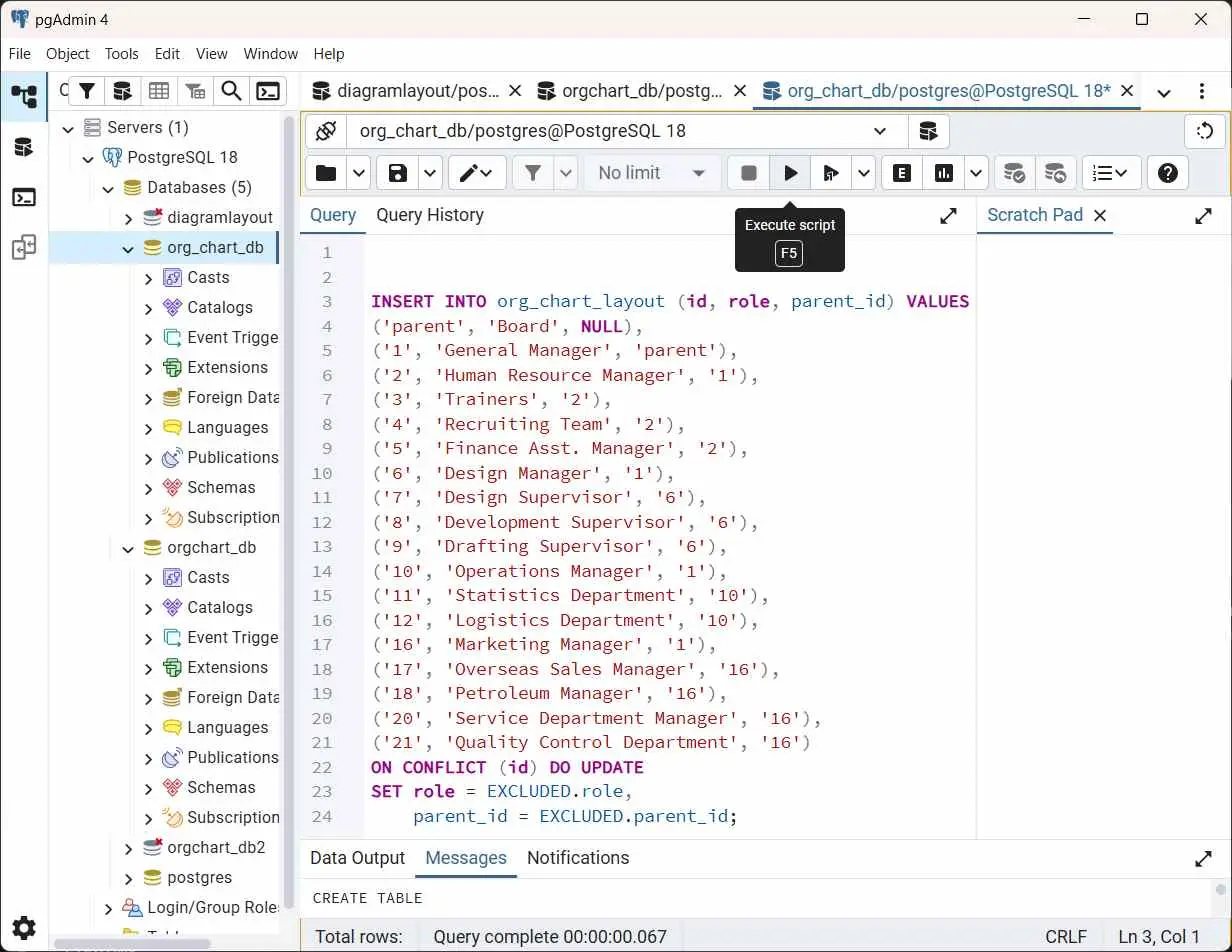
Verifying Data Insertion
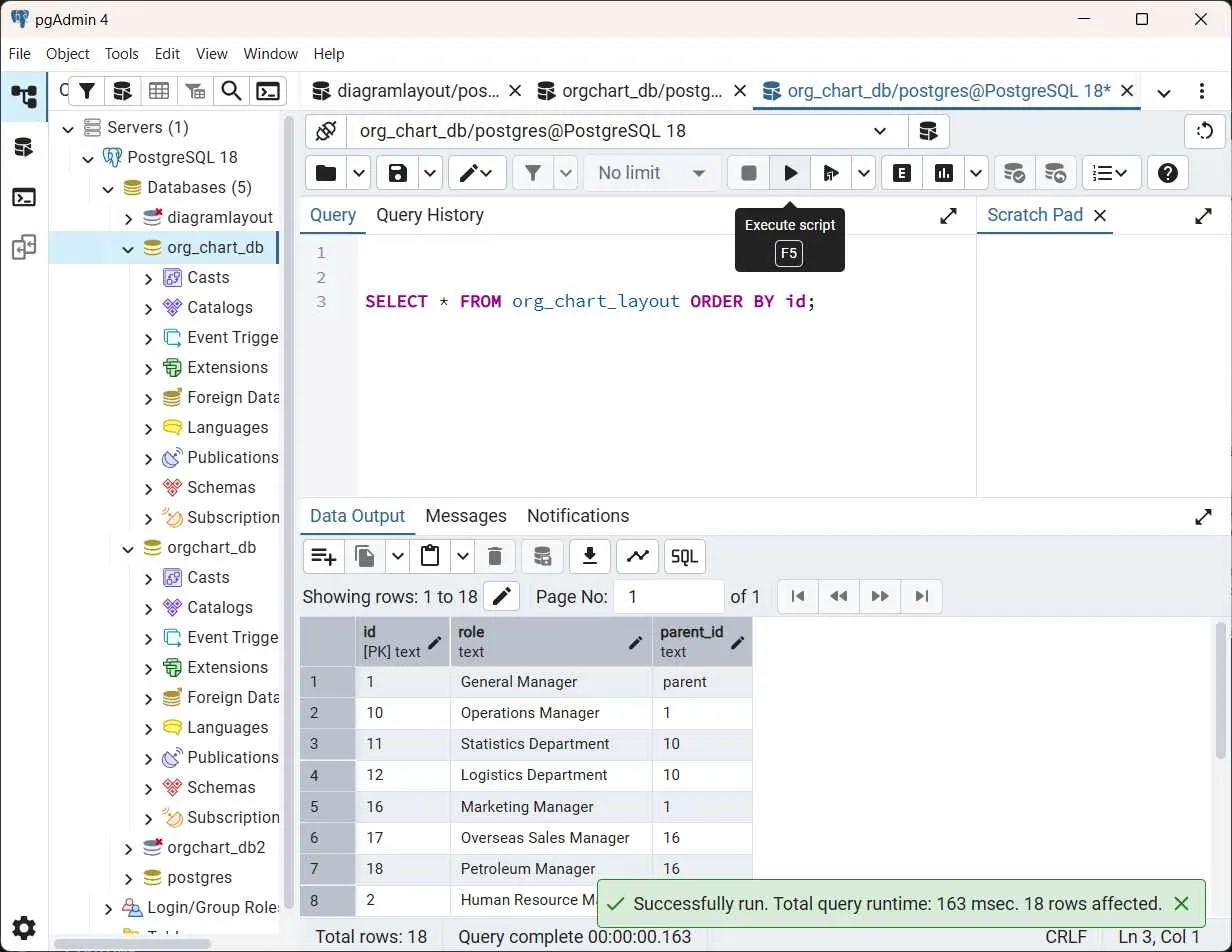
Run a SELECT query to confirm the data insertion:
SELECT * FROM org_chart_layout ORDER BY id;The query should return 18 rows. Parent–child relationships are indicated by the parent_id column, which references the id of the parent node (NULL for root nodes).
Option B — Automated Database Setup Using EF Core Migrations
As an alternative to manually creating database tables and inserting data using SQL scripts, this project supports automated database setup using Entity Framework Core (EF Core) migrations. This approach allows the database schema and initial data to be created directly from the application’s data model and configuration, ensuring consistency between the code and the database.
When EF Core migrations are applied, the following actions occur:
Database Creation: If the target PostgreSQL database specified in the connection string does not exist, EF Core creates the database when migrations are executed, provided that the database server is reachable and the user has sufficient permissions.
Schema Generation: EF Core creates the required database schema based on the AppDbContext configuration. This includes creating the org_chart_layout table and applying primary keys and indexes.
Data Seeding: Initial organizational chart records are inserted into the database using the seed data defined in AppDbContext.OnModelCreating() via the HasData() method.
The exact procedure for creating and applying migrations is described in the automated database initialization and seeding.
Backend Implementation
Step 1: Install Required NuGet Packages
Before installing the necessary NuGet packages, a new Blazor web application must be created using the default template. For full step-by-step instructions on creating a Blazor project, see the getting-started guide: Getting Started.
For this guide, a Blazor application named BlazorServerStyle has been created. Once the project is set up, the next step involves installing the required NuGet packages. These packages enable Entity Framework Core and PostgreSQL integration.
Note:
In Blazor Server, the UI, API, and EF Core all run in the same project.
In Blazor WebAssembly, the API and EF Core must run in a Server host project, and the WASM client calls it over HTTP.
Method 1: Using Package Manager Console
- Open Visual Studio 2026.
- Navigate to Tools → NuGet Package Manager → Package Manager Console.
- Run the following commands:
Install-Package Microsoft.EntityFrameworkCore -Version 10.0.2;
Install-Package Npgsql.EntityFrameworkCore.PostgreSQL -Version 10.0.0;
Install-Package Syncfusion.Blazor.Diagram -Version 34.1.29;
Install-Package Syncfusion.Blazor.Themes -Version 34.1.29
Method 2: Using NuGet Package Manager UI
- Open Visual Studio 2026 → Tools → NuGet Package Manager → Manage NuGet Packages for Solution.
- Search for and install each package individually:
- Microsoft.EntityFrameworkCore (version 10.0.2 or later)
- Npgsql.EntityFrameworkCore.PostgreSQL (version 10.0.0 or later)
- Syncfusion.Blazor.Diagram (version 34.1.29)
- Syncfusion.Blazor.Themes (version 34.1.29)
Method 3: Using Integrated Terminal in Visual Studio Code
Install NuGet packages from the Visual Studio Code terminal (run these from the project folder):
dotnet add package Microsoft.EntityFrameworkCore --version 10.0.2
dotnet add package Npgsql.EntityFrameworkCore.PostgreSQL --version 10.0.0
dotnet add package Syncfusion.Blazor.Diagram --version <your-syncfusion-version>
dotnet add package Syncfusion.Blazor.Themes --version <your-syncfusion-version>
Project File Reference
The installed packages are reflected in the BlazorServerStyle.csproj file:
<ItemGroup>
    <PackageReference Include="Microsoft.EntityFrameworkCore" Version="10.0.2" />
    <PackageReference Include="Npgsql.EntityFrameworkCore.PostgreSQL" Version="10.0.0" />
    <PackageReference Include="Syncfusion.Blazor.Diagram" Version="*" />
    <PackageReference Include="Syncfusion.Blazor.Themes" Version="*" />
</ItemGroup>
Step 2: Create the Data Model
A data model is a C# class that represents the structure of a database table. This model defines the properties that correspond to the columns in the org_chart_layout table.
Instructions:
- Create a new folder named Models in the Blazor application project.
- Inside the Models folder, create a new file named LayoutNode.cs.
- Define the
LayoutNodeclass with the following code:
using System.ComponentModel.DataAnnotations;

namespace BlazorServerStyle.Models;

public class LayoutNode
{
    public string Id { get; set; } = null!;
    public string? ParentId { get; set; }
    public string Role { get; set; } = null!;
}
Step 3: Configure the DbContext
A DbContext is a special class that manages the connection between the Blazor application and the PostgreSQL database. It handles all database operations such as saving, updating, deleting, and retrieving data.
Instructions:
- Create a new folder named Data in the Blazor application project.
- Inside the Data folder, create a new file named AppDbContext.cs.
- Define the
AppDbContextclass with the following code:
using Microsoft.EntityFrameworkCore;
using BlazorServerStyle.Models;  // Or your namespace

namespace BlazorServerStyle.Data;

public class AppDbContext : DbContext
{
    public DbSet<LayoutNode> OrgChartLayouts { get; set; } = null!;

    public AppDbContext(DbContextOptions<AppDbContext> options) : base(options) { }

    protected override void OnModelCreating(ModelBuilder modelBuilder)
    {
        modelBuilder.Entity<LayoutNode>()
            .ToTable("org_chart_layout")
            .HasKey(n => n.Id);

        modelBuilder.Entity<LayoutNode>()
            .Property(n => n.ParentId)
            .HasColumnName("parent_id");

        modelBuilder.Entity<LayoutNode>()
            .Property(n => n.Role)
            .HasColumnName("role")
            .IsRequired();

        modelBuilder.Entity<LayoutNode>()
            .HasIndex(n => n.ParentId);

        // Seed data
        modelBuilder.Entity<LayoutNode>().HasData(
            new LayoutNode { Id = "parent", ParentId = null, Role = "Board" },
            new LayoutNode { Id = "1",      ParentId = "parent", Role = "General Manager" },
            new LayoutNode { Id = "2",      ParentId = "1",      Role = "Human Resource Manager" },
            new LayoutNode { Id = "3",      ParentId = "2",      Role = "Trainers" },
            new LayoutNode { Id = "4",      ParentId = "2",      Role = "Recruiting Team" },
            new LayoutNode { Id = "5",      ParentId = "2",      Role = "Finance Asst. Manager" },
            new LayoutNode { Id = "6",      ParentId = "1",      Role = "Design Manager" },
            new LayoutNode { Id = "7",      ParentId = "6",      Role = "Design Supervisor" },
            new LayoutNode { Id = "8",      ParentId = "6",      Role = "Development Supervisor" },
            new LayoutNode { Id = "9",      ParentId = "6",      Role = "Drafting Supervisor" },
            new LayoutNode { Id = "10",     ParentId = "1",      Role = "Operations Manager" },
            new LayoutNode { Id = "11",     ParentId = "10",     Role = "Statistics Department" },
            new LayoutNode { Id = "12",     ParentId = "10",     Role = "Logistics Department" },
            new LayoutNode { Id = "16",     ParentId = "1",      Role = "Marketing Manager" },
            new LayoutNode { Id = "17",     ParentId = "16",     Role = "Overseas Sales Manager" },
            new LayoutNode { Id = "18",     ParentId = "16",     Role = "Petroleum Manager" },
            new LayoutNode { Id = "20",     ParentId = "16",     Role = "Service Department Manager" },
            new LayoutNode { Id = "21",     ParentId = "16",     Role = "Quality Control Department" }
        );
    }
}
Explanation:
- The
AppDbContextclass connects the Blazor application to the PostgreSQL database. - It maps the
LayoutNodemodel to the org_chart_layout table. - Column mappings, required fields, and table structure are configured in
OnModelCreating. - An index is added on the parent_id column to improve performance when loading organizational chart data.
Step 4: Configure the Connection String
A connection string contains the information needed to connect the application to the PostgreSQL database, including the server address, database name, and authentication credentials.
Instructions:
- Open the appsettings.json file in the project root.
- Update the
ConnectionStringssection with the PostgreSQL connection details:
{
    "ConnectionStrings": {
        "DefaultConnection": "Server=localhost;Port=5432;Database=org_chart_db;User Id=postgres;Password=postgresql@123"
    },
  "Logging": {
    "LogLevel": {
      "Default": "Information",
      "Microsoft.AspNetCore": "Warning"
    }
  },
  "AllowedHosts": "*"
}
Connection String Components:
| Component | Description |
|---|---|
| Server | The address of the PostgreSQL server (localhost for local development) |
| Port | The port number on which PostgreSQL is running (default is 5432) |
| Database | The database name (for this guide, org_chart_db) |
| User Id | The PostgreSQL username |
| Password | The password for the PostgreSQL user account |
Security Note: For production environments, store sensitive credentials in environment variables or Azure Key Vault instead of storing them in appsettings.json. Example: Password=${DB_PASSWORD} and set the environment variable DB_PASSWORD on the deployment server.
Step 5: Create the API Controller
Create a controller file (e.g., Controllers/LayoutController.cs) in the current project. This controller exposes a GET API endpoint at api/Layout that returns all OrgChart layout records from the database.
using BlazorServerStyle.Data;
using BlazorServerStyle.Models;
using Microsoft.AspNetCore.Mvc;
using Microsoft.EntityFrameworkCore;

namespace BlazorServerStyle.Controllers;

[ApiController]
[Route("api/[controller]")]
public class LayoutController : ControllerBase
{
    private readonly AppDbContext _db;

    public LayoutController(AppDbContext db) => _db = db;

    [HttpGet]
    public async Task<IActionResult> Get() => Ok(await _db.OrgChartLayouts.ToListAsync());
}
Step 6: Create the LayoutService Class
The LayoutService class acts as an HTTP client wrapper that calls the API endpoint to retrieve organizational chart layout data. The Blazor application uses this service to load data from the /api/layout endpoint.
Instructions:
- Inside the Data folder, create a new file named LayoutService.cs.
- Define the
LayoutServiceclass with the following code:
using BlazorServerStyle.Models;
using System.Net.Http.Json;

namespace BlazorServerStyle.Services;   // Change namespace for WASM project

public class LayoutService
{
    private readonly HttpClient _http;

    public LayoutService(HttpClient http)
    {
        _http = http;
    }

    public async Task<List<LayoutNode>?> GetOrgChartAsync()
    {
        return await _http.GetFromJsonAsync<List<LayoutNode>>("api/layout");
    }
}
This service encapsulates HTTP-related logic and provides a clean abstraction for retrieving layout data. By centralizing API calls in a service, Blazor components remain focused on presentation and state management.
Step 7: Register Services in Program.cs
The Program.cs file is used to register and configure application services. This step sets up Entity Framework Core with PostgreSQL, registers API controllers, and configures application services used by the Blazor application.
Instructions:
- Open the Program.cs file at the project root.
- Add the following code after the line var builder = WebApplication.CreateBuilder(args):
using BlazorServerStyle.Components;
using Syncfusion.Blazor;
using Services;
using Microsoft.EntityFrameworkCore;
using BlazorServerStyle.Data;

var builder = WebApplication.CreateBuilder(args);

// Add services to the container.
builder.Services.AddRazorComponents()
    .AddInteractiveServerComponents();
builder.Services.AddSyncfusionBlazor();
builder.Services.AddHttpClient<LayoutService>("Api", client =>
{
    // Use the port shown in dotnet run output or launchSettings.json
    client.BaseAddress = new Uri("http://localhost:5069/");
});
// Add controllers and EF DbContext.
builder.Services.AddControllers();
builder.Services.AddDbContext<AppDbContext>(options =>
    options.UseNpgsql(builder.Configuration.GetConnectionString("DefaultConnection")));
var app = builder.Build();

// Configure the HTTP request pipeline.
if (!app.Environment.IsDevelopment())
{
    app.UseExceptionHandler("/Error", createScopeForErrors: true);
    // The default HSTS value is 30 days. You may want to change this for production scenarios, see https://aka.ms/aspnetcore-hsts.
    app.UseHsts();
}
app.UseStatusCodePagesWithReExecute("/not-found", createScopeForStatusCodePages: true);
app.UseHttpsRedirection();

app.UseAntiforgery();

app.UseAuthorization();

app.MapControllers();

app.MapStaticAssets();
app.MapRazorComponents<App>()
    .AddInteractiveServerRenderMode();

app.Run();
Explanation:
-
AddSyncfusionBlazor(): Registers Blazor components such as Diagram and themes. -
AddDbContext<AppDbContext>: Configures Entity Framework Core to use PostgreSQL via theUseNpgsqlprovider. -
AddHttpClient<LayoutService>(...): RegistersLayoutServiceas a typed HTTP client, enabling it to call the /api/layout endpoint using dependency injection. -
AddControllers(): Enables API controllers for handling HTTP API requests.
With these registrations:
- The application can access the database via
AppDbContext. - API endpoints are enabled.
- Blazor components can use
LayoutServiceto retrieve data from the API.
Step 8: Automated Database Initialization and Seeding
This step initializes the PostgreSQL database using EF Core migrations. The migrations create the database (if it does not already exist), apply the schema, and insert the initial organizational chart data required by the application.
To run the migrations, open a terminal in the server host project that contains AppDbContext. Before running the commands, ensure the PostgreSQL connection string is correctly configured in the host’s appsettings.Development.json file.
Example (Blazor Server host):
cd src/BlazorServerStyle
dotnet restore
dotnet build
dotnet ef migrations add InitialCreate
dotnet ef database update
The Blazor WebAssembly host also includes a server project and migrations. To use it instead, run the commands from that project directory:
cd src/BlazorWASMStyle
dotnet restore
dotnet build
dotnet ef migrations add InitialCreate
dotnet ef database update
What happens when you run the above commands
dotnet ef migrations add InitialCreateCreates a migration file based on the current AppDbContext. This migration represents the database structure required by the application.
dotnet ef database updateApplies the migration to PostgreSQL. This command:
- Creates the database if it does not already exist.
- Creates the required tables and schema.
- Inserts the initial data needed by the application.
The initial data is defined using the HasData method inside OnModelCreating() in AppDbContext. This allows EF Core to automatically insert required base data (such as organizational chart layouts) during
migration, without writing or running manual SQL scripts.
The backend setup is now complete. The next section focuses on configuring the Blazor frontend to consume the API and display the diagram.
Rendering the Blazor Diagram Component
Step 1: Install and Configure Blazor Diagram Component
This section explains how to render an organizational chart using the Blazor Diagram component by binding it to data loaded from the backend API.
Instructions:
- The Syncfusion.Blazor.Diagram package was installed in Step 2 of the previous section Backend Implementation🔗.
- Import the required namespaces in the Components/_Imports.razor file:
@using Syncfusion.Blazor
@using Syncfusion.Blazor.Diagram- Before using Blazor components, register your license key in Program.cs:
Syncfusion.Licensing.SyncfusionLicenseProvider.RegisterLicense("YOUR LICENSE KEY");-
Add the stylesheet and scripts to the host page <head> element to ensure that required assets load before the Blazor components are rendered. Use the appropriate host file based on your project type:
- Blazor Server (.NET 8+): Add the links to Pages/App.razor (inside the <head> element).
- Blazor WebAssembly: Add the links to wwwroot/index.html (inside the <head> element).
<!-- Blazor Theme Stylesheet -->
<link href="_content/Syncfusion.Blazor.Themes/bootstrap5.css" rel="stylesheet" />

<!-- Blazor Scripts -->
<script src="_content/Syncfusion.Blazor.Core/scripts/syncfusion-blazor.min.js" type="text/javascript"></script>
For this project, the Bootstrap 5 theme is used. A different theme can be selected or the existing theme can be customized based on project requirements. Refer to the Blazor Components Appearance documentation to learn more about theming and customization options.
For additional guidance, refer to the Diagram component getting-started documentation.
Step 2: Update the Blazor Diagram
In this step, an organizational chart layout is created using the Blazor Diagram component in the Home.razor file.
Instructions:
- Open the file named Home.razor in the Components/Pages folder.
- Add the following code to create a Diagram:
@page "/"
@using Services
@using Syncfusion.Blazor.Diagram
@using Syncfusion.Blazor.Data
@using Syncfusion.Blazor.Inputs
@using BlazorServerStyle.Models
@inject LayoutService LayoutService

@if (loading)
{
    <p>Loading organizational chart...</p>
}
else if (!string.IsNullOrEmpty(errorMessage))
{
    <div style="color: red;">Error: @errorMessage</div>
}
else if (_dataSource == null || !_dataSource.Any())
{
    <p>No data available</p>
}
else
{
    <SfDiagramComponent ID="OrgChartDiagram" @ref="_diagram" Width="100%" Height="1000px" NodeCreating="@OnNodeCreating" ConnectorCreating="@OnConnectorCreating">
        <DataSourceSettings ID="Id" ParentID="ParentId" DataSource="@_dataSource"></DataSourceSettings>
        <SnapSettings>
            <HorizontalGridLines LineColor="white" LineDashArray="2,2">
            </HorizontalGridLines>
            <VerticalGridLines LineColor="white" LineDashArray="2,2">
            </VerticalGridLines>
        </SnapSettings>
        <Layout Type="LayoutType.OrganizationalChart" @bind-HorizontalSpacing="@_horizontalSpacing" @bind-VerticalSpacing="@_verticalSpacing">
        </Layout>
    </SfDiagramComponent>
}
@code
{
    //Initializing layout.
    private int _horizontalSpacing = 40;
    private int _verticalSpacing = 50;

    //Creates nodes with default values.
    private void OnNodeCreating(IDiagramObject obj)
    {
        Node node = obj as Node;
        node.Height = 50;
        node.Width = 150;
        LayoutNode Data = node.Data as LayoutNode;
        node.Annotations = new DiagramObjectCollection<ShapeAnnotation>(){
            new ShapeAnnotation(){
                Content = Data.Role,
            }
        };
        node.Style = new ShapeStyle() { Fill = "#6495ED", StrokeWidth = 1, StrokeColor = "Black" };
    }

    //Creates connectors with default styling.
    private void OnConnectorCreating(IDiagramObject connector)
    {
        Connector connectors = connector as Connector;
        connectors.Type = ConnectorSegmentType.Orthogonal;
        connectors.Style = new TextStyle() { StrokeColor = "#6495ED", StrokeWidth = 1 };
        connectors.TargetDecorator = new DecoratorSettings
        {
            Shape = DecoratorShape.None,
            Style = new ShapeStyle() { Fill = "#6495ED", StrokeColor = "#6495ED", }
        };
    }
    private List<LayoutNode>? _dataSource;
    private bool loading = true;
    private string? errorMessage;
    private SfDiagramComponent _diagram;

    protected override async Task OnInitializedAsync()
    {
        try
        {
            _dataSource = await LayoutService.GetOrgChartAsync();
        }
        catch (Exception ex)
        {
            errorMessage = ex.Message;
        }
        finally
        {
            loading = false;
        }

        await base.OnInitializedAsync();
    }
}
Run the Sample Locally
This section explains how to run the application locally.
Run the Blazor Server host
cd src/BlazorServerStyle
dotnet run
Run the Blazor WebAssembly host
cd src/BlazorWASMStyle/BlazorWASMStyle
dotnet run
Troubleshooting
Application or API Not Working
- Confirm that PostgreSQL is running and reachable.
- Verify the PostgreSQL connection string in appsettings.Development.json:
Server,Port,Database,User Id, andPasswordmust match your PostgreSQL setup. - Run dotnet ef database update from the server host project to ensure migrations were applied successfully.
No data in Diagram
- Verify that
DataSourceSettingsuses the correct property names:ID="Id"-
ParentID="ParentId"
These property names must exactly match the model returned by the API.
- Check the browser developer console (F12) for errors from
LayoutServiceclass. - Ensure migrations completed successfully and that seed data exists in the database
(you may verify this directly in PostgreSQL).
Complete Sample Repository
A complete, working sample implementation is available in the GitHub repository.
You can clone the repository, update the PostgreSQL connection string, apply migrations, and run the project to see the organizational chart in action.
Summary
This guide demonstrates how to:
- Install PostgreSQL. 🔗
- Create a PostgreSQL database with layout nodes using pgAdmin 4. 🔗
- Configure backend implementations. 🔗
- Create data models and DbContext for database communication with PostgreSQL-specific configuration. 🔗
- Configure connection strings and register services. 🔗
- HTTP service abstraction for data access using helper methods. 🔗
- Create a Blazor component with a Diagram that visualizes data as an Organizational Chart layout. 🔗
The application now provides a complete solution for visualizing organizational chart data from PostgreSQL.