How can I help you?
Custom MCP Server
15 Jun 20267 minutes to read
Purpose
Model Context Protocol (MCP) is an open standard that enables AI models to interact with external tools and services through a unified interface. In Code Studio, MCP servers extend your workspace by integrating with external APIs.
Custom MCP Servers let you add and manage MCP servers in Code Studio.
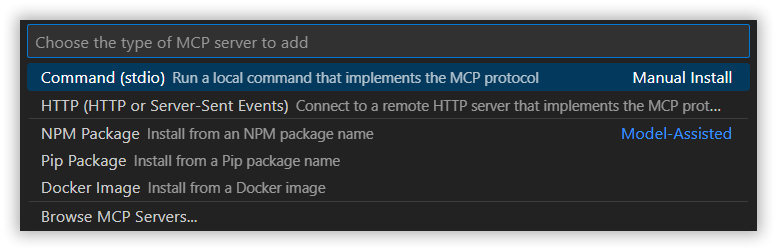
You can add a custom MCP server using one of these connection types, based on how the server is hosted and delivered:
- Command (stdio): Runs a local executable/script that communicates over stdio.
- HTTP: Connects to a remote MCP server endpoint using a URL.
- NPM package: Installs and runs an MCP server published as an npm package.
- Pip package: Installs and runs an MCP server published as a Python package.
- Docker image: Runs an MCP server from a container image.
When to use
Use a Custom MCP Server to integrate external tools or services into Code Studio. Choose this option whenever an MCP server exists for the tool or service you want to connect.
Prerequisites
Supported MCP Server Types and Their Prerequisites:
1. Command (stdio)
Runs a local executable script that communicates over stdio.
Use this when:
- You have a local MCP server executable
- You want zero network communication
- You’re developing or debugging the server locally
Prerequisite:
- The executable script must exist in the system PATH
Installation Steps:
- Ensure your script or binary is globally accessible via PATH
2. HTTP
Connects to a remote MCP server over HTTP.
Use this when:
- Use this option when the MCP server is hosted as a web service and you need to connect to it via a URL.
3. NPM Package
Installs and runs an MCP server from an NPM package.
Use this when:
- Use this option when the MCP server is distributed through the npm registry and you prefer Node.js tooling for installation and execution.
Prerequisite:
- Node.js installed
Installation Steps:
- Install Node.js from the official site.
4. Pip Package
Installs an MCP server from a Python pip package.
Use this when:
- Your MCP server is written in Python
Prerequisites:
- Python 3.13+ installed
-
uvpackage manager installed
Installation Steps:
- Install Python 3.13+ from official site.
-
Then, in CMD, install uv and its documentation site for reference.
pip install uv
uv --version
5. Docker Image
Runs an MCP server from a Docker image.
Use this when:
- You prefer containerized, portable setups
Prerequisites:
- WSL must be installed
- Rancher Desktop must be installed
Installation Steps:
In CMD:
wsl --install
wsl --version
Then install Rancher Desktop from official site.
6. NuGet (dnx)
Runs an MCP server via .NET packages.
Use this when:
- You’re using .NET-based MCP servers
Prerequisite:
- .NET SDK 10 or later
Installation Steps:
- Download .NET SDK 10+ from Microsoft’s official site.
Note: Custom servers installed via npm, pip, or Docker rely on AI model–assisted execution. If your Premium model usage budget is exhausted, these configurations can’t be completed until additional budget is available.
Step-by-Step Guide: Postman MCP Server with CodeStudio
This example shows how to configure the Postman MCP Server (via an npm package) as a Custom MCP Server in Code Studio. Once connected, you can use the Code Studio chat agent to interact with Postman directly—automating API testing and validation tasks without leaving your workspace.
Follow the steps below to configure the Postman MCP Server in CodeStudio,
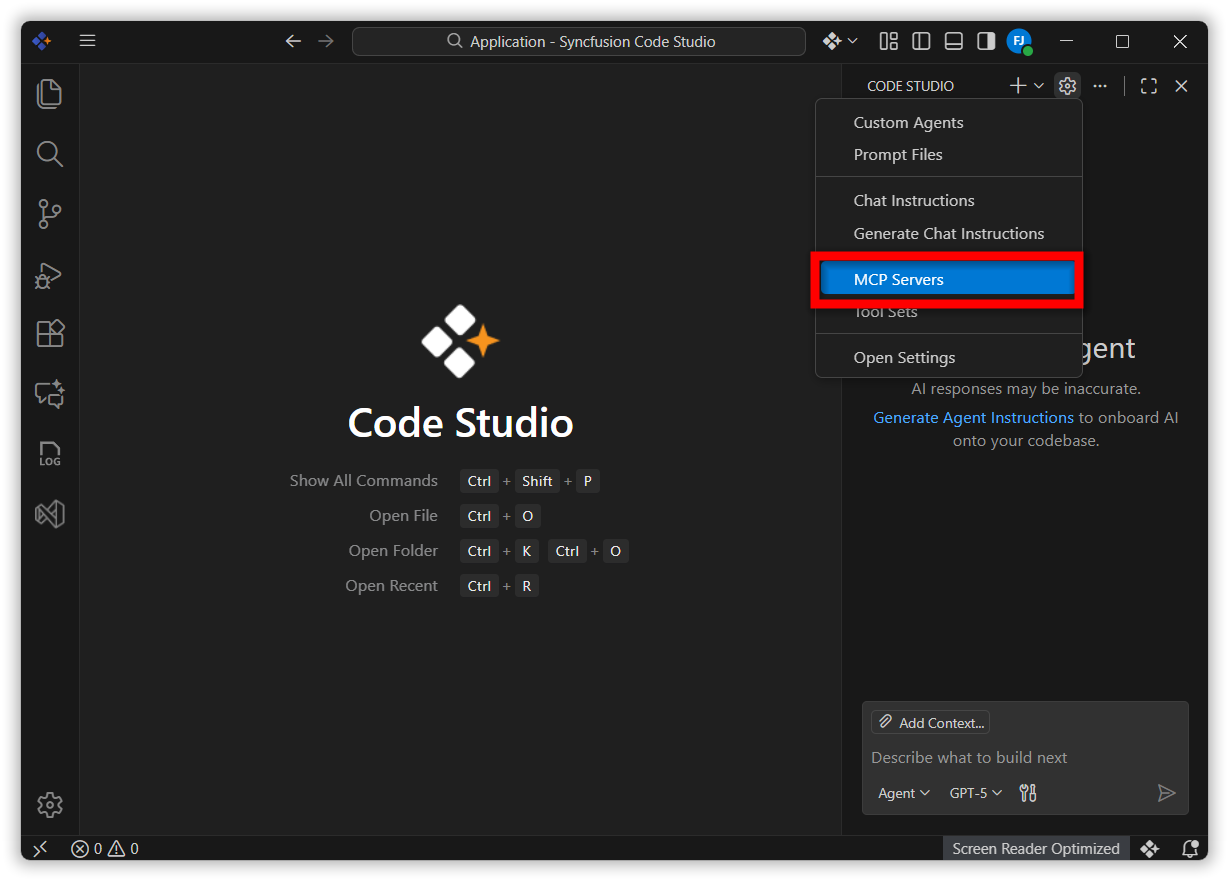
Step 1: In Code Studio Extension, click the Settings icon and select MCP Servers
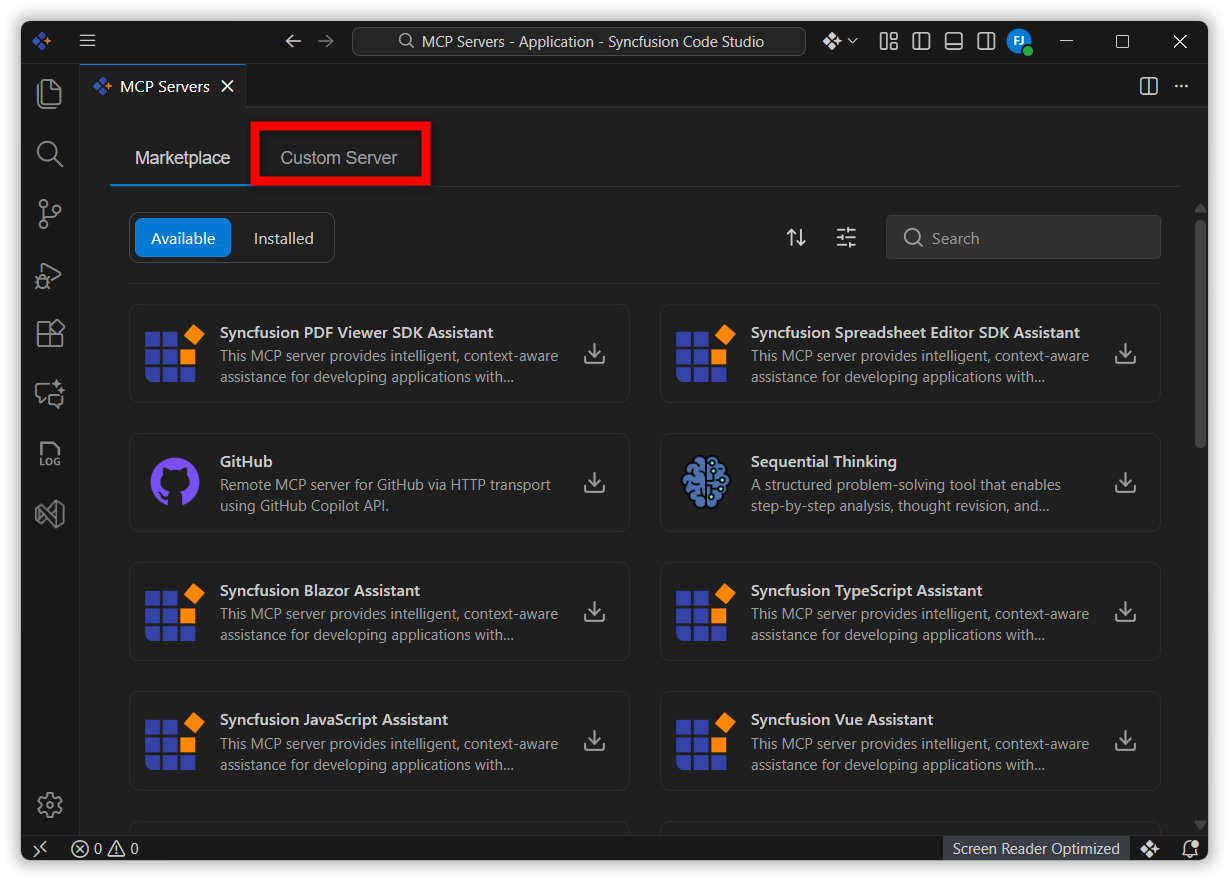
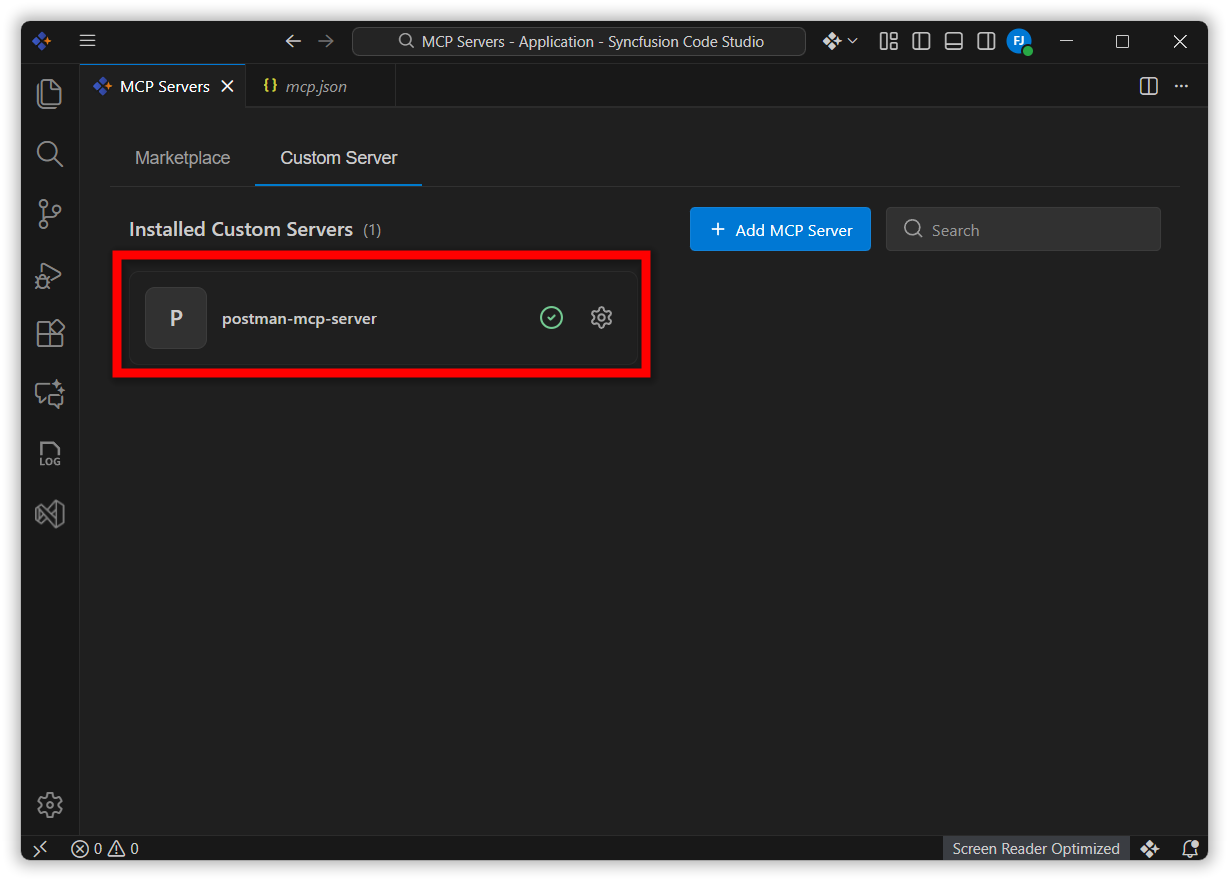
Step 2: In the MCP Servers page, open the Custom Server tab.
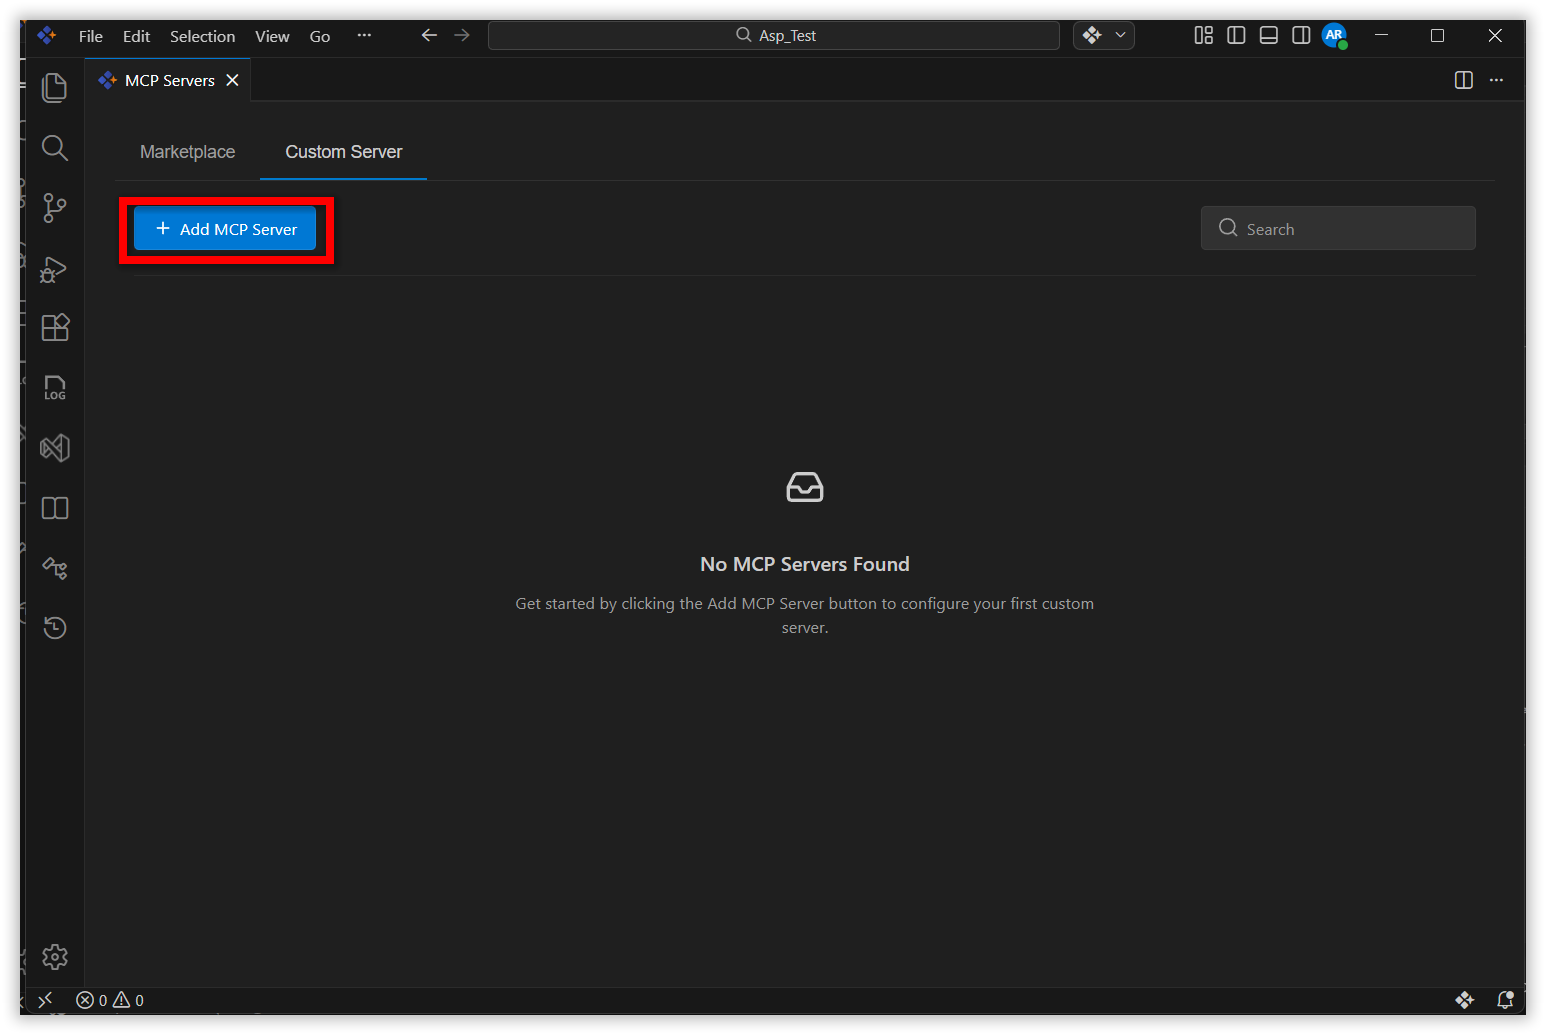
Step 3: Click Add MCP Server.
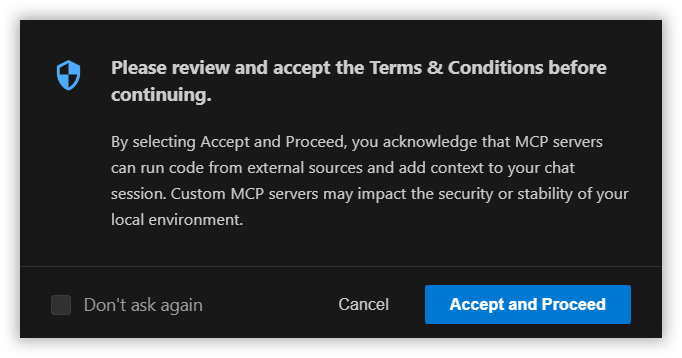
Step 4: Review the Terms and Conditions, then click Accept and proceed.
Step 5: Select the connection type that matches your setup. For this demonstration, choosing NPM package to install the Postman MCP Server.
Step 6: The npm package name field will appear. Enter the required package name. For this demonstration, entering the Postman MCP Server package name (@postman/postman-mcp-server) and press Enter.

Step 7: The Postman API key field will appear. Paste the Postman API key you generated and press Enter.

Note:
- If you don’t already have a Postman account, use Postman’s documentation guide to sign up: Sign up for Postman
- To generate a Postman API key, follow Postman’s official documentation: Postman API Key Generation
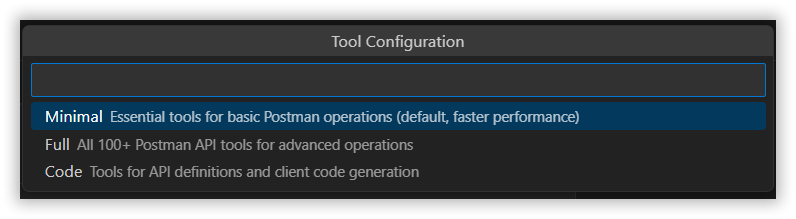
Step 8: Select the tool configuration that fits your needs. For this demonstration, choosing the Minimal option.
Step 9: Select the region. Keep the default selection (US).

Step 10: Enter a Server ID. This is a label you choose in Code Studio to identify the custom server (not a Postman ID).

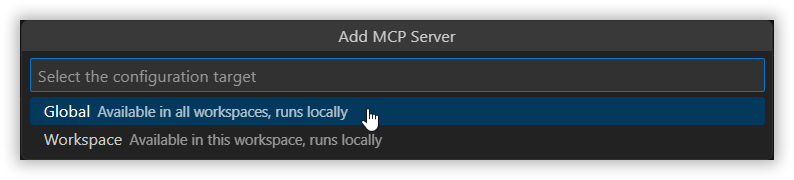
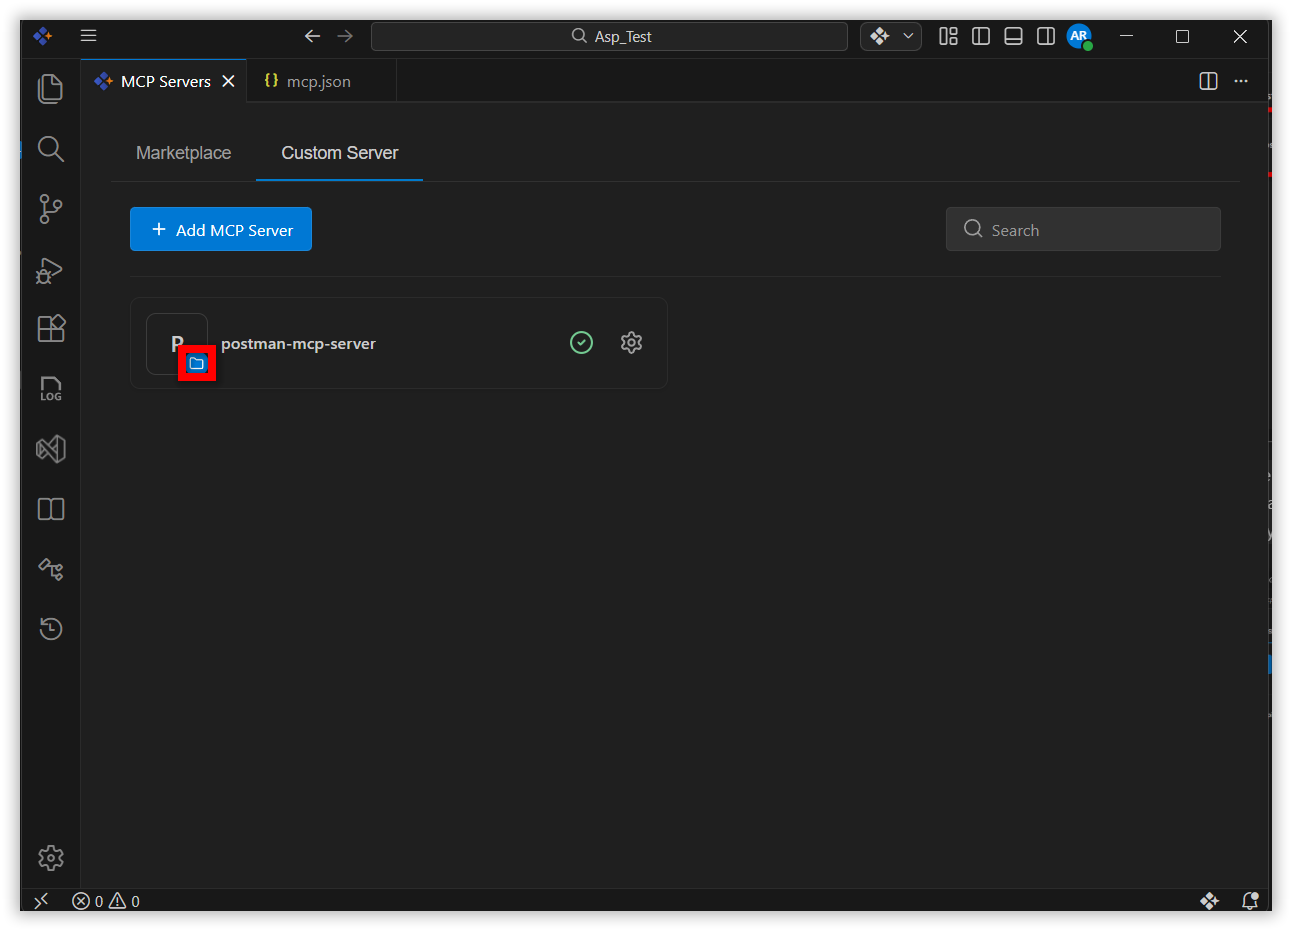
Step 11: Select the configuration target based on your needs. For this demonstration, choose Global to make the server available across all workspaces.
Step 12: The Postman MCP Server is now configured and ready to use.
Note: If you selected the Workspace option in Step 11, a file icon will appear next to the server name icon, indicating that the server is installed for the current workspace only.
How to access the MCP tools
Step 1 : Click the Syncfusion Code Studio icon. The chat window is displayed.

Step 2: Select the Agent in the chat window.
Step 3 : Click the Configure Tools button in the chat input field. The tools are displayed.
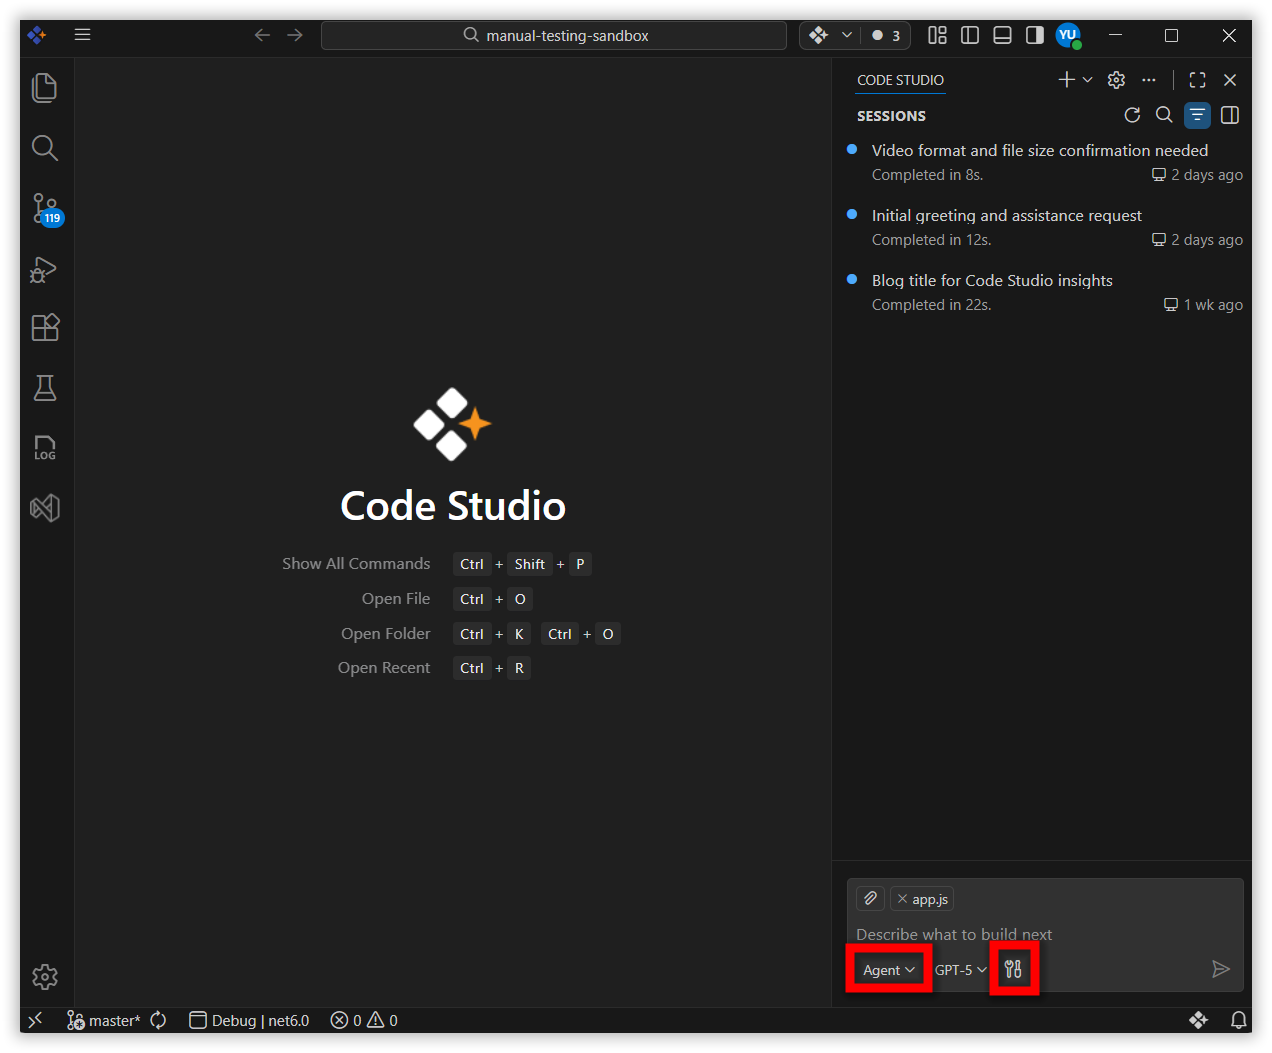
Note: Must select the Agent to access the configuration tools.
Step 4 : Select or deselect tools to control which ones are available for the current request.
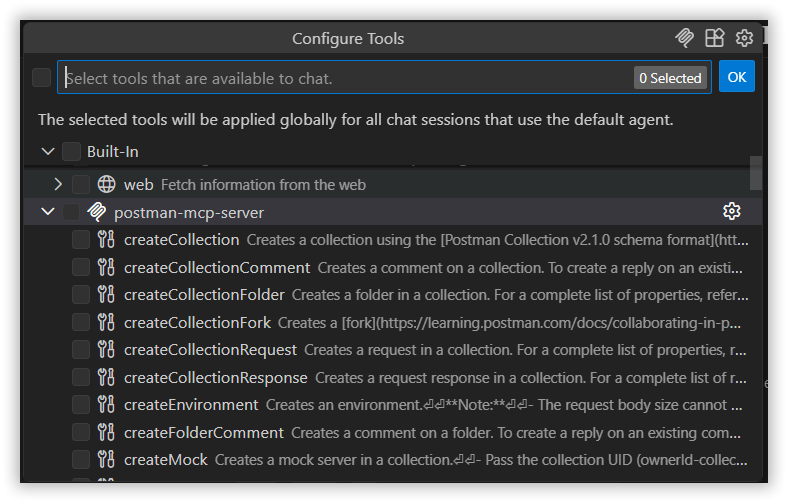
For demonstration purposes, we created a User Management API collection in Postman with sample data and added five sample API requests to the collection.
You can create your own collection and add API requests by following Postman’s documentation.
Generate test scripts
-
In this section, you will use Code Studio and the Postman MCP Server to generate standardized test scripts for the User Management API collection.
-
When you give the prompt, Code Studio generates test scripts for all API requests in the collection.
-
Code Studio then applies the generated scripts in Postman under each API request’s Test Scripts tab.
Sample prompt
Generate Postman test scripts for the “User Management API” collection (5 requests: GET all users, GET user by id, POST create user, PUT update user, DELETE user). Apply the scripts directly to each request’s Tests tab.

For each request, include tests that validate:

1. Expected status code (based on the method/API behavior)
2. Response time is within an acceptable range
3. Content-Type header (when present)
4. Response body structure and key fields (required properties and data types)

Use consistent, readable test names and keep scripts minimal and maintainable. Keep assertions non-brittle (no fixed record counts or hardcoded values). If the API does not persist changes, validate response structure and echoed fields instead of permanent updates.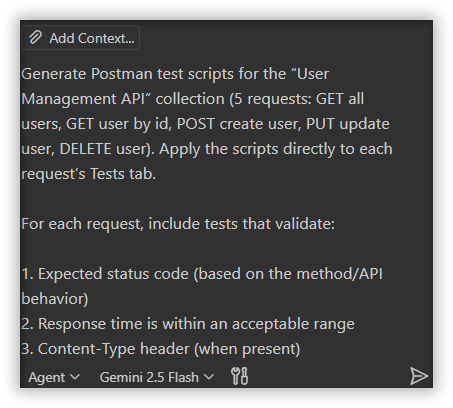
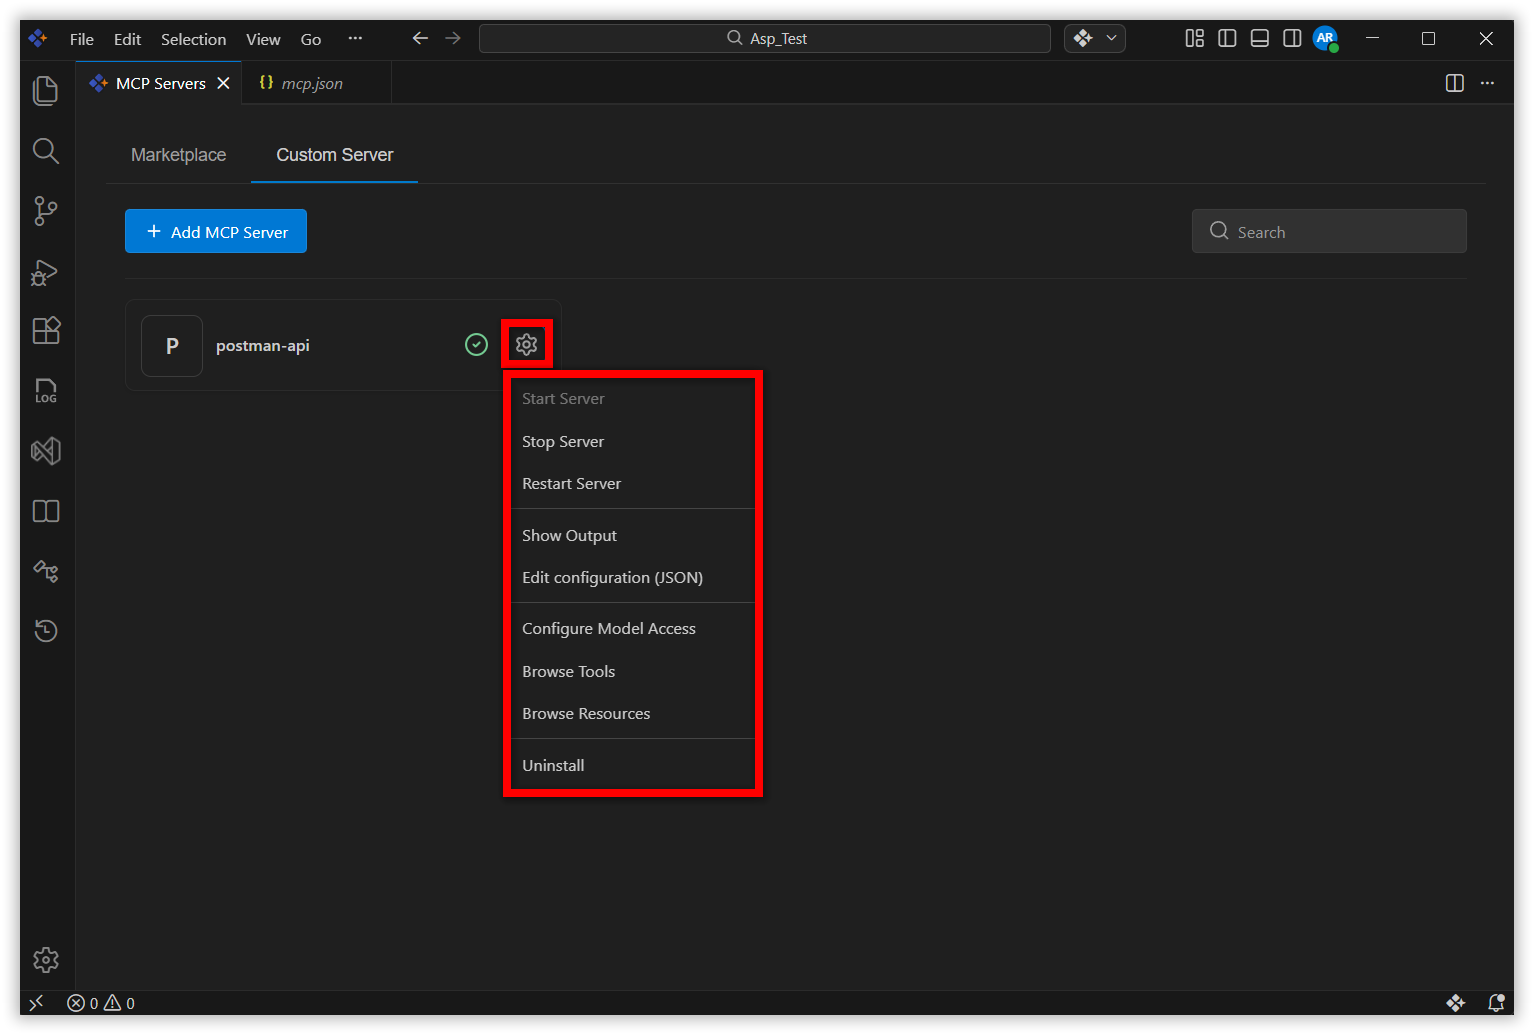
MCP Settings and Management
You can manage your installed MCP servers through the Manage Settings option.
Available actions include:
- Start server
- Stop server
- Restart server
- Show output
- The Output option opens the Output tab in the Terminal panel, where you can view real time MCP server logs
- Edit configuration (JSON)
- Opens the mcp.jsonn file where you can edit the entry manually.
- Configure model access
- Choose which LLMs can access the server
- Browse tools
- View all tools exposed by your MCP server
- Browse Resource
- View all resources provided by your MCP server
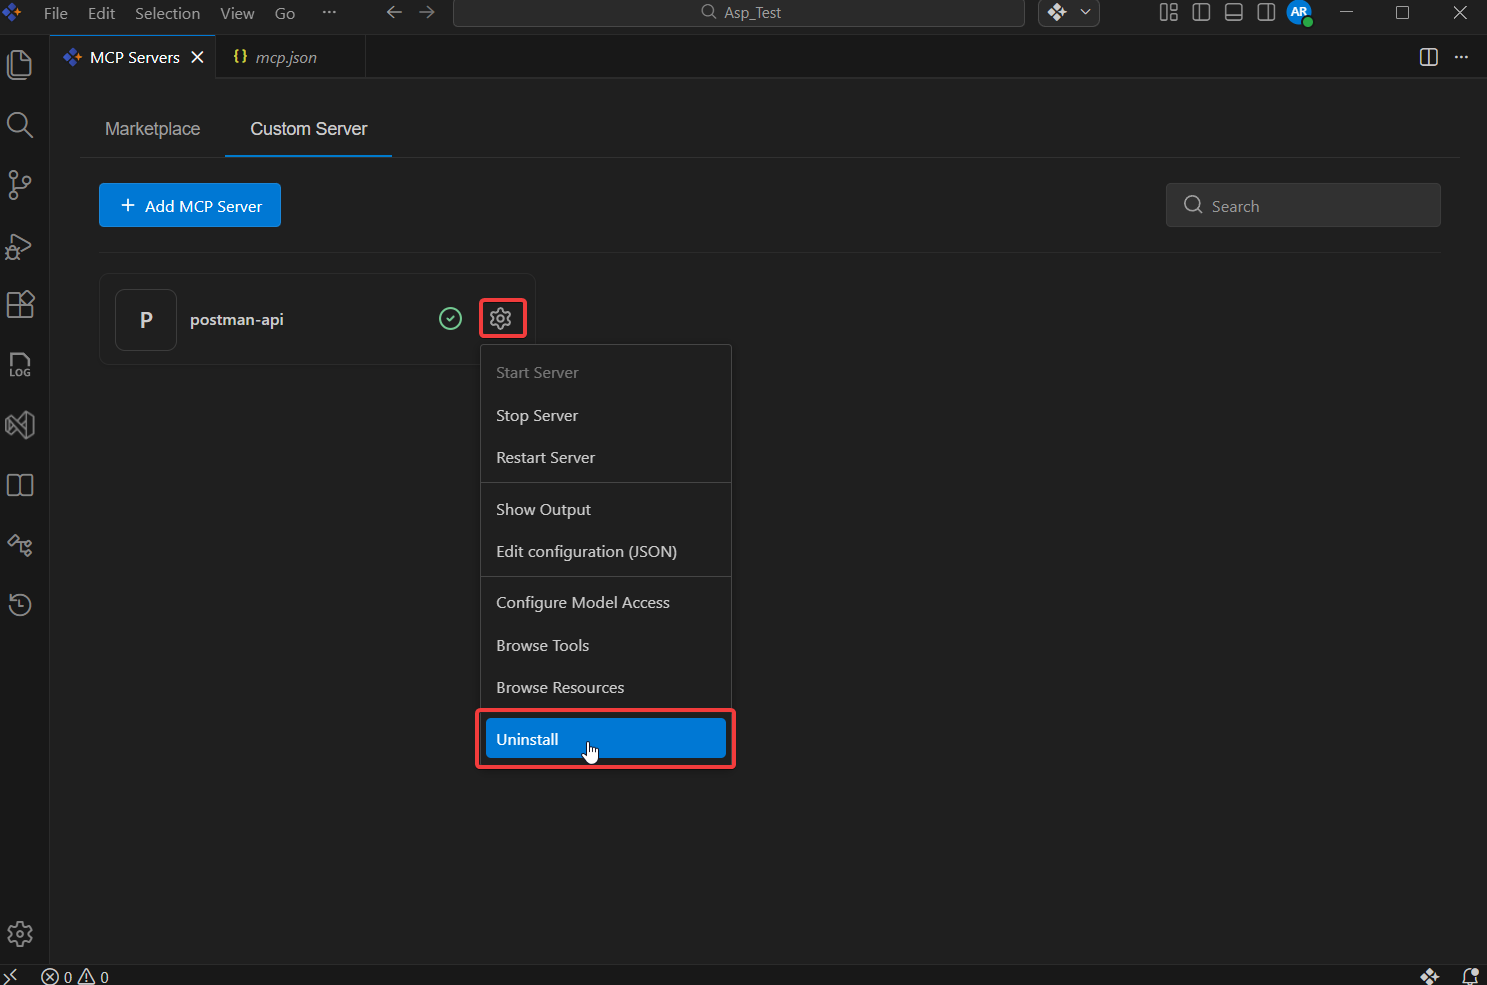
Uninstalling an MCP Server
To remove a custom MCP server:
- Click Manage next to the MCP server.
- Select Uninstall.
- The server is removed from your device and Code Studio.