Getting Started with the Vue TreeMap Component in Vue 3
This article provides a step-by-step guide to creating a Vite JavaScript project and integrating the Syncfusion® Vue TreeMap component using either the Composition API or the Options API.
The TreeMap visualizes flat or hierarchical data as nested rectangles. Each rectangle is sized by a numeric weight and can be colored by a category or numeric range. The example in this guide binds airport-count data, applies equal color mapping, and displays a legend.
Prerequisites
Ensure that the development environment meets the system requirements for Syncfusion® Vue UI components.
Use a release of @syncfusion/ej2-vue-treemap that supports Vue 3 and the Node.js version used by the project. Check the Vue system requirements and package release notes before upgrading.
Set Up the Vite Project
Create a Vite project using either npm or yarn.
npm
npm create vite@latest my-app -- --template vueyarn
yarn create vite my-app --template vueIf Vite prompts you to install dependencies and start the project immediately, select No. The project dependencies and Syncfusion package are installed in the following steps.
Navigate to the project directory:
cd my-appInstall the project dependencies.
npm
npm installyarn
yarn installNote: To create a TypeScript project, use the
vue-tstemplate instead ofvue.
Add the Syncfusion® Vue TreeMap Package
Syncfusion® Vue packages are published on npm.
Install the @syncfusion/ej2-vue-treemap package using either npm or yarn.
npm
npm install @syncfusion/ej2-vue-treemapyarn
yarn add @syncfusion/ej2-vue-treemapThe package manager reports an error if installation fails. You can also confirm that @syncfusion/ej2-vue-treemap appears in package.json and the package manager’s lock file.
Note: The TreeMap renders its visualization with SVG. This example does not require a separate TreeMap theme stylesheet. Import a Syncfusion theme only when other controls in the application require one.
Add the Syncfusion® Vue TreeMap Component
Follow these steps to initialize the TreeMap. The code fragments in this section accumulate into the complete examples that follow.
Step 1: Import and Register the Component
Import the TreeMap component in src/App.vue.
In the Composition API example, use the <script setup> syntax. Imported components are available to the template without a components option.
<script setup>
import {
  TreeMapComponent as EjsTreemap
} from '@syncfusion/ej2-vue-treemap';

</script><script>
import { TreeMapComponent } from '@syncfusion/ej2-vue-treemap';
export default {
name: 'App',
components: {
'ejs-treemap': TreeMapComponent
}
};
</script>Step 2: Declare the TreeMap Data and Settings
Add the following values to the existing <script setup> block for the Composition API or to data() inside the existing export default object for the Options API.
<script setup>
const dataSource = [
        { state: 'Brazil', count: 25 },
        { state: 'Colombia', count: 12 },
        { state: 'Argentina', count: 9 },
        { state: 'Ecuador', count: 7 },
        { state: 'Chile', count: 6 },
        { state: 'Peru', count: 3 },
        { state: 'Venezuela', count: 3 },
        { state: 'Bolivia', count: 2 },
        { state: 'Paraguay', count: 2 },
        { state: 'Uruguay', count: 2 },
        { state: 'Falkland Islands', count: 1 },
        { state: 'French Guiana', count: 1 },
        { state: 'Guyana', count: 1 },
        { state: 'Suriname', count: 1 }
];

const weightValuePath = 'count';
const leafItemSettings = {
  labelPath: 'state'
};
</script><script>
export default {
data() {
return {
dataSource: [
{ state: 'Brazil', count: 25 },
{ state: 'Colombia', count: 12 },
{ state: 'Argentina', count: 9 },
{ state: 'Ecuador', count: 7 },
{ state: 'Chile', count: 6 },
{ state: 'Peru', count: 3 },
{ state: 'Venezuela', count: 3 },
{ state: 'Bolivia', count: 2 },
{ state: 'Paraguay', count: 2 },
{ state: 'Uruguay', count: 2 },
{ state: 'Falkland Islands', count: 1 },
{ state: 'French Guiana', count: 1 },
{ state: 'Guyana', count: 1 },
{ state: 'Suriname', count: 1 }
],
weightValuePath: 'count',
leafItemSettings: {
labelPath: 'state'
}
};
}
};
</script>Step 3: Define the TreeMap in the Template
Add the TreeMap to the template section of src/App.vue.
The example uses the following properties:
-
dataSourcespecifies the data objects. -
weightValuePathspecifies the numeric field that determines rectangle size. -
leafItemSettingsconfigures leaf labels and color mapping.
<template>
  <div id="app">
    <ejs-treemap
      id="treemap"
      :dataSource="dataSource"
      :weightValuePath="weightValuePath"
      :leafItemSettings="leafItemSettings"
    ></ejs-treemap>
  </div>
</template>
Here is the summarized code for the above steps. Replace the contents of src/App.vue with either the Composition API or Options API example.
<template>
  <div id="app">
    <ejs-treemap id="treemap" :dataSource="dataSource" :weightValuePath="weightValuePath" :leafItemSettings="leafItemSettings">
    </ejs-treemap>
  </div>
</template>

<script setup>
import { TreeMapComponent as EjsTreemap } from '@syncfusion/ej2-vue-treemap';

const dataSource = [
    { state: 'Brazil', count: 25 },
    { state: 'Colombia', count: 12 },
    { state: 'Argentina', count: 9 },
    { state: 'Ecuador', count: 7 },
    { state: 'Chile', count: 6 },
    { state: 'Peru', count: 3 },
    { state: 'Venezuela', count: 3 },
    { state: 'Bolivia', count: 2 },
    { state: 'Paraguay', count: 2 },
    { state: 'Uruguay', count: 2 },
    { state: 'Falkland Islands', count: 1 },
    { state: 'French Guiana', count: 1 },
    { state: 'Guyana', count: 1 },
    { state: 'Suriname', count: 1 }
];

const weightValuePath = 'count';
const leafItemSettings = {
  labelPath: 'state'
};
</script><template>
<div id="app">
<ejs-treemap id="treemap" :dataSource="dataSource" :weightValuePath="weightValuePath" :leafItemSettings="leafItemSettings">
</ejs-treemap>
</div>
</template>
<script>
import { TreeMapComponent } from '@syncfusion/ej2-vue-treemap';
export default {
name: 'App',
components: {
'ejs-treemap': TreeMapComponent
},
data() {
return {
dataSource: [
{ state: 'Brazil', count: 25 },
{ state: 'Colombia', count: 12 },
{ state: 'Argentina', count: 9 },
{ state: 'Ecuador', count: 7 },
{ state: 'Chile', count: 6 },
{ state: 'Peru', count: 3 },
{ state: 'Venezuela', count: 3 },
{ state: 'Bolivia', count: 2 },
{ state: 'Paraguay', count: 2 },
{ state: 'Uruguay', count: 2 },
{ state: 'Falkland Islands', count: 1 },
{ state: 'French Guiana', count: 1 },
{ state: 'Guyana', count: 1 },
{ state: 'Suriname', count: 1 }
],
weightValuePath: 'count',
leafItemSettings: {
labelPath: 'state',
}
};
}
};
</script>Run the Project
Save src/App.vue, and then start the development server.
npm
npm run devyarn
yarn run devOpen the URL displayed in the terminal, commonly http://localhost:5173, and verify that the TreeMap is displayed correctly.
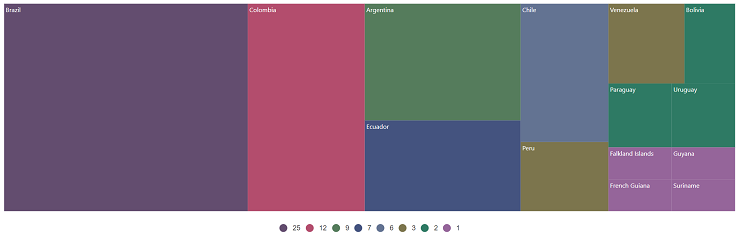
Sample: The older vue3-treemap-getting-started sample uses Vue CLI. Use the code in this guide for the Vite-based setup.
Troubleshooting
-
The TreeMap is not rendered. Verify that
TreeMapComponentis imported or registered correctly, the data source contains records, and the browser console contains no package or runtime errors. -
The TreeMap is blank. Verify that
weightValuePathmatches a numeric field in every data object. -
Labels are not displayed. Verify that
leafItemSettings.labelPathmatches a field in every data object. -
A module-not-found error occurs. Verify that
@syncfusion/ej2-vue-treemapappears inpackage.json, reinstall dependencies, and restart the development server. - A package or Vue version error occurs. Confirm that the installed package release supports Vue 3 and the project’s Node.js version.
For additional assistance, refer to the Vue TreeMap API documentation.