Range in .NET MAUI Linear Gauge
NOTE
Prerequisite: Ensure that the required NuGet package is installed, the necessary namespaces are imported, and the .NET MAUI Linear Gauge control is properly configured in your application. For detailed setup and configuration instructions, refer to the Getting Started guide.
A range is a visual element that helps you quickly visualize where a range falls on the axis track. Multiple ranges with different styles can be added to a linear gauge. The default style of range will be as follows.
<gauge:SfLinearGauge>
    <gauge:SfLinearGauge.Ranges>
        <gauge:LinearRange StartValue="20" EndValue="80"/>
    </gauge:SfLinearGauge.Ranges>
</gauge:SfLinearGauge>
SfLinearGauge gauge = new SfLinearGauge();
gauge.Ranges.Add(new LinearRange()
{
StartValue = 20,
EndValue = 80,
});
this.Content = gauge;
Customize the range shape
The shape of a range can be customized using the StartWidth, MidWidth, and EndWidth properties. To draw a line or rectangle, just the StartWidth and EndWidth are enough, as shown in the code snippet above. But to draw concave and convex shapes, the MidWidth property is needed. The following code snippet demonstrates how to create a convex shape for a range. The default values for StartWidth, MidWidth, and EndWidth are 0.
Convex shape
<gauge:SfLinearGauge>
    <gauge:SfLinearGauge.Ranges>
        <gauge:LinearRange StartValue="0" EndValue="100"
                           StartWidth="70" MidWidth="20"
                           EndWidth="70"/>
    </gauge:SfLinearGauge.Ranges>
</gauge:SfLinearGauge>
SfLinearGauge gauge = new SfLinearGauge();
gauge.Ranges.Add(new LinearRange()
{
StartValue = 0,
EndValue = 100,
StartWidth = 70,
MidWidth = 20,
EndWidth = 70,
});
this.Content = gauge;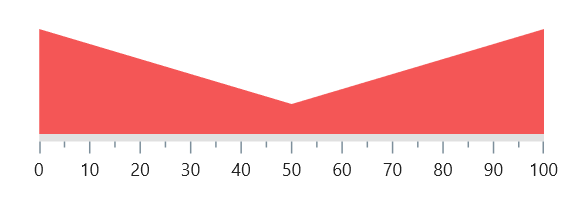
Concave shape
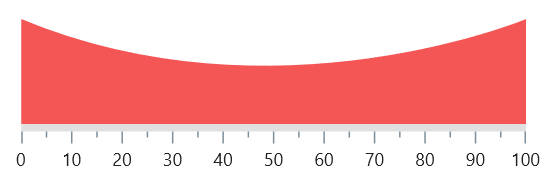
For a concave shape, create a custom class that extends LinearRange, override the UpdateMidRangePath method, and curve the mid shape. The local: XAML namespace prefix should map to the namespace where the LinearRangeExt class is defined. The PathF and PointF types require the Microsoft.Maui.Graphics namespace.
<gauge:SfLinearGauge x:Name="gauge">
    <gauge:SfLinearGauge.Ranges>
        <local:LinearRangeExt StartWidth="70" MidWidth="-20"
                              EndWidth="70"/>
    </gauge:SfLinearGauge.Ranges>
</gauge:SfLinearGauge>
SfLinearGauge gauge = new SfLinearGauge();
gauge.Ranges.Add(new LinearRangeExt()
{
StartWidth = 70,
MidWidth = -20,
EndWidth = 70,
});
this.Content = gauge;
//code omitted for brevity
public class LinearRangeExt : LinearRange
{
protected override void UpdateMidRangePath(PathF pathF, PointF startPoint, PointF midPoint, PointF endPoint)
{
pathF.CurveTo(startPoint, midPoint, endPoint);
}
}
Customize the color of a range
The color of a range can be changed by setting the Fill property of a range. The following code example demonstrates changing the color property of the range.
<gauge:SfLinearGauge>
    <gauge:SfLinearGauge.Ranges>
        <gauge:LinearRange Fill="BlueViolet"/>
    </gauge:SfLinearGauge.Ranges>
</gauge:SfLinearGauge>
SfLinearGauge gauge = new SfLinearGauge();
gauge.Ranges.Add(new LinearRange()
{
Fill = new SolidColorBrush(Colors.BlueViolet),
});
this.Content = gauge;
Apply gradient to a range
The gradient can be applied by using the GradientStops property of a range. The following code example demonstrates applying a gradient to the range.
<gauge:SfLinearGauge>
    <gauge:SfLinearGauge.Ranges>
        <gauge:LinearRange StartWidth="50">
            <gauge:LinearRange.GradientStops>
                <gauge:GaugeGradientStop Value="0" Color="Red"/>
                <gauge:GaugeGradientStop Value="100" Color="Blue"/>
            </gauge:LinearRange.GradientStops>
        </gauge:LinearRange>
    </gauge:SfLinearGauge.Ranges>
</gauge:SfLinearGauge>
SfLinearGauge gauge = new SfLinearGauge();
ObservableCollection<GaugeGradientStop> gradientStops = new ObservableCollection<GaugeGradientStop>();
gradientStops.Add(new GaugeGradientStop() { Value = 0, Color = Colors.Red });
gradientStops.Add(new GaugeGradientStop() { Value = 100, Color = Colors.Blue });
gauge.Ranges.Add(new LinearRange()
{
StartWidth = 50,
GradientStops = gradientStops,
});
this.Content = gauge;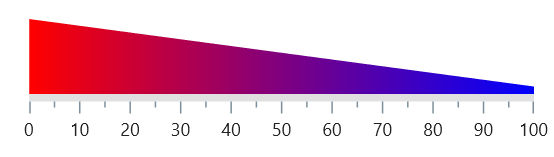
Customize range position
It is possible to position the ranges Inside, Cross, and Outside the axis. By default, the range will be positioned Outside the axis. The Position property of the range is used to position the range. The following code snippet demonstrates the same.
<gauge:SfLinearGauge>
    <gauge:SfLinearGauge.Ranges>
        <gauge:LinearRange Position="Inside"/>
    </gauge:SfLinearGauge.Ranges>
</gauge:SfLinearGauge>
SfLinearGauge gauge = new SfLinearGauge();
gauge.Ranges.Add(new LinearRange()
{
Position = GaugeElementPosition.Inside,
});
this.Content = gauge;
Customize range color for axis elements
You can set range color to axis elements using the UseRangeColorForAxis property of the axis. This feature works best when multiple ranges are positioned Cross on the axis.
<gauge:SfLinearGauge x:Name="gauge" UseRangeColorForAxis="True">
    <gauge:SfLinearGauge.Ranges>
        <gauge:LinearRange StartValue="0" EndValue="33"
                           Fill="#ffF45656" Position="Cross"/>
        <gauge:LinearRange StartValue="33" EndValue="66"
                           Fill="#ffFFC93E" Position="Cross"/>
        <gauge:LinearRange StartValue="66" EndValue="100"
                           Fill="#ff0DC9AB" Position="Cross"/>
    </gauge:SfLinearGauge.Ranges>
</gauge:SfLinearGauge>
SfLinearGauge gauge = new SfLinearGauge();
gauge.UseRangeColorForAxis = true;
gauge.Ranges.Add(new LinearRange()
{
StartValue = 0,
EndValue = 33,
Fill = new SolidColorBrush(Color.FromArgb("ffF45656")),
Position = GaugeElementPosition.Cross
});
gauge.Ranges.Add(new LinearRange()
{
StartValue = 33,
EndValue = 66,
Fill = new SolidColorBrush(Color.FromArgb("ffFFC93E")),
Position = GaugeElementPosition.Cross
});
gauge.Ranges.Add(new LinearRange()
{
StartValue = 66,
EndValue = 100,
Fill = new SolidColorBrush(Color.FromArgb("ff0DC9AB")),
Position = GaugeElementPosition.Cross
});
this.Content = gauge;
Add multiple ranges
You can add multiple ranges for an axis. The following code example demonstrates adding three ranges in a .NET MAUI Linear Gauge.
<gauge:SfLinearGauge>
    <gauge:SfLinearGauge.Ranges>
        <gauge:LinearRange StartValue="0" EndValue="50"
                           Fill="#ffF45656"/>
        <gauge:LinearRange StartValue="50" EndValue="70"
                           Fill="#ffFFC93E"/>
        <gauge:LinearRange StartValue="70" EndValue="100"
                           Fill="#ff0DC9AB"/>
    </gauge:SfLinearGauge.Ranges>
</gauge:SfLinearGauge>
SfLinearGauge gauge = new SfLinearGauge();
gauge.Ranges.Add(new LinearRange()
{
StartValue = 0,
EndValue = 50,
Fill = new SolidColorBrush(Color.FromArgb("ffF45656")),
});
gauge.Ranges.Add(new LinearRange()
{
StartValue = 50,
EndValue = 70,
Fill = new SolidColorBrush(Color.FromArgb("ffFFC93E")),
});
gauge.Ranges.Add(new LinearRange()
{
StartValue = 70,
EndValue = 100,
Fill = new SolidColorBrush(Color.FromArgb("ff0DC9AB")),
});
this.Content = gauge;
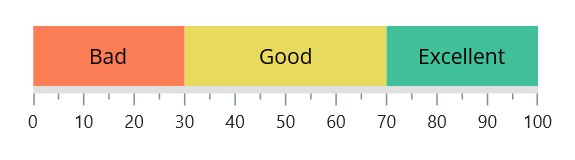
Range child content support
Range allows you to add any content as its child using the Child property. Ensure that the StartWidth and EndWidth values are large enough to contain the child content.
<gauge:SfLinearGauge x:Name="gauge">
    <gauge:SfLinearGauge.Ranges>
        <gauge:LinearRange StartWidth="40" EndWidth="40"
                           StartValue="0"
                           EndValue="30" Fill="#fb7d55">
            <gauge:LinearRange.Child>
                <Label Text="Bad" HorizontalOptions="Center"
                       VerticalOptions="Center" TextColor="Black"/>
            </gauge:LinearRange.Child>
        </gauge:LinearRange>
        <gauge:LinearRange StartWidth="40" EndWidth="40"
                           StartValue="30"
                           EndValue="70" Fill="#e8da5d">
            <gauge:LinearRange.Child>
                <Label Text="Good" HorizontalOptions="Center"
                       VerticalOptions="Center" TextColor="Black"/>
            </gauge:LinearRange.Child>
        </gauge:LinearRange>
        <gauge:LinearRange StartWidth="40" EndWidth="40"
                           StartValue="70"
                           EndValue="100" Fill="#42c09a">
            <gauge:LinearRange.Child>
                <Label Text="Excellent" HorizontalOptions="Center"
                       VerticalOptions="Center" TextColor="Black"/>
            </gauge:LinearRange.Child>
        </gauge:LinearRange>
    </gauge:SfLinearGauge.Ranges>
</gauge:SfLinearGauge>
SfLinearGauge gauge = new SfLinearGauge();
LinearRange range = new LinearRange();
range.StartValue = 0;
range.EndValue = 30;
range.StartWidth = 40;
range.EndWidth = 40;
range.Fill = new SolidColorBrush(Color.FromArgb("#fb7d55"));
range.Child = new Label()
{
Text = "Bad",
HorizontalOptions = LayoutOptions.Center,
VerticalOptions = LayoutOptions.Center,
TextColor = Colors.Black
};
gauge.Ranges.Add(range);
range = new LinearRange();
range.StartValue = 30;
range.EndValue = 70;
range.StartWidth = 40;
range.EndWidth = 40;
range.Fill = new SolidColorBrush(Color.FromArgb("#e8da5d"));
range.Child = new Label()
{
Text = "Good",
HorizontalOptions = LayoutOptions.Center,
VerticalOptions = LayoutOptions.Center,
TextColor = Colors.Black
};
gauge.Ranges.Add(range);
range = new LinearRange();
range.StartValue = 70;
range.EndValue = 100;
range.StartWidth = 40;
range.EndWidth = 40;
range.Fill = new SolidColorBrush(Color.FromArgb("#42c09a"));
range.Child = new Label()
{
Text = "Excellent",
HorizontalOptions = LayoutOptions.Center,
VerticalOptions = LayoutOptions.Center,
TextColor = Colors.Black
};
gauge.Ranges.Add(range);
this.Content = gauge;