Getting Started
20 Aug 201824 minutes to read
This section helps to understand the getting started of the Aurelia TreeView with the step-by-step instructions.
Create an TreeView
You can create an Aurelia application and add necessary scripts and styles with the help of the given Aurelia Getting Started Documentation.
We already configured a template project in GitHub repository syncfusion-template-repository. Run the below set of commands to clone the repository and install the required packages for Syncfusion Aurelia application.
> git clone "https://github.com/aurelia-ui-toolkits/syncfusion-template-repository"
> cd syncfusion-template-repository
> npm install
> jspm install
The below steps describes to create Syncfusion Aurelia TreeView component.
- Create
treeviewfolder insidesrc/samples/location. - Create
treeview.htmlfile insidesrc/samples/treeviewfolder and use the below code example to render the TreeView component.
<template>
  <ul id="treeView" ej-tree-view="e-width:250">
                            <li class="expanded">Artwork
                                <ul>
                                    <li>Abstract
                                        <ul>
                                            <li>2 Acrylic Mediums</li>
                                            <li>Creative Acrylic</li>
                                            <li>Modern Painting</li>
                                            <li>Canvas Art</li>
                                            <li>Black white</li>
                                        </ul>
                                    </li>
                                    <li>Children
                                        <ul>
                                            <li>Preschool Crafts</li>
                                            <li>School-age Crafts</li>
                                            <li>Fabulous Toddler</li>
                                        </ul>
                                    </li>
                                    <li>Comic / Cartoon
                                        <ul>
                                            <li>Batman</li>
                                            <li>Adventures of Superman</li>
                                            <li>Super boy</li>
                                        </ul>
                                    </li>
                                </ul>
                            </li>
                            <li class="expanded">Books
                                <ul>
                                    <li>Comics
                                        <ul>
                                            <li>The Flash</li>
                                            <li>Human Target</li>
                                            <li>Birds of Prey</li>
                                        </ul>
                                    </li>
                                    <li>Entertaining</li>
                                    <li>Design</li>
                                </ul>
                            </li>
                            <li>Music
                                <ul>
                                    <li>Classical
                                        <ul>
                                            <li>Medieval</li>
                                            <li>Orchestral</li>
                                        </ul>
                                    </li>
                                    <li>Mass</li>
                                    <li>Folk</li>
                                </ul>
                            </li>
                        </ul>
</template>- Create
treeview.jsfile with the below code snippet insidesrc/samples/treeviewfolder.
export class Default {
}- Now, we are going to configure the navigation for created TreeView sample in
src/app.jsfile.
export class App {
 configureRouter(config, router) {
  config.title = 'Aurelia Syncfusion';
  config.map([
   { route: ['', 'welcome'], name: 'welcome', moduleId: 'welcome',
                nav: true, title: 'Welcome' },
   { route: 'child-router',  name: 'child-router', moduleId: 'child-router',
                nav: true, title: 'Child Router' },
   { route: 'button',        name: 'button', moduleId: 'samples/button/button',
                nav: true, title: 'Button' },
   { route: 'treeview',        name: 'treeview',       moduleId: 'samples/treeview/treeview',
                nav: true, title: 'TreeView' }
 ]);
 this.router = router;
 }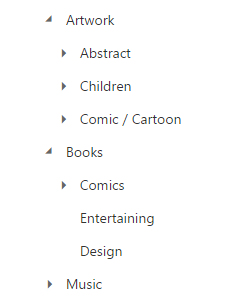
}- To run the application, execute the following command.
gulp watchExecution of above code will render the following output.
TreeView using Data Binding
Another way of creating TreeView is binding with the data source, you can bind local data or remote data source to create a TreeView.
The beforeLoad event will be triggered before loading nodes into TreeView.
Refer to the below example,
<template>
         <div id="treeView" ej-tree-view="e-width:250px;e-fields.bind:fieldData"></div>
</template>export class LocalData {
constructor() {
this.localData = [
{ id: 1, name: 'Discover Music', hasChild: true, expanded: true },
{ id: 2, parent: 1, name: 'Hot Singles' },
{ id: 3, parent: 1, name: 'Rising Artists' },
{ id: 4, parent: 1, name: 'Live Music' },
{ id: 6, parent: 1, name: 'Best of 2013 So Far' },
{ id: 7, name: 'Sales and Events', hasChild: true, expanded: true },
{ id: 8, parent: 7, name: '100 Albums - $5 Each' },
{ id: 9, parent: 7, name: 'Hip-Hop and R&B Sale' },
{ id: 10, parent: 7, name: 'CD Deals' },
{ id: 11, name: 'Categories', hasChild: true },
{ id: 12, parent: 11, name: 'Songs' },
{ id: 13, parent: 11, name: 'Bestselling Albums' },
{ id: 14, parent: 11, name: 'New Releases' },
{ id: 15, parent: 11, name: 'Bestselling Songs' },
{ id: 16, name: 'MP3 Albums', hasChild: true },
{ id: 17, parent: 16, name: 'Rock' },
{ id: 18, parent: 16, name: 'Gospel' },
{ id: 19, parent: 16, name: 'Latin Music' },
{ id: 20, parent: 16, name: 'Jazz' },
{ id: 21, name: 'More in Music', hasChild: true },
{ id: 22, parent: 21, name: 'Music Trade-In' },
{ id: 23, parent: 21, name: 'Redeem a Gift Card' },
{ id: 24, parent: 21, name: 'Band T-Shirts' },
{ id: 25, parent: 21, name: 'Mobile MVC' }];
this.fieldData = { id: 'id', parentId: 'parent', text: 'name', hasChild: 'hasChild', dataSource: this.localData, expanded: 'expanded' };
}
}Drag and Drop
To perform drag and drop operation in TreeView, specify allowDragAndDrop as true. It allows you to drag and drop node in all level of same TreeView.
<template>
                            <ul id="treeViewDrag" ej-tree-view="e-width:250;
                            e-allow-drag-and-drop:true;
                            e-allow-drop-child:true;
                            e-allow-drop-sibling:true;
                            e-allow-drag-and-drop-across-control:true">
                                <li class="expanded">
                                    ASP.NET MVC Team
                                    <ul>
                                        <li>Smith</li>
                                        <li>Johnson</li>
                                        <li>Anderson</li>
                                    </ul>
                                </li>
                                <li>
                                    Windows Team
                                    <ul>
                                        <li>Clark</li>
                                        <li>Wright</li>
                                        <li>Lopez</li>
                                    </ul>
                                </li>
                                <li>
                                    Web Team
                                    <ul>
                                        <li>Joshua </li>
                                        <li>Matthew </li>
                                        <li>David </li>
                                    </ul>
                                </li>
                                <li>
                                    Build Team
                                    <ul>
                                        <li>Ryan </li>
                                        <li>Justin </li>
                                        <li>Robert </li>
                                    </ul>
                                </li>
                                <li>
                                    WPF Team
                                    <ul>
                                        <li>Brown </li>
                                        <li>Johnson </li>
                                        <li>Miller </li>
                                    </ul>
                                </li>
                            </ul>
</template>export class DragAndDrop {
}