Getting Started with Aurelia SplitButton
1 Aug 20224 minutes to read
This section helps to understand the getting started of the Aurelia SplitButton with the step-by-step instructions.
Create a SplitButton in Aurelia
You can create an Aurelia application and add necessary scripts and styles with the help of the given Aurelia Getting Started Documentation.
We already configured a template project in GitHub repository syncfusion-template-repository. Run the below set of commands to clone the repository and install the required packages for Syncfusion Aurelia application.
> git clone "https://github.com/aurelia-ui-toolkits/syncfusion-template-repository"
> cd syncfusion-template-repository
> npm install
> jspm install
The below steps describes to create Syncfusion Aurelia SplitButton component.
- Create
splitButtonfolder insidesrc/samples/location. - Create
splitButton.htmlfile insidesrc/samples/splitButtonfolder and use the below code example to render the SplitButton component.
<template>
    <button id="miniBtn" ej-split-button="e-size.bind: miniBtnValue;
                        e-show-rounded-corner.bind: roundedCorner;
                        e-target-id: subMenu2;
                        e-button-mode.bind: buttonMode;
                        e-text: login"></button>
                        <ul id="subMenu2">
                            <li><span>User</span></li>
                            <li><span>Guest</span></li>
                            <li><span>Admin</span></li>
                        </ul>
</template>- Create
splitButton.jsfile with the below code snippet insidesrc/samples/splitButtonfolder.
export class SplitButton {
  constructor() {
    this.miniBtnValue = 'mini';
    this.roundedCorner = true;
    this.index = 0;
    this.buttonMode = 'split';
  }
  onChange(args) {
    this.buttonMode = args.detail.value;
  }
}- Now, we are going to configure the navigation for created SplitButton sample in
src/app.jsfile.
export class App {
 configureRouter(config, router) {
  config.title = 'Aurelia Syncfusion';
  config.map([
   { route: ['', 'welcome'], name: 'welcome', moduleId: 'welcome',
                nav: true, title: 'Welcome' },
   { route: 'child-router',  name: 'child-router', moduleId: 'child-router',
                nav: true, title: 'Child Router' },
   { route: 'button',        name: 'button', moduleId: 'samples/button/button',
                nav: true, title: 'Button' },
   { route: 'spliButton',        name: 'splitButton',       moduleId: 'samples/splitButton/splitButton',
                nav: true, title: 'SplitButton' }
 ]);
 this.router = router;
 }
}- To run the application, execute the following command.
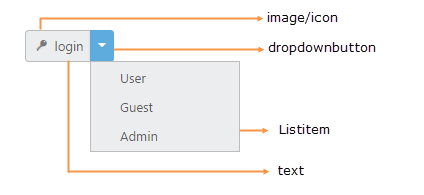
gulp watchExecution of above code will render the following output.