How can I help you?
Getting Started
This section explains briefly about how to create a Menu control in your application with Aurelia. The Essential JavaScript Menu supports displaying a Menu of list-out items. This Menu is based on ul-li hierarchy, where the sub-list items are rendered as the sub-menu items. The Menu control can also be rendered with local and remote data source. From the following guidelines, you can learn how to customize the Menu control for a website. In this case, Syncfusion’s website Menu is discussed. The following screenshot displays the appearance of Menu.
Create a Menu
Essential JavaScript Menu widgets are basically provided with built-in features like keyboard navigation, show and hide Menu items with animations, and flexible API’s. From the following guidelines, you can learn how to render Menu control with Remote data source value.
Before we start with Menu, please refer this page page for general information regarding integrating Syncfusion widget’s.
For quick start, we already configured a template project in GitHub repository syncfusion-template-repository. Run the below set of commands to clone the repository and install the required packages for Syncfusion Aurelia application.
> git clone "https://github.com/aurelia-ui-toolkits/syncfusion-template-repository"
    > cd syncfusion-template-repository
    > npm install
    > jspm install
The below steps describes to create Syncfusion Aurelia Menu component.
Create Menu folder inside src/samples/ location.
Create Menu.html file inside src/samples/Menu folder and use the below code example to render the Menu component.
Adding element for Menu rendering.
<template>
       <div>
         <ul id="syncfusionProducts" ej-menu>
         </ul>
       </div>
</template>export class menu { }Output of the above steps.

Configure parent Menu items
Every Menu has a list of Menu items with list of sub level Menu items. From the following guidelines, you can learn how to initialize the root level elements of Menu control with Local data source value. Initialize the Menu with data source value as illustrated in the following code example.
<template>
          <div>
          <ul id="syncfusionProducts"  ej-menu="e-fields.bind:fields;" >
          </ul>
          </div>
</template>var data = [
{ id: 1, text: "Products", parentId: null },
{ id: 2, text: "Support", parentId: null },
{ id: 3, text: "Purchase", parentId: null },
{ id: 4, text: "Downloads", parentId: null },
{ id: 5, text: "Company", parentId: null }
];
export class menu {
constructor() {
this.fields = {dataSource:data, text:"text" , id:"id", parentId:"parentId"};
}
}The following screenshot displays output.

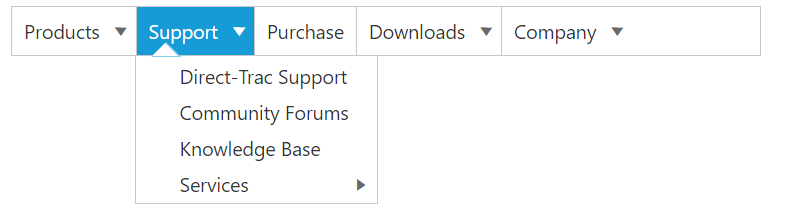
Initialize sub-level Menu items
Every Menu items have a list of sub level Menu items. From the following guidelines, you can learn how to initialize the sub level items of Menu control. The parentId field is used to map root level Menu item to its sub level Menu item.
The following code example describes how to initialize first level sub menu items of product Menu item.
var data = [
            { id: 1, text: "Products", parentId: null },
            { id: 2, text: "Support", parentId: null },
            { id: 3, text: "Purchase", parentId: null },
            { id: 4, text: "Downloads", parentId: null },
			{ id: 5, text: "Company", parentId: null } ,
          //first level child
            { id: 11, parentId: 1, text: "ASP.NET" },
            { id: 12, parentId: 1, text: "ASP.NET MVC" },
            { id: 13, parentId: 1, text: "Mobile MVC" },
            { id: 14, parentId: 1, text: "Silverlight" },
            { id: 15, parentId: 2, text: "Direct-Trac Support" },
            { id: 16, parentId: 2, text: "Community Forums" },
            { id: 17, parentId: 2, text: "Knowledge Base" },
            { id: 18, parentId: 2, text: "Services" },
			{ id: 19, parentId: 4, text: "Evaluation" },
			{ id: 20, parentId: 4, text: "Free E-Books" },
			{ id: 21, parentId: 4, text: "Metro Studio" },
			{ id: 22, parentId: 4, text: "Latest Version" },
			{ id: 23, parentId: 5, text: "Technology Resource Portal " },
			{ id: 24, parentId: 5, text: "Case Studies" },
			{ id: 25, parentId: 5, text: "Bouchers & Datasheets" },
			{ id: 26, parentId: 5, text: "FAQ" }
        ];
      export class menu {
          constructor() {
           this.fields = {dataSource:data, text:"text" , id:"id", parentId:"parentId"};
         }

		}
Execute the above code example to render the following output.
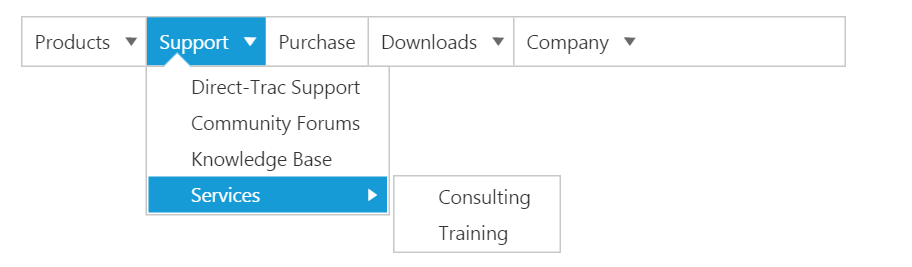
Define multiple level Menu items
You can define the sub-menu items to multiple levels in Menu control. You need to specify the parent Id value to render sub level Menu item for the Menu items.
To initialize multiple levels sub menu items, use the following code example.
var data = [
            { id: 1, text: "Products", parentId: null },
            { id: 2, text: "Support", parentId: null },
            { id: 3, text: "Purchase", parentId: null },
            { id: 4, text: "Downloads", parentId: null },
			{ id: 5, text: "Company", parentId: null } ,
          //first level child
            { id: 11, parentId: 1, text: "ASP.NET" },
            { id: 12, parentId: 1, text: "ASP.NET MVC" },
            { id: 13, parentId: 1, text: "Mobile MVC" },
            { id: 14, parentId: 1, text: "Silverlight" },
            { id: 15, parentId: 2, text: "Direct-Trac Support" },
            { id: 16, parentId: 2, text: "Community Forums" },
            { id: 17, parentId: 2, text: "Knowledge Base" },
            { id: 18, parentId: 2, text: "Services" },
			{ id: 19, parentId: 4, text: "Evaluation" },
			{ id: 20, parentId: 4, text: "Free E-Books" },
			{ id: 21, parentId: 4, text: "Metro Studio" },
			{ id: 22, parentId: 4, text: "Latest Version" },
			{ id: 23, parentId: 5, text: "Technology Resource Portal " },
			{ id: 24, parentId: 5, text: "Case Studies" },
			{ id: 25, parentId: 5, text: "Bouchers & Datasheets" },
			{ id: 26, parentId: 5, text: "FAQ" },
       //second level child
            {id: 111, parentId: 18, text: "Consulting" },
            { id: 112, parentId: 18, text: "Training" }
        ];
      export class menu {
          constructor() {
           this.fields = {dataSource:data, text:"text" , id:"id", parentId:"parentId"};
         }

		}
The following screenshot is the output.
By following the above mentioned steps, you can render the Menu control with multiple level sub items through online data source. You can simply customize the Menu widget in an efficient manner.
In summary of this getting started, you have now simulated the Syncfusion�s website Menu with Essential JavaScript Menu. You have utilized and learn the appearance customization etc.
By following the above mentioned steps, you can render the Menu control with multiple level sub items. You can simply customize the Menu in an efficient manner.