How can I help you?
Tree Node in ASP.NET TreeView Control
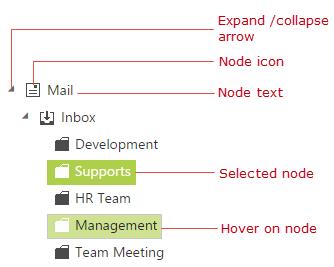
TreeView node is structured with expand/ collapse arrow, checkbox, image and text as shown in below.
Also TreeView node object holds the following properties.
|
Properties |
Data Type |
Description |
| checked | Boolean | Checked state of the node |
| count | Number | Number of child |
| expanded | Boolean | Expanded state of the node |
| index | Number | Index of the node |
| level | Number | Level of the node |
| id | String | Node id |
| parentId | String | Parent id of the node |
| selected | Boolean | Selected state of the node |
Get / Set Node Value
TreeView provides a set of options to configure all its properties by setting and getting values at initialization or dynamically.
To get the node value, you can use getNode method as shown in the below code example, in which on button click action the node value has been retrieved.
Also you can get the text value of tree node by using getText method.
In the code behind page, create a data list which contains the details about tree nodes and map the list data to the DataSource property of TreeView.
public partial class TreeViewFeatures : System.Web.UI.Page
        {
            List<LoadData> treeData = new List<LoadData>();
            protected void Page_Load(object sender, EventArgs e)
            {
                treeData.Add(new LoadData { Id = 1, Parent = 0, Text = "Item 1", Expanded = true });
                treeData.Add(new LoadData { Id = 2, Parent = 0, Text = "Item 2" });
                treeData.Add(new LoadData { Id = 3, Parent = 0, Text = "Item 3" });
                treeData.Add(new LoadData { Id = 4, Parent = 0, Text = "Item 4" });
                treeData.Add(new LoadData { Id = 5, Parent = 1, Text = "Item 1.1" });
                treeData.Add(new LoadData { Id = 6, Parent = 1, Text = "Item 1.2" });
                treeData.Add(new LoadData { Id = 7, Parent = 1, Text = "Item 1.3" });
                treeData.Add(new LoadData { Id = 8, Parent = 3, Text = "Item 3.1" });
                treeData.Add(new LoadData { Id = 9, Parent = 3, Text = "Item 3.2" });
                treeData.Add(new LoadData { Id = 10, Parent = 5, Text = "Item 1.1.1" });
                this.treeView.DataSource = treeData;
            }
        }
        public class LoadData
        {
            public int Id { get; set; }
            public int Parent { get; set; }
            public string Text { get; set; }
            public bool Expanded { get; set; }
        }
In the view page, add TreeView element and map the properties defined in to the corresponding fields in data source with that also specify button element to get node details.
<ej:TreeView
            ID="treeView"
            runat="server"
            DataTextField="Text"
            DataIdField="Id"
            DataParentIdField="Parent"
            DataExpandedField="Expanded">
        </ej:TreeView>
        <ej:Button
            ID="getNode"
            Text="getNode"
            Type="Button"
            runat="server"
            ClientSideOnClick="onClick">
        </ej:Button>
In the ASPX page, specify following method in script tag to get node value of tree node
<script type="text/javascript">
            function onClick() {
                //create an instance from an existing TreeView.
                // only after control creation we can get treeObj otherwise it throws exception.
                treeObj = $("#<%= treeView.ClientID %>").ejTreeView('instance');
                //get node object using getNode method
                var node = treeObj.getNode("1");
            }
    </script>
NOTE
Existing TreeView instance can be created by jQuery.data() and you can control the API’s of TreeView behavior
To edit the node text, you can use updateText method as shown in below code example.
<script type="text/javascript">

        //create an instance from an existing TreeView.
        // only after control creation we can get treeObj otherwise it throws exception.
        treeObj = $("#<%= treeView.ClientID %>").ejTreeView('instance');

        //get node object using getNode method
        var node = treeObj.getNode("2");

        //sets text to existing node
        treeObj.updateText(node.id, "updated Item");

    </script>
Get Parent Node
To get current parent node of a particular node, you can use the getParent method as shown in below code example.
<script type="text/javascript">

        //create an instance from an existing TreeView.
        // only after control creation we can get treeObj otherwise it throws exception.
        treeObj = $("#<%= treeView.ClientID %>").ejTreeView('instance');

        //get parent node using getParent method
        var node = treeObj.getParent("4");

    </script>
Get Node Index
To get node index, you can use the getNodeIndex as shown in below code example.
You can use getNodeByIndex method to get TreeView node by using index position.
<script type="text/javascript">

        //create an instance from an existing TreeView.
        // only after control creation we can get treeObj otherwise it throws exception.
        treeObj = $("#<%= treeView.ClientID %>").ejTreeView('instance');

        //get node object using getNode method
        var node = treeObj.getNode("4");

        //gets the index of node
        treeObj.getNodeIndex(node.id);

    </script>
Node Manipulations
You can perform following operation in tree nodes and the modified node values can be saved in database.
Add or Remove nodes
To add/ remove nodes programmatically, use addNode and removeNode methods of the TreeView.
//create an instance from an existing TreeView.
        // only after control creation we can get treeObj otherwise it throws exception.
        treeObj = $("#<%= treeView.ClientID %>").ejTreeView('instance');
        var newNode = { Id: 11, Text: "Item 2.1" };
        //to add tree node
        treeObj.addNode(newNode, "2");

        //to remove node
        treeObj.removeNode("4");
You can able to add a new node after or before some TreeView node by using insertAfter and insertBefore methods.
//create an instance from an existing TreeView.
        // only after control creation we can get treeObj otherwise it throws exception.
        treeObj = $("#<%= treeView.ClientID %>").ejTreeView('instance');
        var newNode = { Id: 12, Text: "Item 2.2" };

        //to add tree node after some element, which having id 2
        treeObj.insertAfter(newNode, "2");

        var newNode = { Id: 13, Text: "Item 2.3" };
        //to add tree node before some element, which having id 2
        treeObj.insertBefore(newNode, "2");
Move node
You can also achieve cut and paste operation by using moveNode method.
//create an instance from an existing TreeView.
        // only after control creation we can get treeObj otherwise it throws exception.
        treeObj = $("#<%= treeView.ClientID %>").ejTreeView('instance');

        //to move tree node which having id 5, to child of node which having id 2.
        treeObj.moveNode("5", "2");
Expand or Collapse node
Tree nodes can be expanded or collapsed by clicking the expand/ collapse icon of the node or in code behind by using the following methods.
|
Methods |
Description |
| Expands the node with specified id | |
| Collapse the node with specified id | |
| Expands all the node | |
| Collapse all the node |
Also you can get all the expanded nodes index in tree by using getExpandedNodesIndex method, which returns the array of expanded node indices.
Prevent multiple node expand
You can able to prevent multiple expand of TreeView nodes by specifying enableMultipleExpand as false.
For example, if you want to allow only one node to be expanded in TreeView at a time. Refer the below code block for more details.
<ej:TreeView
            ID="treeView"
            runat="server"
            DataTextField="Text"
            DataIdField="Id"
            DataParentIdField="Parent"
            DataExpandedField="Expanded"
            EnableMultipleExpand="false">
        </ej:TreeView>
Get updated node collection
You can get the updated node values after manipulating or editing the node of TreeView to save at server end by using getTreeData method. It returns the JSON data represented as in tree with modified structure.
You can also get the updated data source for remote data binding after performing the operation like editing, selecting/unselecting, expanding/collapsing, checking/unchecking and removing node. You cannot get the updated data source when you perform operation like drag and drop, adding node for remote data binding.
The updated data source also contains custom attributes if you return these from server.
//create an instance from an existing TreeView.
        // only after control creation we can get treeObj otherwise it throws exception.
        treeObj = $("#<%= treeView.ClientID %>").ejTreeView('instance');

        //to get TreeView data
        treeObj.getTreeData();
Editing
You can directly edit the tree node’s text in-place by double-click on the tree node or select the tree node and press F2 key. The editing works only if the allowEditing property is true in TreeView control. When editing is completed by focus out or “enter” key press, the modified node’s text is saved automatically. The nodeEdit event will be triggered whenever edited the TreeView node.
Also beforeEdit event will be triggered before the TreeView node change into editing mode.
<ej:TreeView
            ID="treeView"
            runat="server"
            DataTextField="Text"
            DataIdField="Id"
            DataParentIdField="Parent"
            DataExpandedField="Expanded"
            AllowEditing="true">
        </ej:TreeView>
Selection
You can select a specific node by using selectedNode property or selectNode method. To get the selected status of a given TreeView node you have to use isSelected method.
The nodeClick event will be triggered whenever TreeView node is clicked. The beforeSelect event will be triggered before the TreeView node is selected.
The nodeSelect/nodeUnselect events will be triggered based on the TreeView node click operations.
//create an instance from an existing TreeView.
        // only after control creation we can get treeObj otherwise it throws exception.
        treeObj = $("#<%= treeView.ClientID %>").ejTreeView('instance');

        //to select node
        treeObj.selectNode(2);
Ensure Visibility
To get the visibility status of the given TreeView node, you can use isVisible method.
You can ensure the specified tree node is visible by using ensureVisible method, which expands tree nodes and scrolls the TreeView control as necessary.
Also you can use getVisibleNodes method to get currently visible nodes in TreeView.
<script  type="text/javascript">
        function onClick() {
            //create an instance from an existing TreeView.
            // only after control creation we can get treeObj otherwise it throws exception.
            treeObj = $("#<%= treeView.ClientID %>").ejTreeView('instance');

            //to ensure the visibility of node
            treeObj.ensureVisible("10");
        }
        </script>